
BLOG ARCHIVE

On Location Photographing Snowdonia Part Two
Part two of an on-location article chronicling my recent landscape photography trip to Snowdonia.
Welcome to part two of my on-location blog post featuring more photos and stories from a trip I took to Snowdonia in February 2024.
If you didn’t catch part one, I encourage you to pop over by clicking on this thumbnail so you can start from the beginning of the trip. For those of you who have already read part one, we pick things up where we left off, as I finish up beside Lynnau Mymbyr after taking one of my favourite photos of the entire trip.
I packed up my camera gear on a bit of a high, jumped in the car and made my way to the Ogwen Valley.
Photographing the Ogwen Valley and the mighty Tryfan
Parking up again just a little further down the road here, I walked to Ogwen Cottage to finally get a coffee and have a spot of lunch. It was a pleasant afternoon, not too cold with the sun making regular appearances. As I sat there, sipping my coffee, I was drawn to the scene across the road, as I could see the old boathouse basking in the sun.
Photographing the Boathouse on Llyn Ogwen
Encouraged by the success I had taking that photo of Snowdon in similar conditions back at Lynnau Mymbyr, I finished my drink and crossed the road to photograph this popular view of Llyn Ogwen.
I used a 10mm focal length for this photo to avoid chopping off the top of the tree, while still leaving some grassed area at the base of the image to create a natural frame. Ordinarily, I may have lowered the camera, making the shrubbery more of a feature in the foreground, but I wanted to keep the boathouse isolated by the lake, and if I had got any lower, the top of it would start to overlap with the mountains.
It was now close to 2pm, but with it being February, the sun was still low in the sky and the light had a subtle warmth to it. So, although the photo I took below isn’t necessarily portfolio-worthy, I’m still quite pleased with how it turned out.

Fujifilm XT5 | XF10-24mm | 10mm | 1/80th Second | f/9 | ISO125
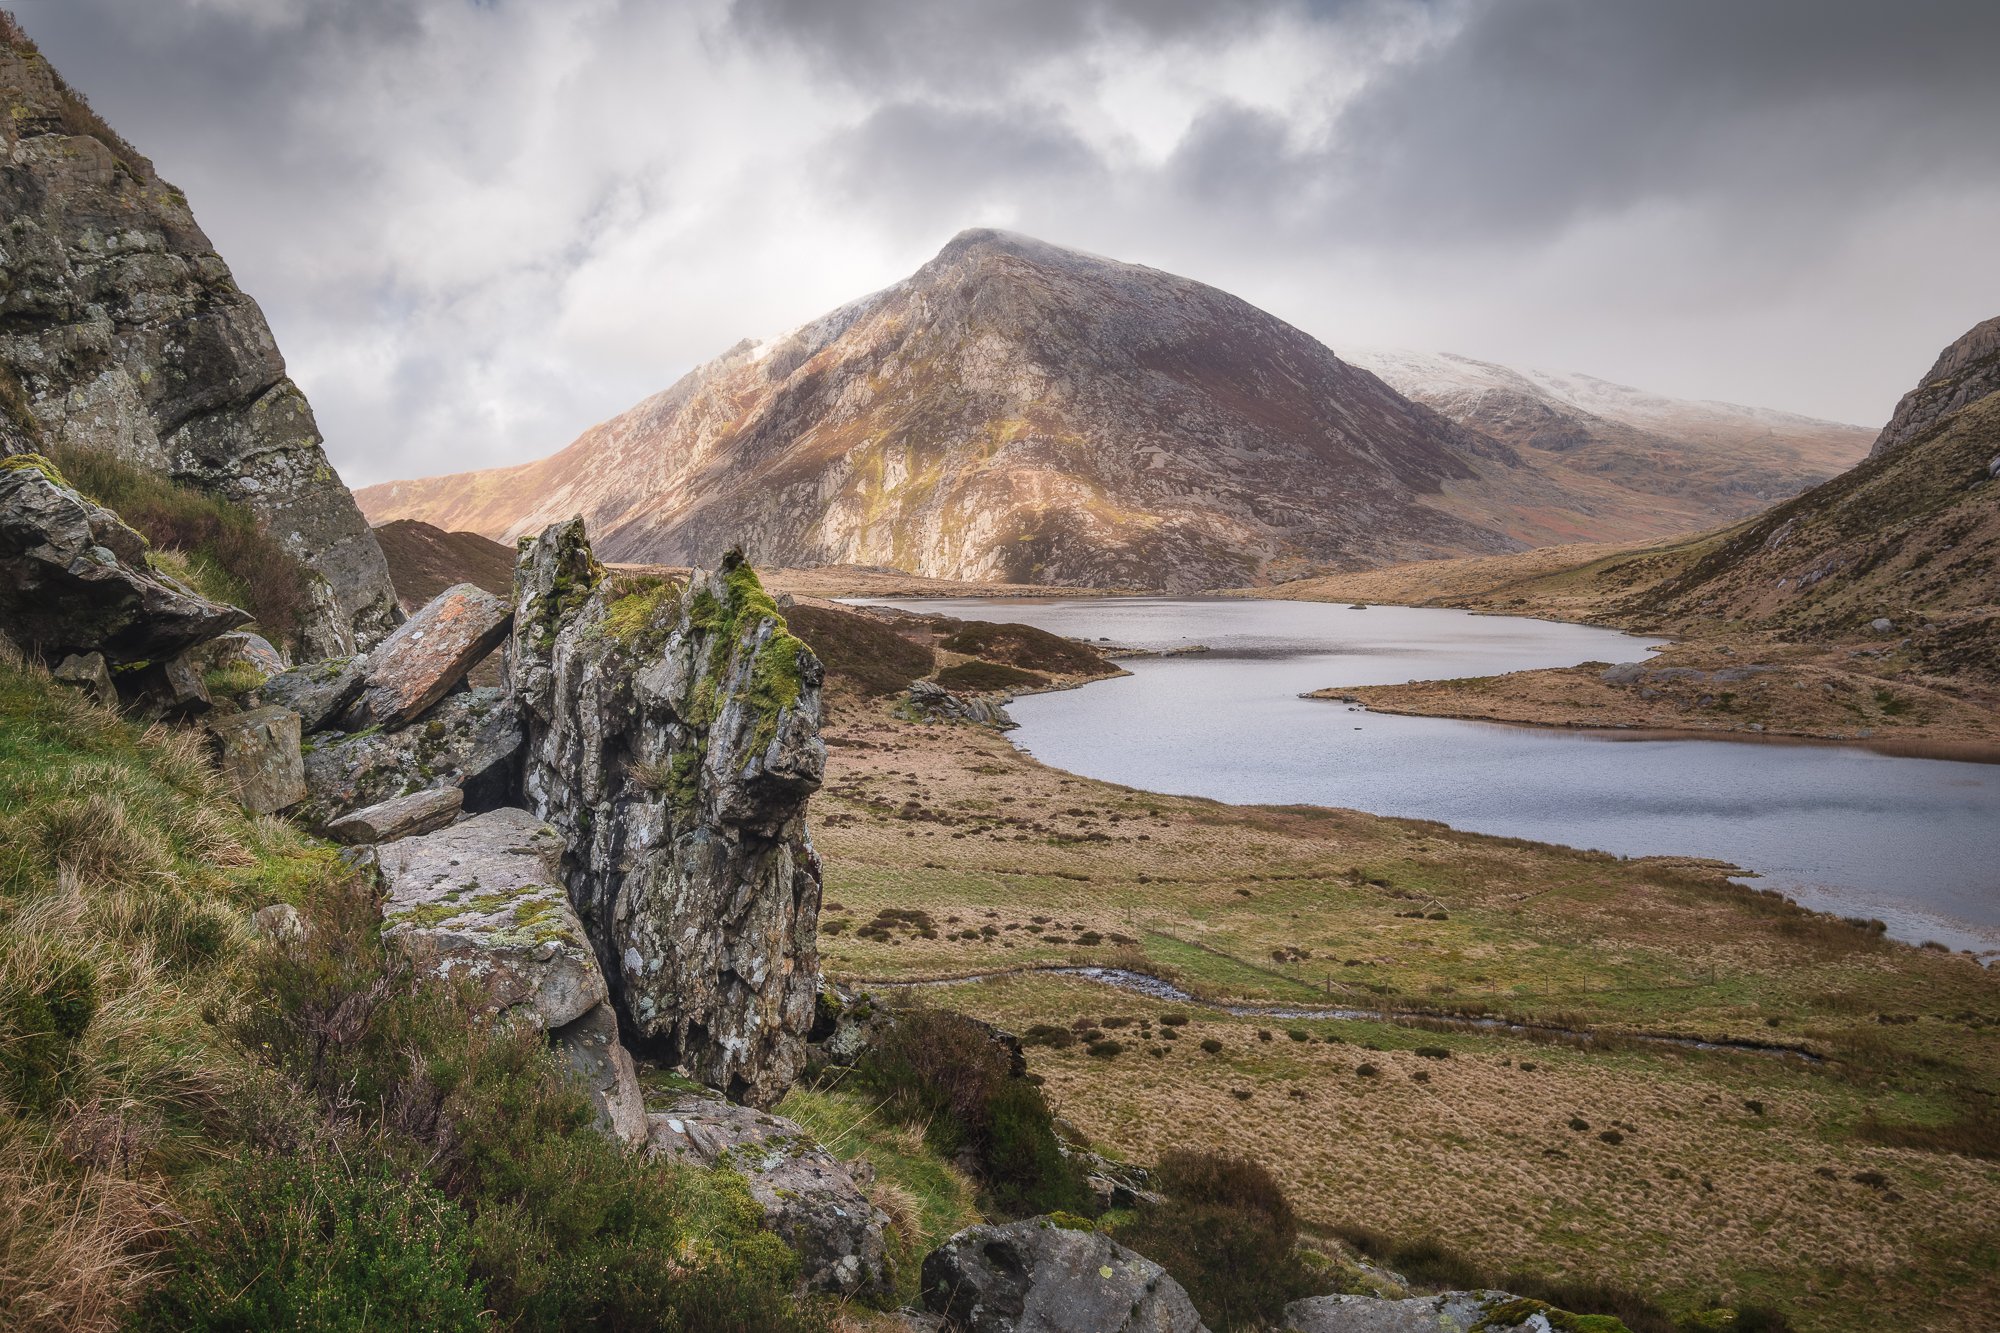
Looking down the valley from Y Garn
Seeing the light hitting the landscape as the sun was intermittently breaking through the clouds, I decided to climb part way up Y Garn, close to a location where I took a similar photo from the previous winter. This time, I climbed 150-200 metres higher to find a better vantage point and found a great spot, offering fantastic views of the Ogwen Valley.
With low, moody clouds working their way down the valley and the sun still breaking through over my right shoulder, the landscape in front of me was a sight to behold and I wasted no time setting up the camera to photograph it. The light was warm, making the landscape glow where it fell and with the cloud just about kissing the top of Tryfan, I took another of my favourite photos from the trip.

Fujifilm XT5 | XF10-24mm | 15mm | 1/100th Second | f/8 | ISO125
The Sleeping Dragon’s Back
With the wider landscape photographed, I donned the 50-140mm lens and zoomed in tighter on Tryfan. With its vertical crags and jagged edges, this iconic Snowdonia mountain is also referred to by some as the Dragon’s Back. You can certainly see why from this angle.
Waiting patiently for the opportune moment when the clouds revealed Tryfan’s summit while illuminated by the sun, I took the two photos below at 50 and 140mm.
Fujifilm XT5 | XF50-140mm | 50mm | 1/40th Second | f/11 | ISO125
Fujifilm XT5 | XF50-140mm | 140mm | 1/11th Second | f/11 | ISO125
Spotting some tiny figures on top of Tryfan in the distance, I mounted my 70-300mm lens and zoomed in to take one last photo. I could see someone climbing on the trig point/platform up at the top, so I held off taking the photo until the figure was standing upright.
For illustrative purposes, I’ve shared a couple of different versions of the same photo underneath, both zoomed in to 100%, but each focusing on a different part of the frame.
Looking again at the photo I took of the view down the valley and how far away from Tryfan I was, it’s quite astonishing that I can pick out so much detail from the photo I took.
Even though the sun had gone in while I took this photo, I still cooled the image down a little more when editing it as I liked the monochromatic look it gave.
Fujifilm XT5 | XF70-300mm | 300mm | 1/320th Second | f/6.4 | ISO125
The rugged face of Glyder Fawr
Happy with the photos I’d taken up on the slopes of Y Garn, I made my way back down towards Llyn Idwal. As I got close to the lake, Glyder Fawr came into view and even though the light was far from ideal, the dark clouds skimming the peaks of this rugged mountain caught my eye enough for me to grab the camera one more time and take this photo.
I love the detail in the rock face, the white slither of water as it tumbled down the mountain and the dark clouds hugging the ridge as they glide past.
The most challenging aspect when taking this photo was making the scene feel balanced as the ridge continues up on the left-hand side and works its way downwards on the right. To solve this dilemma, I opted for a square crop.

Fujifilm XT5 | XF16-55mm | 25mm | 1/30th Second | f/8 | ISO125
With there being only an hour or so of light left in the day, I wandered to my car contemplating somewhere nearby to take one last photo before heading back to the hotel for the night.
When it comes to my landscape photography, two things I admit to being are both stubborn and a creature of habit. I’m the kind of photographer that, once I decide on a photo I want, I will keep returning to a location to try to capture it. This is as true for when photographing close to home as it is during photography trips further afield such as this. So, when all of a sudden, the cloud started to clear above me and being so close to Tryfan once more, I made a snap decision to take a walk back up to the waterfall along Afon Lloer and try to get the sunset photo of Tryfan I wanted.
Well, would you believe it, the clouds continued to thin to a clear blue sky. Far from ideal conditions for the photo I wanted to take. I sat alongside the waterfall questioning the decisions I make in life knowing that once again, this photo has eluded me.
I very thin layer of high cloud did eventually make its way into the scene over towards the setting sun, which gave me a little hope, and I was able to take a nice enough photo, but I guess I’ll need to come back once more at least to try again. Every cloud and all that.

Fujifilm XT5 | XF10-24mm | 10mm | 1/25th Second | f/14 | ISO125
With what I thought was the best photo of the evening taken, I set off back to the hotel to get some much-needed food and rest as I’d be up early again on my last morning in the national park before my 5-hour drive home later that afternoon.
Photographing a misty sunrise at Lynnau Mymbyr
Waking up and heading out into the dark the next morning, I made my way back to Lynnau Mymbyr. I decided to head back to the lake as very little wind was forecast and I was hoping to photograph the lake with the Snowdon Horseshoe reflected in the water.
It was pitch black when I arrived and I couldn’t see a thing, but as the light gently increased, I got an impression that the lack of visibility wasn’t just to do with the time of day. As it turns out, there was a thick cloud of fog between the lake and the mountains in the distance.
Fujifilm XT5 | XF16-55mm | 55mm | 13 Seconds | f/10 | ISO125
Embracing the cool, pre-dawn light, I started by taking a long exposure of this tree sticking out partway across the water. Apart from the occasional car driving past me, everything was silent, and I felt a minimal-looking scene would work well and represent the feeling I had as I stood there on the edge of the lake.
Although I like the 3x2 ratio of the original photo, back at home during the edit, I went for a square crop. I feel the square provides a more balanced composition as it avoids the trees on the left creating too much visual weight.
The blanket of fog in the distance was shifting from left to right, seemingly rocking in the cradle of the valley and every now and then, Snowdon would appear in the distance for just a short while and I had to be ready to take a photo when it did.
Wanting to take a wider composition, allowing me to make a feature of the rocks in the foreground, I zoomed out and waited for the opportune time to click the shutter.
With Snowdon just about visible and the atmospheric mist across the lake, this is one of my favourite photos I took that morning.
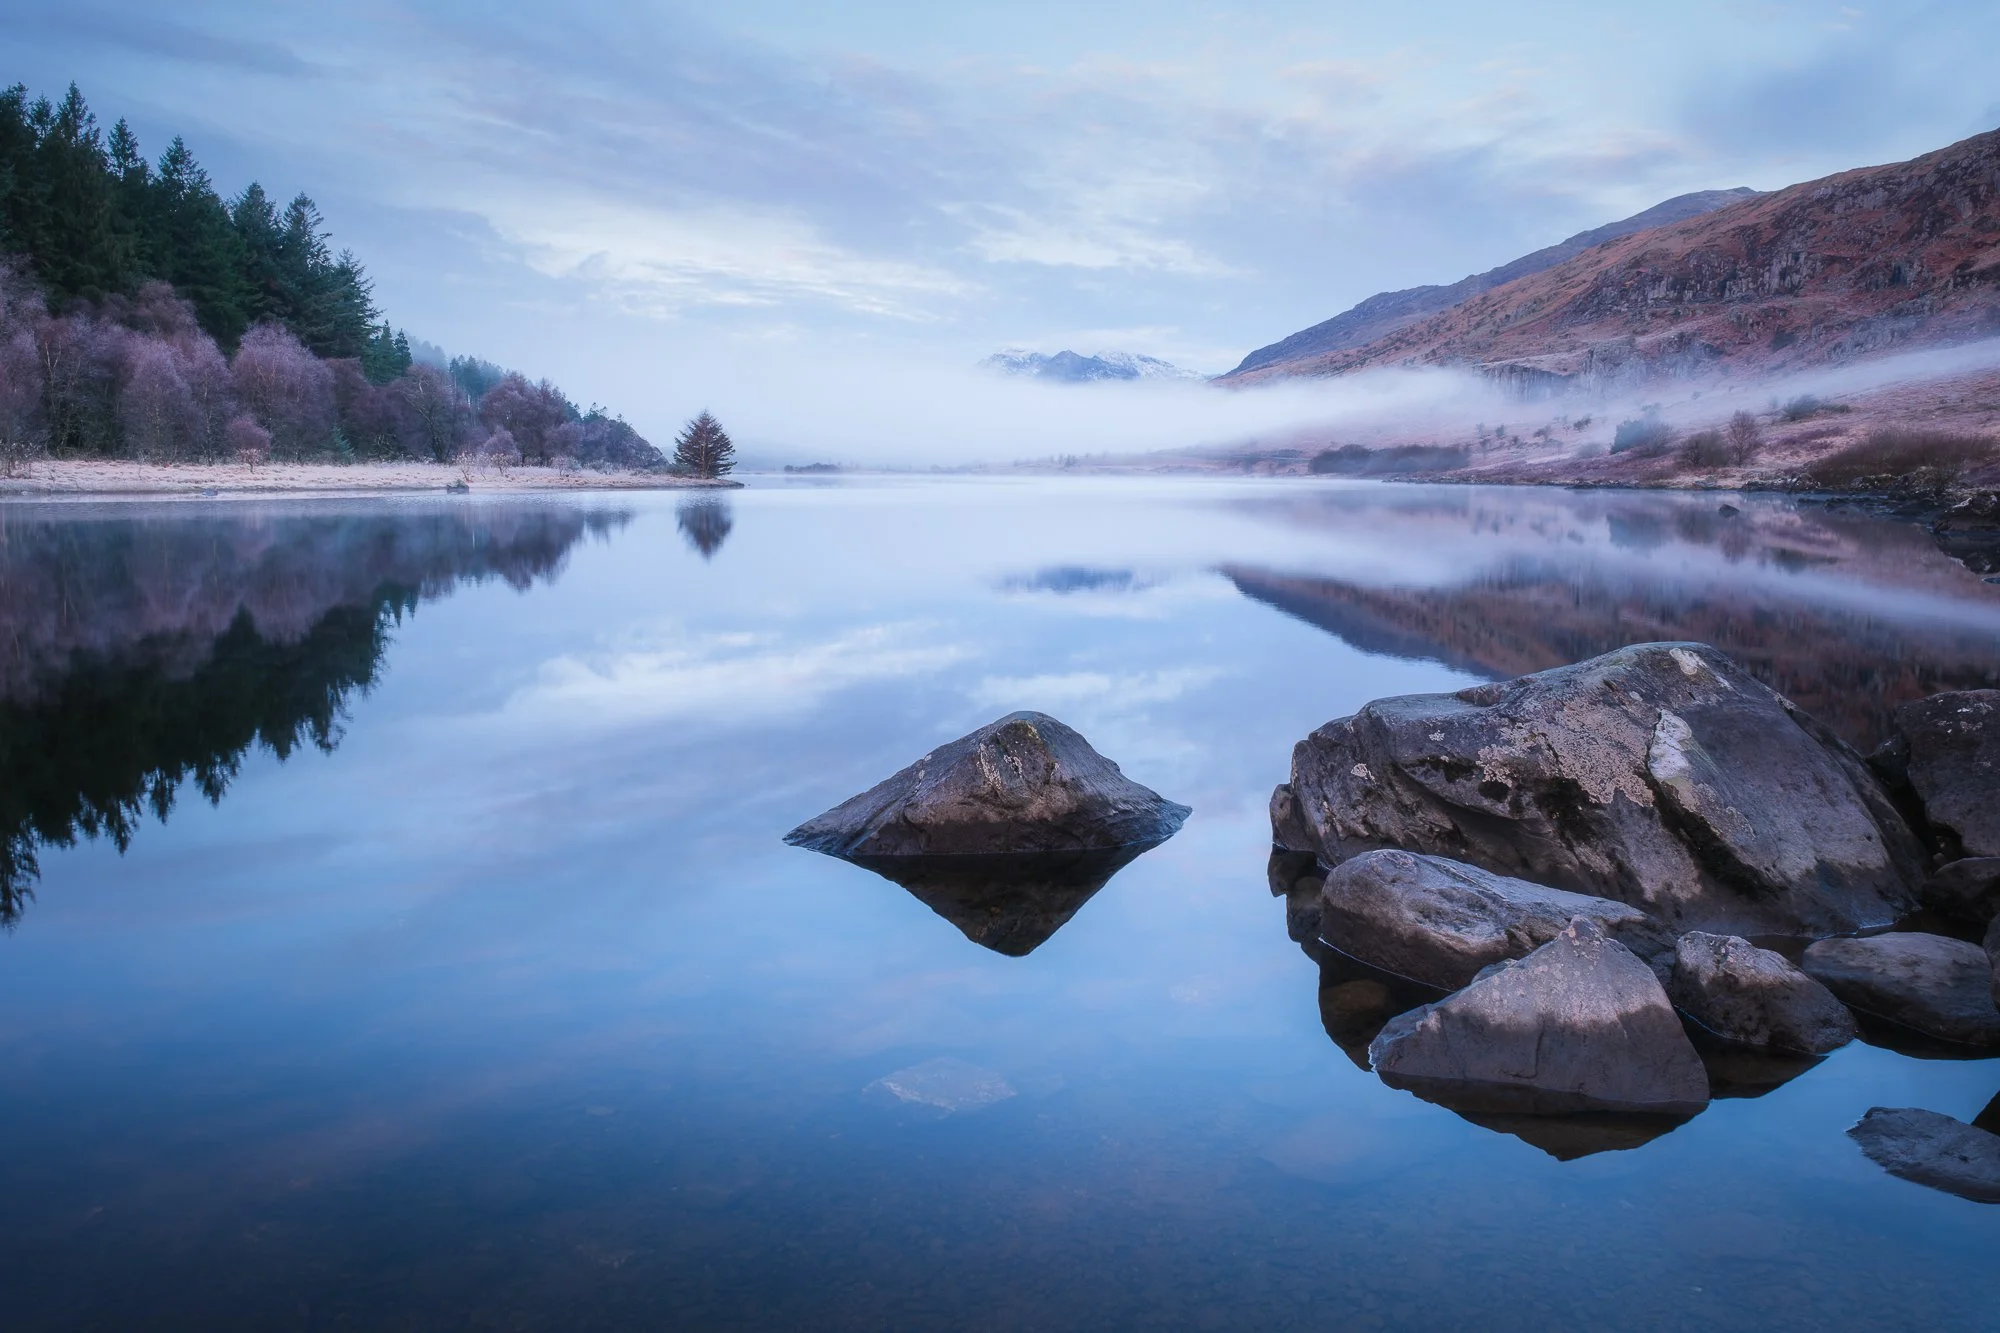
Fujifilm XT5 | XF16-55mm | 18mm | 1/4th Second | f/10 | ISO125
I wanted to photograph the wide vista but minimise the foreground and sky. One way I could achieve this is to choose a wider focal length and just crop the image into a panoramic. The issue with that approach is that the wider the focal length, the smaller the mountains will look in the frame.
What I tend to do in this situation is to create a stitched panoramic image using a longer focal length. This way, the mountains still retain their prominence, and I don’t have to crop the photo and essentially throw pixels away.
To get as much resolution as I could, I rotated the camera to a portrait orientation and zoomed in even further, pulling the mountains closer to me. Although this means I need to take more photos as I pan, the resulting image has a far higher resolution. I took the various photos while panning the camera from left to right, overlapping each one by around 50%. I made sure to start and finish the panoramic further to the left and right of the scene than I needed as this gave me more flexibility with the final crop back in post-production.

Taking multiple photos and stitching them together can be problematic if there’s movement in the scene, particularly in water as it can make them more difficult to line up. Thankfully, the water was still, and the clouds were moving slowly enough that Lightroom had no issues at all. After a creative crop, the resulting photo below is a respectable 115 megapixels and if I ever decide to print this photo, I’ll have no issues regardless of the size I want to make it.
It can be tricky to view panoramic photos properly when using a small phone screen. If you are using a phone to read this blog, try to view it on a larger screen or at least select the photo and rotate your screen to get a better view.
Fujifilm XT5 | XF50-140mm | 74mm | 1/2 Second | f/11 | ISO125 (Stitched Pano)
With the telephoto lens still attached, Snowdon made its last appearance of the morning, and with the lake still offering up these fantastic reflections, I composed a landscape-oriented photo making more of a feature of the mist and mountains in the distance.

Fujifilm XT5 | XF50-140mm | 50mm | 0.6 Seconds | f/11 | ISO125
Happy with the pre-dawn photos I’d taken, I stopped to take a break and just enjoy the scene unfolding in front of me. I was hoping some colour would appear in the sky but the very subtle hint of magenta you can see in the photo above was the best it got before thicker clouds started to roll in across the mountains. That was the last time I would see the Snowdon Horseshoe that morning.
As dawn turned to day, the sun, which was now rising over my left shoulder was lighting up the hills with a beautiful orange glow, so I grabbed the camera and made a few handheld photos of the scene. Having Snowdon visible in the background would have been the icing on the cake, but it was not to be.

Fujifilm XT5 | XF16-55mm | 20mm | 1/50th Second | f/8 | ISO125
I also took a more simplified photo of the view across the lake, removing the foreground rocks to give the image more of a mirror-like look. The subtle ripples you can see in the water “ruining” my perfect reflection was not due to wind, but the effects of some early morning swimmers over to the left of me.
Of course, I jest about it ruining my photo, as I appreciate the lake is there for us all to share. I waited a while, but more swimmers started to arrive, this time to the right of me, so, all I could do was try to take the best photo possible at the time. I still really like the results.
Fujifilm XT5 | XF16-55mm | 19mm | 1/50th Second | f/8 | ISO125
Getting on for mid-morning, the best of the light was gone and with only a few hours left before driving home, I went back to the Ogwen Valley as there were still a couple of photos that, for one reason or another, I hadn’t yet managed to take.
Photographing Cwm Idwal and the Ogwen Falls
Once again, I parked further up the road, beside Llyn Ogwen and walked up to Llyn Idwal as I wanted to take a photo of Cwm Idwal’s fantastic natural amphitheatre. It was a composition I had taken the year before and although I was happy with it, the lack of a wide-angle lens meant that I couldn’t include enough foreground or leave enough sky above the mountains.
Next to the bridge where Llyn Idwal feeds into Afon Idwal, I placed my tripod into the shallow water and mounted my camera about a foot above the surface. I used two of my Kase filters for this photo. The first was the CPL filter which helped to remove some of the glare from the water and wet rocks. The second was my three-stop ND filter which enabled me to set a shutter speed of 1/20th of a second and smooth the water a little as it rolled over the rocks in front of me.
Right in the middle of the image, at the top of the ridge is a big crack in the rock called Twll Du (Black Hole), also known as the Devil’s Kitchen. It’s called the Devil’s Kitchen because water flows into the crack at speed and the spray it causes appears like a plume of steam rising from within the rocks. It’s said, when steam can be seen rising from the chimney, the Devil is cooking.

Fujifilm XT5 | XF10-24mm | 12mm | 1/20th Second | f/11 | ISO125
While sitting on a rock, having a snack, I decided to send the DJI Mini 3 Pro drone up to see what the view looked like from high above Llyn Idwal. The clouds continued to hug the top of the peaks with the sun breaking through from time to time. I flew towards the Devil’s Kitchen at the back of the lake, turned the drone around and framed up this familiar view of Pen yr Ole Wen with its peak lost in a layer of clouds.
While keeping half an eye on the drone’s battery levels, I waited for what seemed like an age for the clouds to become a little more central above the mountain and once in position, I was able to take this photo of Llyn Idwal and Pen yr Ole Wen across the valley.
With the drone safely landed, I made my way down to the Ogwen Falls to take my last photo of the trip.

DJI Mini 3 Pro | 24mm (effective) | 1/6,400th Second | f/1.7 | ISO100
Dark clouds over Tryfan at the Ogwen Falls
This is a view that escaped me when I visited a year before. On that day, the skies were blue, and the light was too strong to make a photo I was happy with, so, with another opportunity to photograph the scene, I scrambled back down to take in this popular view of the Ogwen Falls with a part covered Tryfan lurking menacingly the background.
The good news is that the sky wasn’t blue, and I had some moody clouds to use to add a touch of drama, but as good as those clouds were, unfortunately, they were also blocking Tryfan’s recognisable peak. Not to be deterred, up went the tripod and out came the camera for the very last time of the trip. Once again, I used the CPL and ND filters for this photo for the same reasons as before and then I waited in the hope that Tryfan would make an appearance.
Fujifilm XT5 | XF10-24mm | 16mm | 1/5th Second | f/8 | ISO125
All I needed was a second or two to react and take the photo, but it was not to be. I even sent my drone up while I waited but still, the clouds wouldn’t release their firm grip of Tryfan’s peak.
Even with a lack of interesting light, I’m still happy with both the photos I took at this location as the dark clouds provided some contrast and mood I could work with. Tryfan’s summit never did make an appearance and after around an hour, it was time to pack up and head home.

DJI Mini 3 Pro | 24mm (effective) | 1/1,250th Second | f/1.7 | ISO100
As I embarked on the 5-hour drive home, I reflected on how I thought the trip went and what I might do differently next time. I was feeling optimistic about some of the photos I took, and it seems that optimism was well placed, as along with quite a few photos I was happy to share on this blog, I did manage to take one or two photos I especially like and may even make it into my portfolio. I’ll leave you to guess what ones they are.
When I return (and I will return), I plan to visit in Autumn as I want to capture a bit more of the Snowdonia woodland in my photos and maybe visit a few of the beautiful waterfalls found in the national park. I do have a family trip to Snowdonia planned for the end of May 2024, but it will be a busy week and I don’t expect to get too many landscape photos. I also plan to travel lighter on the next trip. I got away with it this time as I didn’t summit any mountains, but next time I plan to climb even higher to take in some new views to photograph. At the time of writing, I have already added a 16-80mm lens to my kit which means I can carry just the three, lighter lenses which will help me when I take on those more strenuous hikes.
I know these longer-form posts are not for everyone, so thanks for sticking with it and reaching the end of this rather long two-part blog post. I’m motivated to share more from my landscape photography trips, so stay tuned for more on-location blog posts soon.
Until next time,
Trevor.
If you enjoy these longer, on-location articles, I’ve posted a few more from some of my previous trips to Wales below. All the On-Location blog posts I’ve ever written can be found here.


Trees - A Photographic Exploration by Gary Turner | My Photo Bookshelf
An A5 zine celebrating the wonder of trees, featuring 40 captivating photos by photographer Gary Turner
After listening to Gary Turner speak about his photo book projects with Euan Ross on the In Discussion podcast over at https://biblioscapes.com, I popped over to Gary’s website and picked up both his Long Exposure zine and this one he calls Trees, A Photographic Exploration.
Author’s synopsis
A beautifully curated collection of black and white and colour photography of trees.
More than 40 photographs, carefully arranged across 24 pages, allowing you to explore the subtle details of trees and their setting in the British landscape.

My thoughts about the book
Let’s cut to the chase. I really like this book. Being just 24 pages and A5 in size, it seems a simple concept but when you start to read it, you quickly realise it goes far deeper than that. I admit, having a mutual admiration for trees means I approach this review somewhat biased, but something about this book connected with me.
There are 40 photos, all featuring trees and within the collection, so much is represented. The book starts by celebrating the form and composition of the tree with a collection of black and white photos transitioning to colour photos for the second part of the book with all of the seasonal tones represented. Throughout the book, there are portraits of trees, landscapes featuring trees and intimate photos with creative use of depth of field.
A particularly nice touch was to interweave extracts from Rudyard Kipling’s poem, “The way through the woods”. A fitting addition to such a lovely little book.
Book Details
Softcover
Size: 210mm x 148mm
Pages: 24 printed on 200gsm silk paper
Availability at the time of writing: In stock and available from the author’s website here: https://www.shutterspot.co.uk/product/trees-a-photographic-exploration-zine/

On Location Photographing Snowdonia Part One
The first of two instalments of an on-location article chronicling my recent landscape photography trip to Snowdonia.
Snowdonia, where rugged peaks pierce the heavens and mist-clad valleys cradle the tranquil lakes as they reflect the ever-changing drama of the sky above.
Situated in North Wales, this breathtaking national park enchants both photographers and wanderers alike. Join me as I recount my recent trip to photograph the awe-inspiring beauty of this stunning landscape.
Back in January 2023, I made my first dedicated photography trip to Snowdonia. I spent a wonderful two days photographing the mountainous landscape and had the good fortune of timing my visit while there was a blanket of snow across the higher ground. After just a short 48 hours, I could see why this location was loved by so many. The views are simply spectacular and feeling incredibly inspired by the landscape as I drove home from that trip in 2023, I knew I would be back again soon enough.
Fast forward just over a year to February 2024 and with my bag packed and a tank full of fuel, I was off once again to immerse myself in this beautifully rugged landscape, exploring the mountains with my camera and with hope, coming away with a few keepers.
With so many photos to share, I split them into two posts for easier viewing, and if you can, I recommend reading them on a larger screen to get the full benefit of the photos I’ve included. This is part one and you'll find the link to part two at the end of this post.
With the UK experiencing such a mild winter, with plenty of wind and rain, I knew I wouldn’t be lucky enough to get the wintry conditions I had the previous year, but that didn’t bother me at all. Being someone who likes a sky full of clouds and soft, defused light; my biggest fear was having two days of clear blue skies with harsh directional light across the landscape. Those more predictable conditions are perfect to hike in but certainly not for my style of photography. As you will see from the photos I’ve shared below, the weather gods were again on my side.
If you’re interested in looking at some of the photos I took on my previous trip, you can jump into that blog by selecting the thumbnail here.

A quick note about the photography gear I took with me. Overall, it was similar to what was in my camera bag back in January 2023. I still have the same Fujifilm XT5 camera, DJI Mini 3 Pro drone, Kase magnetic filters and Benro Mach3 TMA37AL tripod with the Gd3Wh geared head.
The only changes I made were the additional lenses I took this time. On my last visit, the only regrets I had in terms of the gear I took was not being able to go wider than 16mm when trying to include a stronger foreground while still leaving plenty of space in the sky above the mountains and not being able to zoom in more, extracting extra detail when photographing the distant peaks. So, alongside my XF16-55mm standard zoom and 50-140mm telephoto, I added the XF10-24 wide angle and the XF70-300mm telephoto giving me a focal range of 10mm to 300mm or in full frame terms, 16 to 450mm. The obvious downside here is the extra weight in the bag but even with all this kit in the camera bag, it was still manageable even on the more strenuous hikes.

If you want to read more about the kit I use for my landscape photography, check out my latest camera gear blog post here: My Camera Gear for Landscape Photography in 2024
Landscape photography in the Ogwen Valley
I love to explore the Ogwen Valley, and this was the first of two visits I made during the 48 hours I spent in Snowdonia. Featuring so many stunning views in a relatively small area with opportunities for both leisurely walks and strenuous hikes on offer, it's no wonder the area is so popular.
Pen yr Ole Wen from above Llyn Idwal

Arriving after my 5-hour drive from southeast England, I headed straight for the Ogwen Valley and knowing how busy the car park could get at the Ogwen Cottage, I decided to walk the extra 5-10 minutes and parked further along Llyn Ogwen at this car park where there are typically more free spaces. I grabbed a quick coffee at the cafe and started to make my way up towards Cwm Idwal.
I’m the kind of photographer who works better after a little warming up and I will often try to take a photo or two early on a trip as it helps me get into the zone faster and see potential compositions more easily.
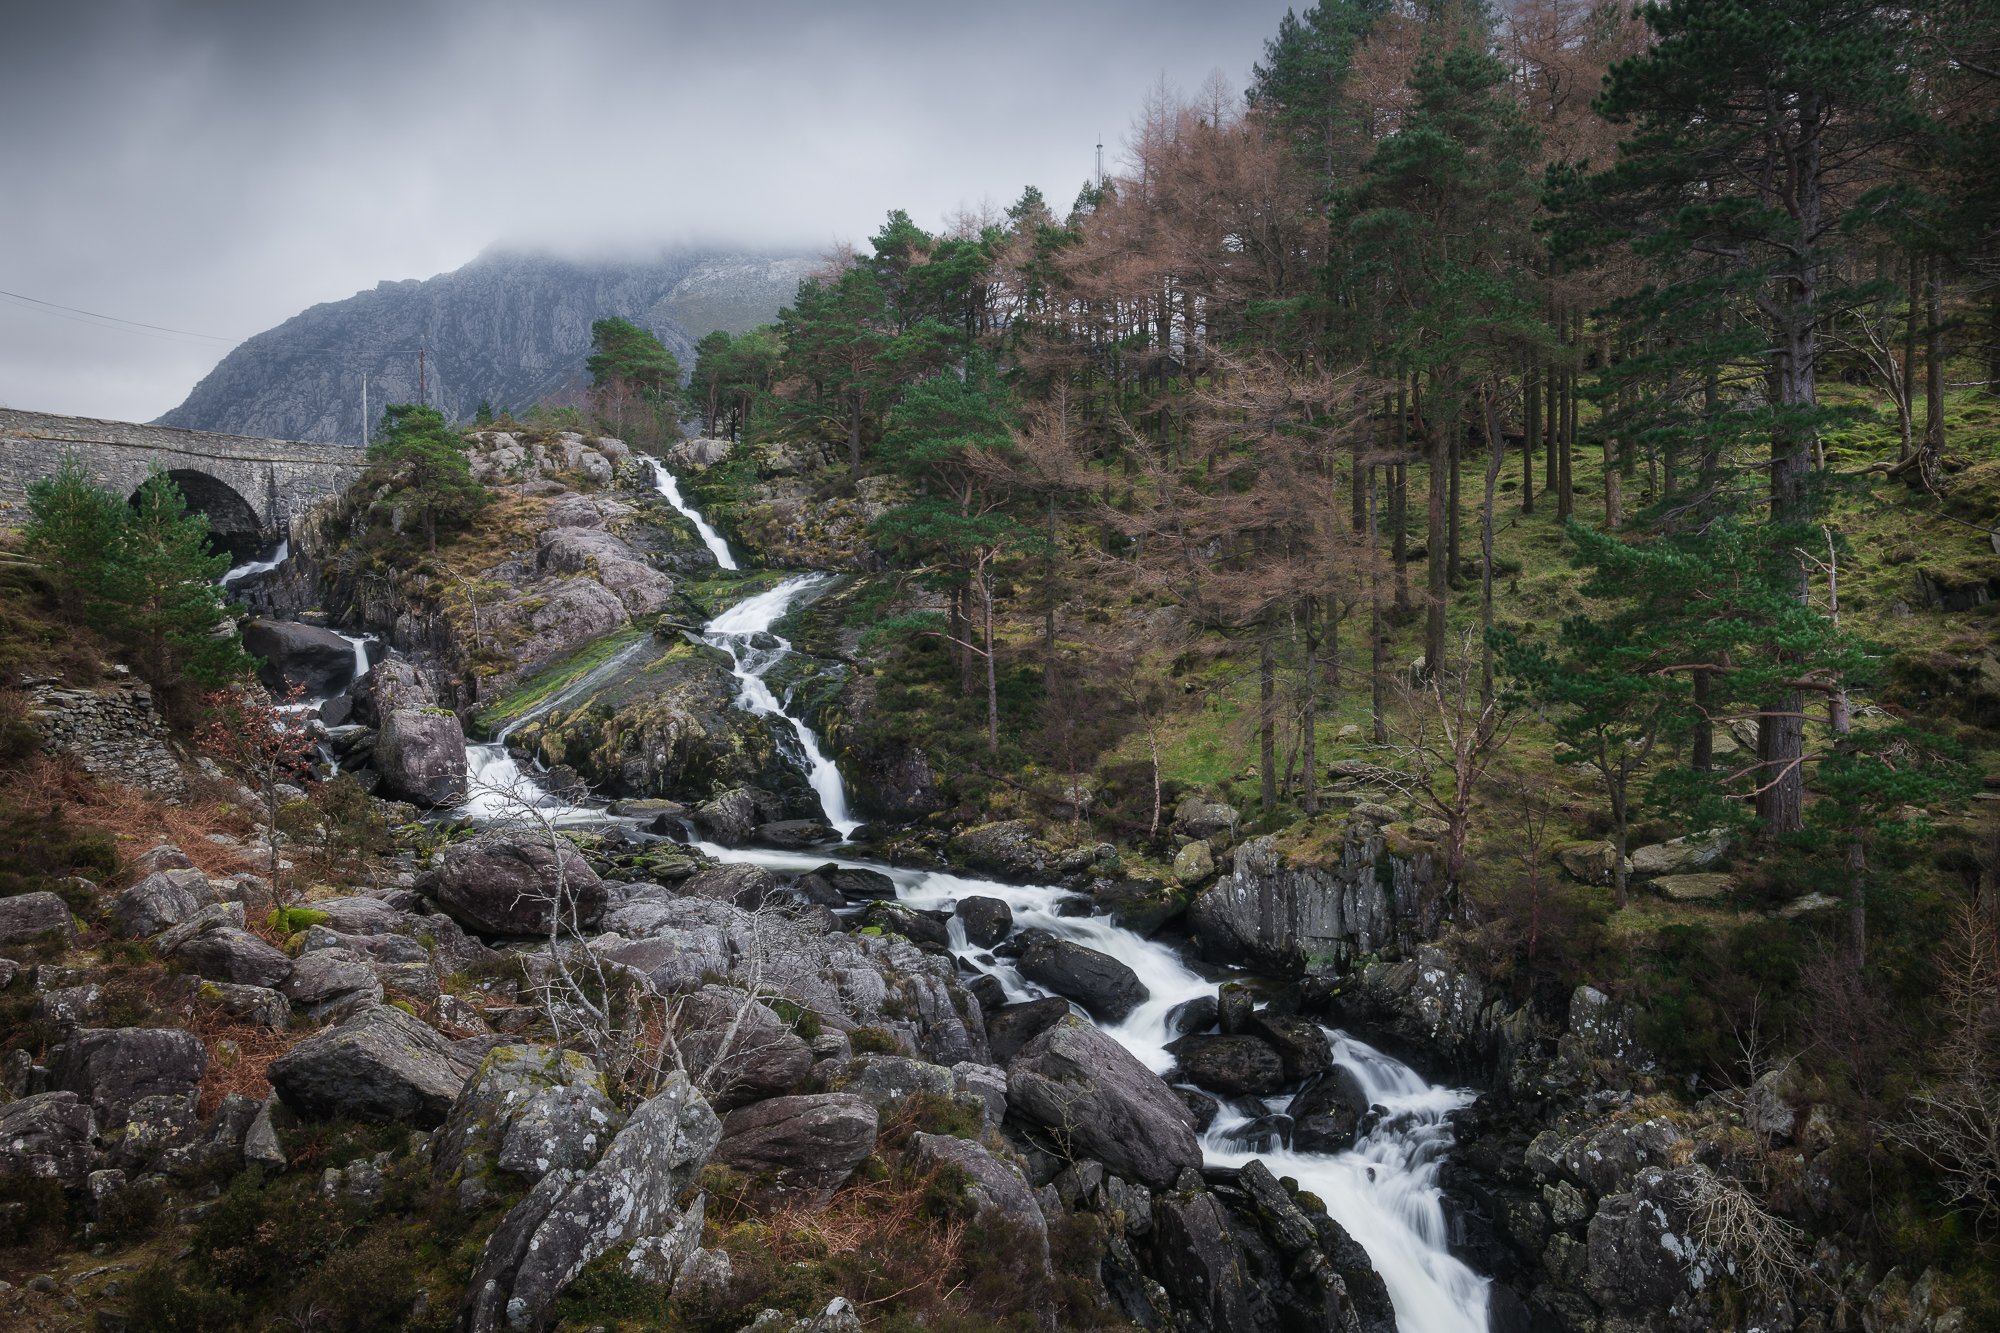
So, after walking just a few minutes up the trail and with some moody skies above Y Garn, out came the camera to photograph the cascades from the footbridge across Afon Idwal.
Along with the camera and lens, I used two filters to take this photo, the first being my circular polariser (CPL). Although there were some dark clouds above the peaks, it was still quite bright overhead as the sun was coming in and out to the left of the frame and using the CPL helped me by removing some of the reflective light from the water and rocks.

Fujifilm XT5 | XF10-24mm | 15mm | 1/13th Second | f/8 | ISO125
Secondly, I used a 3-stop neutral density (ND) filter which allowed me to slow the shutter speed just enough to capture the movement and get the effect I wanted in the flowing water.
I’m happy with how the photo turned out and although I think I prefer this composition, I think the version I took with snow-capped peaks in the background a year before is the better of the two.
Following the trail that runs uphill alongside Afon Idwal for 10 or 15 minutes, I arrived at the banks of Llyn Idwal. From the north side of the lake, you can take in the breathtaking view of Cwm Idwal’s natural amphitheatre (you’ll see a photo of this in part two, it’s quite stunning).
With the sun to the south, behind the high ridge, Cwm Idwal was in the shade and to the north across the valley, I could see the winter light hitting the face of Pen yr Ole Wen. With the clouds kissing the peak as they passed by, I decided to head around to the south side of the lake and take a photo from there.
As I reached the other side of Llyn Idwal, I first took the lower path and found this composition below using some of the exposed jagged rocks to provide some interest in the foreground. I composed the frame so that the lake would snake in from the right, leading towards Pen yr Ole Wen and at the same time, offering some balance to the dominant rock features on the left. During this time, the clouds had started to break up a little behind me and I quite liked the dappled light hitting Pen yr Ole Wen in the distance.
Fujifilm XT5 | XF10-24mm | 17mm | 1/200th Second | f/8 | ISO125
At this stage, I was still only a few metres higher than the lake and being curious to see how the view might look from a more elevated position, I climbed the upper path towards the crack in the rocks called the Devil’s Kitchen or Twll Du (black hole) as its also known. From this spot, around 550 metres up, I could include the entire lake and the slopes on either side of the scene helped to balance the composition and frame Pen yr Ole Wen which I once again placed in the centre of the image.
As the clouds rolled in from the left-hand side, I took a few photos, some with dappled light on the mountain, but of those I took, I like this photo below the most. The cooler tones are muted, and the clouds have drama but without being too distracting. I also like how the low, misty clouds on the left hug the side of the mountain as they travel east through the valley.

Fujifilm XT5 | XF10-24mm | 21mm | 1/30th Second | f/8 | ISO125
The classic view of Tryfan from beside Afon Lloer
I get it, this view of Tryfan is probably one of the most photographed views in the Ogwen Valley and far from original, but that doesn’t matter to me in the slightest. Having tried and failed to get a photo of Tryfan I really like for a few years now, nothing was going to stop me from having another go.
One of the many things I’ve learned about photographing Snowdonia is that on a cloudy day, the weather can change significantly from one minute to the next, making the task of capturing some sunset colour even harder to predict. While heading down from Cwm Idwal I noticed the clouds were starting to thin, meaning there was a small chance of catching a sunset. Buoyed by the thought of getting that photo I’ve wanted for so long, I set off up the other side of the valley in a bid to be in the right place at the right time to get my shot of the mighty Tryfan.
There were two locations I wanted to take a photo from, both shown below. I made my way to the higher spot first, which features this old stone wall and a wooden stile. I absolutely love this composition. There is a similar, seemingly more popular composition on the other side of the stream, but I find the wall cuts across the scene more abruptly, appearing to slice the photo in half whereas, compared to this scene, the wall heads off into the distance but importantly disappears within the frame rather than leading the viewer off the edge of the photo.
As you can see, the cloud had rolled back in as I was making my way up the hill, so a sunset was looking less and less likely by the minute. I didn’t mind though; as I love the drama in the sky and although some evening light would have been great, I would take these moody clouds over a predominantly clear sky every single time.
This was hands-down my favourite photo I took that day.

Fujifilm XT5 | XF10-24mm | 11mm | 1/15th Second | f/9 | ISO125
Feeling pretty happy with the photo I’d just taken, I made my way back down the hill, stopping about halfway down next to this small waterfall to make my final photo of the day. It’s another composition I’d love to photograph with some sunset light in the sky but the best I had was a slight thinning of the cloud you can see on the right side of the image.
With the light fading fast, I hurriedly set the camera up and while experimenting with various shutter speeds, took multiple photos of this composition. After looking at the photos properly later in Lightroom, I settled on this image below taken at 1/8th second as the water was moving incredibly fast and it captures that energy perfectly.

Fujifilm XT5 | XF10-24mm | 10mm | 1/8th Second | f/8 | ISO125
As I mentioned before the weather can change quickly in the mountains, so, being somewhat overly optimistic, I hung around for a short while after sunset just in case a gap in the clouds appeared. Alas, it was not to be, so I packed up my gear and walked back to the car.
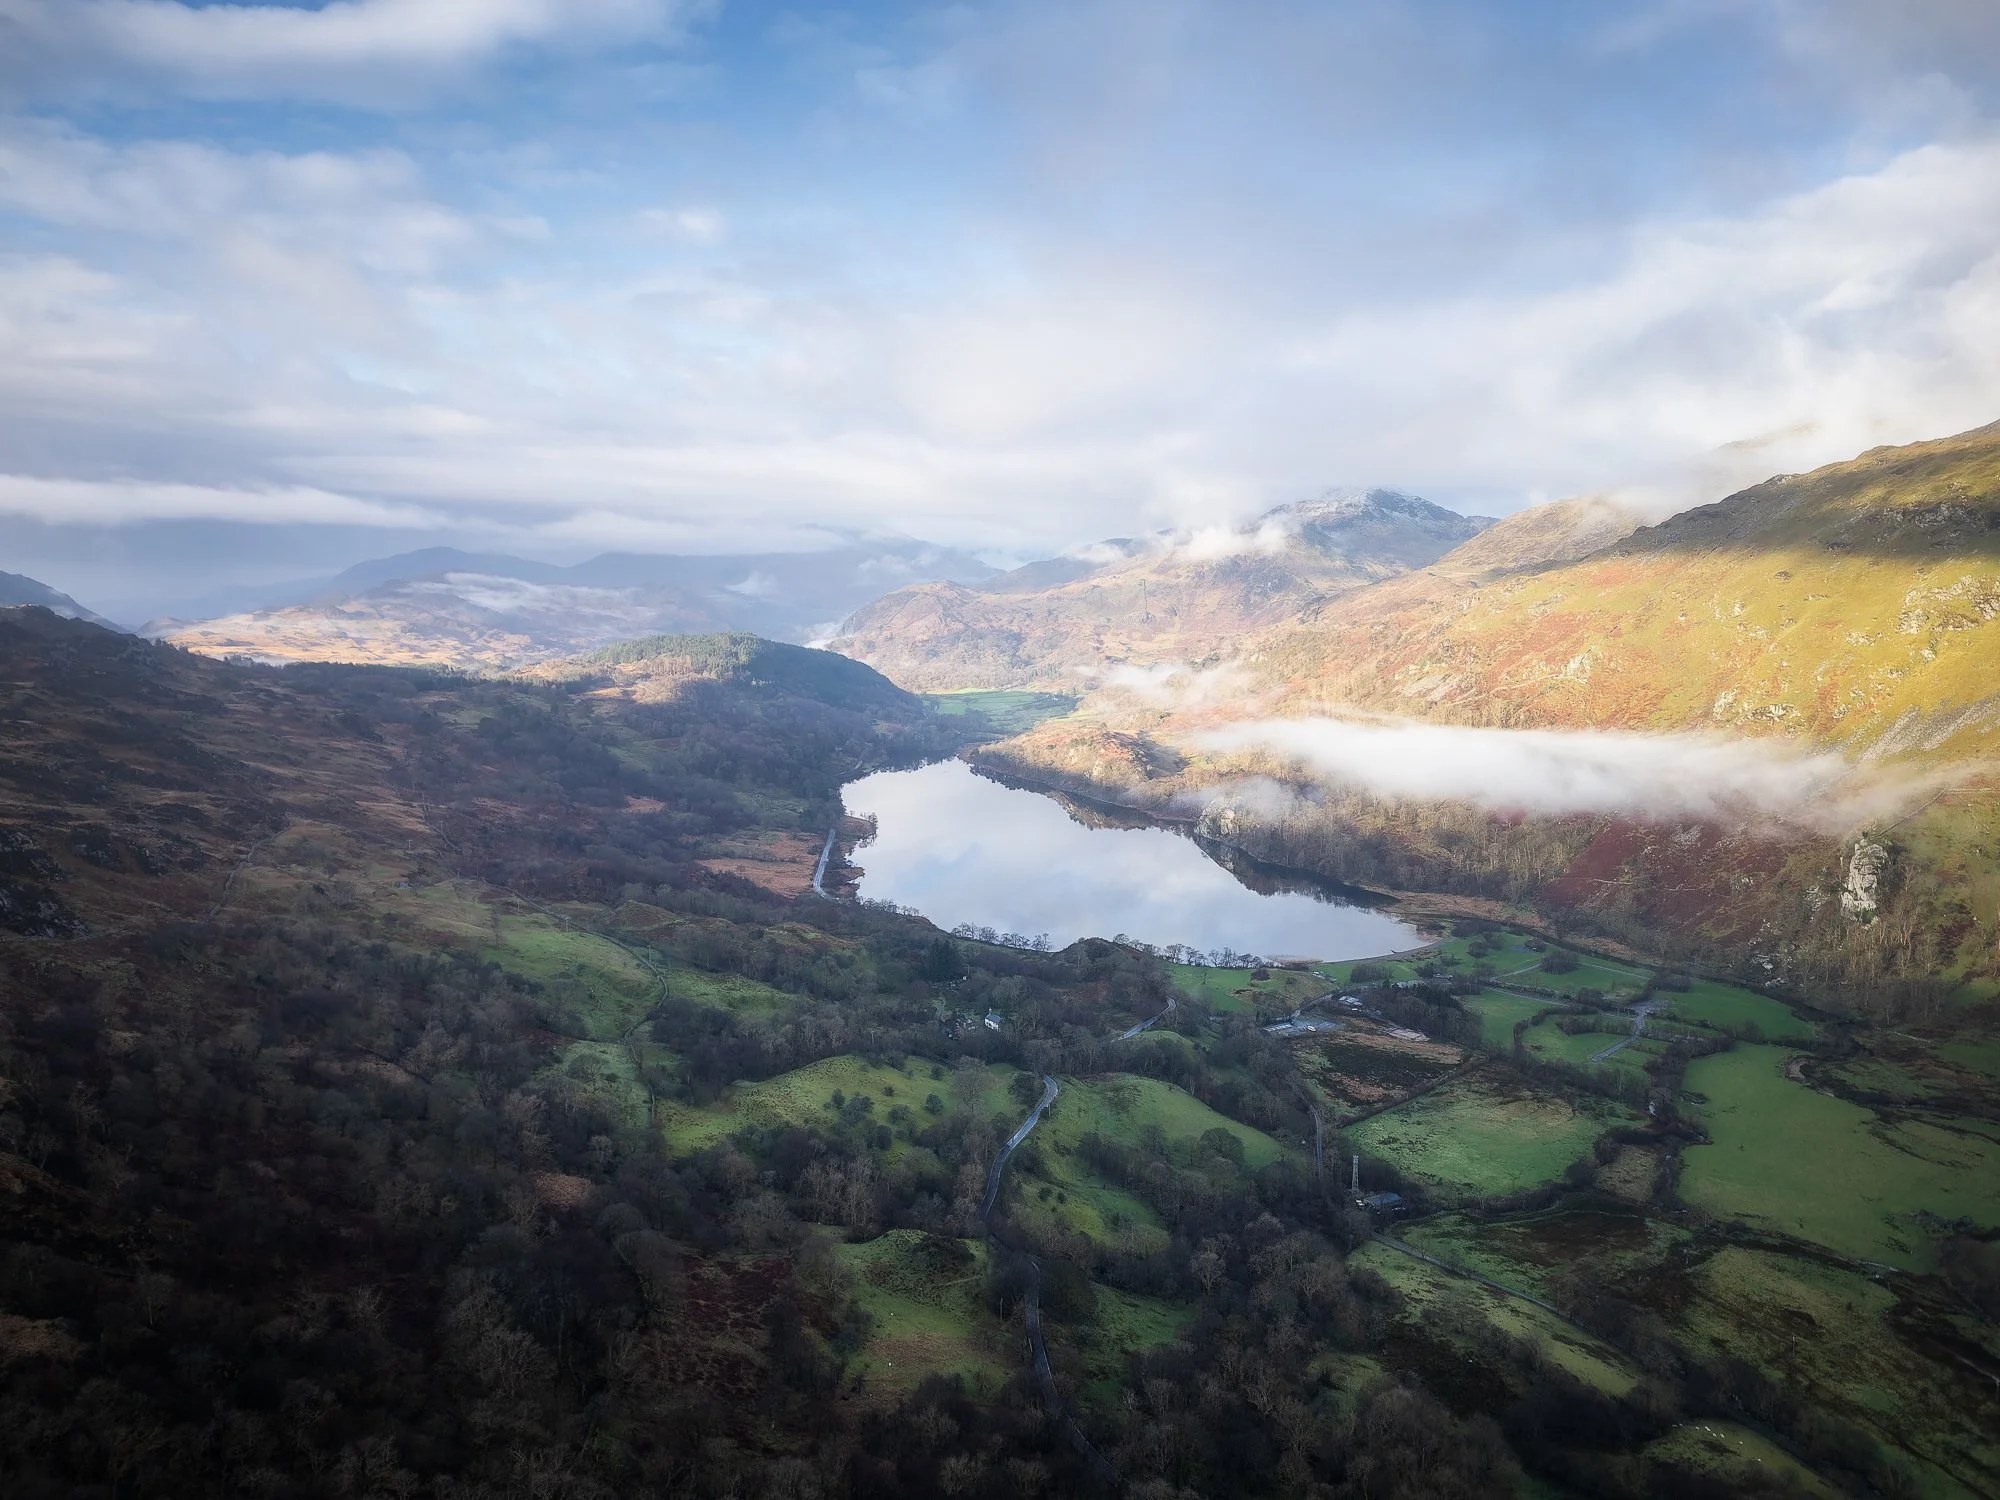
Photographing the Nant Gwynant Valley
Waking up the next morning, I set off before sunrise towards the Nant Gwynant Valley, a location I’d tried and failed to photograph the year before. Parking my car here, instead of heading to the usual roadside viewpoint most people go to, I crossed the road, went through the gate and climbed around 300m to a spot I believe offers a much better view of the lakes and valley below.

Fujifilm XT5 | XF70-300mm | 70mm | 1/25th Second | f/9 | ISO125
I arrived on location around 30 minutes before sunrise and as the landscape started to appear in front of me, I got a slight feeling of déjà vu and not in a good way! Rain was in the air; visibility was poor and there was no sign of any useful light appearing. Part of me wondered if I had wasted another sunrise up this hill.
With the daylight starting to brighten up the snow-capped Snowdon range across the valley, I mounted the 70-300mm telephoto lens for the first time on this trip and took some photos of the peaks as they momentarily appeared between gaps in the low-lying clouds. Being drawn to the textures created by the snow and rocks, the two below with a monochromatic pencil sketch look are my favourites from the set.
Fujifilm XT5 | XF70-300mm | 300mm | 1/20th Second | f/9 | ISO125
Fujifilm XT5 | XF70-300mm | 198mm | 1/30th Second | f/9 | ISO125
Turning my attention back to the view down the valley, Llyn Gwynant and the area around it was still looking a bit hazy and subdued so I decided it was time to get the drone up and fly it around the valley to see what the view looked like from up high.
Fujifilm XT5 | XF16-55mm | 39mm | 1/60th Second | f/7.1 | ISO125
DJI Mini 3 Pro | 24mm (effective) | 1/1,250th Second | f/1.7 | ISO100
While flying the drone and enjoying the views, the sun started to rise higher in the sky, illuminating the far side of the valley, and making for some interesting contrast between the light and shadow areas. Of the handful of photos I took while flying the drone, the two images above and below are those I kept.
DJI Mini 3 Pro | 24mm (effective) | 1/2,500th Second | f/1.7 | ISO100
With the drone still high above me, I noticed the sun was lighting up the far side of the valley. Llyn Gwynant was like a mirror and some low-lying clouds were working their way up the valley. Although there was still plenty of haze in the air, I was sure there was a photo to be had here.
As I landed the drone, the low-lying clouds were starting to surround the lake and with more of the scene basking in that glorious light, I managed to take my favourite photo of the morning. If I were being super picky, some of the higher peaks would be visible and not blocked by the clouds but I couldn’t wait for them to appear as the clouds around the lake were moving through the scene quickly and would have soon been out of the frame.

Fujifilm XT5 | XF16-55mm | 40mm | 1/125th Second | f/7.1 | ISO125
Photographing reflections at Llyn Gwynant
While standing high above Llyn Gwynant, I couldn’t help but notice the mirror-like reflections on its surface. With my photo of the lake from this vantage point in the bag, I made my way back down the hill to the car and drove to the banks of Llyn Gwynant hoping to photograph some of those gorgeous reflections.
Thankfully, the winds held off for a while longer, allowing me the time to get into position beside the water and from this spot, the reflections looked even better! I was over the moon with the photos I took and have shared two of them below. With a bit more drama in the sky and the top of (I think) Bylchau Terfyn subtly peeking through the clouds on the right, I prefer the first photo.

Fujifilm XT5 | XF16-55mm | 29mm | 1/60th Second | f/10 | ISO125
Fujifilm XT5 | XF16-55mm | 21mm | 1/50th Second | f/10 | ISO125
Once I was finished taking photos with the Fujifilm XT5, I sent the drone up again to see how the lake looked from the air. Thicker clouds had now rolled in over to the south, but as the sun was still casting its light over the scene from the east, it created a nice contrast between the darker clouds and the illuminated landscape.

DJI Mini 3 Pro | 24mm (effective) | 1/5000th Second | f/1.7 | ISO100
The Snowdon Range from across Lynnau Mymbyr
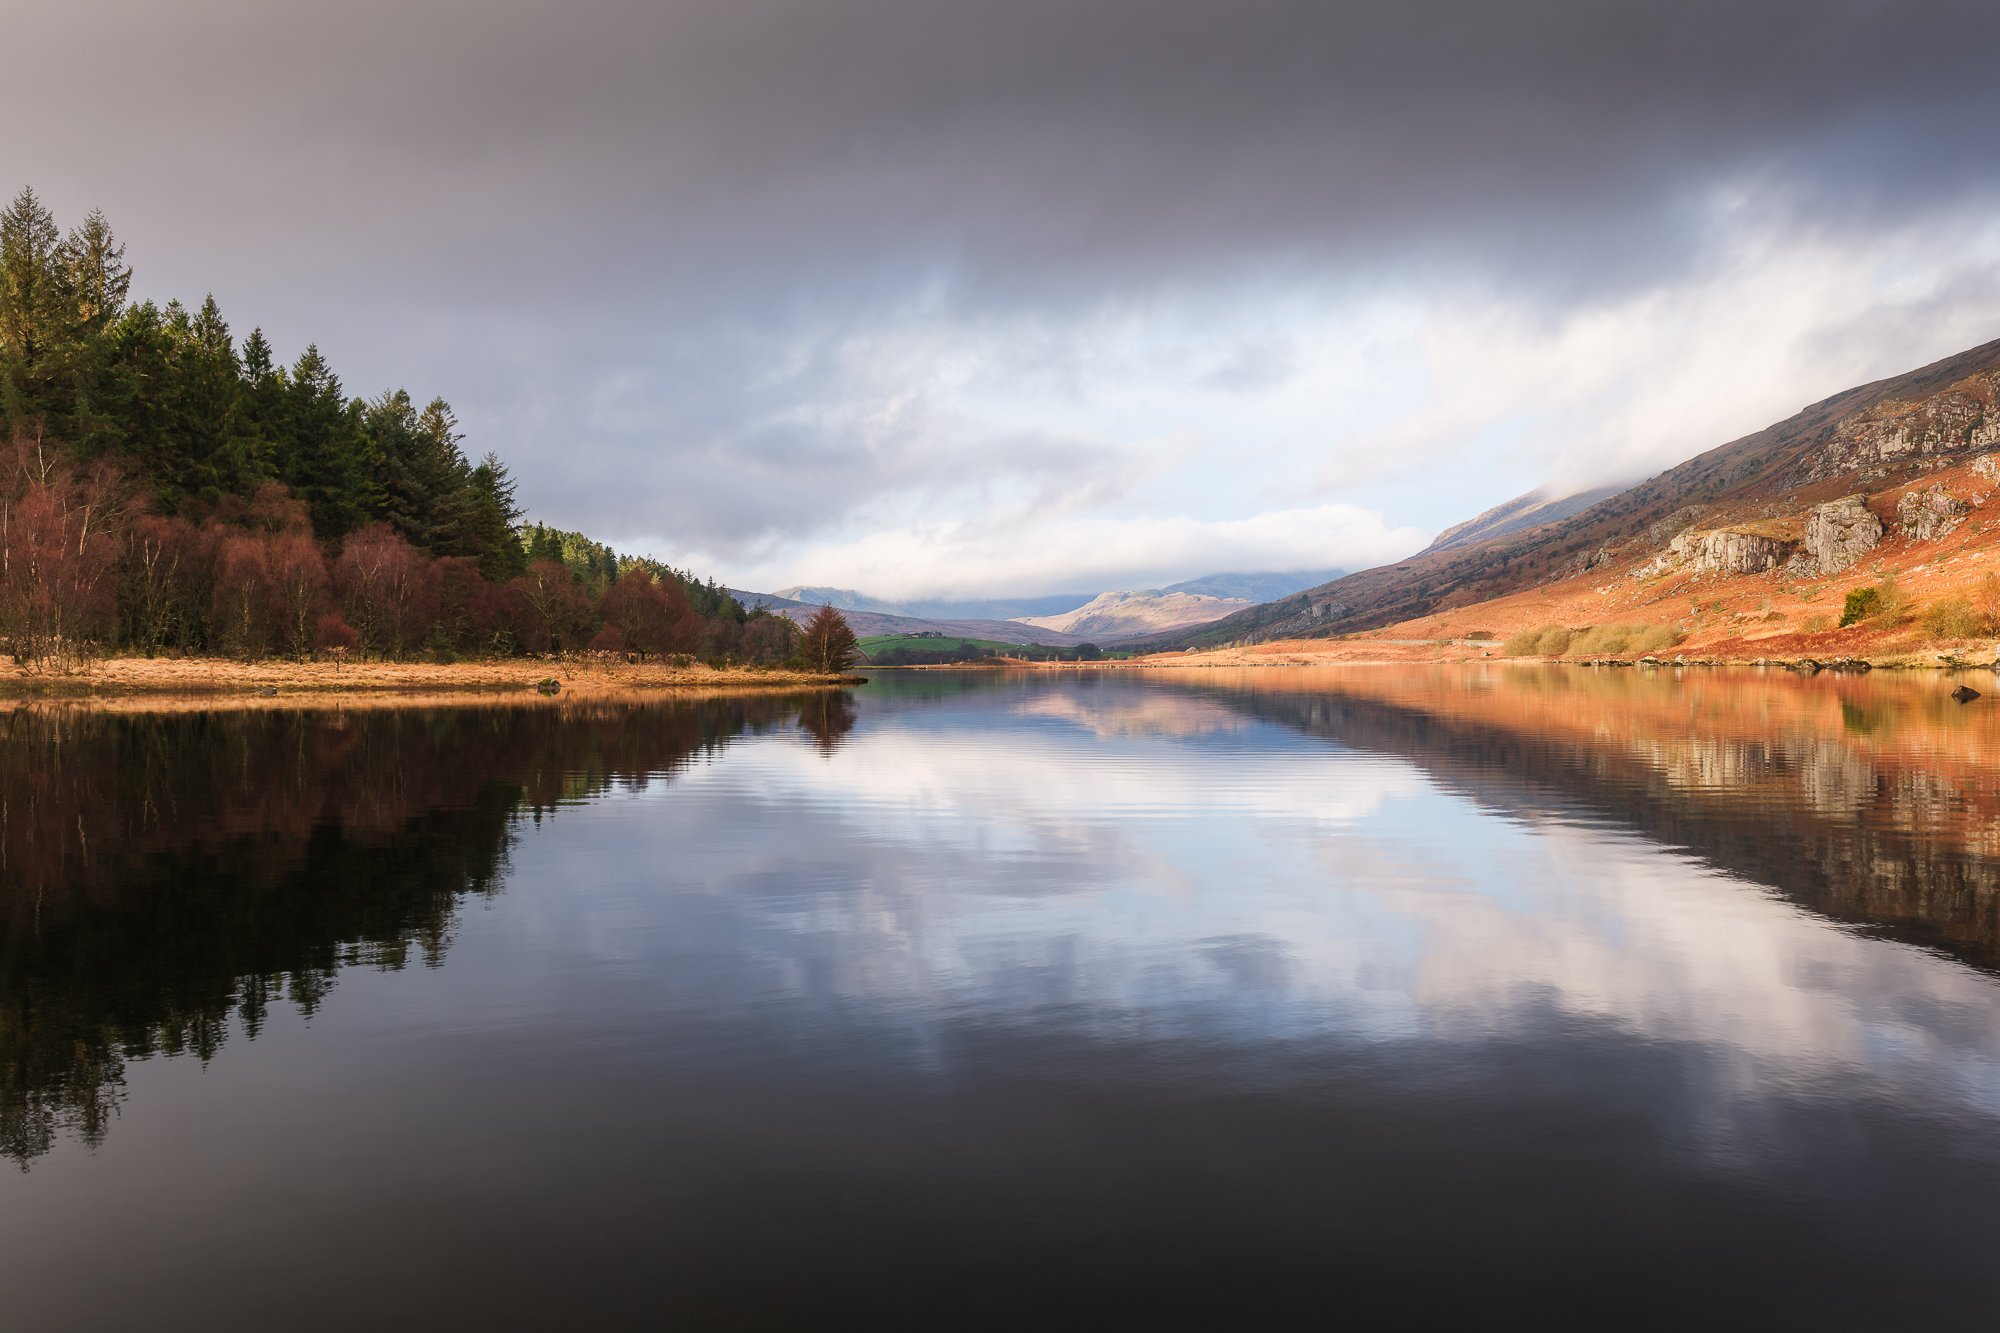
By now, it was getting close to midday and with the sun out, high up in the sky, these were not normally conditions I liked to photograph in. I packed up my gear and set off to find a place to grab a coffee. I didn’t make it far. As I drove towards Capel Curig, I parked up here to spend a few minutes beside Lynnau Mymbyr. I wasn’t particularly hopeful and only intended to stop momentarily to take in the view of the Snowdon Range from across the lake, but as I arrived, I got the feeling there might be a photo or two to be had here after all.
The wind had picked up just a bit, but in between gusts, the ripples settled down and the reflections on the lake were revealed. I started with the XF50-140 telephoto lens and took the slightly wider landscape image shown below. The clouds were hugging the peaks in the distance but above me, there were clear blue skies, and with the light a bit strong for my liking, I took this photo intending to illustrate the view I was witnessing rather than to bag a portfolio-worthy image.
That being said, I do like the photo. The reflections aren’t perfect, but still pretty good and I particularly like how the white clouds mimic the shapes of the mountains underneath. I’m not sure if that’s just a coincidence or if it’s the result of the clouds passing over, following the shape of the mountains.

Fujifilm XT5 | XF50-140mm | 61mm | 1/40th Second | f/11 | ISO125
Zooming into the landscape a little more, I wanted to make more of a feature of the Snowdon peaks and reflections in the water, while at the same time removing some of that blue sky from the frame.
There’s quite a lot going on in this composition, with the diagonal lines, the symmetry created by the reflections and the central positioning of the mountain peaks.
While composing the image, I felt a square crop worked best as it helped balance these elements better. With a wider, landscape aspect ratio, it was too heavy on the right of the frame and going with the square helped me to eliminate parts of the scene I either found distracting or didn’t add anything to the overall image.
Given the time of day this photo was taken, I’m surprised how much I like it, as I wouldn’t typically consider getting the camera out in the middle of the day with the sun so high in the sky, casting such strong light on the landscape. I guess it proves that if you keep an open mind, there is always an opportunity for a photo, regardless of the conditions.
Fujifilm XT5 | XF50-140mm | 80mm | 1/40th Second | f/11 | ISO125
Photographing Yr Wyddfa
With Snowdon’s peak appearing now and then from behind the clouds, I mounted my 70-300mm lens onto the camera and zoomed right in to get a detailed photo of this much-loved mountain. Having to punch through so much atmosphere between my camera and subject, there was a lot of haze and the scene lacked clarity, so I used my CPL filter which helped bring some of the definition back.
I waited patiently, ready to press the shutter the moment Snowdon reappeared into view and after a few minutes, I got a brief glimpse and fired the shutter. As fast as Snowdon revealed itself, it was gone again and with so much cloud lingering above the mountains, there was no telling when it might reappear. No matter, I had the photo I wanted and after editing it back in Lightroom, It’s now one of my favourite photos of the entire trip.

Fujifilm XT5 | XF70-300mm | 300mm | 1/100th Second | f/11 | ISO125
There is so much detail in the photo. The XF70-300mm is not considered one of Fujifilm’s high-end lenses but it certainly delivered for me. The photo was nice and sharp and to get a real sense of the detail I was able to capture, I’ve also posted a cropped version of the same image below. The original is around 40 megapixels, and the one below has been cropped to around 6 megapixels.

Fujifilm XT5 | XF70-300mm | 300mm (significant crop) | 1/100th Second | f/11 | ISO125
How cool does that look? The detail is amazing! You can see the tiny figures of people who have climbed Snowdon and are now lining up to have their moment standing on its famous summit. It is bonkers what I can photograph with a range of 10mm to 300mm on the Fujifilm’s cropped sensor.
That’s it for part one of this on-location blog post. You can read part two by clicking on the thumbnail here to read how I got on during the second half of my trip.


Working The Light | My Photo Bookshelf
Published in 2006, Working the Light provides an invaluable insight into the thinking of three of the UK’s leading landscape photographers.
Alongside newly published books, I also enjoy picking up older, usually second-hand photography books. I like to look back and enjoy the earlier work of my favourite photographers and read about their approach to photography back in the day. Working the Light was first published in 2006 and features three of the UK’s most well-known landscape photographers; Joe Cornish, David Ward and Charlie Waite. I bought this book to feel inspired, to learn from their critiques, and to find out how they went about taking photos almost two decades ago.
Author’s synopsis
Working the Light offers readers a unique chance to participate in a masterclass with three of Britain’s leading practitioners and teachers of landscape photography. Alongside a portfolio of their latest work, Charlie Waite, Joe Cornish and David Ward write about the genre for which they are best known: how they came to it, what inspires them, their current projects and the directions in which they see their work developing - for example, what role might digital play for any of these lovers of film?
Each of the three section of the book explores the theme of ‘working the light’ - surely the most critical and challenging aspect of landscape photography - with Joe Cornish writing about Wilderness Landscapes, Charlie Waite discussing Inhabited Landscapes and David Ward concentrating on inner landscapes.

Each section also contains a Gallery Workshop in which the trio critique images submitted by clients of the renowned travel company Light & Land, offering the kind of constructive comment and positive advice that one would normally only expect to get in the field.
Working the Light gives its readers a real sense of taking part in a location workshop with Waite, Cornish or Ward while also preserving their wisdom in permanent form that can be referred to in the future. Follow-up volumes are already planned, with the next in the series looking to explore the concept of Developing Vision and Style.
My thoughts about the book
It’s an interesting concept and one I like quite a lot. The book is made up of three chapters, each dedicated to one of the three aforementioned masters of their craft and each focused on a sub-genre of landscape photography. Within each chapter, you are taken on a bit of a journey, starting with a collection of photos and writing from each photographer, followed by a gallery of images submitted by previous clients of the Light & Land workshops and at the end of each chapter, Joe, David and Charlie offer their thoughts on those photos.
What I like the most about the book is that it’s not just about showing successful photos, but the three photographers also share what they consider unsuccessful images and write about how they might have been improved. This is important, as it teaches us that even those we consider the pinnacle of landscape photography are always learning and still need to work hard on their craft to take the best photos possible.
This book includes some thought-provoking quotes and useful tips for taking better images, and the critique offered to the submitted photos is both fair and respectful.
Even based on today’s standards, this book still holds its own and I thoroughly enjoyed reading it, drawing inspiration from the photos shared within.
Book Details
Hardcover
Size: 260mm x 234mm
Pages: 160
Availability at the time of writing: Unavailable from the usual UK booksellers. Consider buying a used copy.

Tips for Photographing the Woodland in Spring
In this article, I share some of my favourite tips for photographing the woodland in spring.
I think I’m starting to sound like a scratched record as I’ve said it so many times over the last few weeks, but I’ll say it one more time; thank goodness winter is coming to an end! It has been the worst winter for woodland photography since I first started to point my lens towards the trees. I prefer calm, relaxed conditions when I photograph the woodland and the high winds and relentless rain has meant I’ve lacked the motivation to pick up my camera and head to the woodlands over the last couple of months. Now winter is finally coming to an end and with spring just around the corner, I’m now looking forward and planning for another season of fresh green leaves and colourful carpets of woodland flowers.
So, in a bid to share some of the lessons I’ve learned over the last few years, I’ve listed a few tips that I feel can help anyone trying to get the most from their springtime woodland photography.

Get to know the woodland you plan to photograph
Starting with the big one. Scouting! This, in my opinion, is the most important thing any photographer can do when looking to photograph a spring woodland. Knowing where those colourful wildflowers will appear and having some compositions in mind means that when the time comes and conditions are right, you can head to the woodland prepared with some ideas as to what to photograph.
It’s worth noting that when all the fresh flowers and leaves appear, the woodland transforms and can look very different compared to its lifeless, wintry self. So, although it’s great to head into the woodland with some previously scouted compositions in mind, be prepared to change things up if the shot you planned is no longer on.
2. Be prepared to revisit your chosen woodlands
The thing about the woodland in spring is that it’s not always easy to tell when the colour will appear. It can happen in just a matter of days. So, when you’ve found the areas of woodland you plan to focus your attention on, be prepared to revisit a few times so you catch the growth at the perfect time. For this reason, it’s also worth thinking about trying to find local woodlands to photograph, that way you can keep a closer eye on how things are progressing.
Below are three photos of the same scene spanning just two weeks. Look how fast the woodland bloomed into life.


3. Embrace the woodland’s natural disorder
When I first started woodland photography, the number one springtime photo I wanted to take was the iconic uncluttered carpet of bluebells surrounding a bunch of perfectly straight beach trees. For some, it’s the holy grail of springtime woodland photography. Fast forward a few years, and as my woodland photography has progressed, I’ve learned to embrace the clutter and am now much happier seeking compositional order in a natural disorder. I am immeasurably more satisfied when I find a composition I like after working harder on the arrangement.

4. Learn to spot the telltale signs of a misty morning
Like 99% of all other woodland photographers, I love a misty woodland. Along with removing distracting backgrounds and defusing the light, having mist or fog while photographing the woodland can add atmosphere and a sense of mystery to the images.
Although it is never foolproof, it helps if you can identify the telltale signs of a foggy morning when checking your favourite weather app the night before a shoot. In a nutshell, the chances of encountering a misty forest significantly increase when there is little or no wind, humidity is in the high 90s, and the dew point matches the temperature. The weather being the weather means that even when all the signs are there, it doesn’t always work out the way you plan.

5. No mist, no problem
The thing about foggy or misty conditions is that even when all the signs are there, more often than not, it doesn’t happen. So, my advice to anyone photographing woodland is to embrace the woodland whatever the conditions.
Misty mornings aside, my ideal conditions for photographing woodland is in soft, defused light. Personally, I struggle when the light is strong and direct but the great thing about living in the UK is that there are plenty of cloudy days and even when the sun is out, it typically won’t be long before a cloud floats in and tempers the harsh light.
Another challenge when photographing woodland is that it can be quite dark and if there is any sky visible between the trees, it will likely be the brightest thing in the shot and appear very distracting. In foggy conditions, this is less of a problem as the light will be defused but when it’s clear, I will typically find a composition without any sky, using the thicker foliage or the undulations in the landscape as a backdrop to the image.
6. Use a polarising filter to give the colours a bit of punch
If like me, you enjoy photographing the woodland early in the morning or in damp, rainy conditions, you will almost certainly come across wet, reflective leaves in your scene. Reflective light can be very distracting in your woodland photos. This is where a circular polarising filter (CPL) can come to the rescue. A CPL filter works by blocking the reflective light from entering your lens, which means less glare and more punchy colours in your woodland images. This effect is practically impossible to replicate when processing your photos back at the computer, so, to get the very best quality pictures in these conditions, it’s definitely worth mounting a CPL onto the end of your lens.
Just a word of caution. A common mistake many photographers make is to automatically turn the CPL all the way; removing all reflective light from the image. This can result in flat, highly saturated pictures. My advice is to rotate the filter back and forth until there is a good balance between eliminating the distracting reflections and retaining some of the life in the scene. Taking it one step further, photograph the scene with and without the filter mounted so you can choose the picture you like best later.
7. Photograph the small scenes
When the woodland comes alive with new growth in spring, there can be an abundance of smaller scenes to photograph and one thing I’ve been trying to do more often is to get much closer and photograph the finer details. With so much texture and patterns on offer, once you get the camera up close to these smaller scenes, you will be able to tap into a wealth of photographic opportunities and although getting down that low can often be a little tough on the back, by slowing down and taking your time to compose the image properly, you will undoubtedly capture some beautiful, intimate woodland photos.
At the time of writing, I don’t own a macro lens as I don’t want to carry yet another piece of camera gear. Instead, I invested just a few pounds in a set of extension tubes which I mount between my camera and the lens. These allow me to focus much closer for a fraction of the price (they cost me about £30). Extension tubes may not be as good as a high-quality macro lens, and you typically lose a stop of light when using them, but they are the next best thing in my opinion and incredibly handy for the odd occasion where you want to get a little closer to your subject.

8. Embrace the vibrant greens
Photographing the plethora of beautiful colours can be a wonderful experience, however as quickly as they appear, they will be gone again, and you will be left with an abundance of vibrant green tones across the woodland. I love to include those fresh leaves in my images, but having a single colour across the entire frame can result in an image that lacks interest or dynamism. One approach I take to make more interesting photos is to use the strong lines created by the trees to break up the colour and add structure to the composition. This is the approach I took for the photos below and they remain some of my favourite springtime woodland photos I’ve taken.


9. Leave no trace
Over the last few years, so many people have rediscovered the beauty of their local woodlands, and I love to promote the benefits of woodland photography, but all this footfall is having a big impact on these important natural spaces. That’s why, through effective education and following a few simple principles, these popular places can still be visited and enjoyed, but remain protected for future generations to experience.
Our actions directly impact these natural spaces, and one key example is the English Bluebell. Bluebells are a protected species in the UK and picking or digging them up is illegal, but not many people know just how fragile they are. Bluebells can take years to recover from the damage caused by people trampling over them just to take a selfie, and if their leaves are crushed, they can be weakened (as they can no longer photosynthesis). This can all be avoided if everyone sticks to the woodland pathways.
Nature First is just one of many organisations trying to help us woodland photographers to keep these natural spaces safe and they have a few simple principles to follow. By doing so, we can all do our part to preserve our beautiful woodlands.
Prioritize the well-being of nature over photography.
Educate yourself about the places you photograph.
Reflect on the possible impact of your actions.
Use discretion if sharing locations.
Know and follow rules and regulations.
Always follow Leave No Trace principles and strive to leave places better than you found them.
Actively promote and educate others about these principles.

I hope you found that somewhat useful and if you’re looking for some more woodland photography-related articles to read, check out these three I’ve posted below.


Until next time.
Trevor

My Camera Gear for Landscape Photography in 2024
This post provides a look inside my camera bag and lists the gear I use for landscape photography in 2024.
Does camera gear really matter when taking landscape photos? Well, this may seem somewhat controversial to some, but yeah, I actually think it does. Sure, it’s not the be-all and end-all when it comes to taking photos, as most modern cameras are pretty decent at that, but I believe a camera and lens system is a subjective choice based on the photographer’s specific needs and priorities. Being happy with the size, weight, ergonomics, functionality, menu system, lens choices and features is, in my opinion, very important as it can remove much of the friction from the picture-taking process, leaving the photographer to focus on the creative side of photography.
I’ve been using Fujifilm’s X series for around 8 years now and am still very happy with the choice I made way back in 2016. Having used the system for so long, I know the camera inside out and love the fact that while out in the field, I can manage all my settings without going near a menu. That and the balance between size, weight and features means that this system still works best for me.
Here’s a rundown of the photography gear I use when out taking landscape photos in 2024.
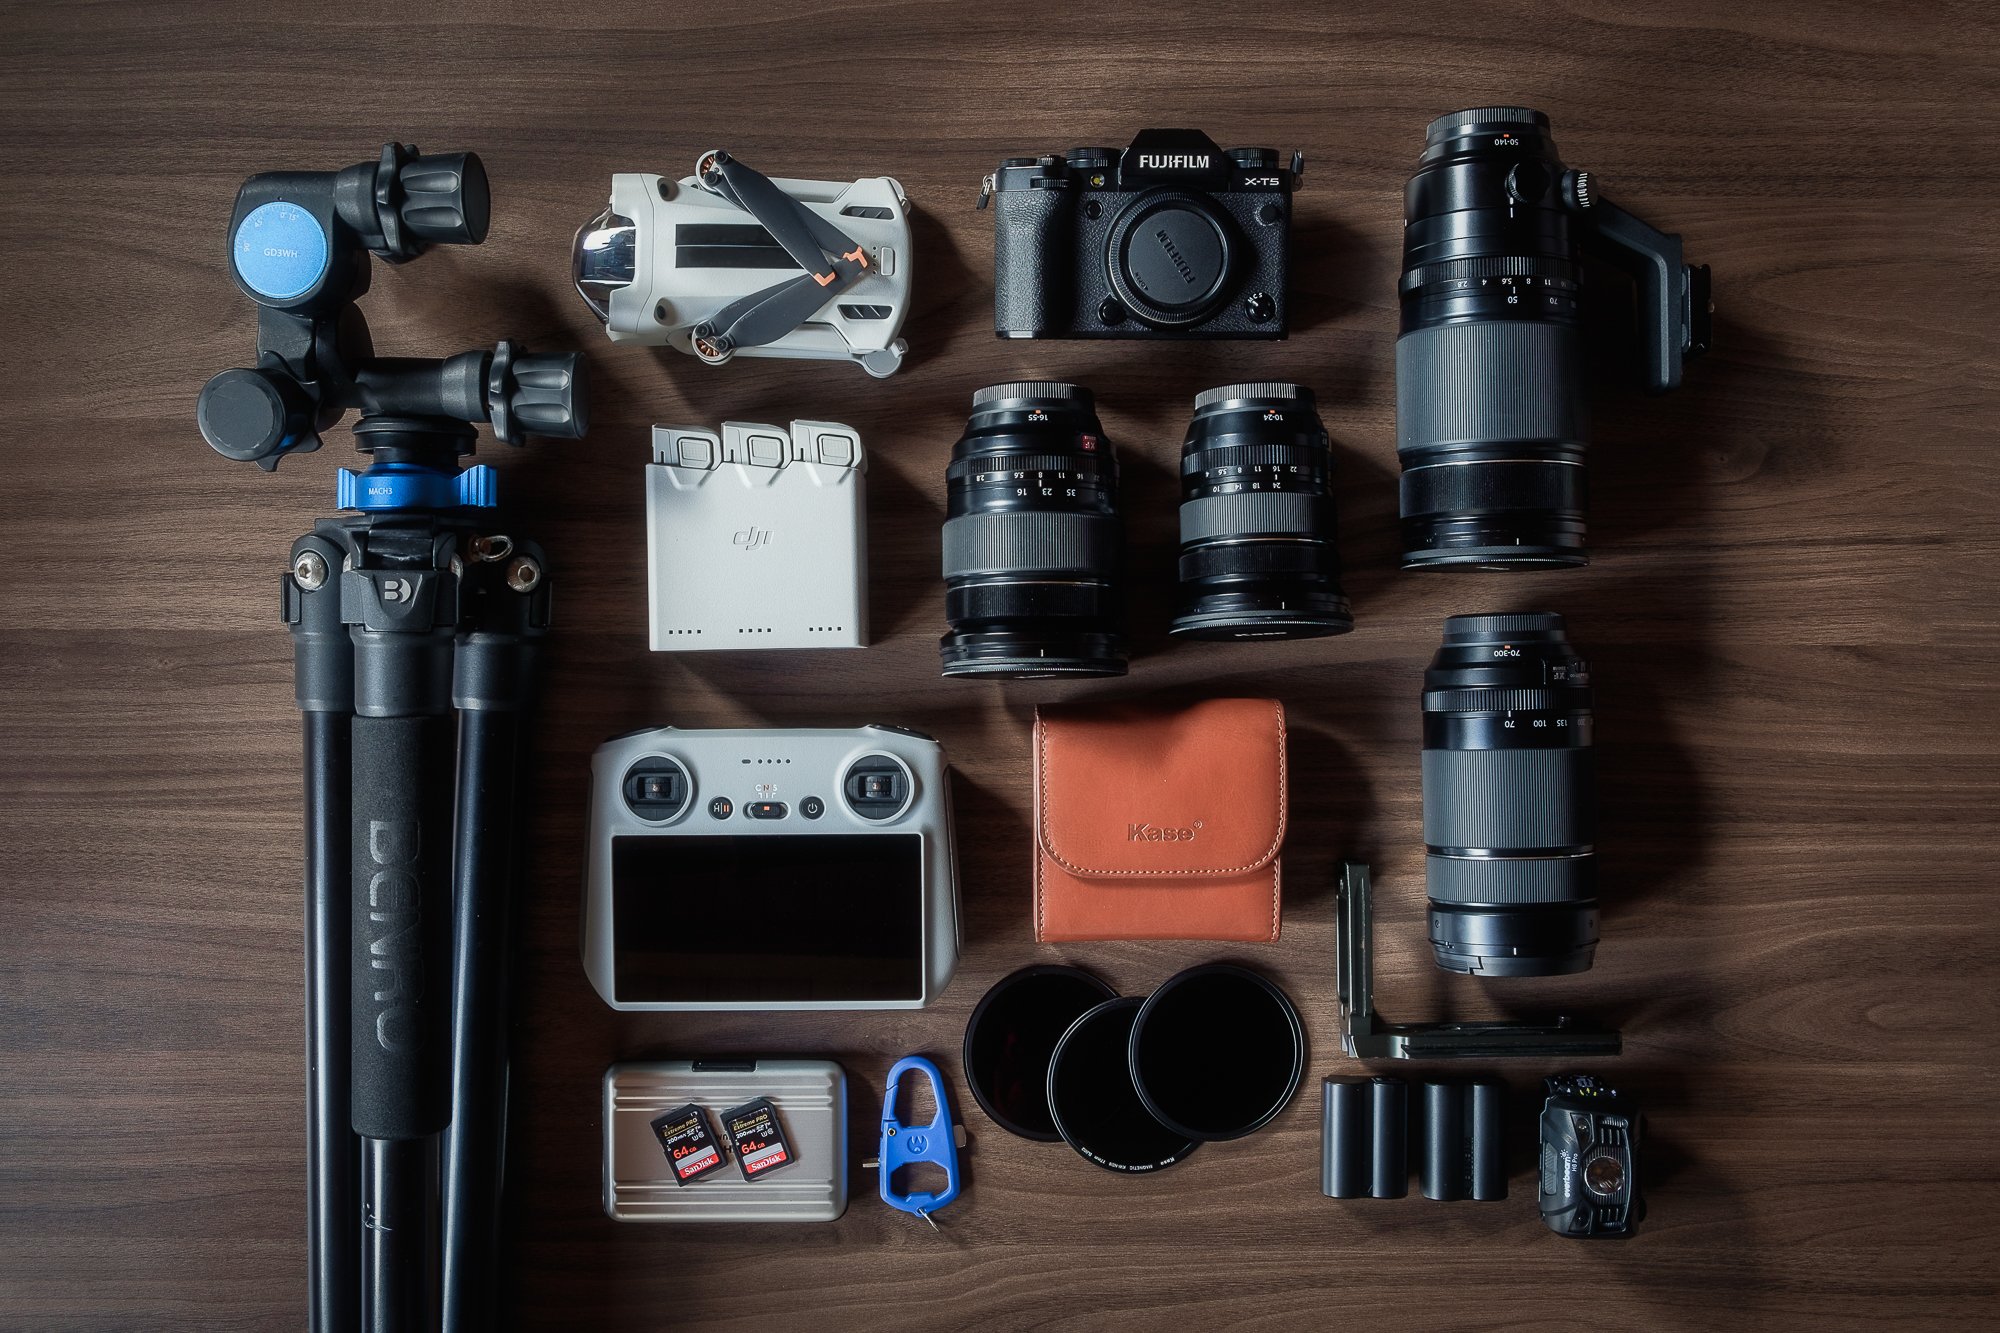
My landscape photography gear
Fujifilm Camera and Lenses
XT5 camera: With a weather-resistant shell, dual card slots, 40 megapixels and tons of other useful features, this is a great camera for landscape photography. If you want to read more about how well the camera performs from a landscape photographer’s perspective, you can read my review of it here.
XF16-55 F2.8 standard zoom lens: Although I still have the very capable XF18-55mm, in 2022, I decided to upgrade to the XF16-55 F2.8 as I wanted all my main landscape gear to be weather sealed. The improved optics is a nice bonus, but the extra weight most certainly isn’t.
XF50-140mm F2.8 telephoto lens: For the same reasons I upgraded my standard zoom, I also traded in my XF55-200mm lens for the even heavier but weather-sealed XF50-140 F2.8.
XF10-24mm IOS WR wide-angle lens: New to 2024 is this wide-angle lens. I used to own the original non-weather-sealed version but decided to sell it as I wasn’t using it often enough, but in 2023, I felt not having the ability to go as wide as 10mm limiting in certain situations and with the release of the newer, weather-sealed version of the 10-24mm lens, I decided to buy it once again.
XF70-300mm IOS WR telephoto lens: Like with the wide-angle lens, I felt at times when out in the landscape, the 50-140mm lens lacked the extra reach I needed. So, instead of buying a teleconverter as I had originally planned, I opted for the 70-300mm instead. I’ve not had this lens too long, so the jury is still out but after using it just a few times, so far so good.
DJI Mini 3 Pro drone
In 2022, after what seemed like an eternity of indecision, I finally took the plunge and purchased my first drone. For a few reasons, I opted for the DJI Mini 3 Pro. Having owned it for a while now, and given most of the blogs and YouTube videos out there talk about the video side of things, I wrote a few blog posts about using the DJI Mini 3 Pro specifically for landscape photography.

DJI Mini 3 Pro | A Landscape Photographer’s Review

DJI Mini 3 Pro Camera Settings for Landscape Photography

How I Process My Landscape Photos Taken with the DJI Mini 3 Pro
Filters and accessories
Kase Wolverine magnetic filters: I used to carry larger, square slide-in filters and would spend time fiddling with step-up rings for the different lenses and the holder before being able to slide in the filter I intended to use. That all changed when I got the Kase Wolverine filters. No more fuss! Snap the filter onto the lens and get shooting. In the pouch, I have a CPL, a 3-stop, 6-stop and 10-stop filter. I wrote more about my experiences with these filters in a previous blog post here: Kase Magnetic Filters | A Landscape Photographers Review.
Benro Mach3 TMA37AL tripod: After using my previous tripod for several years, I was after something a little sturdier and a little taller without relying on a less stable centre column. After much research and getting a few recommendations, I eventually opted for the Benro Mach3TMA37AL.
Benro Gd3Wh geared tripod head: For years I’d been happy to use a ball head on my tripod but when I started taking woodland photos, the lack of precision and having to compensate for further movement while making small adjustments with the tripod head began to frustrate me a lot. I invested in this Benro geared head and although it has a bit more bulk, it has solved this problem for me completely.
Spare batteries: The Fujifilm NP-W235 used in the XT4 and XT5 is so much better than the last generation of batteries and I can shoot for much longer on a single charge.
Memory cards: You can’t have too many memory cards. I still prefer to use Sandisk as they have been bulletproof for me so far, but I know there are other brands, just as capable out there.
3 Legged Thing L-bracket: Used to quickly switch from landscape to portrait orientation when using my tripod.
3 Legged Thing Toolz: A handy tool to tighten tripod legs, remove L-brackets, etc.
Headtorch: Not much to say about this one, other than it is bright, light, waterproof and rechargeable. It cost about £15 and lights my path on those dark treks before or after a shoot.
Camera Bag
If you don’t own a load of camera bags, can you even call yourself a landscape photographer? Jokes aside, I’m still using the Vanguard VEO Active 46 as my primary means to carry my landscape photography gear around. For the features I wanted, the size, weight and price, it ticks all the boxes for me.


Going forward, I have half an eye on what Fujifilm plan for the X-T30 II replacement in 2024 as I may decide to buy a backup camera. I’m also contemplating the XF16-80mm F4 lens to complement the XF70-300mm and use them both for trips where I need to keep my camera bag weight down.
As with all my blog posts, if you have any comments or questions, feel free to drop a comment below.
Until next time.
Trevor

Walking a Winter Woods
A collection of woodland photos I took while on a walk through the forest during a brief interlude in a period of relentless wet and windy weather.
What a wet and windy winter it’s been for us here in the southeast of England. Minimal frost, no snow at all and what seemed to be day after day of high winds and rain. Another example of global warming or just a milder winter? Probably both, but for someone who enjoys mild, uneventful conditions to photograph woodland, it means I’ve spent very little time photographing my local forest recently. Sure, I miss it, but on the bright side, it means I have spent a bit more time in London, photographing the cityscape and working on my Timeless City project. So, not too bad really. That’s the good thing about having more than one photographic interest; when conditions aren’t ideal for one subject, I can still find something to photograph that interests me. I may not like photographing the woodland in high winds and rain, but I’m happy to put a raincoat on and take some moody urban cityscapes in London.
Between the long periods of inclement weather, there has (thankfully) been one or two brief interludes where the weather has been calm with conditions more to my liking, and just one or two coincided with my availability to head out into the forest with my camera. So, in the spirit of publishing more pictures from my adventures and avoiding those pesky social media algorithms, here’s a new bite-sized, on-location blog post featuring some of the photos I took on one of those rare winter woodland walks.

Fujifilm XT5 | XF16-55mm | 44mm | 4 Seconds | f/7.1 | ISO125

Fujifilm XT5 | XF16-55mm | 41mm | 3 Seconds | f/7.1 | ISO125
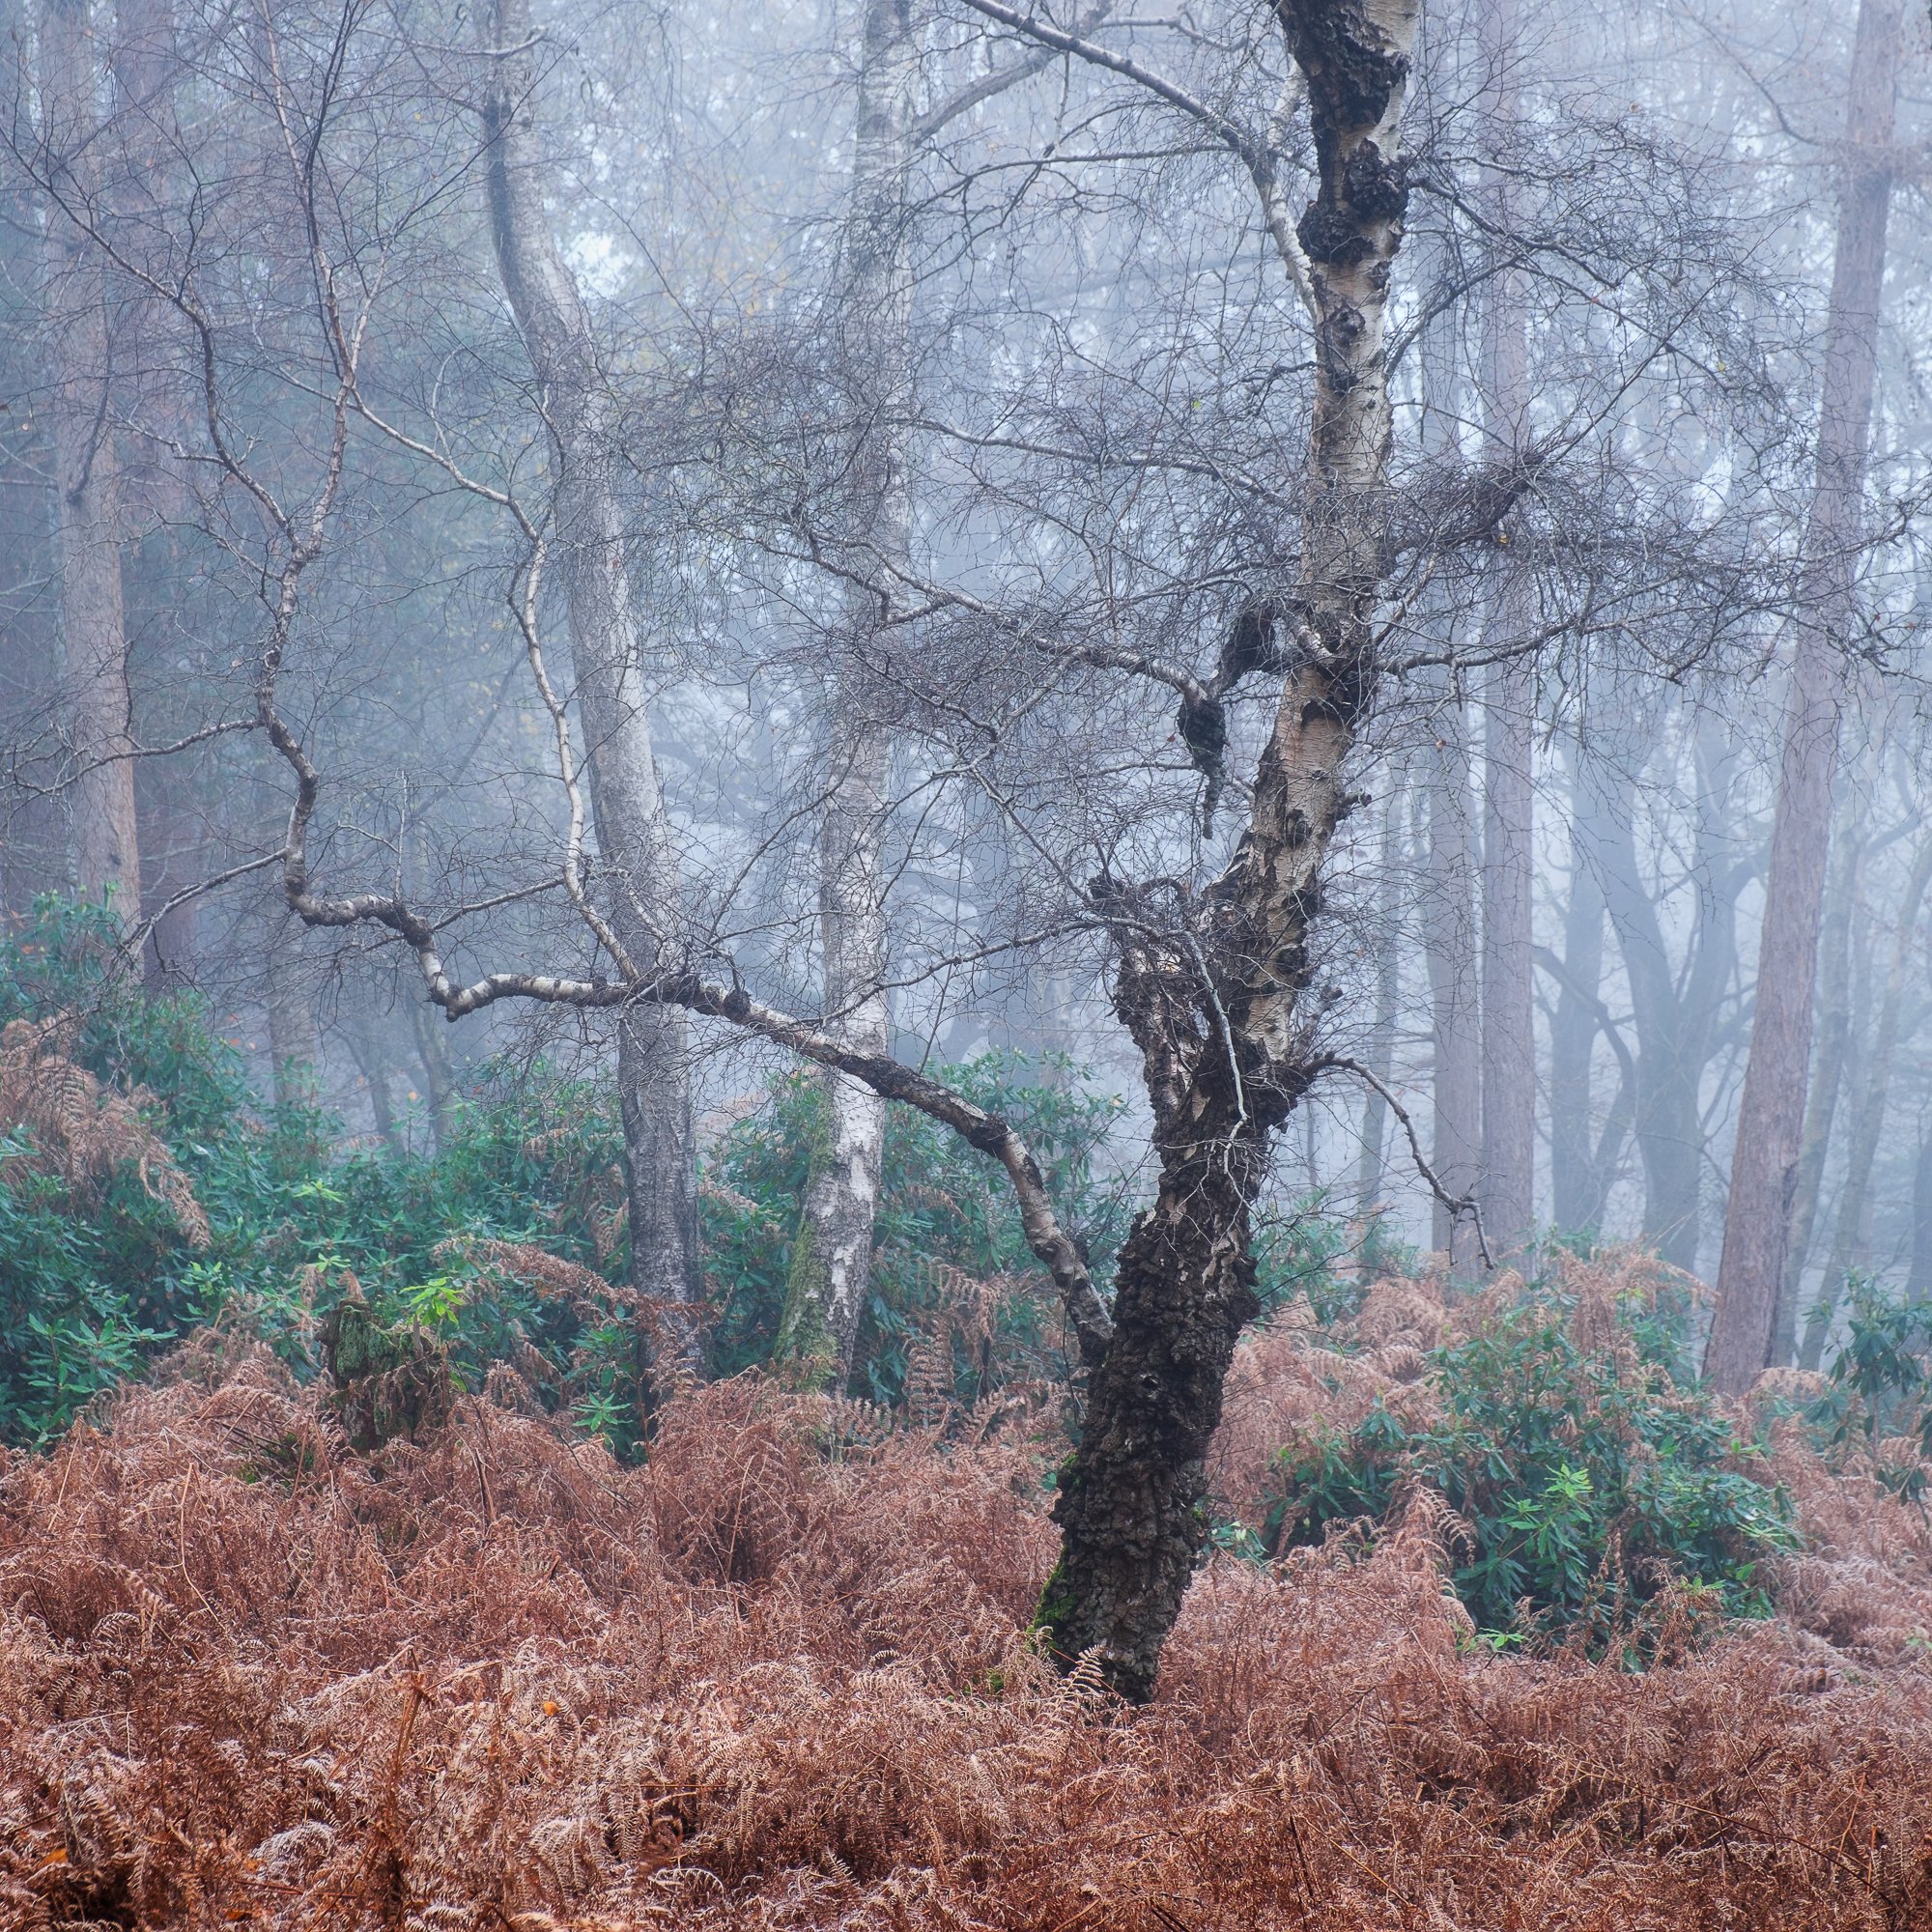
This trip to the forest took place in December last year, a time when the last of the autumn leaves were just about clinging on. It was cold, misty and frost was underfoot outside the woodland on the open heath. The first two compositions above were quite new to me, only spotted in the weeks leading up to this morning and with the arrangement, the soft defused light and uncluttered background, I think they work well in these conditions.
No trip to this part of the forest would be complete without a visit to an old friend or two. So, while exploring the forest, I wandered over to this woodland character I first met in the spring. I love the way the tree seems to be posing for the photo, anthropomorphically spreading its arms wide towards the camera in readiness to have its picture taken.

Fujifilm XT5 | XF16-55mm | 26mm | 1/2 Second | f/7.1 | ISO125

Fujifilm XT5 | XF16-55mm | 49mm | 0.8 Seconds | f/7.1 | ISO125
Fujifilm XT5 | XF16-55mm | 55mm | 0.8 Seconds | f/7.1 | ISO125
You may have noticed most of the photos in this article are square and that’s because, over the last 12-18 months, I’ve become a little obsessed with using this aspect ratio. Truth be told, I’m still working out the finer details as to why this is as it has been more of an instinctive change in my compositional approach to my landscape, woodland and cityscape photography. I touch on this a little in my recent Timeless City introductory post, but when I’ve given it a bit more thought, I plan to write about it in a future article, so if that’s of any interest to you, do keep an eye out for it.

Fujifilm XT5 | XF16-55mm | 55mm | 0.6 Seconds | f/7.1 | ISO125

Fujifilm XT5 | XF16-55mm | 21mm | 1.2 Second | f/9 | ISO125
Finishing off my woodland walk, I started to walk back to the car park, stopping off briefly to take this photo below of a young, frosty birch sapling. Ordinarily, it’s a bit of a messy composition, but the subdued tones and misty background help keep the focus on the tree. Along with the subject, I like the colour pallet in the scene, particularly the frosty orange leaves and ferns set against the cooler ice and mist. A pleasant photo in my opinion.

Fujifilm XT5 | XF16-55mm | 28mm | 1/10th Second | f/9 | ISO125
At the time of writing, spring is fast approaching, so unless we get a late flurry of frosty weather here in the south of England, the next on-location woodland blog post will be jam-packed with lush spring greens, flowery meadows, surrounded by mist and basking in soft, defused light.
Well, we must remain optimistic, right?
Until next time.
Trevor
A Year Amongst Trees by Brad Carr | My Photo Bookshelf
As the title suggests, A Year Amongst Trees by Brad Carr is the result of a 12-month project, photographing his local woodland.
Towards the back end of 2022, I was listening to a Biblioscapes episode featuring Brad Carr as he talked about his photobook featuring woodland photos he took over the course of a year back in 2021. He spoke about the project and his love for the woodland with so much genuine enthusiasm, I immediately went online and added his book to my collection.
Author’s Synopsis
This zine contains a collection of photographs from my 2021 portfolio and tells the story of a year which changed me as a photographer and human. Featuring a series of short stories, a poem that I felt inspired to write whilst out in nature, a little insight into why I create and where my love of the woodland was born.
There are stories to be told everywhere out there in nature. I hope that this zine inspires you to get out there and tell your own.

My thoughts about the book
When I picked this zine up for the first time, my initial impression was how good the soft touch cover felt in the hand. It has a luxurious feel to it, which adds so much to the overall reading experience. The book has a nicely written introduction, with childhood memories and a touching encounter Brad had with his Nan, which inspired much of his photography in 2021.
The book is jam-packed with beautiful woodland photography, and if you’ve followed me for any length of time, you will know that woodland photography is a subject I also have a strong connection with, making the overall reading experience even more special. The photos are overflowing with atmosphere and whether taken in warm, late summer light or on a cold, misty morning, Brad was able to capture that mood in his photos and unleash it via this book for us all to experience.
Alongside some of the photos, Brad included some stories which feature his thoughts about a particular photo or encounters he had while out in the field. There is a raw honesty and vulnerability in these stories and when I finished reading a page, I would find myself pausing, just to let the words sink in before moving on to the next page. This is a testament to how strong of a writer Brad is.
Overall, the book’s layout works well. The images were well-sequenced and flowed nicely with a good text-to-picture ratio. My only (very small and subjective) niggles were twofold. The first, and one I’ve mentioned before is when a picture spans more than one page. I can understand why it’s done, but for photography books, where the image is the main visual element, I find it very distracting. I also found having the paragraphs of text centre justified a little distracting. It may just be me, but it is harder to read, and I feel paragraphs of text should be left-justified. As I said, these are tiny issues.
Photography zines are typically less expensive and with it, carry lower expectations than a larger, more expensive coffee table book, but I think for projects like this and other smaller bodies of work, they are a fantastic way to get your work in the hands of others and should never be considered inferior. In a world where self-publishing has never been so accessible, I would love to see more landscape photographers use the zine format to help get their work printed and out in the world. Maybe I need to start taking my own advice.
Brad has a blog article to accompany his book here. He also has a YouTube channel centred around creativity, photography and nature.
This little book packs a big punch, oozing creativity from both the photos and the written word. If you can, do buy this gem of a woodland photography book.
Book Details
Softcover
Size: 210mm x 148mm
Pages: 52
Availability at the time of writing: In stock and available from Brad Carr’s website https://www.bradcarrphotography.co.uk/books-zines/a-year-amongst-trees-2021-zine.

Sunrise in the City
Photos from a short walk around the London Bridge area with my camera at sunrise.
Continuing my mission to upload more of the photos I take to this website without feeling pressure to write long-form, location-based stories or update my portfolio after every trip, here is another on-location jaunt where I took a stroll with my camera along the Thames at sunrise.
Arriving in the nick of time off the train, I started off just a little west of Tower Bridge on the south side of the river. A composition I’d not yet photographed at this time of day and with the blue hour making way for the pre-sunrise glow, I wasted no time getting the camera out to take the photo. It took a minute or two to fine-tune the composition, making sure Tower Bridge was nicely centred between the lights above and the wall below. With the composition looking as balanced as it could be, I took the photo.
With the help of my ND filter (I forget which one), I opted for a 15-second exposure. This was because there were one or two early morning runners on the walkway and by opening the shutter for 15 seconds, it rendered them invisible in the frame. This is a great tip for when photographing places with people and you want them to magically disappear from the photo.

Fujifilm XT5 | XF16-55mm | 16mm | 15 Seconds | f/9 | ISO125
Talking of quick tips, here’s another for anyone looking to photograph the city with a tripod, particularly in this area between London Bridge and Tower Bridge. Get it done fast! It doesn’t matter if you are the only one out there, the tripod police are always on the hunt, ready to pounce the minute they hear the telltale sound of a tripod leg being extended. That’s exactly what happened as I was taking the photo above. Luckily for me, I know it to be a hot spot for being told off for using a tripod, so I composed the photos, locked in a few settings and only then did I extend the tripod, mount the camera and click the shutter. I had around 3 or 4 minutes of photo-taking joy before the inevitable chap in a reflective jacket headed my way.
To be fair, whether you agree or not (obviously I do not), it’s private property and those are the rules. If the security guards come and ask me to put the tripod away, I know they are just doing their job and are usually polite enough. Deep down, they probably don’t see what the big deal is either, but I don’t cause a fuss and just pack up and move on. I can always return another time.

Fujifilm XT5 | XF16-55mm | 16mm | 2.5 Seconds | f/13 | ISO125
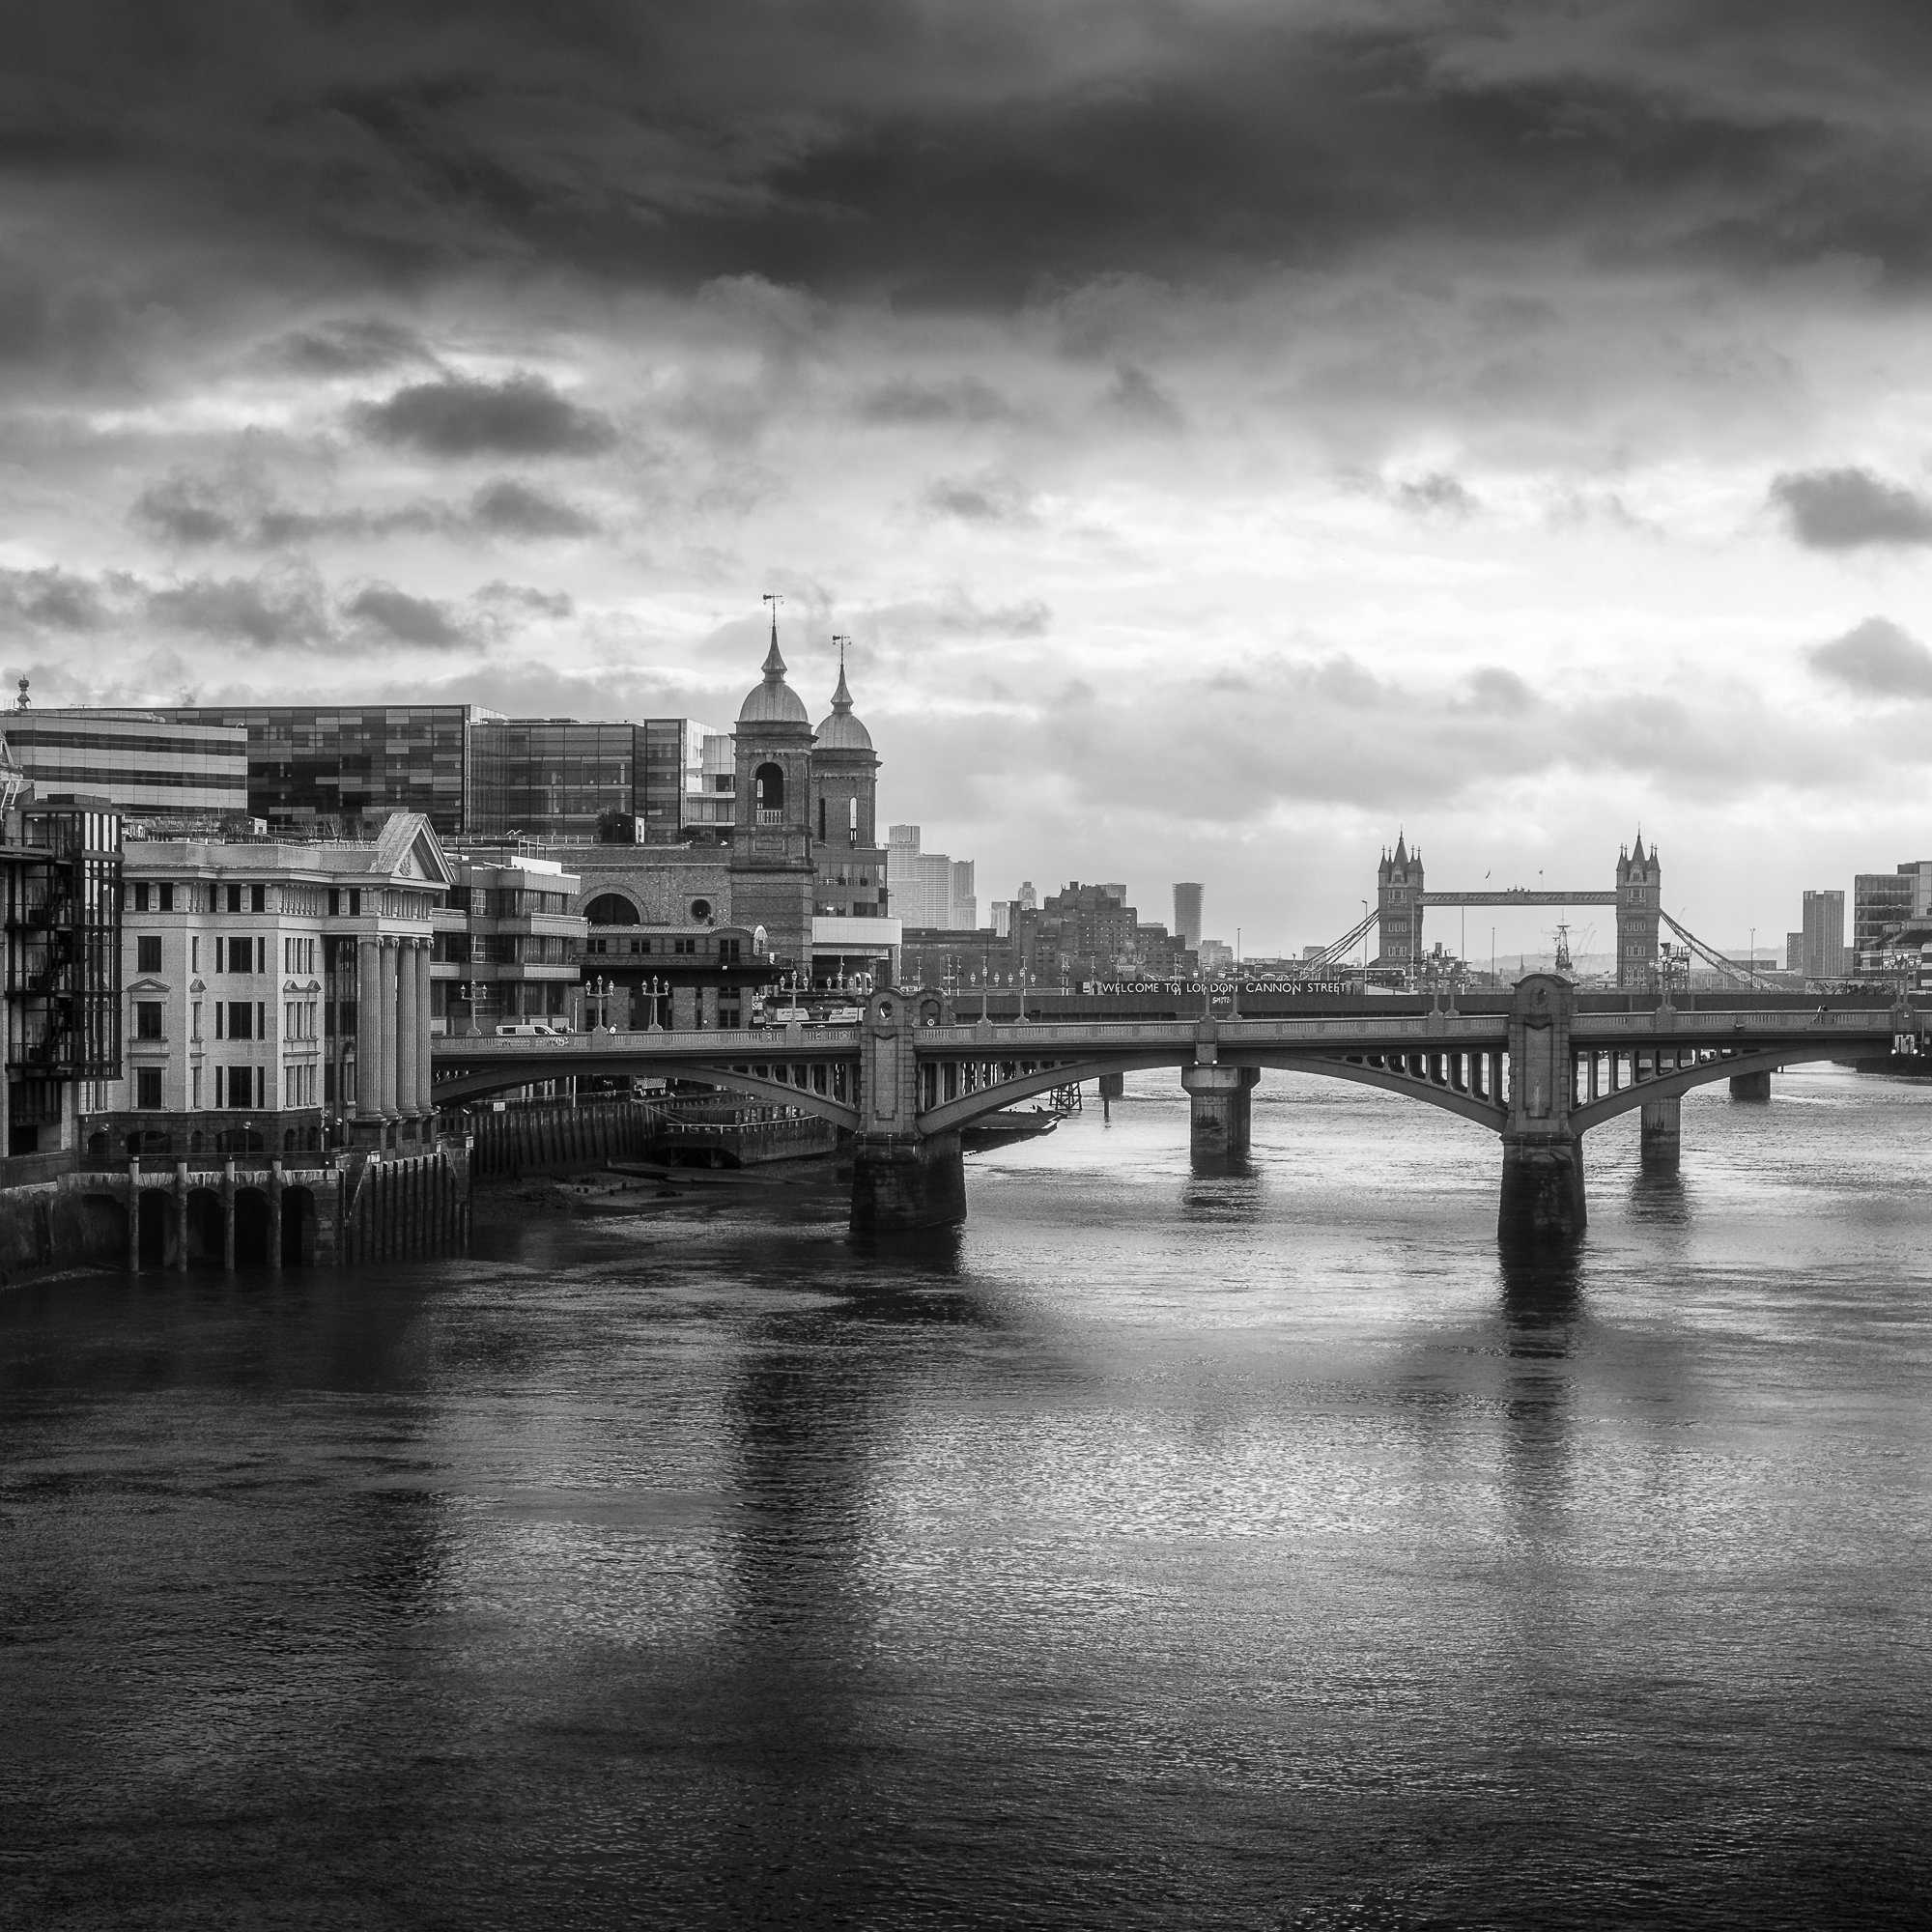
Moving on and with a little pre-sunrise magenta still lingering in the sky, I stopped by a spot I’ve photographed many times featuring this view of HMS Belfast with Tower Bridge and the Tower of London visible in the background.
The photo above is probably my favourite I’ve taken at this location. I love a blue-hour cityscape, but the pink light hitting the clouds and reflecting on the water added something extra to this image.
After taking in the last of that pre-sunrise colour, some thicker cloud passed through taking all the nice light and colour with it. I decided to hang around for a while and wait for the cloud to move, with the hope that some golden morning light might still make it through. As you can see by the photos below, that’s exactly what happened.

Fujifilm XT5 | XF10-24mm | 14mm | 1/80th Second | f/10 | ISO125

Fujifilm XT5 | XF10-24mm | 10mm | 1.3 Seconds | f/10 | ISO125

Fujifilm XT5 | XF16-55mm | 16mm | 1/1000th Second | f/6.4 | ISO125
The photo above of HMS Belfast using the railings and roof to create a framed composition is one I haven’t personally seen before and although it’s probably been taken a thousand times before, it was new to me. Finding previously unseen compositions of London’s cityscape is always difficult and on the rare occasions it does happen, it always gives me a buzz.
With the light getting increasingly stronger and more contrast appearing in the scene, I started to take photos to process them for my Timeless City project. While editing these as black-and-white photos back in post-production, I couldn’t ignore how good they looked in all that glorious golden light, so I also decided to process them in colour.

Fujifilm XT5 | XF16-55mm | 16mm | 1/1000th Second | f/6.4 | ISO125
Walking across London Bridge, I took a few photos looking east along the Thames, directly towards Tower Bridge and the rising sun. The dynamic range in the scene was through the roof, and I had to let go of some of the cloud details in the brightest areas around the sun to preserve some of the shadow details in the scene.
Even though this is a well-photographed view, taking the photos in these conditions, in this light and processing them my way makes them unique to me.

Fujifilm XT5 | XF10-24mm | 10mm | 1/40th Second | f/11 | ISO125
While the sun rose higher into the sky, I made my way to the opposite side of the river to get a view of The Shard across the water and take my final photo of the morning.

Back of the camera shot with an iPhone
This composition from between two buildings and The Shard in the centre has captured my attention lately and I have visited it a few times to photograph it in different conditions. I have, in my mind’s eye two particular images which I know are possible in the right conditions, so being the person I am, I have returned time and again to take them before I feel I can move on with my life. It’s becoming an obsession!
It may well be the increased use of the square format, but I’ve fallen for the central composition recently, and with lines around the edge of this frame, leading into the centre, towards The Shard, this composition works for me. In this picture, I like the soft light illuminating the city across the river and the natural vignette created by the shadows in the alley.
That’s it for this on-location post. What do you think of these bite-sized blogs? Do you like them and want to see more?
As I mentioned, I like to write them as they enable me to share a few more of my photos without depending on the social media algorithm, and I can display and talk about them in a way that suits me.
If you have any feedback, please do leave a comment or get in touch here.
Until next time.
Trevor

Timeless City | An Introduction
An introduction to my Timeless City project. In this post, I provide a bit of background and answer a few questions such as why I take photos of London, why I chose this style for the photos and what the future might hold for the project.
London is my local city. It’s the closest city to where I grew up, a place I’ve worked for quite a few years and ever since I first picked up a camera and started taking photography more seriously, it’s a city I have spent countless hours photographing.
Why London?
Growing up in the suburbs, I didn’t visit London often as a child, when I did, it was usually a family day out or a school trip to some of the tourist hotspots such as the Tower of London or Trafalgar Square. I remember walking around the city, dwarfed by the buildings around me, in awe of the many different styles of architecture I saw. The hustle and bustle, the noise, and so many people; it was a different world to the one I was used to. This was all decades ago, when there were just a handful of buildings taller than St Paul’s Cathedral and over on the Isle of Dogs stood a solitary One Canada Square. How times have changed.
Fast forward a few years and long before I’d taken up photography, I took a job which involved travelling to London almost every day and getting to know the city much better. My work took me all over London and this is when I first started to build my own, personal connection with the city.

In 2016, photography started to evolve from an occasional hobby, photographing a bit of everything, to the passion it is for me today. After a few years of working closer to home, I was back in London most days and naturally drawn to landscape photography and given the connection I’d already built with the city, it made sense that I would feel more compelled to point my lens at London’s incredible cityscape.
Since then, I’ve spent an untold number of hours across countless visits to the city walking the streets, seeking out new compositions and like all landscape photographers, hoping for perfect conditions in a bid to take that perfect image, knowing full well that such a thing doesn’t exist.
I chose to use “Timeless” in the title because from the subject to processing style, I felt it represented a few of the important ingredients that make up this project.
London as we know it has existed for around 2000 years, from a time when Londinium was the size of Hyde Park to the megacity it is today. Throughout all that time, architectural styles have inevitably evolved, from the medieval Tower of London, English Baroque such as St Paul’s Cathedral through to post-war brutalist and the contemporary 21st-century style with plenty of glass being used today.
London’s iconic cityscape is still represented by all of these architectural styles, and this is why timeless doesn’t mean a city that never changes, embodying just a single point in history. To me, it means a city that represents all times, a place consistently evolving over hundreds of years to a point where all of the significant architectural ages London existed through are represented across its skyline. With both old and new coexisting side by side, I wanted to capture a sense of that in my work.
Although the need to develop and evolve with the times has contributed to London’s ever-changing cityscape, this somewhat mishmash of styles has by no means been solely by design. Through the many turmoils the city has faced, such as the great fire or the blitz, London has been forced to rebuild significant parts of the city over the centuries, and one of the challenges I relish is to seek out ways to represent London in my photography and how it’s many structures stand together side by side in what I can only describe as a chaotic harmony.
The goal here isn’t to produce an “old and new” series of photos and even though most of the photos I take will include more than one architectural style in the frame. The goal is to document London’s cityscape across the entire body of work from high up in the rooftops with views stretching for miles, to closer, more intimate photos where scale can be represented better by including a subject in the composition.

At the time of writing this post, the earliest photo I have included in this project was taken in 2018, which, in the grand scheme of time, isn’t very long at all, but still long enough for many changes to take shape across London’s cityscape between then and now. The rate at which new buildings are being erected, particularly in the financial districts is accelerating and as I continue to take new photos, I will be inadvertently documenting these changes as they happen. If this ends up being a very long-term project, I think it will be good to look back at how the cityscape used to look years before.
Why this aesthetic?
Something important to mention about this work is that it is intended to be more of an artistic project than a documentary one, and every photo is taken with the full intention of being edited in post-production. This will include converting the raw files to black and white (more on that later) and alongside some usual tonal and contrast adjustments, I use plenty of selective dodging and burning to achieve the final look.
I still, however, have my own views about authenticity and how I edit my images. I never swap out the sky and never add something that wasn’t in the scene at the time the picture was taken. I might clone out the odd distraction if I feel it is taking away from the aesthetic, but these are typically transient elements such as rubbish in the foreground, old chewing gum on the pavement or the odd crane in the background. I want the viewer to be confident that if they were standing next to me as the shot was taken, they would have observed the same scene I show in my final image.
Alongside those adjustments, if the dynamic range is too much or I want to illuminate certain moving elements in the scene, I will blend images. I will only do this if there is just a very short time between frames and the camera has not been moved.
Sometimes reality doesn’t quite behave as we want, and we need to find our own limit as to what we are willing to do to get the final image. There is no right or wrong answer here, but I do believe in being upfront and honest about how the photo was created. You should stand by your work and not purposely mislead the viewer.

Getting back to the point about this being more of an artistic project than a “straight out of the camera” documentary, I wanted to give the finished photos a timeless look and feel.
I felt to represent the work as a single body, I had to ensure the final look was as consistent as it could be and given the ever-changing conditions, the many different styles of architecture and the multitude of colour in the scenes I photograph, removing colour and producing only black and white work seemed the right choice.
Of course, I still love colour photography and still produce most of my landscape work this way. So, once the project was starting to take shape and I ventured out into London to deliberately take photos for this black and white project, I learned very quickly that I would have to think and see differently. I had to remove colour from being a compositional element and focus only on shape, form and light. I feel, however, that it was a necessary step to make, as in addition to a more consistent look, black and white photography has a timeless feel about it, as the process does not age the photos and although I have no intention of doing so, they are free from a style that represents any contemporary trend in my work.
Another creative decision I made for this project was to use the square format for all finished photos, and like my decision to only process the images in black and white, there are several reasons for this. The first and most obvious reason for the square is that by having a single aspect ratio for all photos, it helps when trying to obtain a consistent look across the entire body of work.
Additionally, using a square crop has other compositional advantages. For instance, it can help when placing the subject in the centre of the image. I tend to do this quite often and the square crop, with all sides equal, can further emphasise that symmetry in the frame.

For a landscape photographer, the square format may appear more restrictive than the traditional 3:2 or 4:3 aspect ratios, but that’s not the case at all. I feel I have more freedom when composing a photo as the traditional “rules” carry less weight. Having equal sides seems to reduce the need to compensate when composing the image. I’m able to place the subject close to the middle or nearer to the edge of the frame without feeling the picture lacks balance.
Michael Kenna’s work is frequently referred to as being “zen-like” and although I’m sure this has a lot to do with his photographic style and technique he uses, I think that his use of the square format and the compositional freedom it provides has a little something to do with it too.
What’s next?
It’s early days and way too soon to know where this project will go. For now, I’m enjoying heading out with my camera and shooting new images for the collection alongside my traditional landscape work.
I’m still tweaking and refining as I go and allowing the project to develop as the body of work builds.
Along with a spin-off Instagram account dedicated to the project here: https://instagram.com/_timeless.city_, I wanted to give the project a permanent home, so I created this project page. I plan to update the page now and then with newly released photos and if I publish any more “behind the lens” or general blog articles related to the project, I’ll also post them there.
I’ve started to think about how I might present the images and at the moment, I have a few themes such as views from the rooftops or from along the Thames. There are, however, other images creeping into the collection that don’t fit a specific theme just yet and as long as they align with the spirit of the project, I’m quite happy to let them lead me somewhere new.
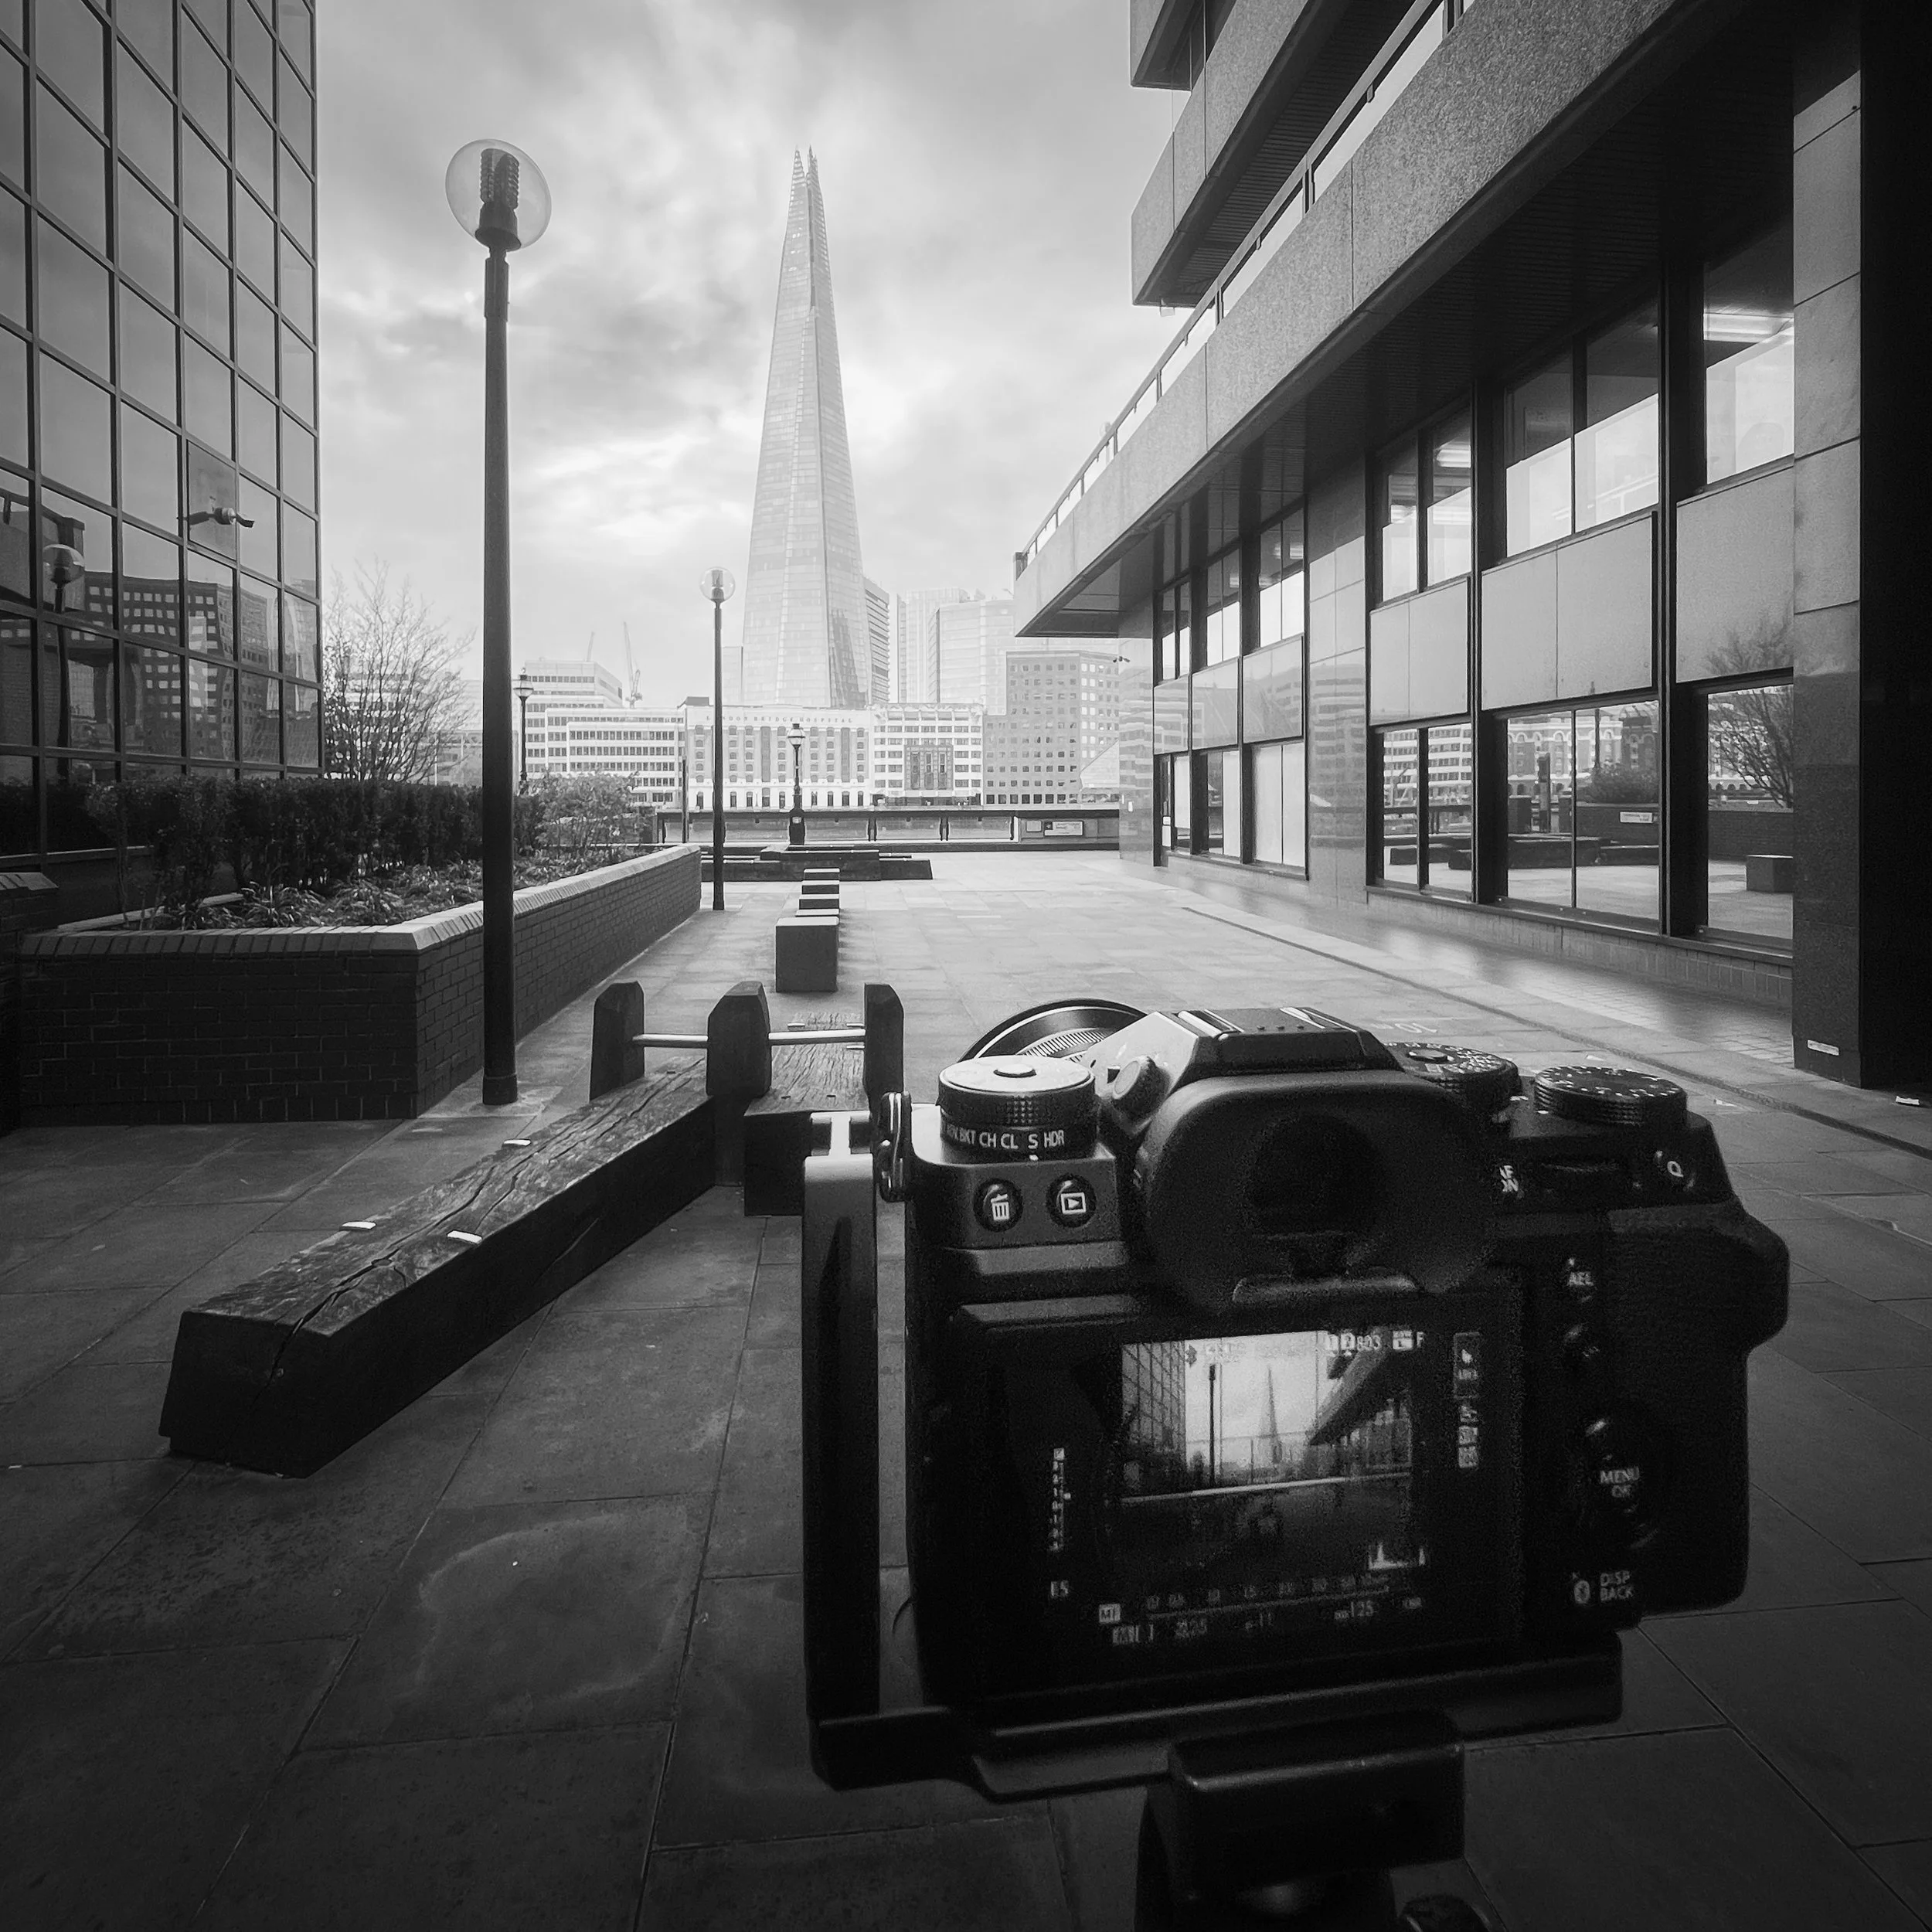
To get the very best experience of one’s work, I truly believe photography should be printed so I will of course be printing this work. To start it will be printed just for me, but in time I would love to turn this project into a series of zines or maybe even one day, a coffee table book. Thats a little way off yet but certainly something I would like to aim for.
That’s it for this project intro. Hopefully, you found that useful, but as ever, if you have any questions and want to know more about the process or ideas for future blog posts, just drop them in the comments below.
Until next time.
Trevor

Woodland Sanctuary by Simon Baxter & Joe Cornish | My Photo Bookshelf
A joint woodland photography project by Joe Cornish and Simon Baxter celebrating the beautiful and diverse woodlands of the North York Moors.
You may have noticed that I enjoy a bit of woodland photography. In fact, I just enjoy the woodland and spending time exploring my local forest camera in hand or not. So, when two well-established photographers joined forces and released the Woodland Sanctuary book to accompany their exhibition to showcase the trees and woodland of the North York Moors, I jumped at the chance to own a copy. I don’t say this lightly, but Joe Cornish and Simon Baxter have both significantly influenced my landscape and woodland photography over the past few years, so, owning a book and experiencing more of their work in the printed form was an exciting prospect.
Author’s Synopsis
Trees and Woodland of the North York Moors
Woodland Sanctuary is a joint exhibition between photographers Simon Baxter and Joe Cornish. The work was gathered over the last six years, all of it within the North York Moors National Park.
This book is its hand-held equivalent. It is a record of the pictures and words from the exhibition. It also contains a few pictures for which there was insufficient space in the gallery! Arranged in a series of artistically inspired themes, we hope the photographs convey a sense of joy and wonder, and sometimes other complex emotions that can be triggered by looking at trees, and walking through the woods.

My thoughts about the book
I wasn’t able to attend Simon and Joe’s Woodland Sanctuary exhibition in person and although I thoroughly enjoyed the videos they released, there is no substitute for being there in person to view their work hanging on the wall, so I guess this book is the next best thing.
For the £20 I paid, this softcover book is packed full of 90+ beautiful woodland photos, organised by themes, including taken alongside rivers, scenes shaped by humans and 7 others. It’s such a unique and effective way to present their work, aligning them to a narrative that has a deeper meaning than just the aesthetic of the scene itself.
The book starts with an introduction by Joe Cornish, who provides some of the background to the work, the artists and the exhibition. This is followed by an artist statement from them both, talking about their own journeys that led them to create their own, deep connections with the woodland.
It goes without saying that the work presented in this book is on another level, but what I like even more is how distinct the work is between the two artists. As I flicked through, I would instantly recognise Simon’s or Joe’s work without the need to look at the text underneath. Although these two photographers have their own distinct style, the thoughtful sequencing allowed them to place their photos harmoniously side by side with a nice flow throughout each chapter.
To own some of the best woodland photography I’ve seen to date for as little as £20 is quite unique. This is a book I’ll return to time and again for inspiration.
Book Details
300gsm fine uncoated softcover
Size: 300mm x 240mm
Pages: 92 Litho printed on170gsm Silk Art Paper
Availability at the time of writing: In stock and available from Simon Baxter’s website https://baxter.photos/shop/woodland-sanctuary Also available on Joe Cornish’s gallery shop website here.
Photographing autumn colour with the Fujifilm XF50-140mm lens
I took a walk into the woodland with just my Fujifilm XF 50-140MM telephoto lens to photograph the last of the autumn colours.
Late last year, toward the end of November (2023), I popped out to the forest to photograph what was left of the autumn colours. Only having a couple of hours to spare that morning and deciding to travel light….(ish). I took just my Fujifilm XT5 camera, the XF 50-140mm f2.8 lens and my tripod. Everything else was left in the car. Don’t worry, this blog isn’t a lens review, but more of an acknowledgement of the single camera and lens combo I used for all the photos during this little photography jaunt.
I arrived before sunrise and whenever I start from this area of the forest, I’ll typically head to my favourite viewpoint with a coffee to watch the sunrise and witness the landscape appear in front of me. It was a cloudy day, but for a short period before sunrise, there was a thin mist in the air, providing a touch of atmosphere across the landscape. So, taking advantage of the cooler, pre-sunrise tones, I took this photo of the undulating landscape below.
Fujifilm XT5 | XF50-140mm | 59mm | 1.3 Seconds | f/10 | ISO125
As the light levels increased and the mist withdrew into the distance, I photographed the same scene, but this time with the colours in the foreground looking warmer and more autumnal. Wanting to take in the wider landscape and being restricted to a minimum focal length of 50mm, I decided to take a stitched panoramic image. The advantage of doing it this way is that I can switch to a portrait orientation and zoom in further to bring the foreground even closer, making it appear larger in the picture. If I tried the same with a single shot on a wider lens, then I would have a huge foreground, tons of sky and a small slither of trees in the middle.

Fujifilm XT5 | XF50-140mm | 77mm | 0.6 Seconds | f/10 | ISO125
The other benefit of taking a stitched panoramic with 7 or 8 40-megapixel images is that you end up with a super-high resolution file. The panorama above is a whopping 157 megapixels and with so much resolution to play with, I was able to create another version of the image by just cropping it down to a 3:2 aspect ratio. The cropped photo below is still over 70 megapixels. Thats nearly double the resolution of my camera!

Fujifilm XT5 | XF50-140mm | 77mm | 0.6 Seconds | f/10 | ISO125
Before heading off into the woods and being drawn to how the brighter birch trees looked against the darker trees along the woodland’s edge, I took advantage of having the telephoto lens and zoomed right into 140mm and took some close-up photos of the woodland’s edge.

Fujifilm XT5 | XF50-140mm | 140mm | 2 Seconds | f/10 | ISO125

Fujifilm XT5 | XF50-140mm | 140mm | 0.5 Seconds | f/10 | ISO125
By this time, I had probably been in the same spot for around an hour, so, I decided to stretch my legs and head into the forest to have a little explore. Having just the 50-140mm lens with me, I focused on taking pictures of more intimate scenes, including just parts of the trees and cutting out any sky from the frame.

Fujifilm XT5 | XF50-140mm | 111mm | 0.6 Seconds | f/10 | ISO125
Fujifilm XT5 | XF50-140mm | 52mm | 0.8 Seconds | f/10 | ISO125

Fujifilm XT5 | XF50-140mm | 50mm | 1/5th Second | f/9 | ISO125

Fujifilm XT5 | XF50-140mm | 140mm | 1/8th Second | f/9 | ISO125
On the face of it, having one lens can appear restricting, but while out in the field with my camera, it didn’t feel like that at all. It felt a little liberating in fact. There was no decision needed as to what lens to use, no faffing with gear and certainly less weight. It helped me to focus my mind and see in a specific way, resulting in me coming away from the shoot with a few photos I’m pleased with.
I hope you enjoyed this bite sized on-location post. In a bid to get more of my photos up on my website, look out for more like this throughout 2024.
Until next time.
Trevor
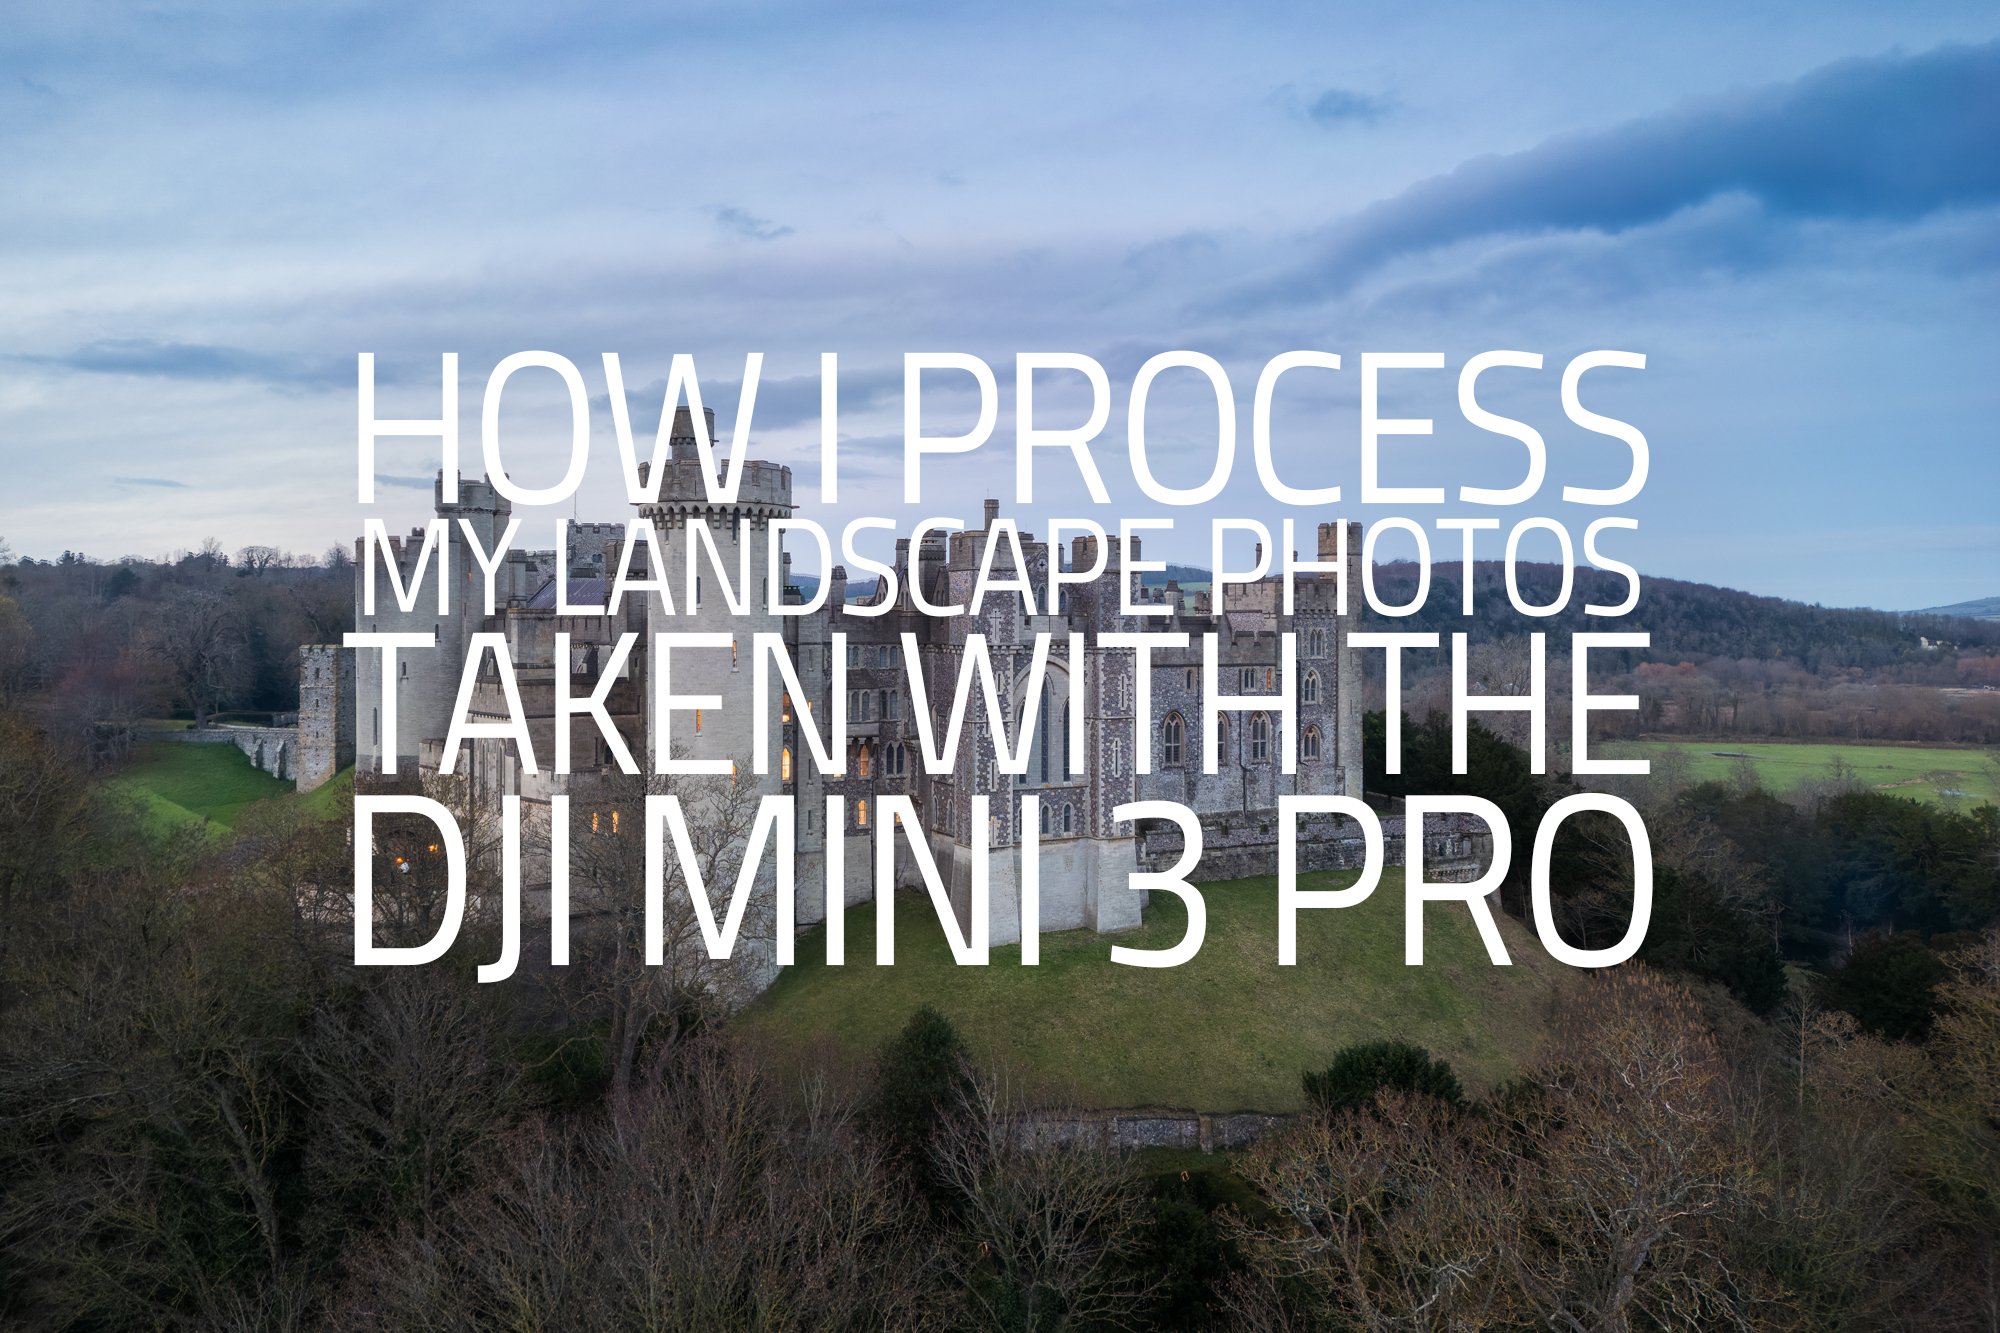
How I Process My Landscape Photos Taken with the DJI Mini 3 Pro
In this article, I share my processing steps to create the best quality landscape photos with my DJI Mini 3 Pro.
When I first decided to buy a drone to use for landscape photography, I had to consider the pros and cons of each model available at the time. For example, the larger Mavic models typically have a more capable camera, but the smaller, sub 250g Mini models have fewer restrictions on where they can be flown. After weighing up the pros and cons, I eventually chose the DJI Mini 3 Pro. I’ve already published a post covering my thoughts on this drone, and you can read a full review from a landscape photographer’s perspective here: DJI Mini 3 Pro | A Landscape Photographer’s Review.
Following on from the review I wrote about this drone, I published a second post demonstrating the different camera settings I use while out taking landscape photos with the Mini 3 Pro. DJI Mini 3 pro Camera Settings for Landscape Photography.
You can find both of my previous DJI Mini 3 Pro blog posts below:


So, given that I’ve written a review of the Mini 3 Pro and published a blog post detailing the settings I use to take landscape photos, what’s this blog post all about then? When I published my previous post, I had a few messages asking for a bit more detail as to how I process the Mini 3 Pro raw files and although there are countless different approaches one can take, I decided to write this post detailing the steps I took from raw to final edit using a photo I took recently in low light conditions.
Before I start, I wanted to make two points. Firstly, this post is aimed at those wanting to get their files ready to be printed. The techniques I use to sharpen and overcome noise in the image aren’t really going to benefit you if you plan to just share your drone photos on social media.
The second point to make is that both this and the camera settings for landscape photography post above applies to those using the DJI Mini 3, Mini 3 Pro and the recently released Mini 4 Pro. Features may vary from model to model, but overall, their capabilities are very similar when it comes to taking landscape photos.
Step 1: Taking the photo in the field
Let’s start with the original raw files I took in the field. This is Arundel Castle located in West Sussex and after sunset came and went without much fanfare, I decided to hang back just a bit longer to take a photo during blue hour. It’ll not win any awards but with the low light conditions, I figured this image was a good candidate to use for this processing blog post.

Raw files as shown in Adobe Lightroom. DJI Mini 3 Pro | 24mm Pano | 1/6th and 1/3rd Second | f/1.7 | ISO100
In terms of camera settings, I used the 48mp setting in PRO mode when taking this photo to get the highest resolution. I knew from previous experience that there would be some noise in the files, so I decided to take two pictures, manually adjusting the shutter speed for each. The first image was exposed for the castle at 1/6th of a second, and the other was exposed for the sky at 1/3rd of a second.
Step 2: Increase detail and reduce noise in Adobe Lightroom
As I expected, there was some noise in the sky when viewing the raw file at 100%. So, before I merged the bracketed images, that noise needed to be dealt with. Even though I can see the noise at 100% here on my screen, I’m not too sure how well that comes across on yours, so here’s a 100% and 200% crop demonstrating the noise I can see in the sky. I know the 200% crop isn’t representative in the real world but it’s just to help visualise the noise. If you still can’t see it, you’ll just have to trust me that it is there.


There seems to be a plethora of noise reduction software hitting the market recently and among those, Adobe released its own AI Denoise feature in Lightroom and Camera Raw. Having tried some of the other tools available, in my opinion, Adobe’s AI Denoise is as good as, if not better than many of the other options out there. Plus, its baked into Lightroom making for an easier workflow.
AI denoise is a part of Adobe’s Enhance feature (located in the Photo menu along the top). Along with denoising an image, it also improves raw files by enhancing the details and reducing artefacts. It can, however, only be used with raw images so needs to be applied before using the Photomerge-HDR function in the next section.

To remain consistent across both the under and over-exposed raw files, I ran them both through the Enhance feature, being careful not to add too much noise reduction as overuse can have unintended consequences.
Below is a side-by-side comparison of the original and enhanced files. With any hope, you will be able to see the refined edges and enhanced definition on the right-hand side.
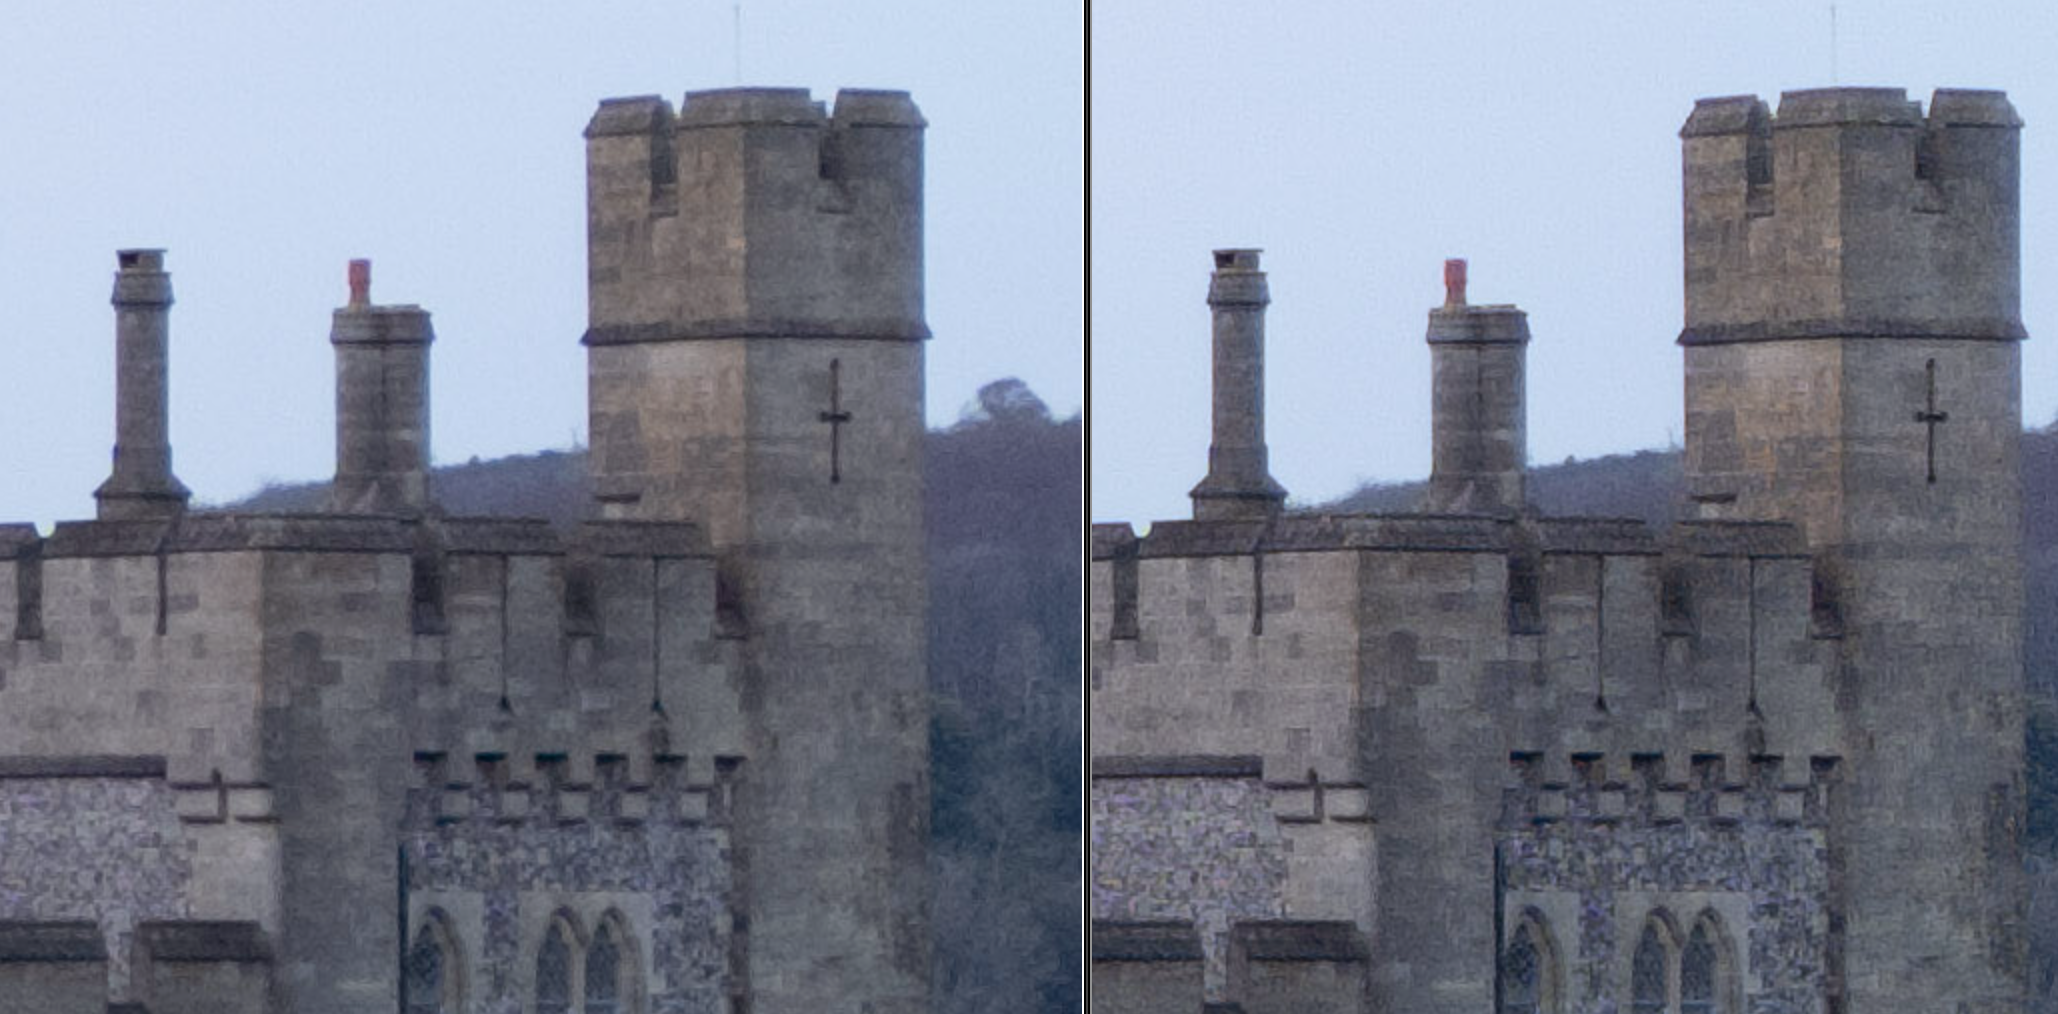
Step 3: Merging the bracketed image files in Adobe Lightroom
With the two new DNG files created by the Enhance feature, I selected them both and used the Photomerge-HDR option in the Photo menu (or via a right-click on the photo). I typically use the settings you see below and once finished, a new HDR DNG file is created. This new file will have less noise in the shadow areas and more detail that can be recovered in the brighter areas, resulting in a cleaner, editable image.
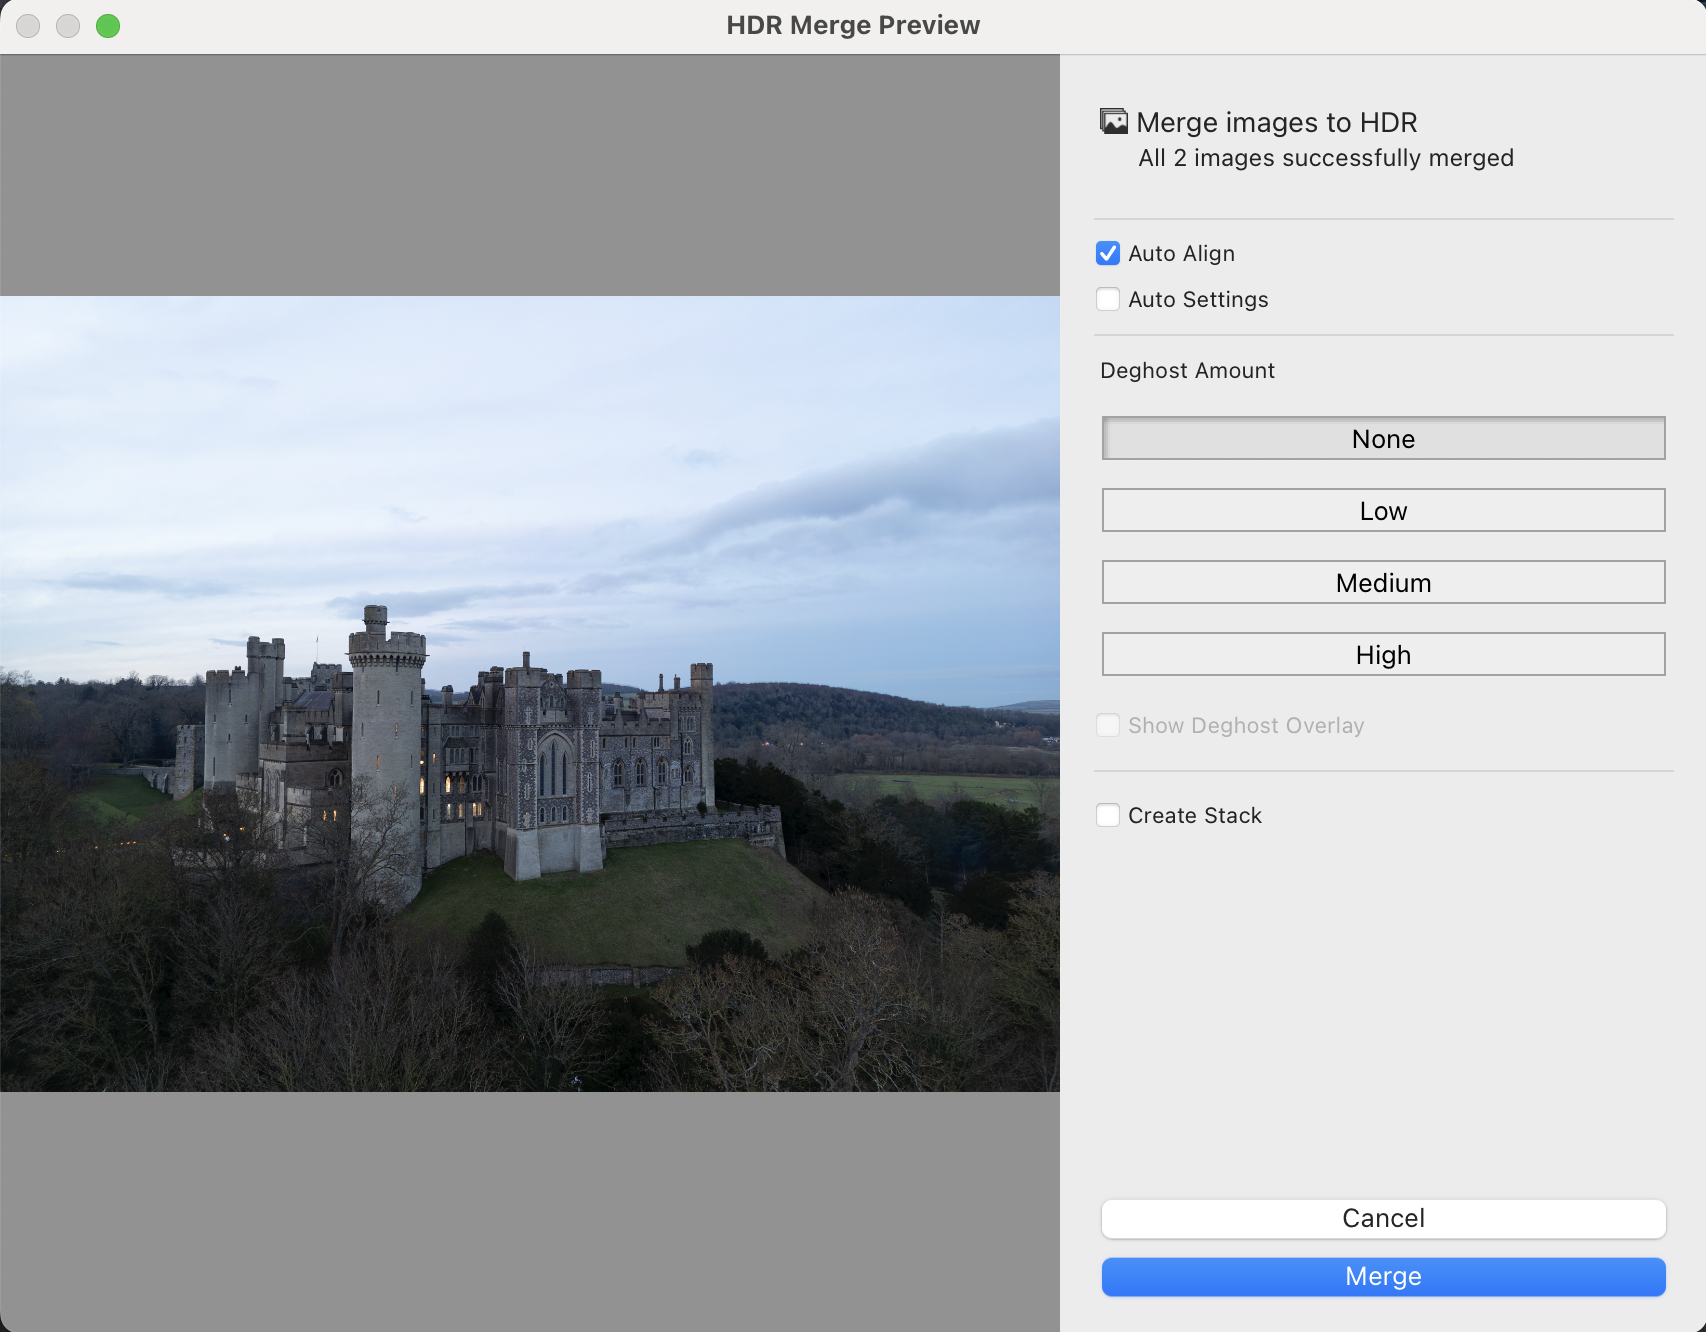
Step 4: Editing the image in Adobe Lightroom
Now, with the image file prepared, it’s time to edit.
This post isn’t a tutorial as to how best to edit a photo as everyone’s style will be different. However, what I have highlighted below is the Detail panel showing that I have applied minimal sharpening in Lightroom and for the small amount that is applied, I have increased the masking to ensure it only applies to the areas of high contrast such as the castle edges, excluding large parts of the image such as the sky.

Step 5: Sharpening in Adobe Photoshop
A note on sharpening. Opinions vary as to when to apply it. During the edit or only when the file is being outputted for a particular use case such as web, socials or print. This is just my approach, and I don’t for one minute suggest it is right for everyone. I will typically add some sharpening when editing, call it a “base sharpening” if you will. This is typically fine for all of my online needs but If I feel I need to add any more sharpening for print, I will do so when preparing the file before sending it to the printer.
Not being a big fan of how Lightroom sharpens my raw files, I apply just a small amount of sharpening using the Details panel before I finish it off properly in Photoshop. For this, I use the High Pass filter. It’s a great tool to detect the edges (or high contrast areas) in a frame, which, when combined with a contrast-boosting blending mode applied to those edges, sharpens the photo without affecting the areas with less contrast, such as the sky.

First up, create a duplicate layer and then, from the menu, select Filter - Other - High Pass. Here, you will decide how much sharpening you want to add by adjusting the Radius amount. Choosing the right number depends on the resolution of the file and how much sharpening you want to add. Typically, I stick between 1-2 pixels at this stage with the view that I can add more later if needed. If you start to see colour artefacts in the preview, you’ve probably taken it way too far. Experiment with the radius yourself to get the effect you like. Once I’m happy with the thickness of the edges detected by the High Pass filter, I then hit OK.
Next, I use the Overlay blending mode for the same layer. This blending mode will hide the grey areas and add contrast to the edges highlighted by the High Pass filter, resulting in a clean, sharper file. Hopefully, you can see the effect by comparing the before and after images in the screengrab below.

The final image, ready to print
After a few Photoshop tweaks that include the spot healing brush to remove a few distracting lights and a final 3:2 crop back in Adobe Lightroom, here is the final photo with more clarity and less noise than before.
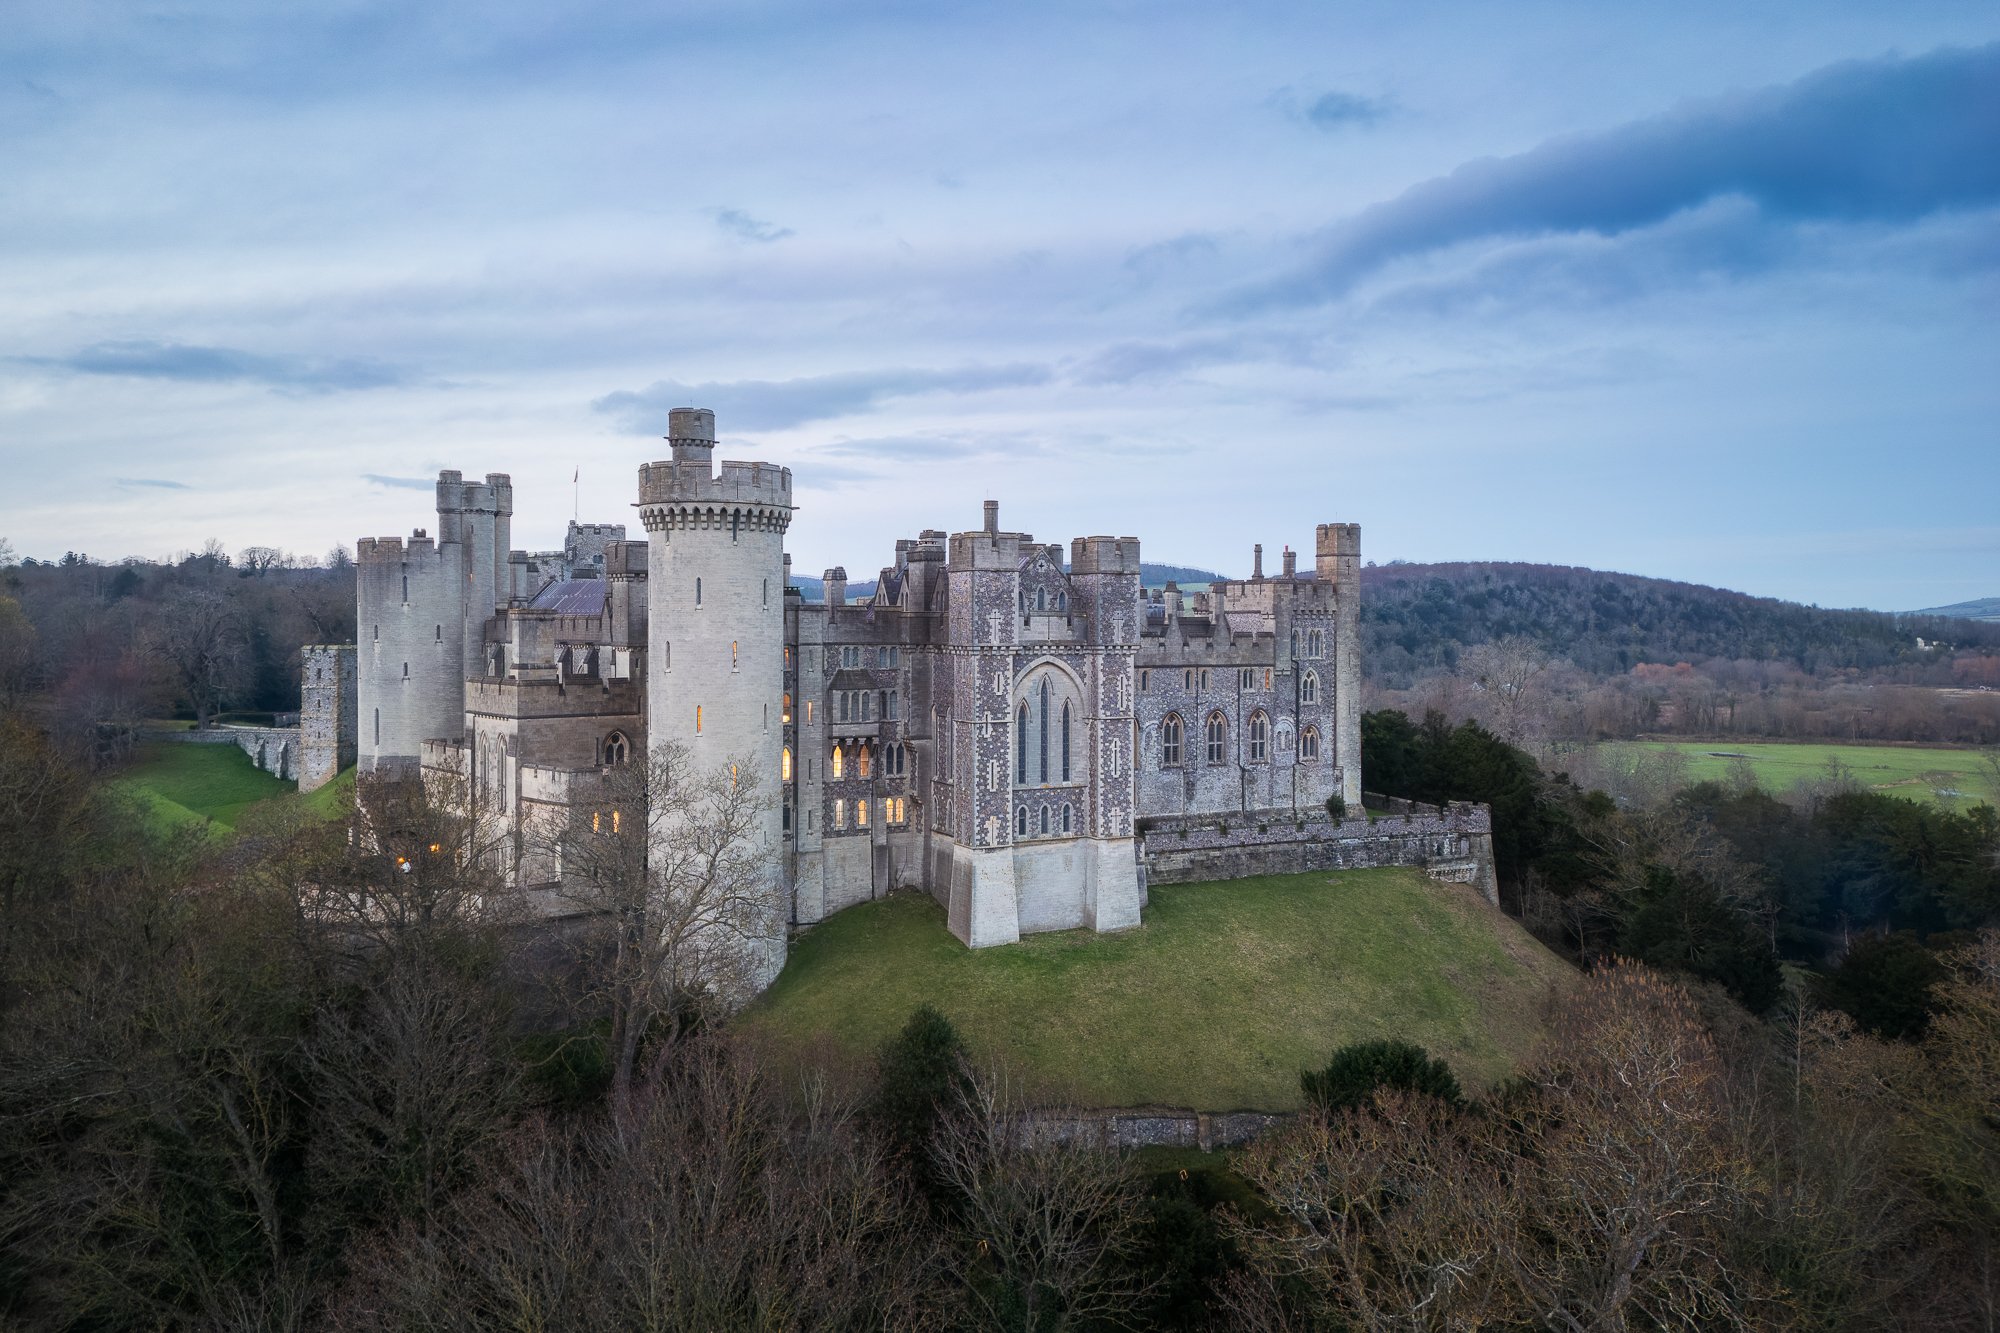
As with all processing methods, this approach, which works for me, may not work for everyone, but in some way or another, I will use some or all of these steps when processing my drone photos.
Having said all of that, the proof is in the pudding, so, next up, I plan to print this and a few other photos I’ve taken with my drone to see how the quality holds up at different sizes. If I can find a way to communicate that process in this blog format, I’ll post a follow-up article on that soon.
I hope you found this article useful, and if you have any tips or tricks or can suggest any improvements to my workflow, feel free to leave a comment below.
Until next time.
Trevor

Littoral | My Photo Bookshelf
Littoral is a photo book comprised of 35 black and white photos that pay homage to the extraordinary features and views found along the shoreline.
I first heard about the books created by John Ash and Paul Gotts a couple of years ago when they released a previous book called New Beginnings. Unfortunately, I was too late to bag a copy of that book before it sold out, so when Littoral was released, I made sure not to miss out again.
The typical format of the most recent books released by John and Paul over at https://makingaphotobook.co.uk is that they will commission a limited number of photographers who will shoot to a pre-determined theme. The resulting images will be curated and published in the final photobook. What makes the books even more special is that the photographers have given their time for free as the proceeds of the book are donated to a charity in keeping with the theme of the book.
Author’s Synopsis
Littoral is a stunning new hardback photobook published in June 2023.
Black and white images from three talented photographers have been reflected on and woven together by a master storyteller at the peak of his powers.
The book is about memories and personal stories – the images and words will resonate with readers everywhere.
Photographs by: Lynn Fraser, Ali Lewis and Fiona McCowan
Words by: Jeff Young
Foreword by: Jack Lowe
My thoughts about the book
As the title suggests, Littoral includes photos with a shoreline theme running through them and with proceeds going to the RNLI, it all ties together nicely. At the very beginning is a forward written by Jack Lowe. The forward is written with much thought and affection for the RNLI as those familiar with Jack Lowe will surely know about his project to photograph all 238 lifeboat stations onto glass plate. It’s a fascinating and worthwhile project you can read more about here: https://lifeboatstationproject.com.
In the book are 35 back-and-white photos taken by Lynn Fraser, Ali Lewis and Fiona McCowan. All three of these accomplished photographers had their own unique take on the brief so the photos included are wonderfully diverse. Still, with praise for the curation and sequencing, they flowed incredibly well. I particularly liked the range of subjects in the work from small, intimate rock scenes, to man-made subjects such as swimming baths and lighthouses.
Woven in among the photos are some creative words written by Jeff Young. Inspired by the photos, I found these passages worked well to both add some artistic narrative as well as to introduce a timely pause between each collection of images.
I thoroughly enjoyed Littoral, and with an important underlying message for both supporting the RNLI and protecting our oceans, it made for an even richer experience.
Book Details
Hardcover
Size: 250mm x 250mm Square
Pages: 58 pages printed on Fedrigoni 170 gsm paper.
Availability at the time of writing: Unavailable from the usual UK booksellers. Consider looking for a used copy if available. Link to the book’s original website: https://littoralphotobook.co.uk/