
DJI Mini 3 Pro Camera Settings for Landscape Photography
I’ve had quite a few questions, both in the comments or sent via email since I posted my 6-month review of the DJI Mini 3 Pro for landscape photography, and one question that has been asked a few times is how I find the image quality, particularly when it comes to editing the raw files. The DJI Mini 3 Pro is a very capable drone. When looking to fly almost anywhere (flight restrictions aside) by staying under the 250g weight limit, you will do well to find a more capable drone on the market today.
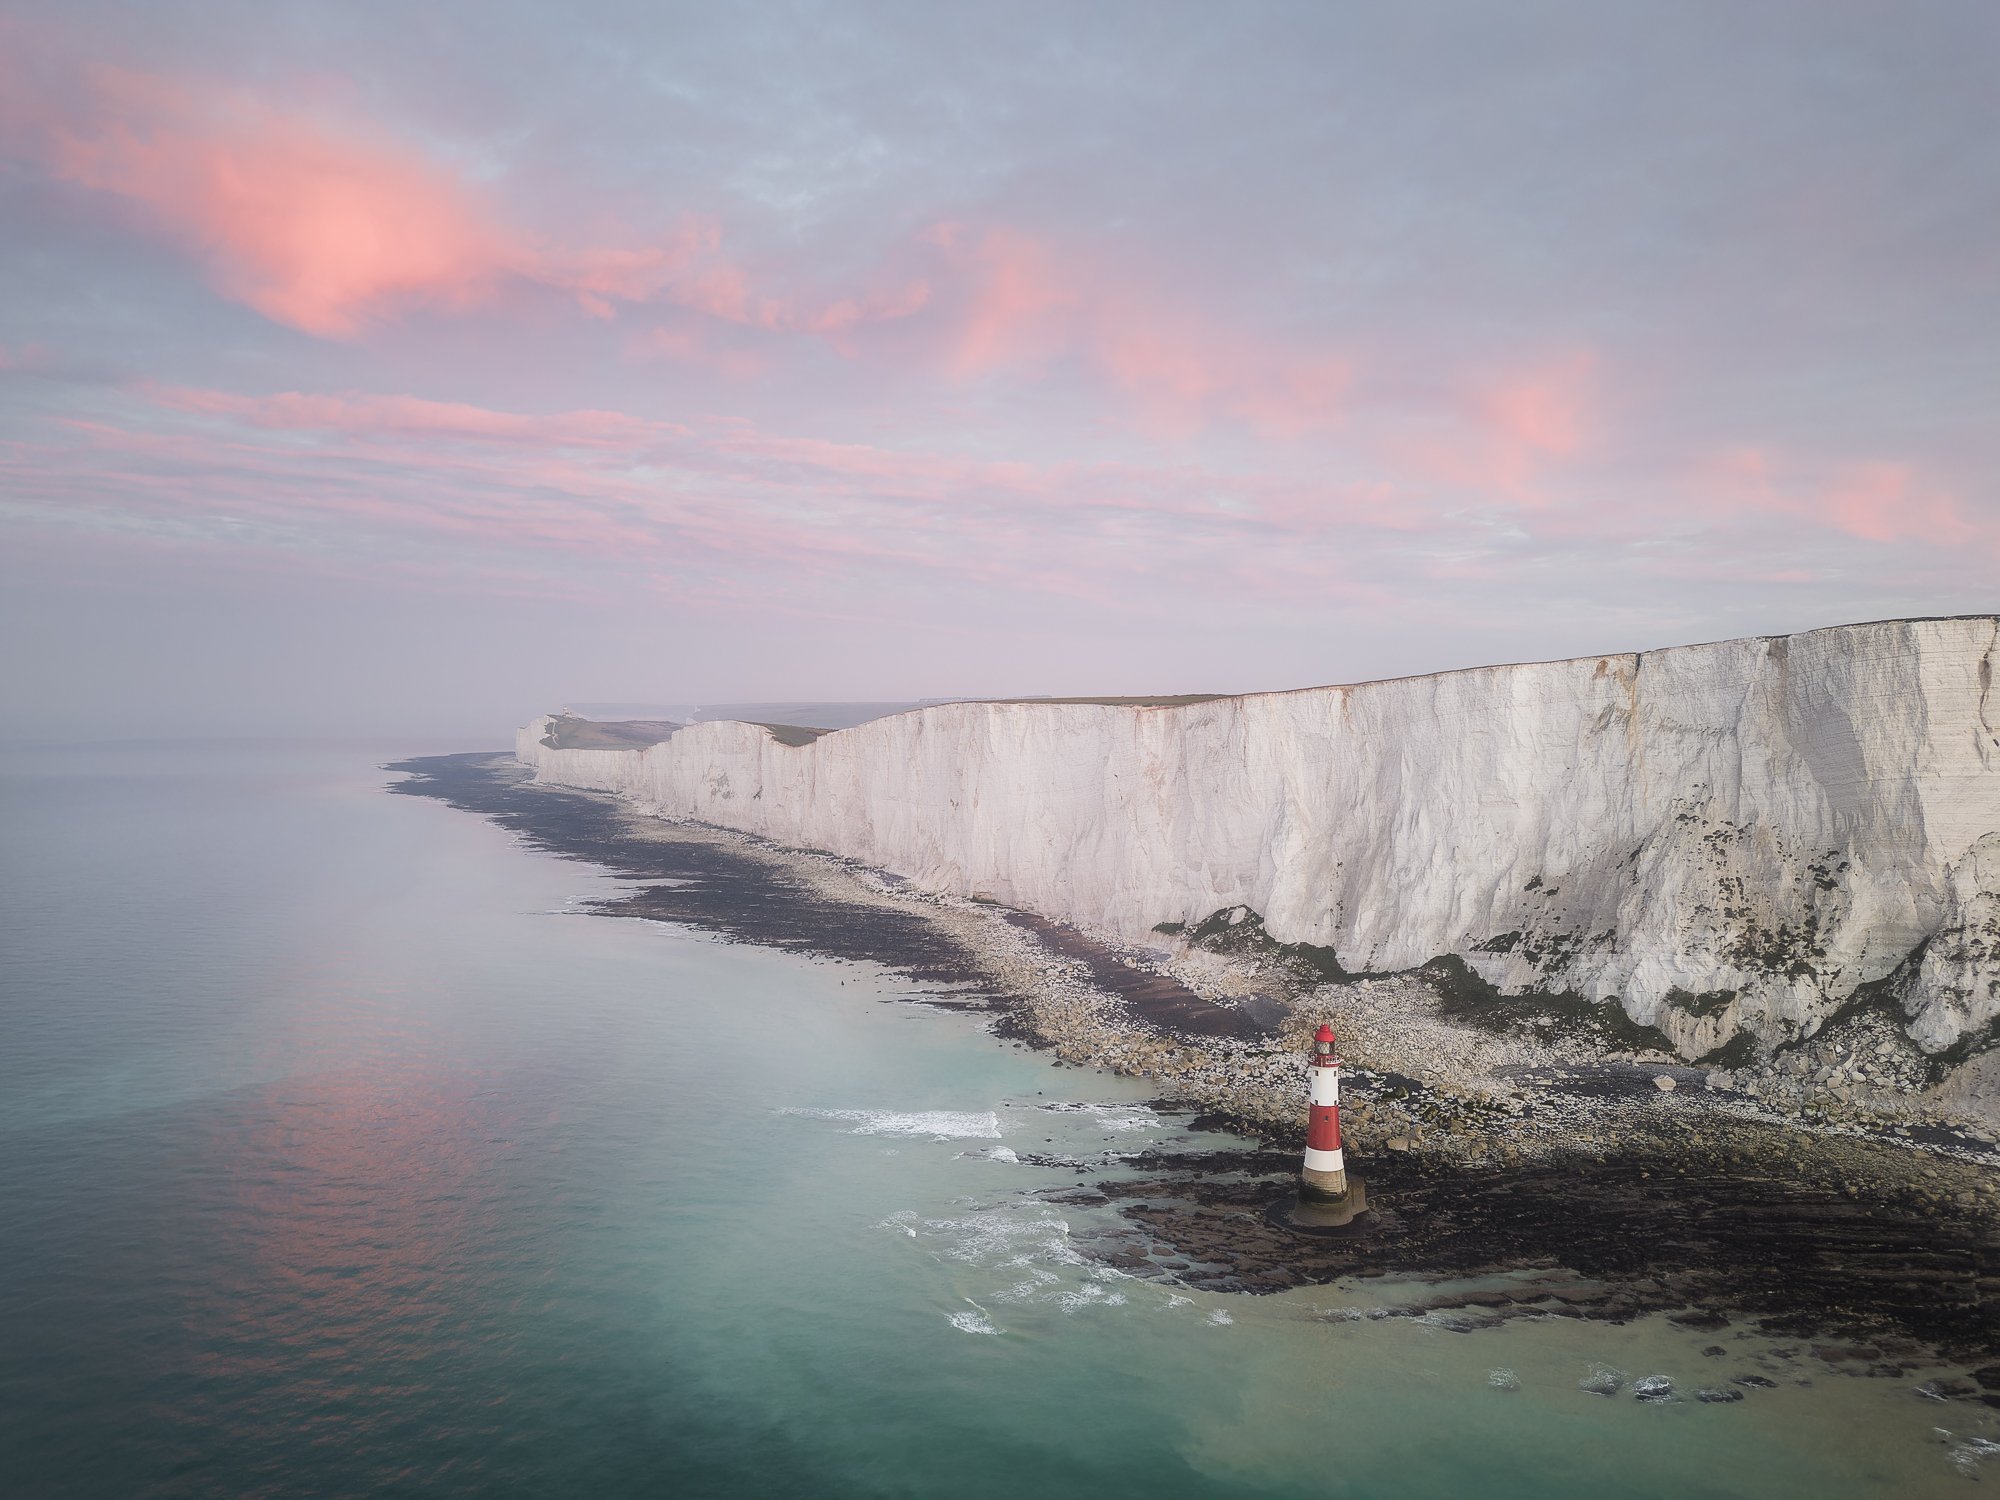
DJI Mavic Mini 3 | 24mm (effective) | 1/30th Second | f/1.7 | ISO100
That being said, there is no getting around the fact that the image sensor used in the Mini 3 Pro’s camera is a little on the small side. With smaller pixels and a lower resolution compared to some of the larger drones on the market, getting the very best image quality will require you to take advantage of all of the settings and features available. In this article, I will share some tips and tricks I’ve picked up over time so you can take the best aerial landscape photos possible with the DJI Mini 3 Pro.
One final point before we jump in. This article has been written with a specific focus on photos and contains my personal opinion based on my own experience capturing and editing photos taken with the Mini 3 Pro. I won’t be covering other topics in this post such as the best video settings or even flying modes. I’ll save those topics for someone else.
Set the photo mode to PRO
Like most traditional cameras, the Mini 3 Pro has both auto and pro (manual) camera modes. For those that may be apprehensive about switching their camera away from auto mode, it really isn’t as scary as you may think and making the switch provides you full control of the shutter speed, white balance and ISO settings. Having the PRO picture mode enabled will open up more possibilities to ensure the image looks the way you want, and the great thing is, the real-time feedback you get on the screen will help ensure you don’t under/over-expose your photos. Many of the settings I mention in the post rely on PRO mode being activated, so, in my opinion, this should be one of the first things you do when you’ve mastered flying your drone and want to take better photos.

To switch from AUTO to PRO mode, simply tap the AUTO icon located in the bottom right-hand side of the screen. You will know you are shooting in PRO mode as the icon will change and more settings will appear.
Shoot in J+R (JPEG+RAW)
Most people who take digital photos will be familiar with a JPG or JPEG file as it’s by far the most used image format out there. But what is a raw file? Think of it as a digital negative. It’s a lossless picture format that contains all the image data captured by the drone’s camera, without any editing or adjustments and although not for everyone, shooting stills as raw images really is the best way to ensure all of that image data is retained.
When taking JPGs, the camera’s processor will apply the default picture profile settings and discard all other data no longer used. The file size is smaller and if that’s all you need, that’s great. But if wanting to maintain full control of the final look of the image and plan to import the photos into your chosen editing software, then choosing to shoot raw is the better choice.
It’s worth noting that the Mini 3 Pro doesn’t have a raw-only mode, so whatever format you choose, you will still have a JPG copy saved onto your card. That can be useful for the times you just want to quickly grab an image from the memory card to share, bypassing the editing stage altogether. It really is the best of both worlds.
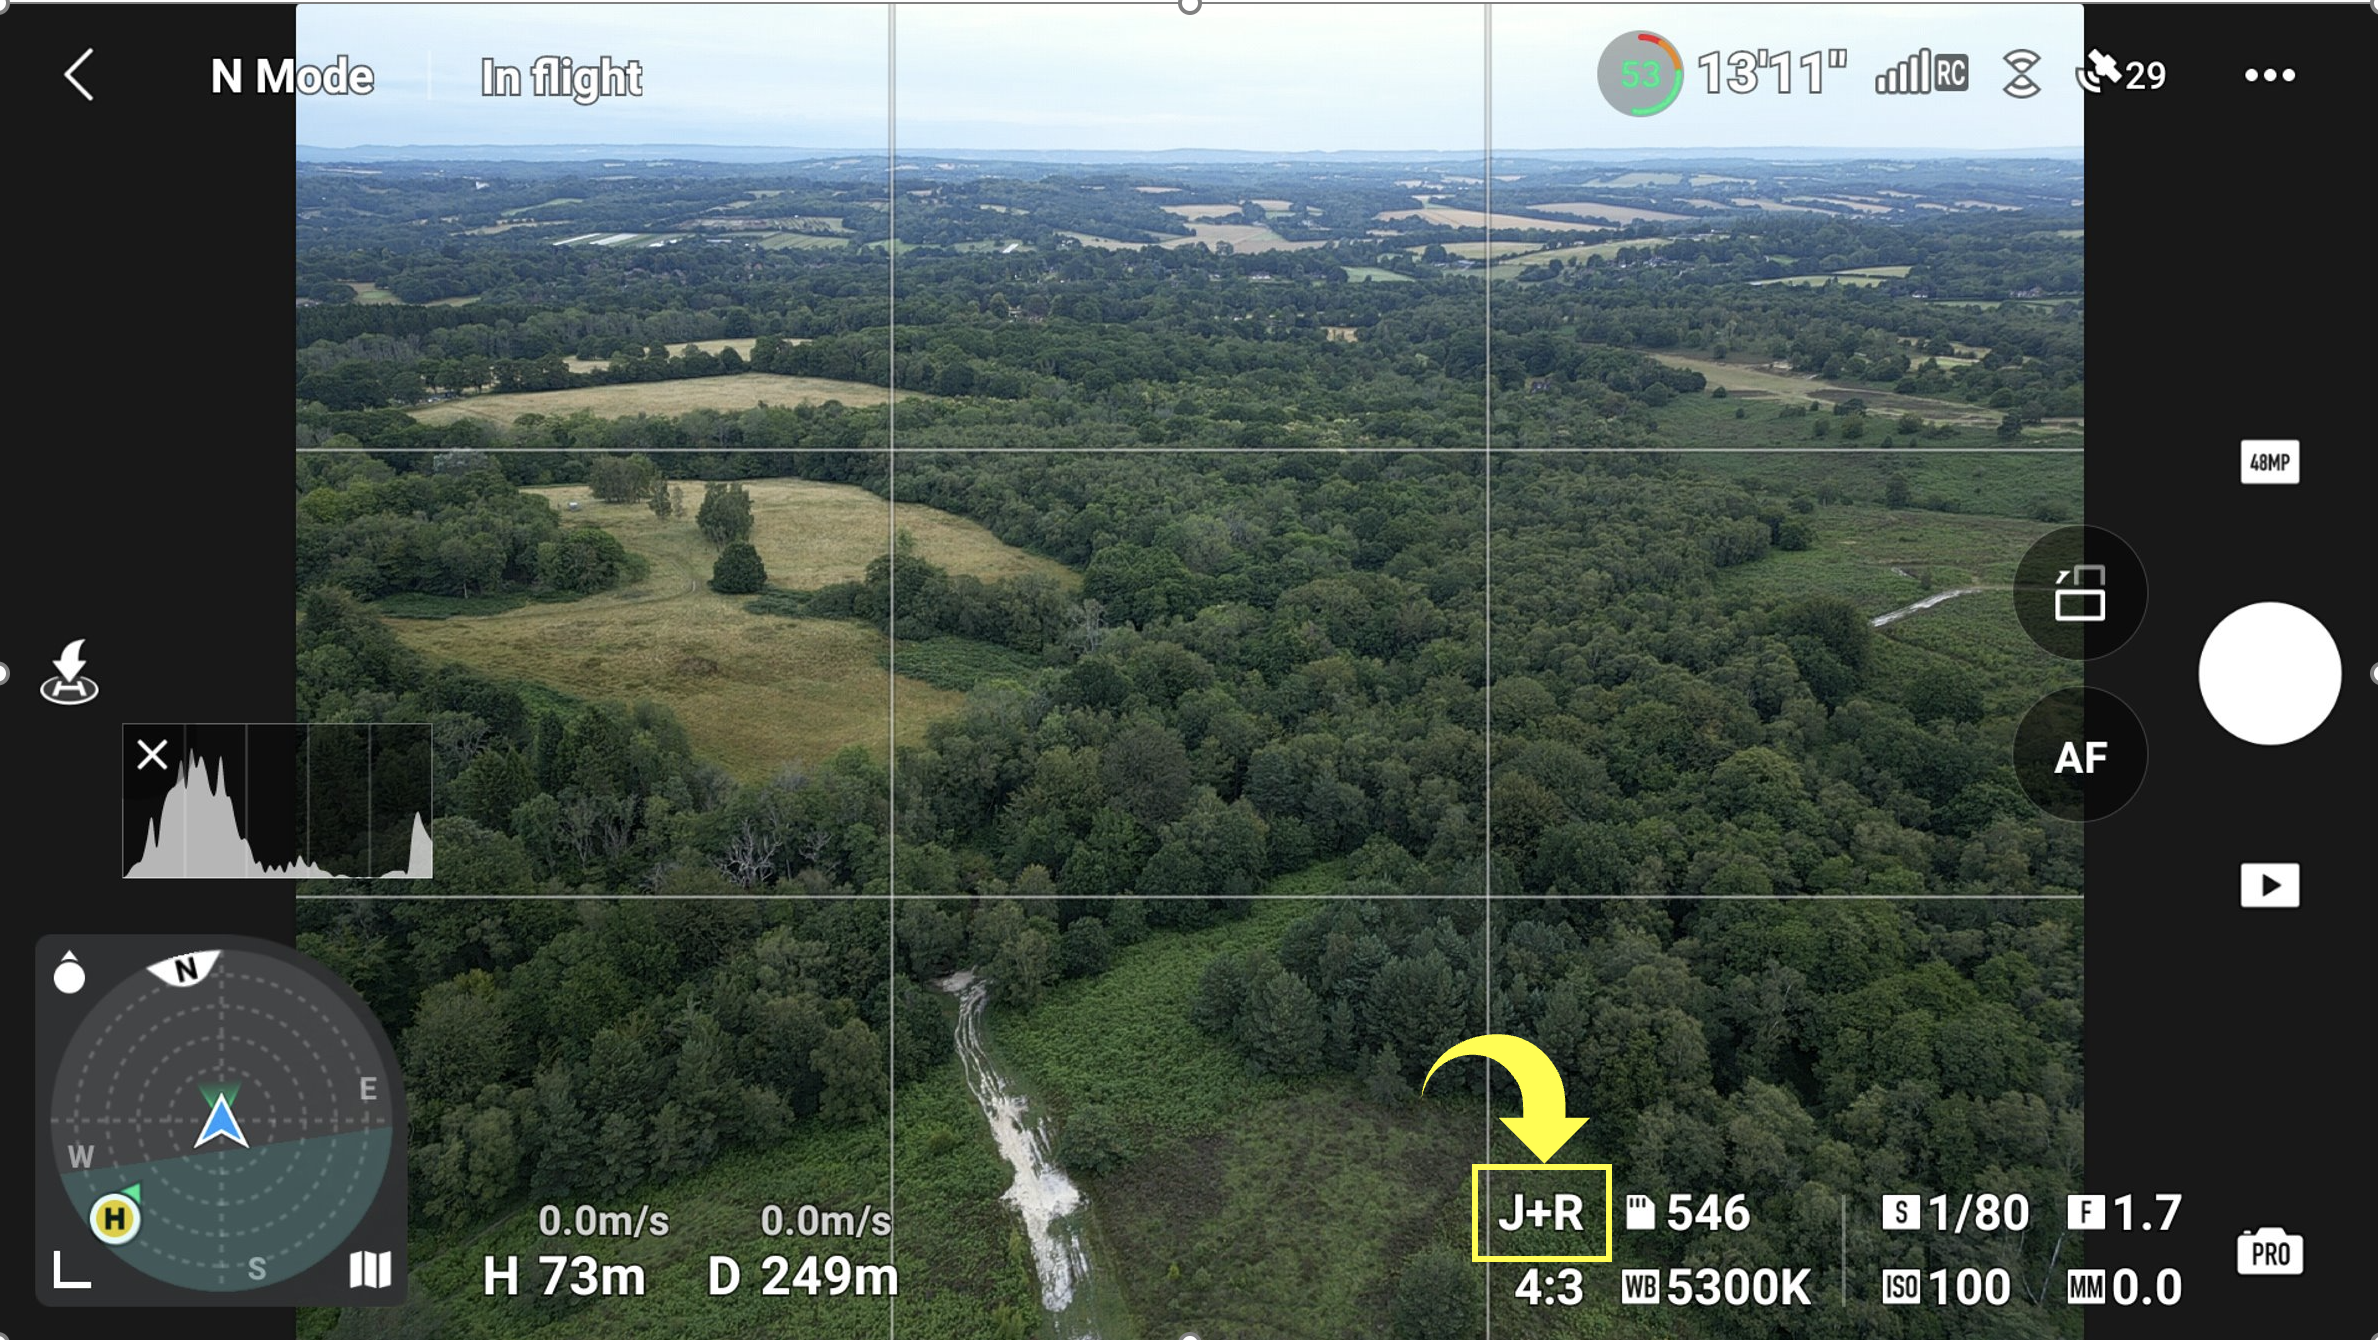
You can shoot in JPEG+RAW in either AUTO or PRO modes. To change from jpg to raw, tap the word JPEG in the bottom right-hand corner of the screen, and depending on whether you are in PRO or AUTO mode you will need to select either J+RAW or J+R.
Keep your ISO as low as possible
The native ISO for taking photos with the Mini 3 Pro is 100, and although raising your ISO can be incredibly useful when the ambient light is too low to take a sharp photo, it will negatively affect picture quality. The higher the ISO, the more digital noise and artefacts will be introduced to your images, and yes, a sharper, noisier image is better than a blurry one in nearly all cases, to keep my images as clean as possible, I will only raise my ISO as a last resort.
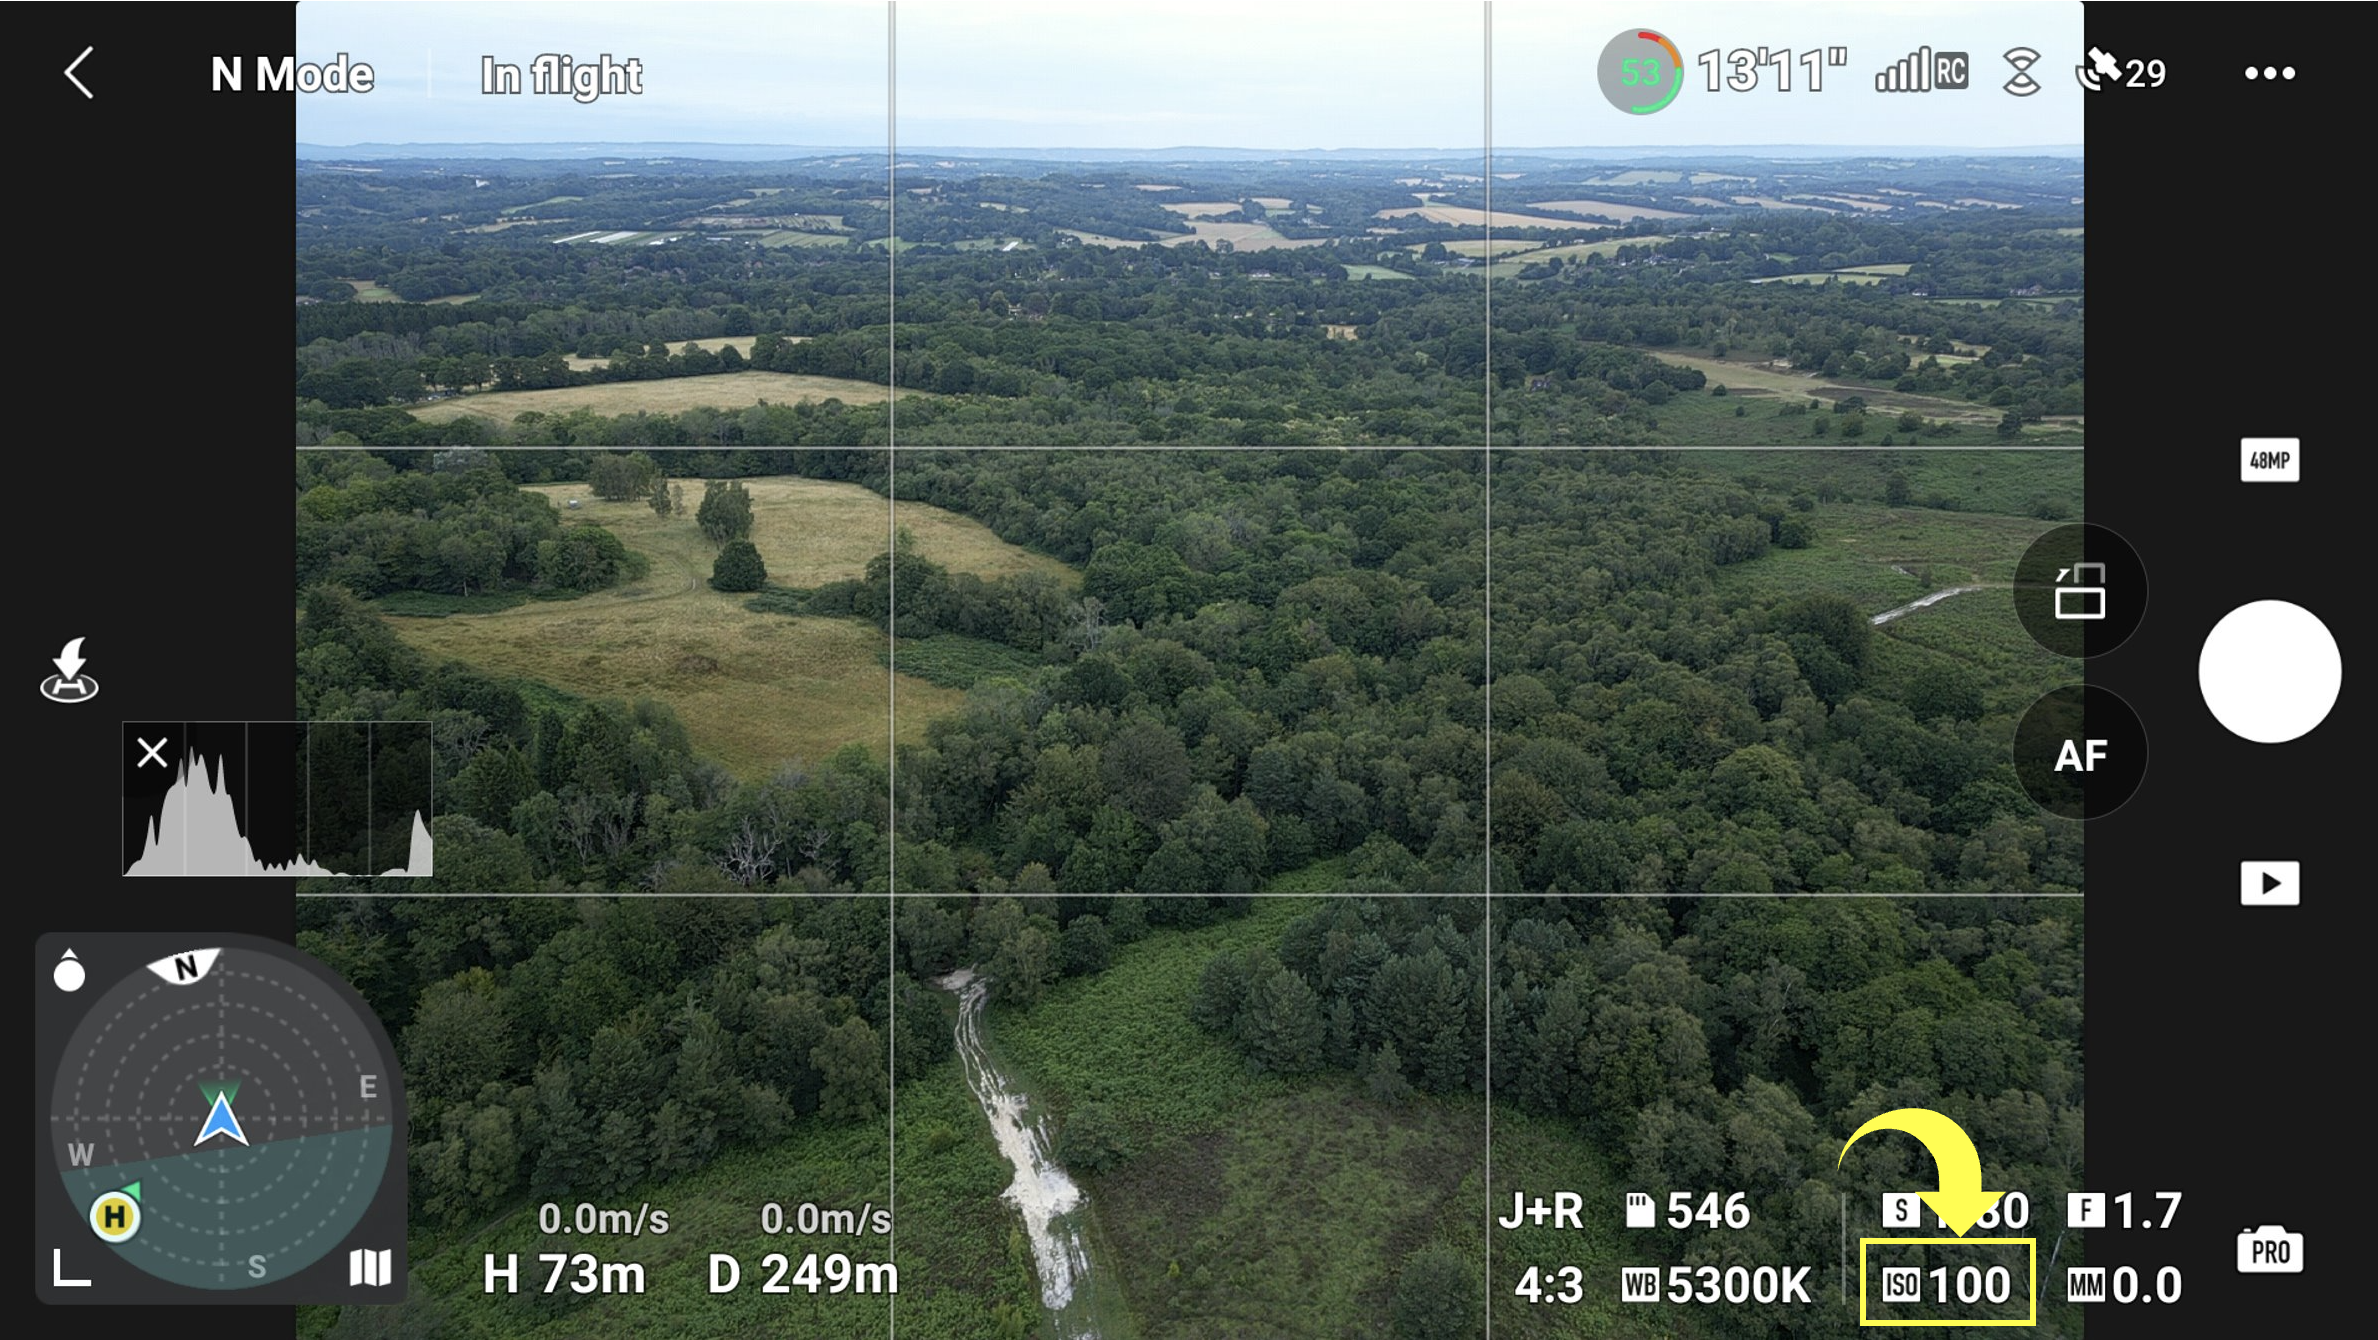
If you are in a situation where a higher ISO is needed and PRO mode is enabled, simply tap the ISO icon located at the bottom right of the screen and slide the dial until you have the exposure you need.
Enable the Histogram and Overexposure Warning
Unlike traditional photography where you and the camera typically have the same view of the subject, taking photos with a drone means relying far more heavily on what you can see on the screen. So, in my opinion, the more info it provides, the more likely you will take a high-quality, well-exposed photo and that’s why I keep the histogram and Overexposure Warning enabled when taking pictures with the Mini 3 Pro.
I won’t dig too deep into what a histogram is, but in short, it is a graph that visually represents how much light, mid or dark tones are in the photo. The shape of the graph will depend on the type of photo being taken but the thing to watch out for is when the graph data starts to touch and overlap with the far left or right-hand side. Typically, this is called clipping and means you’re losing image details in the shadows or highlights which might not be recoverable later in post-processing.
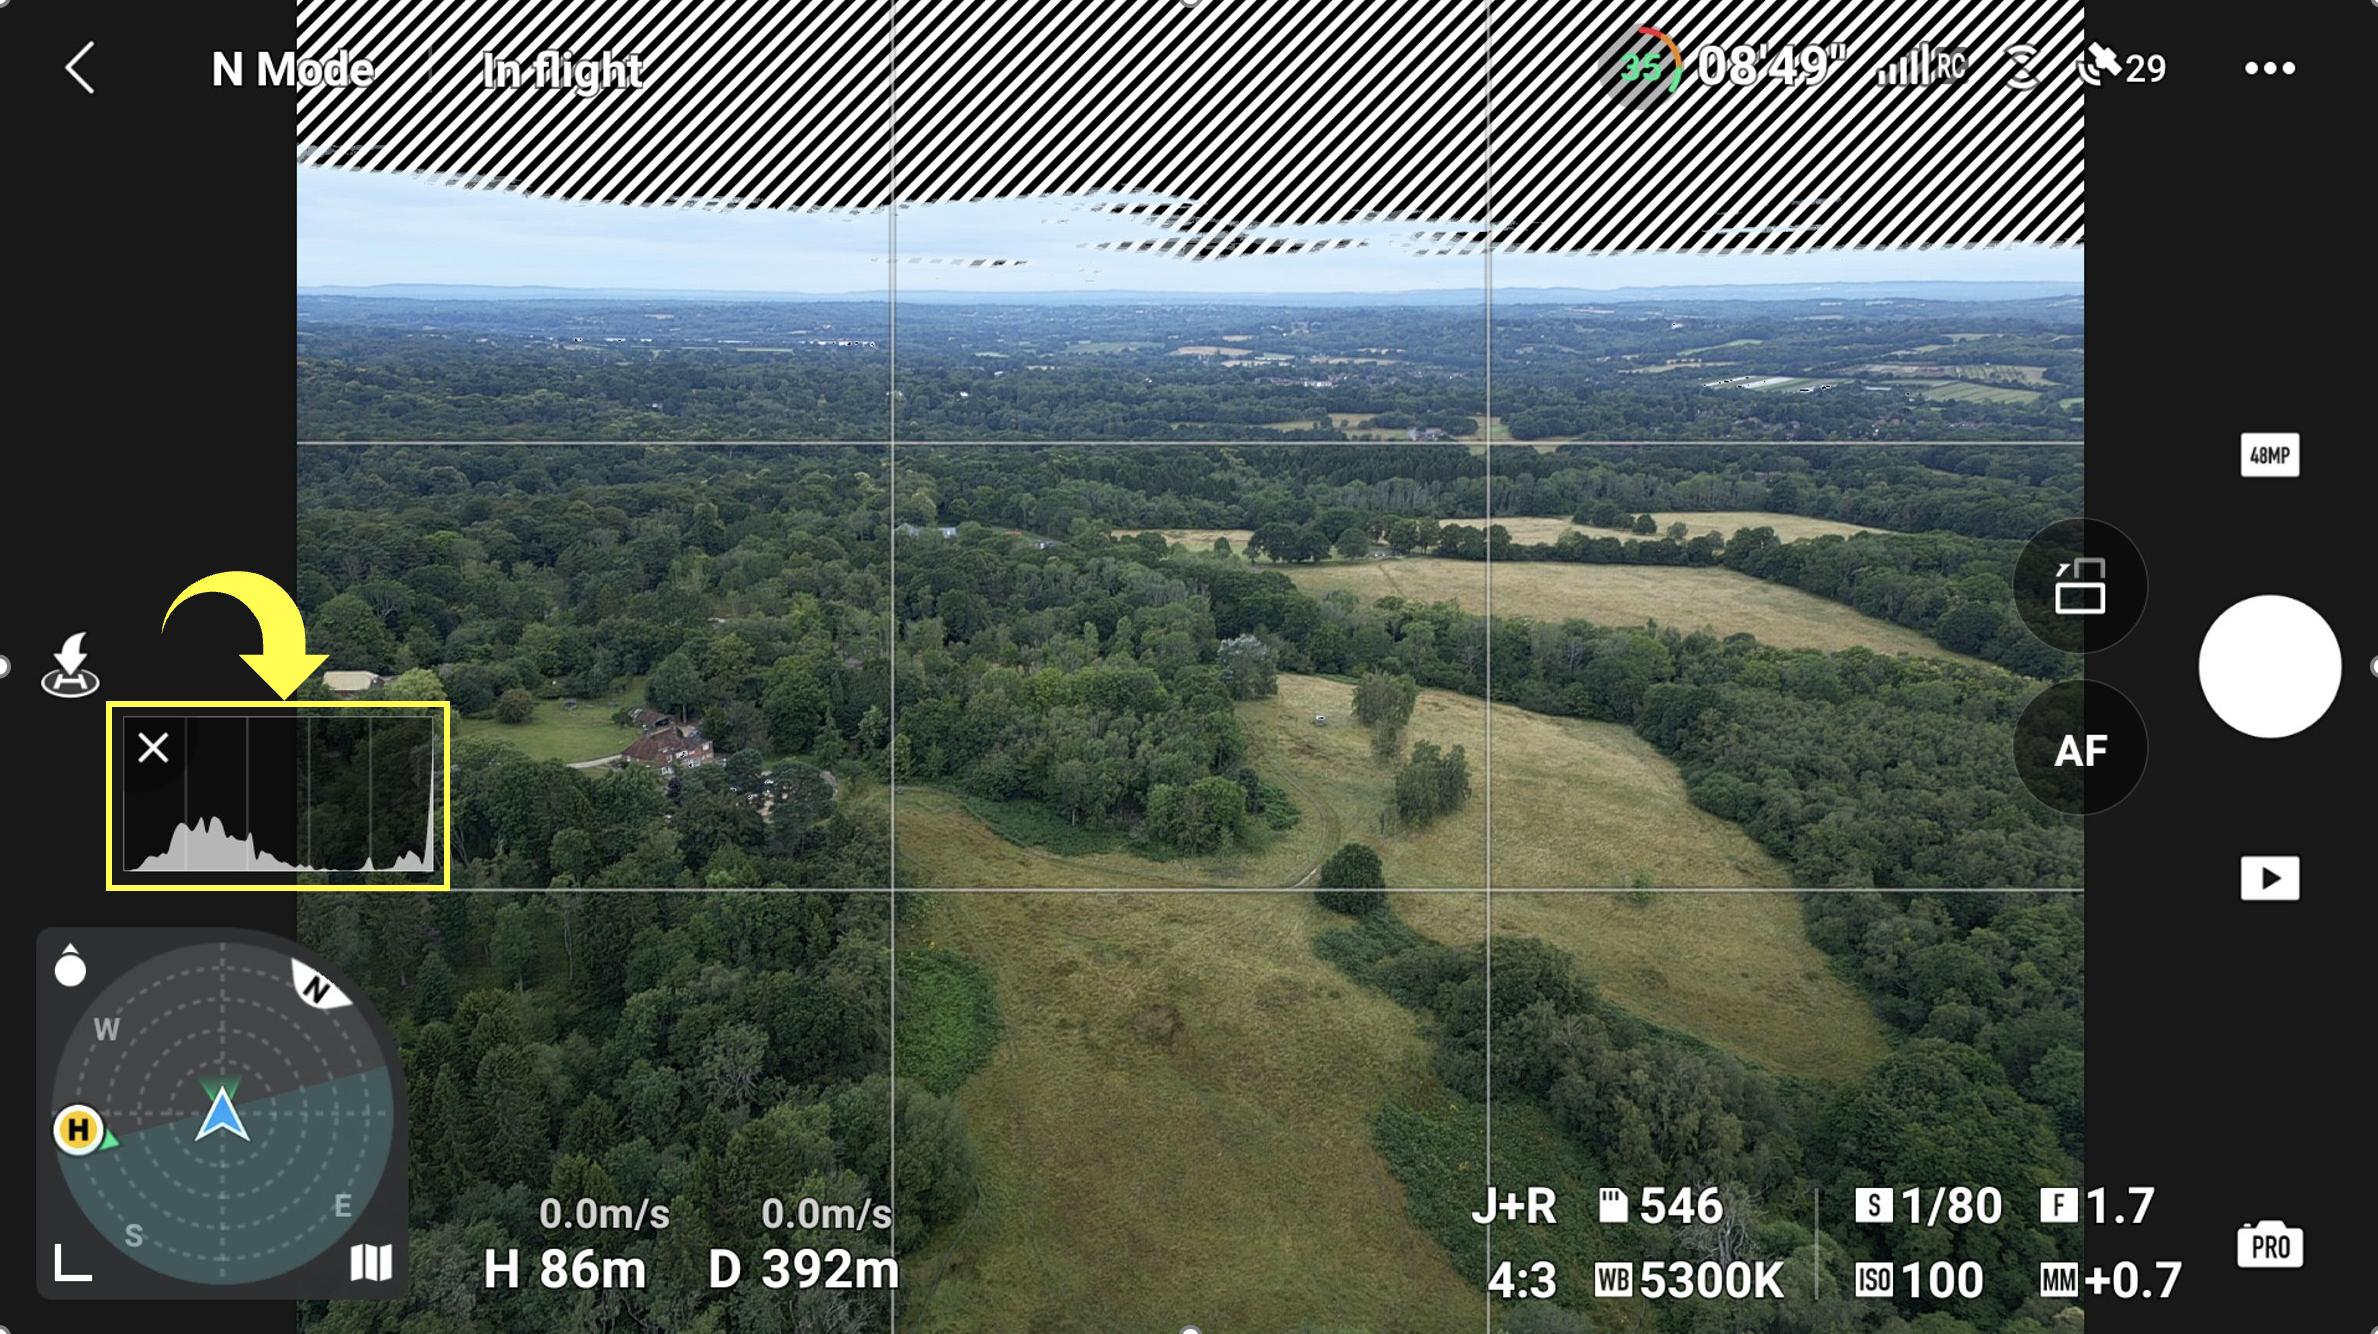
The Overexposure Warning feature is a little easier to explain. All this really does is highlight parts of the image that are overexposed with black and white moving lines. To some, this might be a bit too distracting, but I use the same option on my main Fujifilm camera and find it a useful feature to enable to prevent overexposing parts of the image.
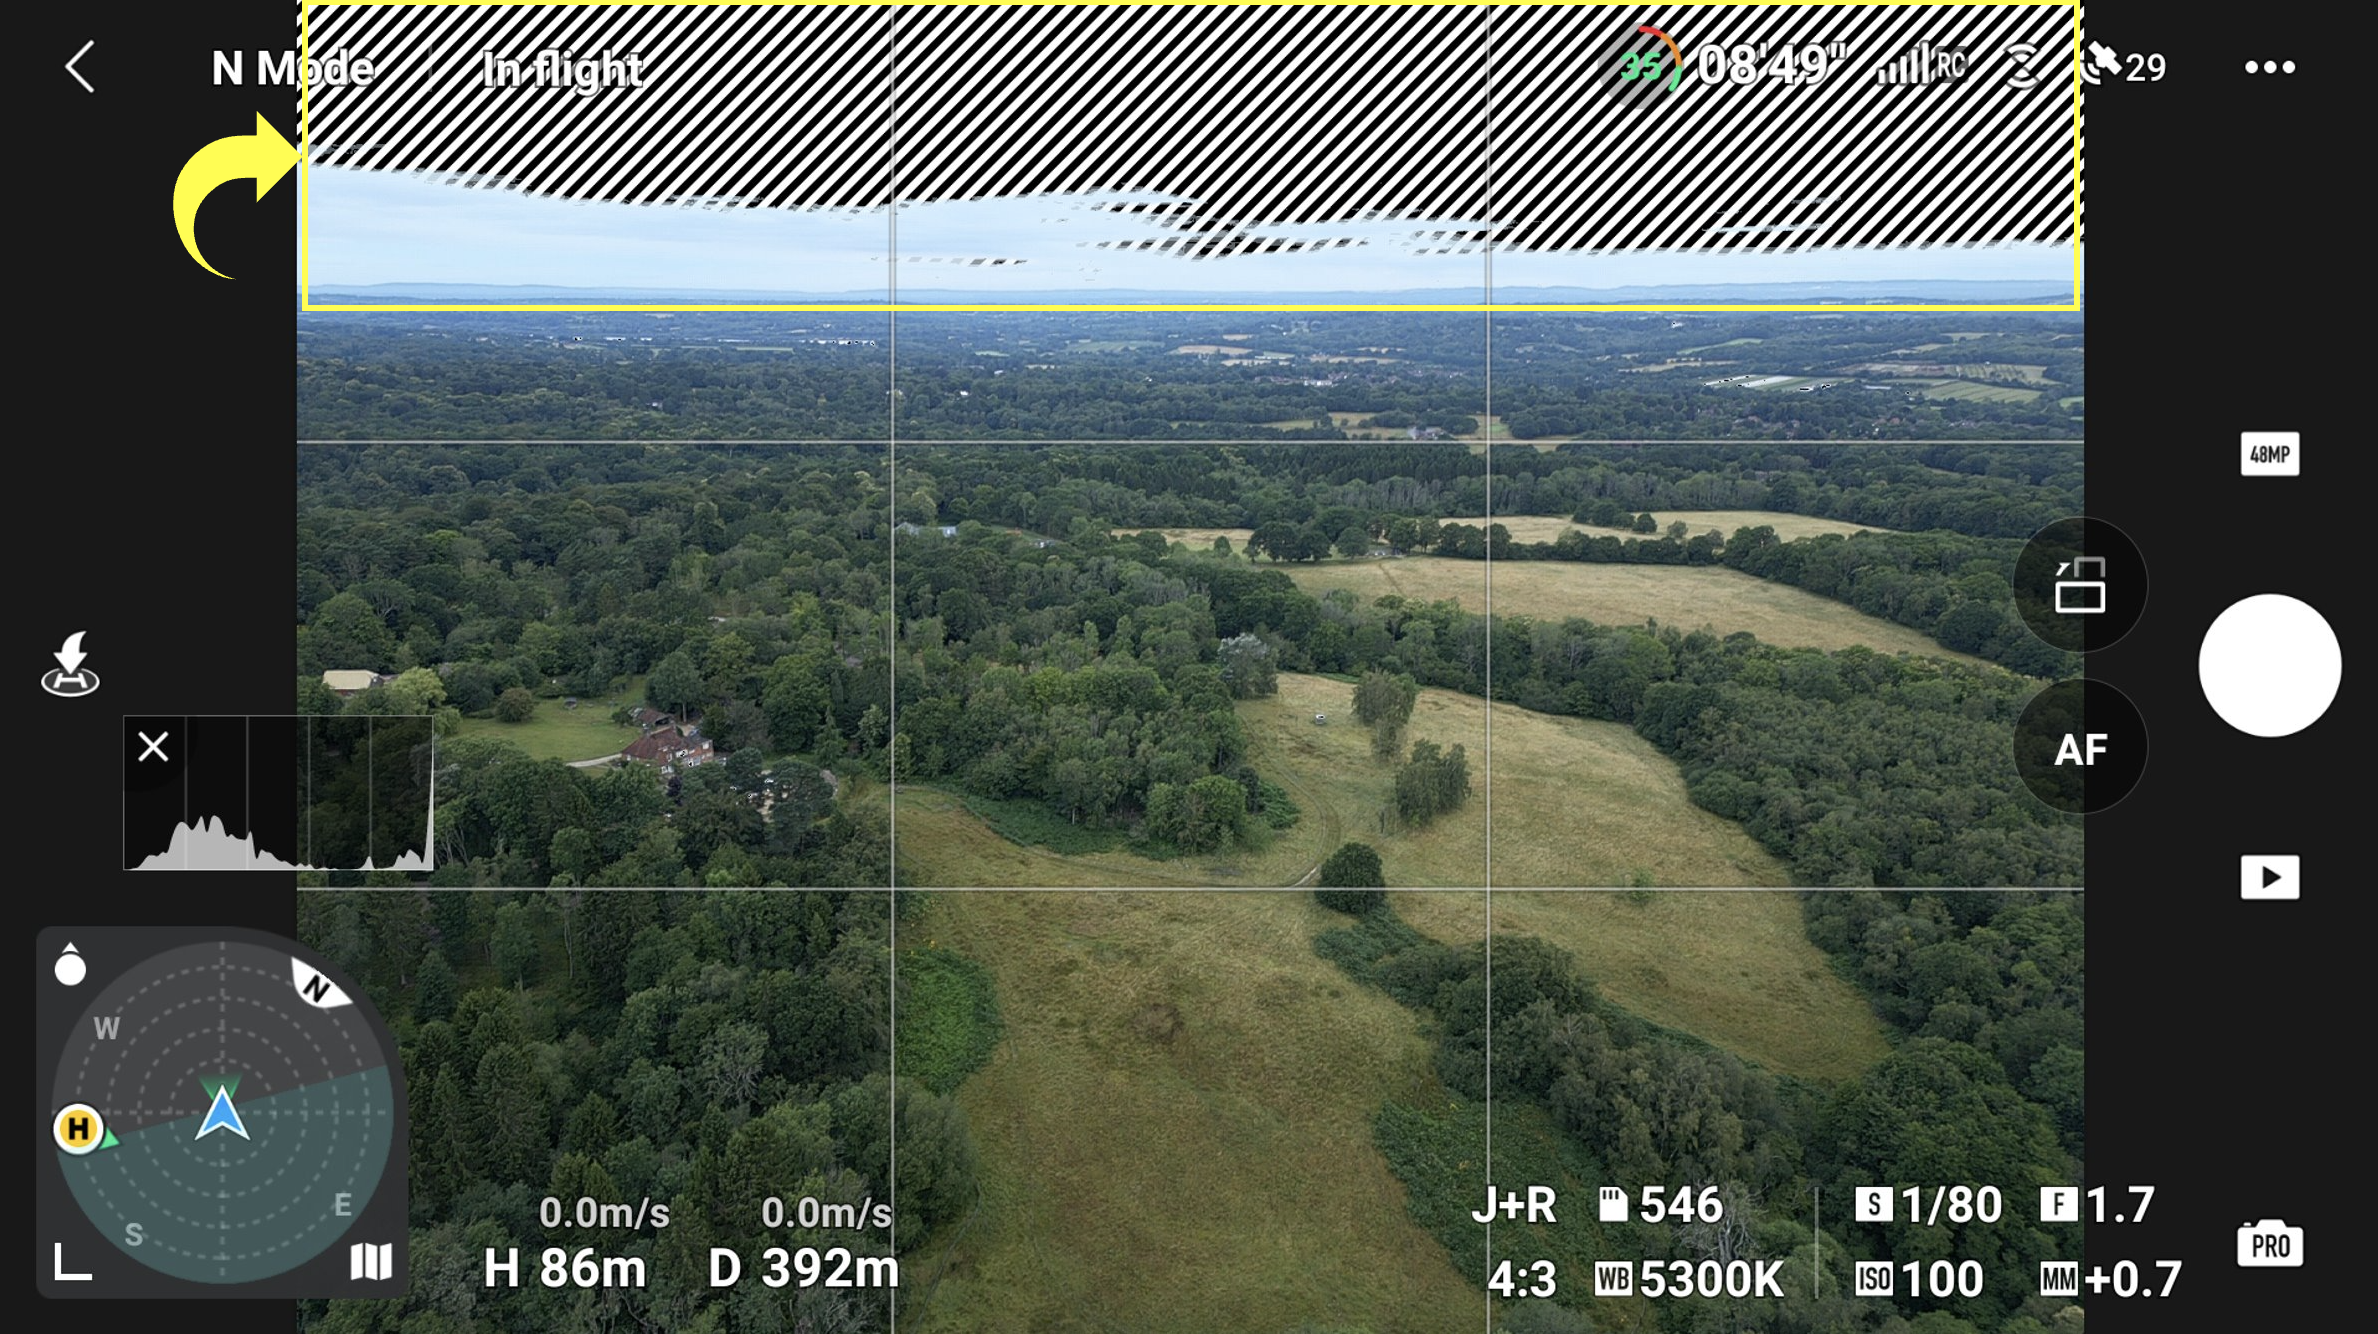
To enable one or both features, select the three dots on the top-right of the screen to open the main menu. From here, select the Camera settings sub-menu and scroll down. Here you will see both options with a toggle switch to enable or disable the feature.

Shoot to the right
This suggestion requires the histogram to be enabled, so check out the previous point to see how this is done.
Typically, the more light collected onto the sensor when exposing an image, the higher the quality, because less noise and artefacts will be present in the resulting photo. So, one technique to try is to overexpose an image by a stop or two where the histogram will be heavier weighted towards the right. This is where the term “Shoot to the right” or STTR comes from and is commonplace in traditional landscape photography.
Shooting to the right should be practised with a degree of caution. For example, slowing down the shutter speed risks adding motion blur to an image and if not careful, you can also end up pushing it too far and clipping the highlights. Shooting to the right along with AEB being enabled (see the next tip) can help get around these issues.

Use AEB mode when shooting in high dynamic range situations
AEB stands for Auto Exposure Bracketing and is a super useful feature enabling you to capture varying exposures of the same scene, all with a single press of the shutter button. It works by taking a base exposure using the settings you have already chosen, then taking either one or two extra photos on either side, increasing or decreasing the exposure by a stop each time. This results in 3 or 5 separate images which can be merged in your chosen image editor later.

DJI Mavic Mini 3 | 24mm (effective) | 1/2500th Second | f/1.7 | ISO100
As I mentioned at the beginning of this article, the DJI Mini 3 Pro has a smaller sensor, with smaller pixels compared to the higher end/bigger drone models, meaning it will have more difficulty properly exposing a photo in high dynamic range scenes. So, to make sure I gather as much image detail in the highlights and shadows as possible, I will take 5 bracketed images of a given scene 90% of the time. Not all photos will need to be bracketed, but the file sizes are relatively small and, in my opinion, the benefits significantly out way the minimal drawbacks.
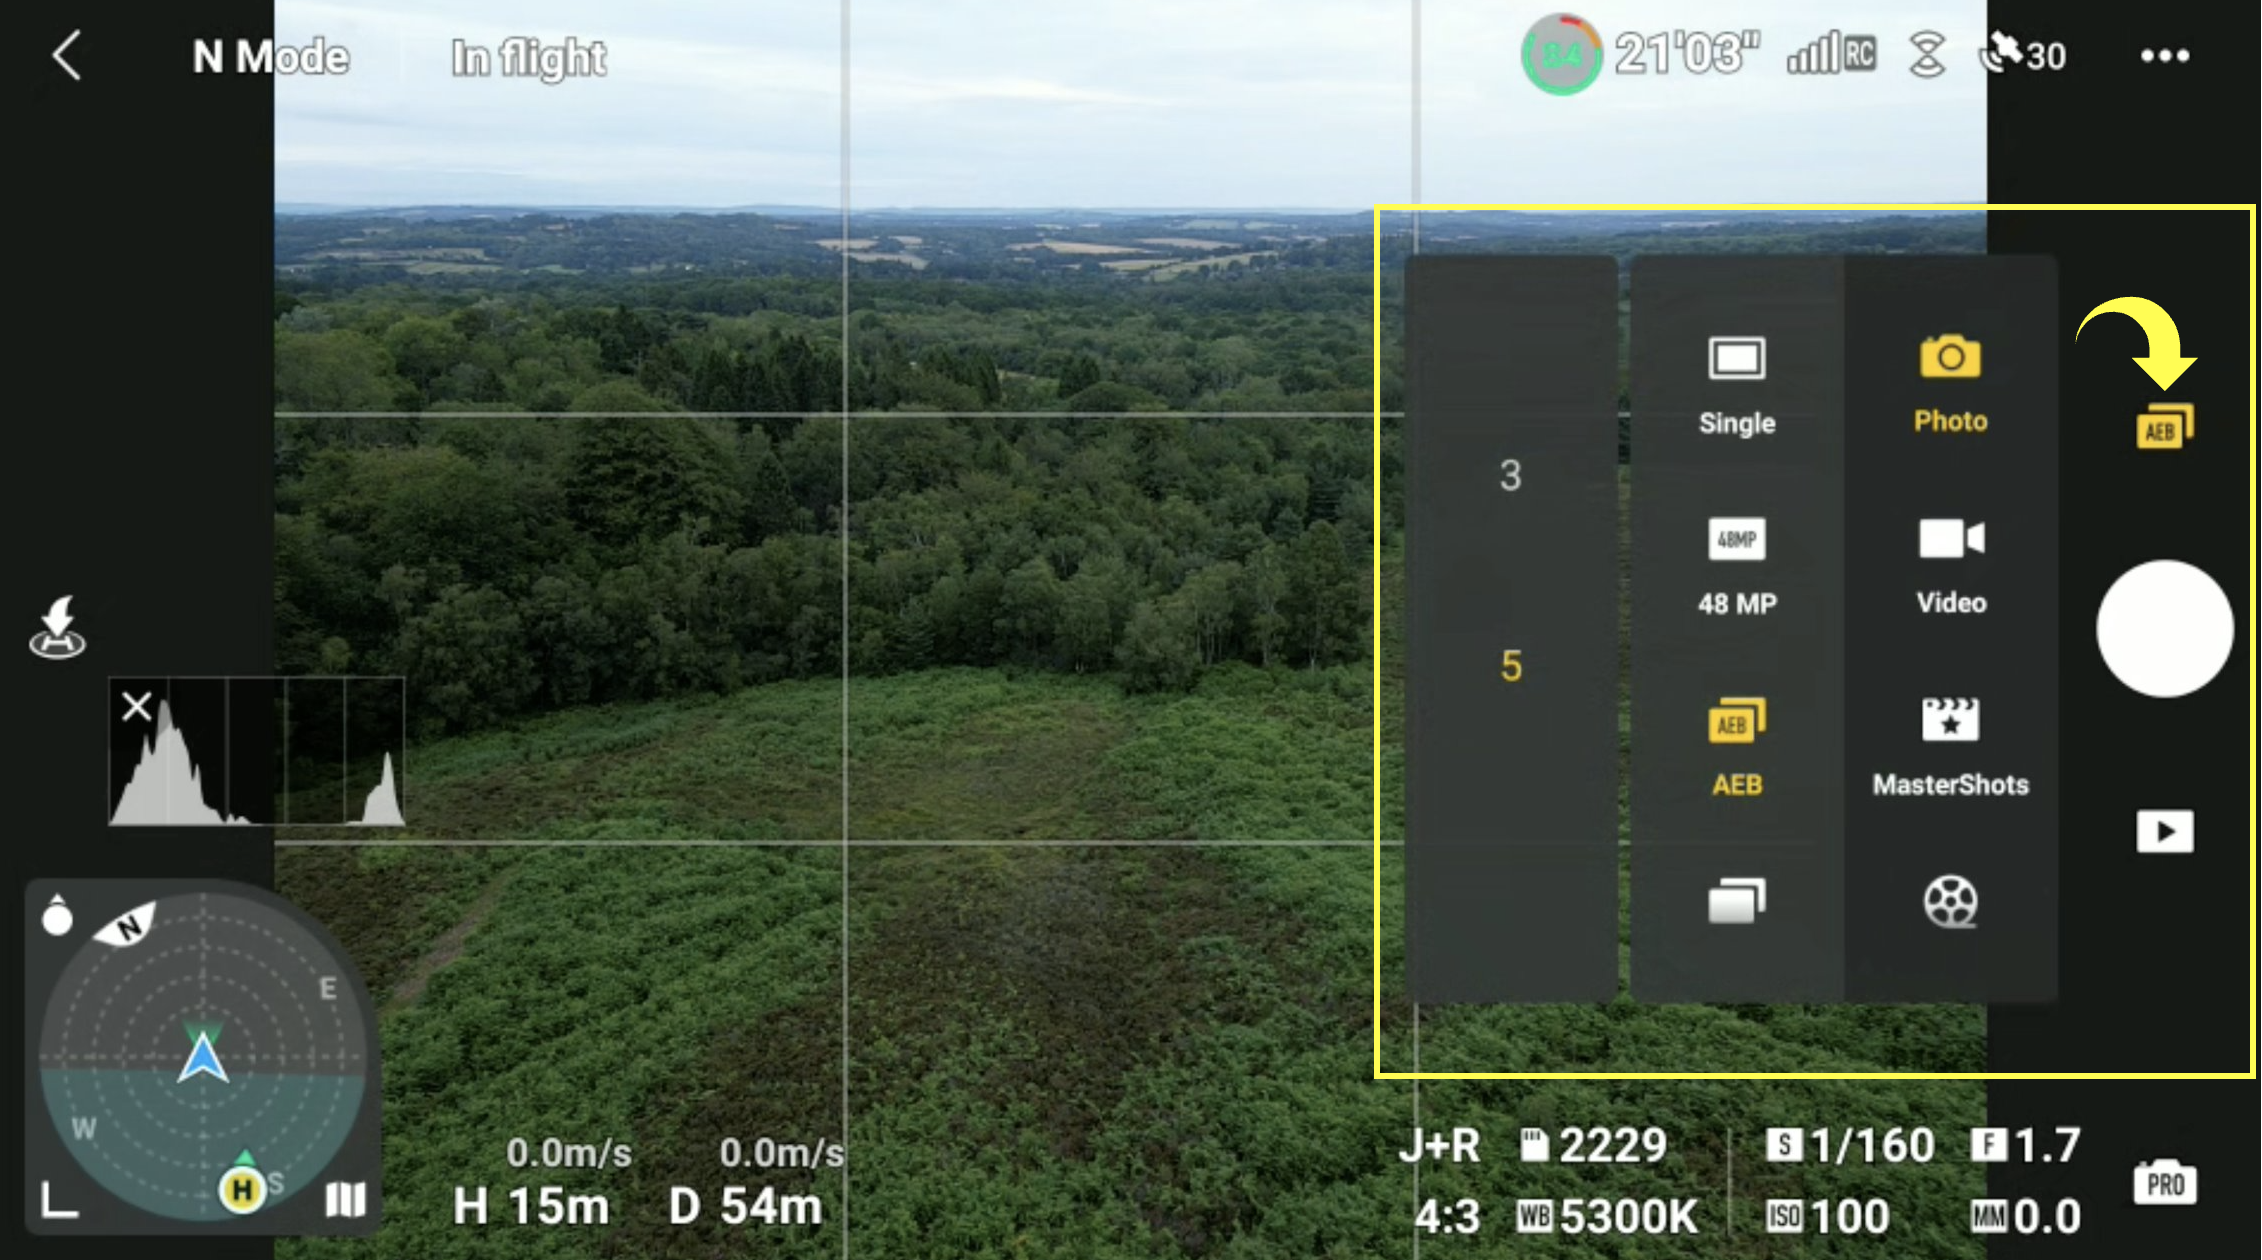
To enable AEB when in photo mode, select the icon just above the screen’s shutter button, select Photo, then AEB, then select whether you want to take three or five bracketed images. Select the AEB icon above the shutter once more to close the menu.
Capture a panoramic image for maximum resolution
The native image resolution for the Mini 3 Pro is 12MP which, by modern standards is on the lower side and if you plan to print your photos, then a great way to boost your resolution is to take multiple images and stitch them together in post. There are actually a few ways to achieve this.
First up, there are the built-in Pano options. If there is plenty of light and the dynamic range isn’t too high, then using one of the built-in pano modes is a great option as the drone will take care of panning and picture taking. All you need to do is set your exposure settings and press the shutter button.
I used the built-in Pano mode when I created the picture below.

DJI Mavic Mini 3 | 24mm (effective) | 1/2000th Second | f/1.7 | ISO100 - Wide Pano Mode
When shooting in jpeg+raw, the drone will automatically stitch the JPEG image and place the individual raw files in their own sub-folder on your memory card, ready to be imported and merged into your chosen software later.
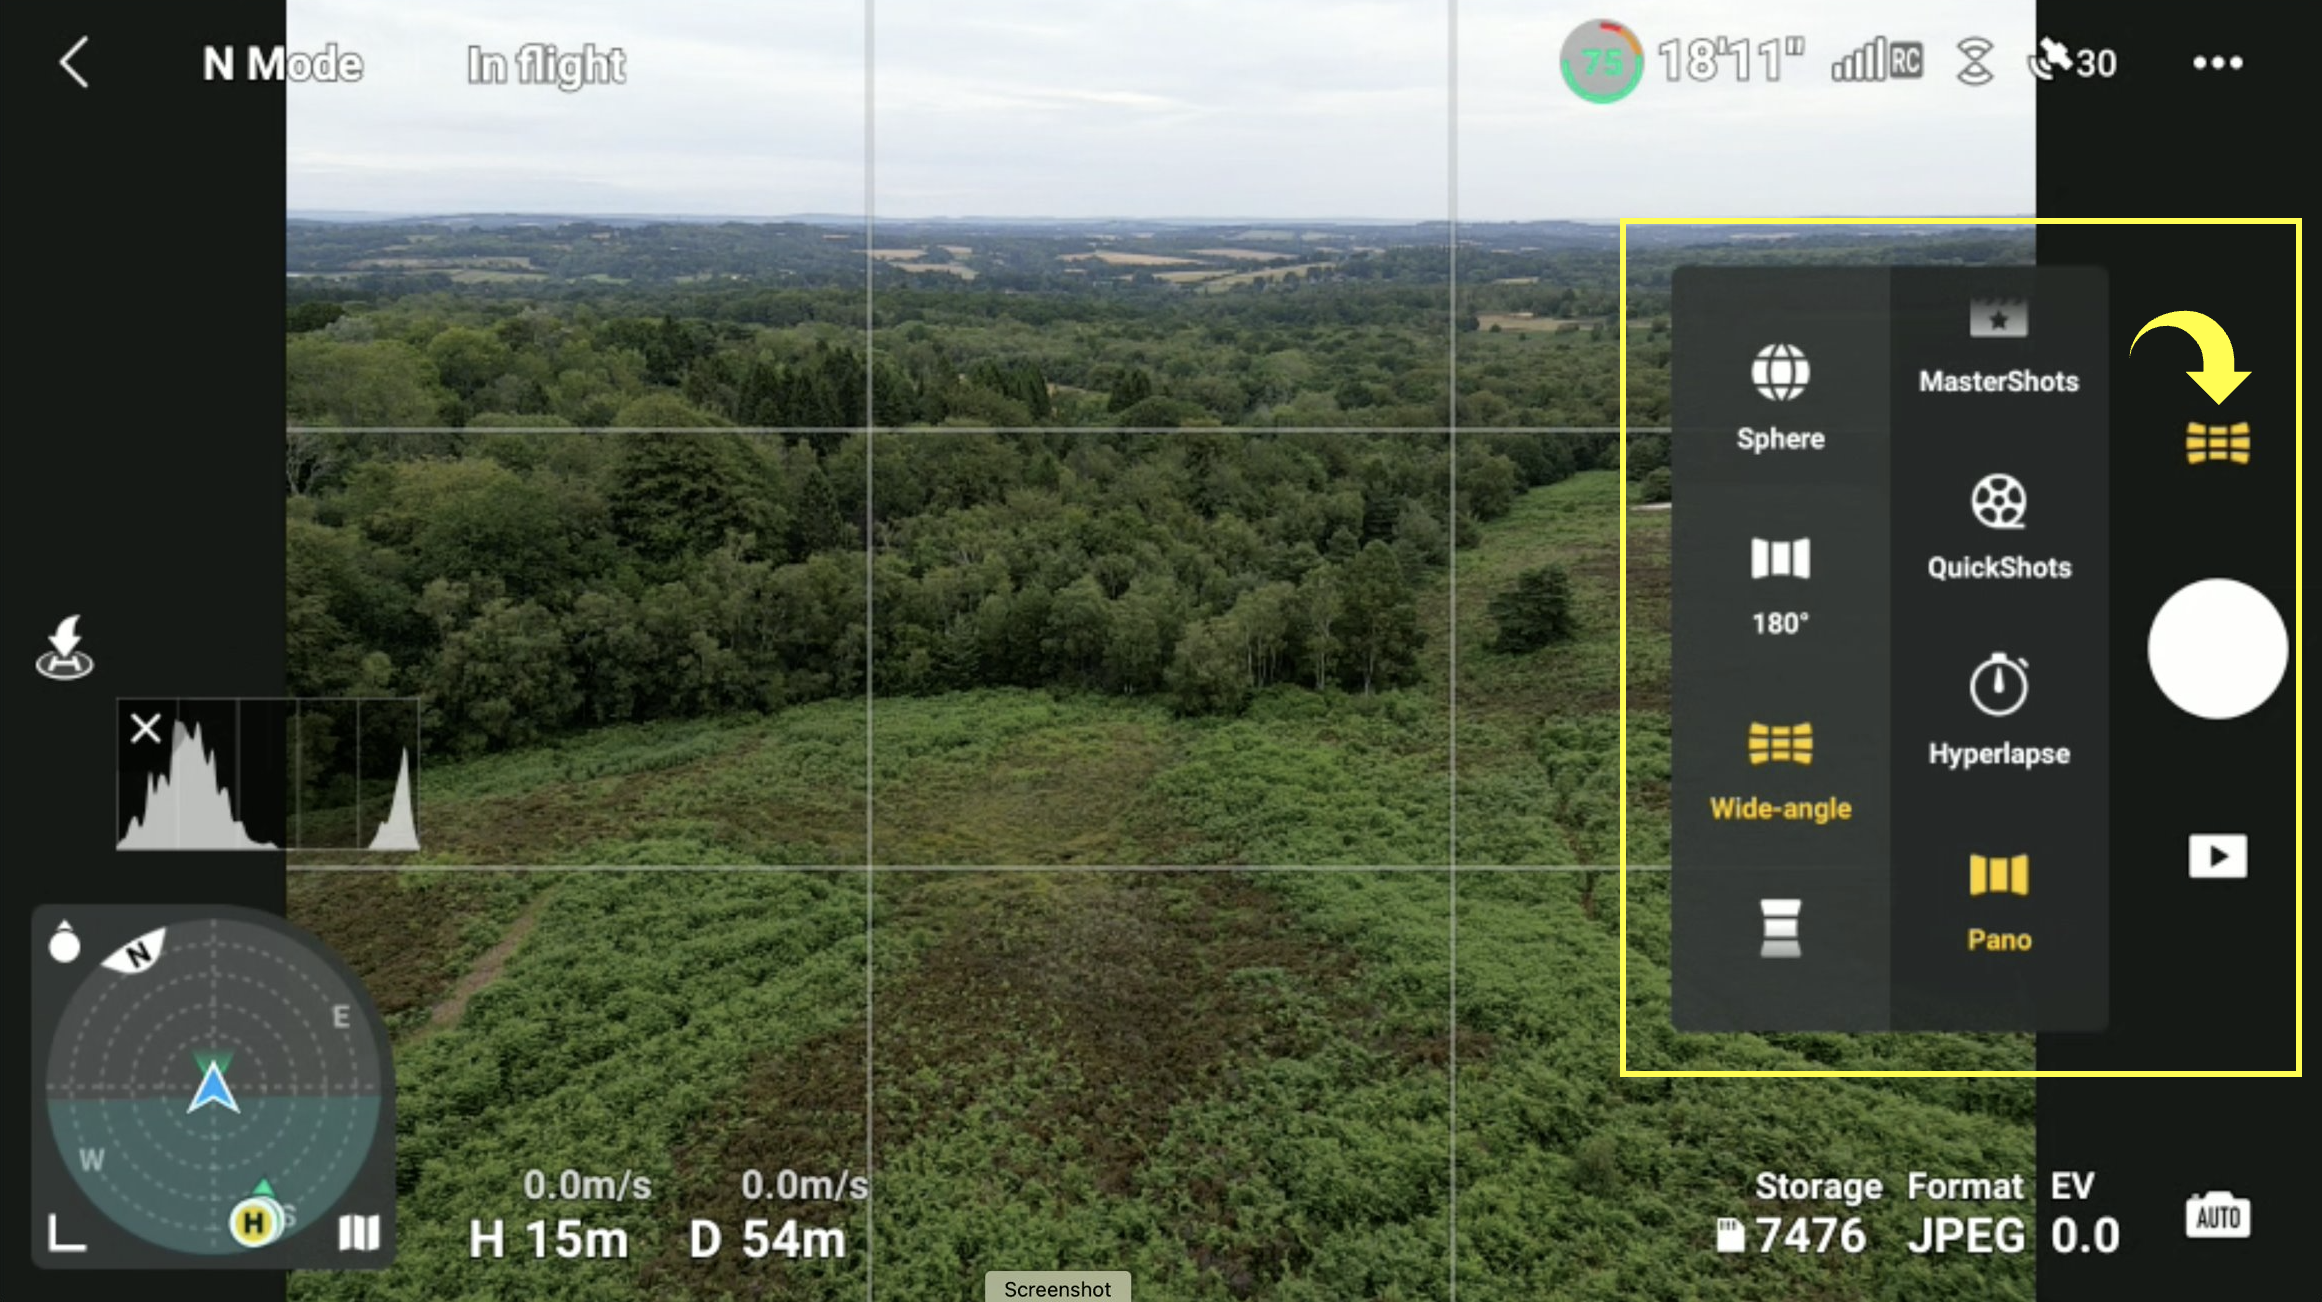
To access the built-in pano modes, choose the icon above the screen’s shutter button and when the menu opens, scroll down and select Pano. Here you can select from the different panorama options which are Sphere, 180°, Wide Angle, and Vertical. I won’t go into all the various options here but for a traditional panorama, you would select the wide option. In this mode, the Mini 3 Pro will take a grid of 9 photos automatically.
The built-in pano modes are incredibly useful but to retain more control of the final image, I prefer to take the individual photos manually, like I would when taking traditional landscape photos with my main camera. My typical approach would be to switch the camera to portrait mode (a welcome feature introduced in the Mini 3 Pro) as this provides more vertical resolution without the need to tilt the camera up or down, thus avoiding any unnecessary distortion which would need to be dealt with in post. I will then pan horizontally, taking individual photos as I go, overlapping by 30-50% and leaving a little room on either side for cropping.

DJI Mavic Mini 3 | 24mm (effective) | 1/5th Second | f/1.7 | ISO100
Create a manual pano with AEB for maximum dynamic range and resolution
This is the number one reason why I like to create my panoramas manually. For reasons only known to DJI, the Mini 3 Pro does not have the ability to take AEB images in pano mode. Maybe it will be introduced later but this seems an obvious feature to add with a firmware update. So, for now, I manually combine the two by taking a manual panorama with the 5-image AEB mode enabled. The resulting images will have the highest (native) resolution with the most image detail and the highest dynamic range.
I will then import them into Adobe Lightroom (my chosen image editing software) and with all the raw images highlighted, I select Photo - Photo Merge - HDR Panorama from the main menu.
With the sun setting behind the mountains, I needed all the dynamic range available to avoid blowing out the sky when creating the panorama below.

DJI Mavic Mini 3 | 24mm (effective) | 1/6400th Second | f/1.7 | ISO100
Use the 48-megapixel mode, (but do so with some caution)
The Mini 3 Pro comes with a high-resolution stills mode, allowing you to take photos at 4x the resolution compared to the base 12-megapixel option. In the right conditions, using the 48MP mode can help when you might want to crop the image later or print your photos even bigger.
Sounds too good to be true, right? Well, maybe. Although the native resolution is 12MP, to achieve a 48MP image, the Mini 3 Pro’s camera has a type of filter (called a quad bayer filter) which, splits each of the 12MP into four, resulting in the 48 megapixels mentioned. The issue is that smaller pixels capture less light and can result in noisier, lower-quality images. If the conditions are good for photography and there is plenty of light, the 48MP images can look really good, but when conditions are less than ideal, the images can leave a lot to be desired. That’s certainly my experience, anyway.
My usual workflow when taking stills with the Mini 3 Pro is to hedge my bets and capture a native 12MP image with AEB first and then a 48MP version which I can then compare and decide on the best one to edit later in Lightroom.
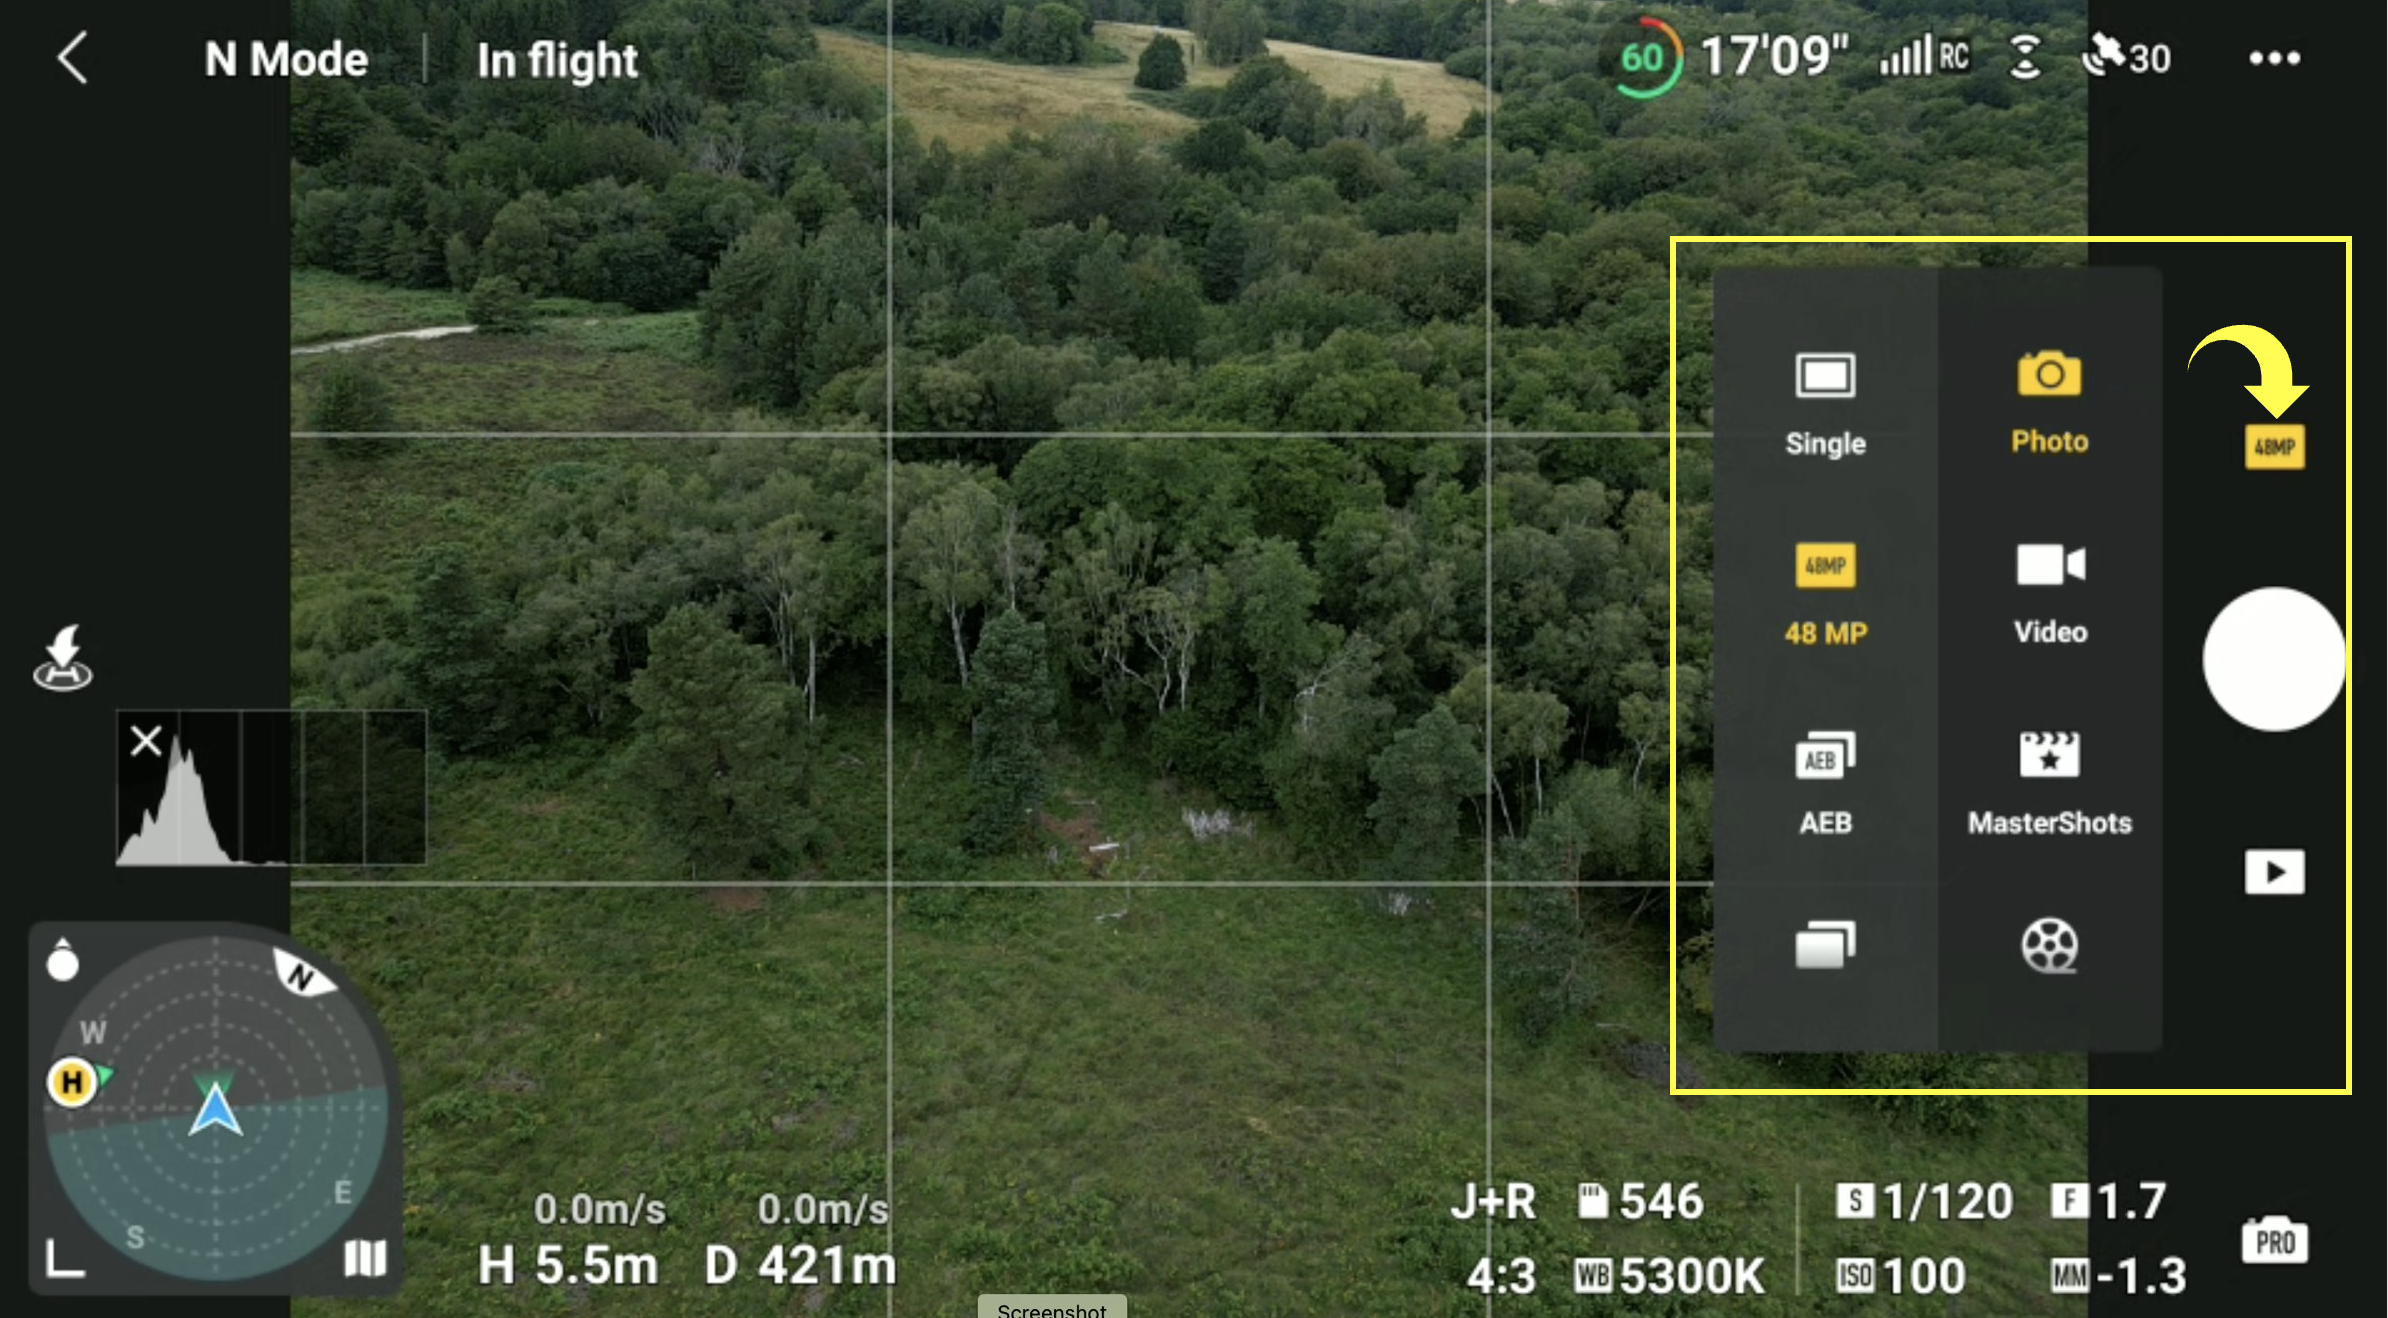
To enable the 48MP stills mode, simply select the icon above the screen’s shutter button, from there select Photo then to the right, select 48 PM.
It’s probably worth mentioning that using the base 12MP stills mode and taking a panorama can result in high-resolution, less noisy images too, but it will be a wider aspect, requiring the drone to be closer to the given subject. There is no right or wrong here, just different options suitable for different situations.
Set your white balance to manual
There are a couple of reasons why you might consider manually setting your white balance while out taking photos with the Mini 3 Pro. If you’re taking single, raw photos, then it’s not such an important topic as the white balance can be changed later in post. But if taking JPEGs, the white balance is baked into the image at the time it is taken, so getting it right while out with the drone is much more important.
Secondly, and the main reason I set the white balance manually is to keep all images completely consistent when taking panoramic images. As you pan the camera around, the changes in the scene being photographed might lead to changes in the white balance which can add more work when trying to seamlessly stitch the photos together later.

I tend to keep the WB at about 5300-5500 on brighter days and a little higher when there is more cloud around but typically, I will judge each situation individually. To manually set the white balance, you need to be in PRO photo mode. On the bottom right corner of the screen, there will be a square with WB and a Kelvin number next to it. This number is the numerical value the white balance will be set to. Select the WB icon and a familiar box will pop up. At the top, if the white balance is set to automatic, the box with Auto will be highlighted in yellow. If so, tap that and then use the slider to scroll through the numbers to your desired white balance value.
BONUS TIP: Fix it in post!
Ok, I hear you. We all want to take the very best photos while out in the field but sometimes you will reach the limit of what the Mini 3 Pro camera is capable of and have noisy photos. Luckily, we seem to be in a bit of a boom when it comes to software-based noise reduction. Amongst others, DxO, Topaz and not Adobe have all recently released updated software with some impressive noise-reduction features. So, even if you use all the suggestions I have listed in this article and still end up with noise or artefacts in your photos, try running them through one of these applications as it might save the day.
Printing your photos taken with the DJI Mini 3 Pro
If you regularly visit my website, you will know that I am a big believer in the printed image. Be it a single print, a photo book or wall art, the physical, tangible print is a far better way to view and experience a photo compared to a screen. With this in mind, I recently printed some of the drone photos I’ve taken over the last year to get a better idea of how they look in the flesh.
I printed a selection of my photos, taken using many of the techniques I mention above at both A4 and A3 sizes, and although it’s impossible to demonstrate here, I have to say, they look pretty good. Nice and sharp and with little to no noise. If you’ve taken some photos with the Mini 3 Pro and are on the fence when it comes to printing your photos, then my advice is to power up that printer or choose a good lab and get some printed. You won’t regret it!

DJI Mavic Mini 3 | 24mm (effective) | 1/30th Second | f/1.7 | ISO100
So, there you have it. If you follow some or all of these suggestions, you will take the very best landscape pictures possible from the DJI Mini 3 Pro and if you have any suggestions I might have missed, feel free to leave a comment below.
Until next time,
Trevor