
BLOG ARCHIVE
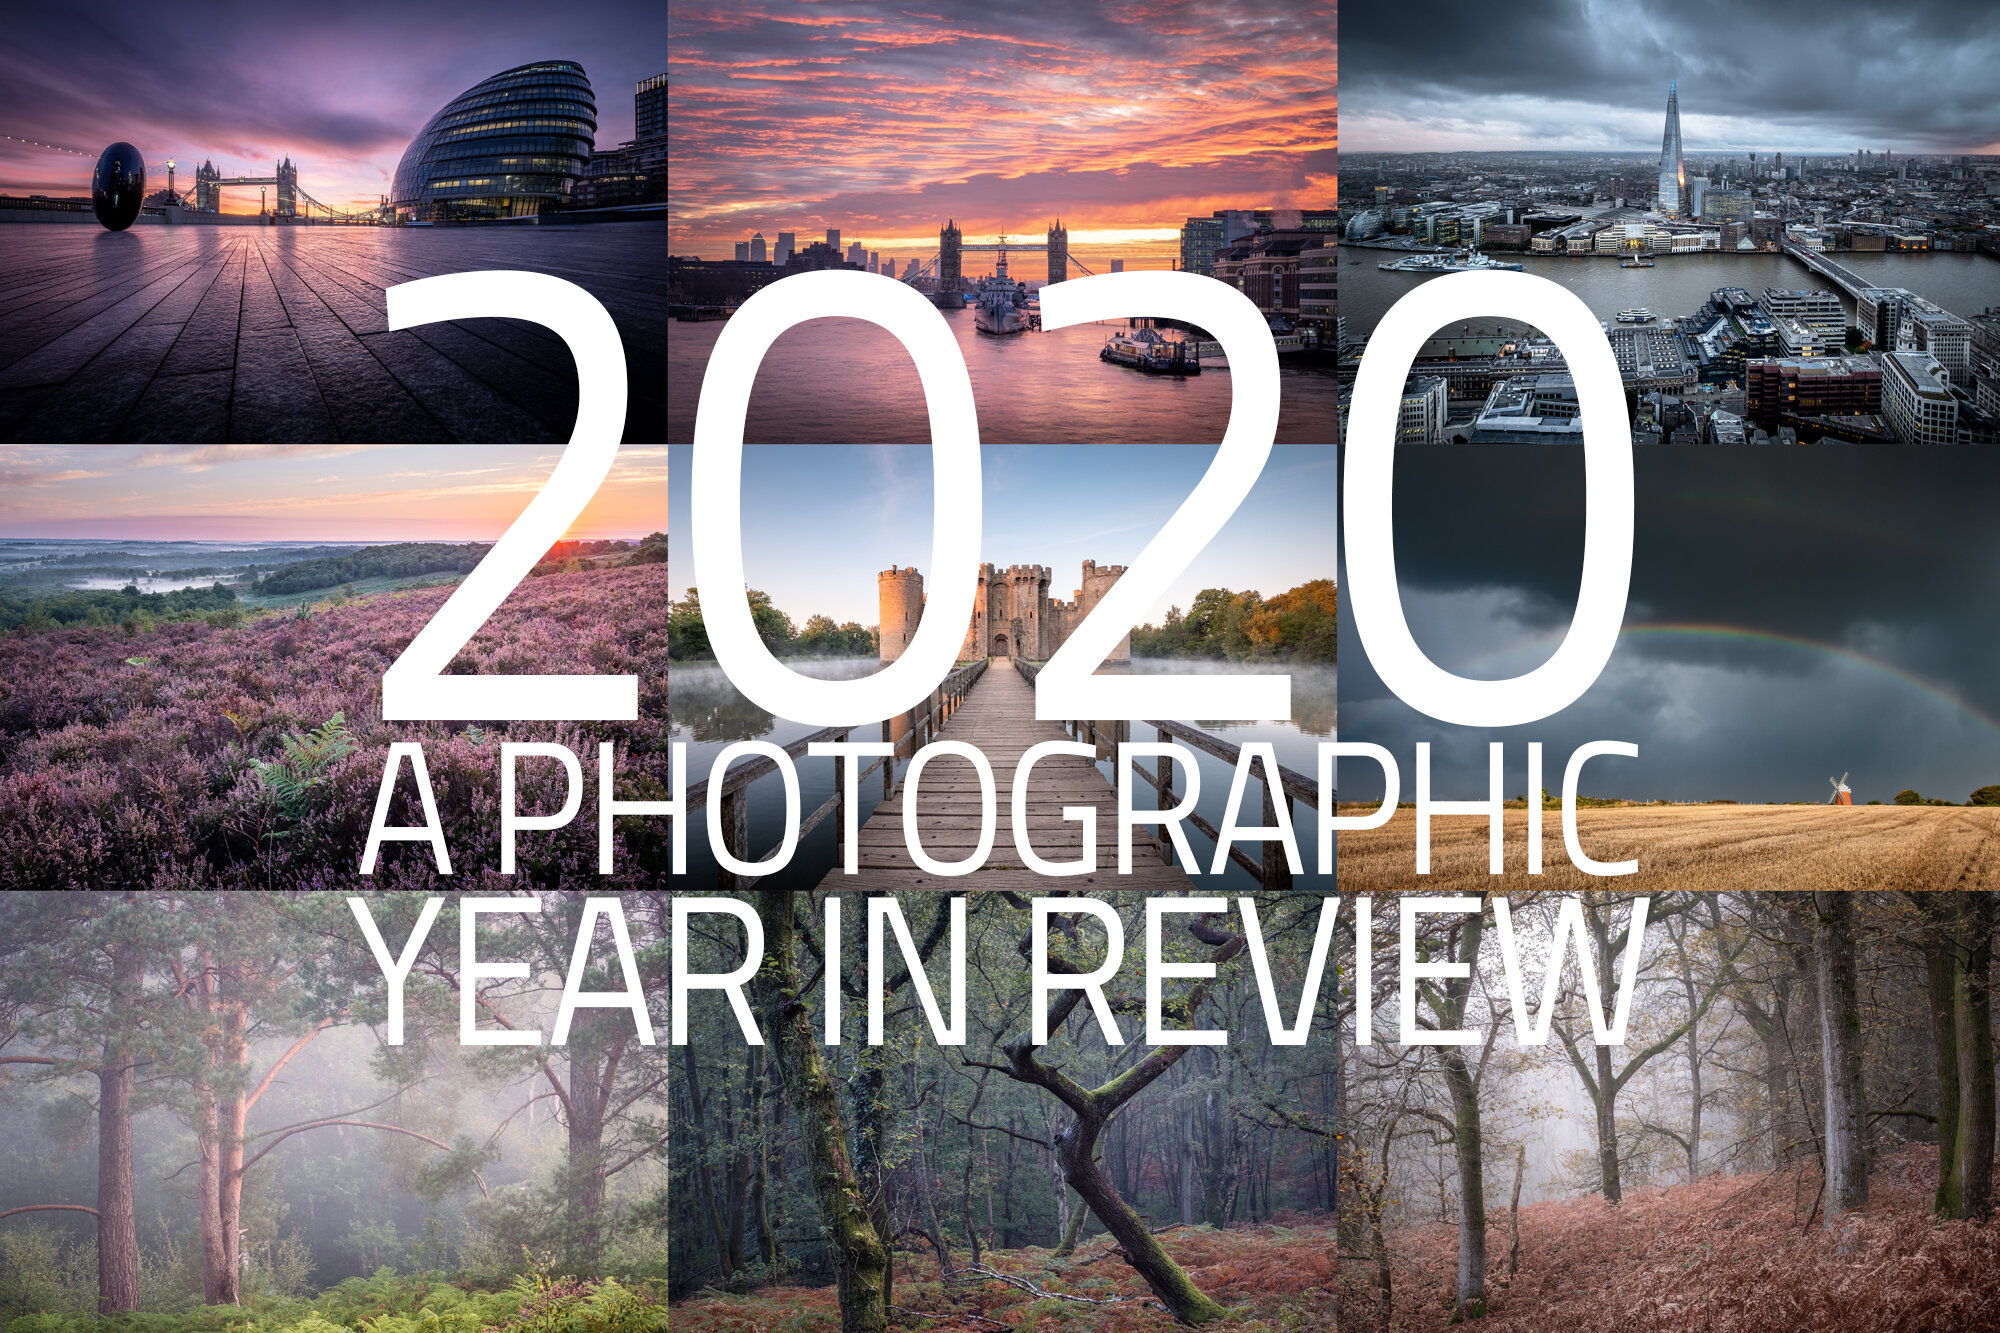
2020 | A Photographic Year in Review
My photographic review of 2020 including a look back at some of my favourite photos.
Wow, what a year it’s been! It’s been a tough one for so many people but you won’t find me complaining here as I feel I have got through it all so far relatively unscathed. Yes, I had to stay indoors, cancel some of my travel plans and home-school my children but I count myself lucky compared to many that have suffered devastating loss or our heroes on the front-line fighting back against this invisible disease on behalf of us all. As I said, I can’t complain.
Overall, it’s not been a bad year for me. My family and I still managed to get a holiday to sunny Greece during the summer, I’ve been able to continue working from home while using the time I would have spent commuting to continue focusing on my fitness and just the other day, ran my 1000th mile since the start of 2020.
So, what about photography? I started 2020 as I finished 2019 with some trips into London in January and February before it all changed. My camera went into hibernation during March, April and most of May and only really came out again from June but my photoshoots in London which I love so much have been few and far between ever since. Last year, I managed over 40 trips into London with my camera whereas this year I only just made it to 20 but thankfully I still came away with some photos I really like, three of which I’ve shared in my favourite 9 landscape shots of 2020 below.
Photographing the woodland
I would say the single biggest change I’ve experienced this year was my venture into woodland photography. It’s a photographic genre I’ve flirted with before but never really given it a good go. My photography style has always been about a significant subject in the landscape, be it a skyscraper in London or the piers along England’s south coast, but with the need to keep away from the crowds and remain socially distant, woodland photography was an obvious direction to take, but I have to say, trying to create interesting compositions in an otherwise random and chaotic environment was very new to me and a challenge to say the least.
That being said, I have stuck with it and after a few months of exploring my local forest and regularly coming away without a photo, I do feel I’m getting into a groove and finding my style so I’m very much looking forward to seeing what I can capture during the upcoming winter months.
I have absolutely loved reconnecting with nature and have really enjoyed the peace and tranquillity which has, without doubt helped me personally during the more anxious times this year. So, when life gets back to normal, I’ll certainly be continuing this woodland photography adventure.
Print and backup your photos!
During 2020, I released a couple of longer form articles and shared some useful information about two photography related subjects that I feel are incredibly important. I’ve been printing my photos for a few years now and whether you use a print lab or your print at home, I think there is so much to gain by creating printed versions of your photography.
Next up and although not quite as sexy as printing photos this one is equally as important. To some people, protecting their photos is a bit of a minefield, full of pitfalls, uncertainty and jargon, so I decided to share my own photo backup workflow in order to help others who might be struggling with their own.
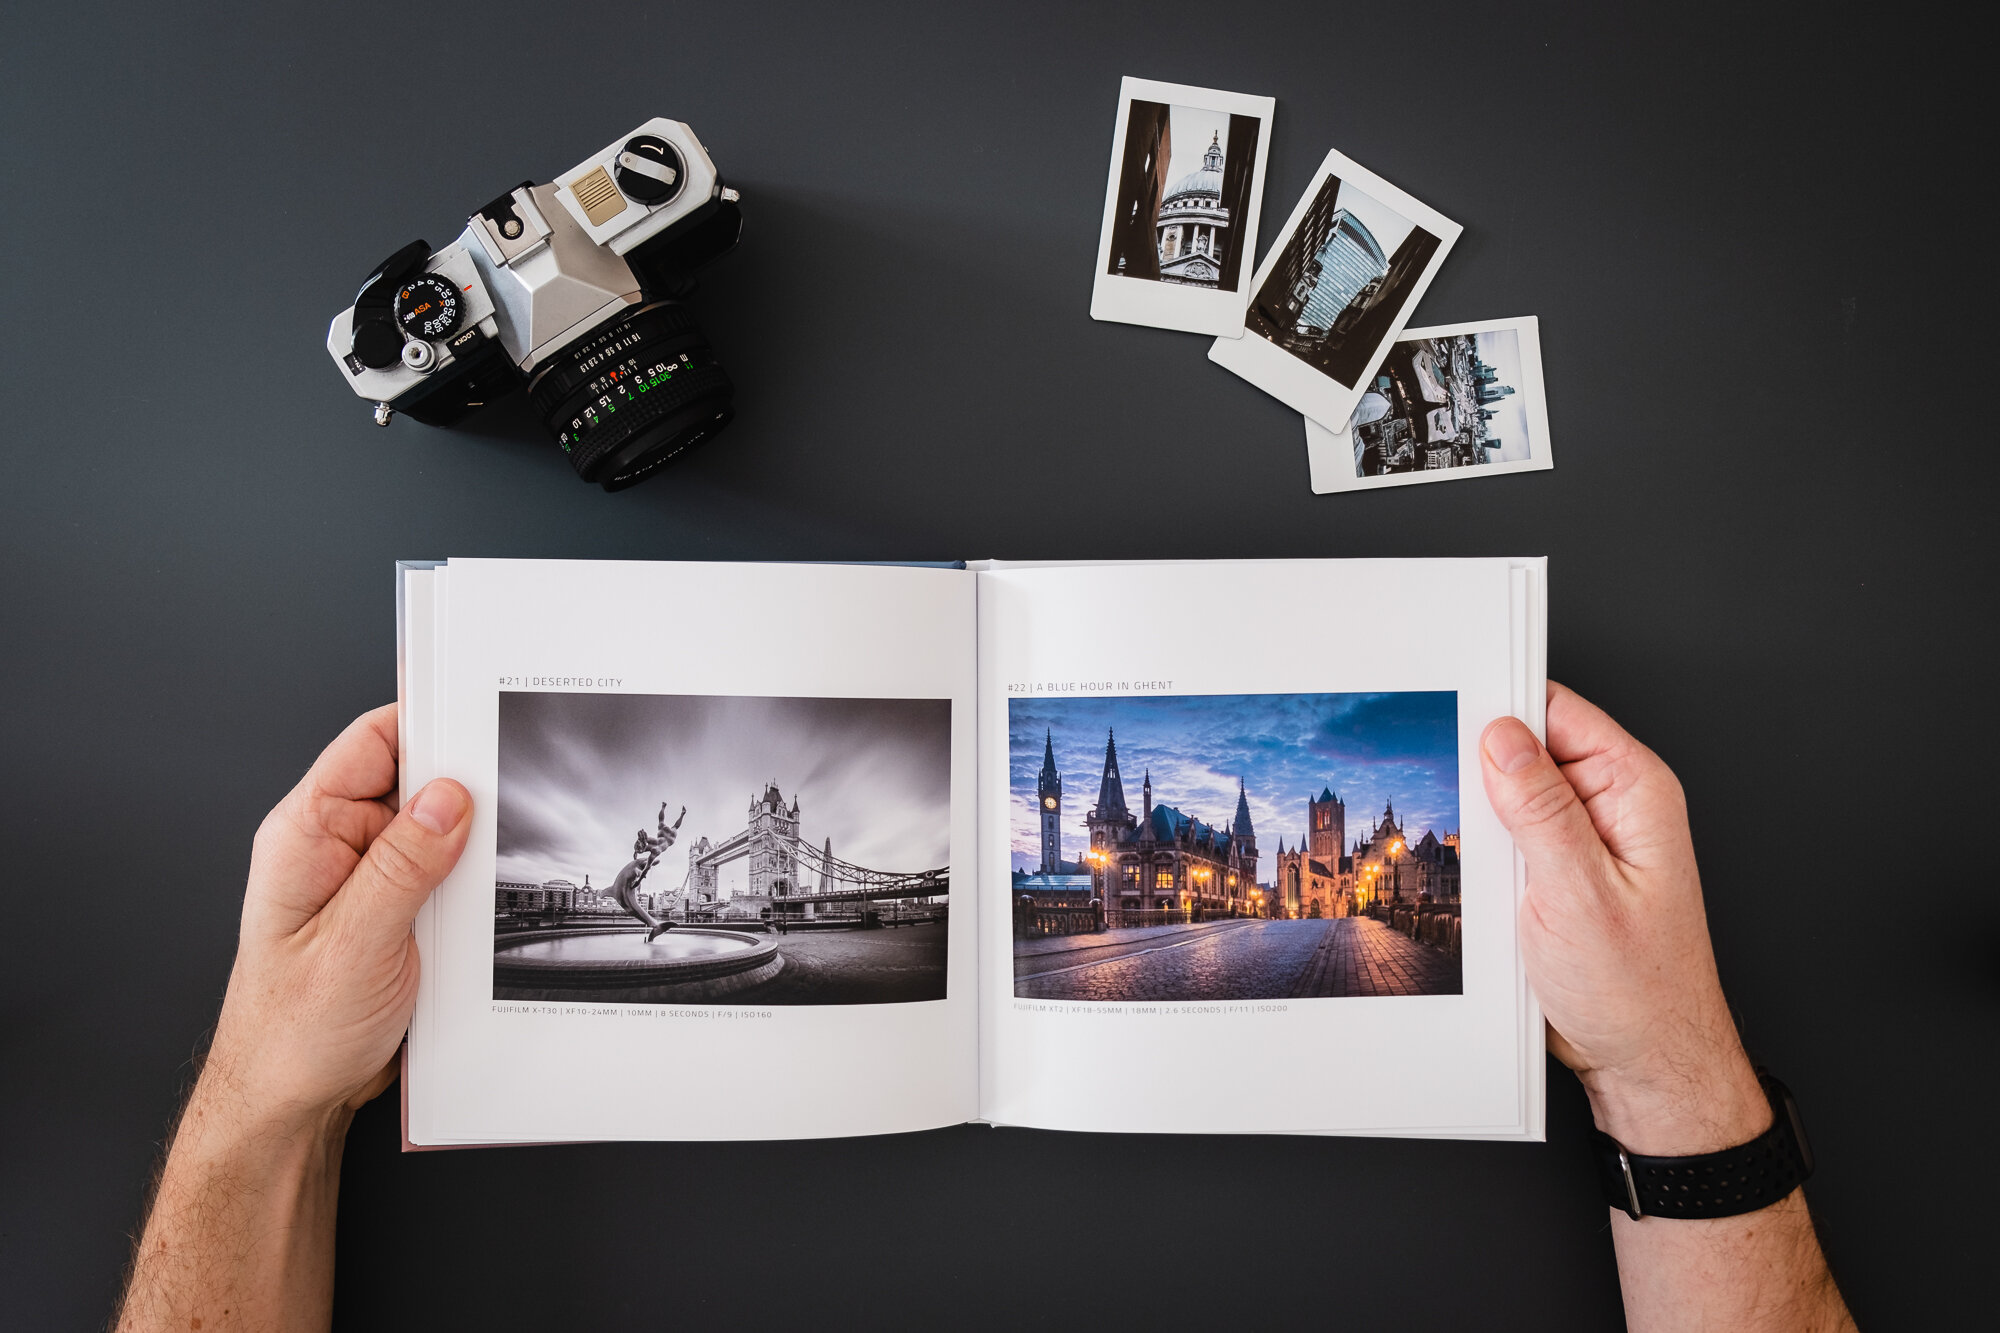
9 of my favourite landscape photographs I took in 2020
Given the year we’ve all had, I was still pretty pleased with the crop of photos I took in 2020. I have around 20-25 keepers taken in London and across the South East and as I have done over the last few years, I have shared my 9 of my favourite landscape photos taken over the last 12 months.
For those I’ve already shared on my Weekly Photo page, I have included a link to take you straight to the post where you can read a little more about the picture.
Landscape photography in London

Fujifilm X-T30 | XF35mm F2 | 35mm | 1/20th Second | f/10 | ISO160
Titled “London’s Burning”, this photo was taken early in 2020 during one of the most epic sunrises I have ever seen and a worthy inclusion in my top 9 photos. Find out more about this photo here: London's Burning | Weekly Photo #64.

Fujifilm X-T30 | XF10-24mm | 10mm | 1/9th Second | f/11 | ISO160
Taken around More London, I had to get down low to get the strong lines that lead the eye over towards the recognisable shape of Tower Bridge and with the sunrise providing all of that amazing colour, I knew I had a keeper when I took this photo.

Fujifilm XT2 | XF10-24mm | 10mm | 1/6th Second | f/6.4 | ISO200
As soon as the restrictions were lifted after the summer, I booked myself in for a couple of trips to the Sky Garden to capture London from the rooftops. I took this wide-angle shot of The Shard across the river and just love the way that iconic shape stands alone in the centre of the frame, towering over the surrounding buildings under those moody clouds which shortly after brought some heavy rain which you can see over on the right-hand side of the frame.
South of England landscape photos

Fujifilm XT2 | XF10-24mm | 11mm | 1/20th Second | f/10 | ISO200
After deciding to photograph more around the south of England and less in London during the pandemic, taking a trip to the beautiful Bodium Castle was high on my list of places to photograph and I could not have asked for a better first visit back in May. The light was amazing and there was a light mist over the moat adding a special amount of atmosphere into the photo. Read all about it here: Misty Moat | Weekly Photo #63.

Fujifilm XT2 | XF10-24mm | 18mm | 1/50th Second | f/10 | ISO200
I was after a photo of wild heather for some time and after scouting a few locations, I came across this beautiful scene in East Sussex during a misty late summer morning. Read all about this photo here: Late Summer | Weekly Photo #72.

Fujifilm XT2 | XF18-55mm | 18mm | 1/1250th Second | f/7.1 | ISO200
One I haven’t shared yet but boy what a morning I had over at Halnaker in West Sussex back in the Autumn. I love the way the scene was lit by the sun behind me, those dark stormy clouds adding some epic drama and to top it off, a fantastic double rainbow! I’ll talk more about this morning in an upcoming Weekly Photo post so stay tuned for that.
Woodland Photography

Fujifilm XT2 | XF55-200mm | 55mm | 1/3rd Second | f/9 | ISO200
While on a sunrise shoot during a foggy morning in my local forest, I took this woodland photo of these Scots Pines amongst the ferns. Read all about this particular shoot here: Misty Dawn | Weekly Photo #78

Fujifilm XT2 | XF55-200mm | 86mm | 2 Seconds | f/10 | ISO200
Titled “Zigzag”, I took this photo in a local Forest and was drawn to the strong lines created by this interesting tree to the right. I wrote more about this photo here: Zigzag | Weekly Photo #80

Fujifilm XT2 | XF55-200mm | 55mm | 0.5 Seconds | f/11 | ISO200
I had some great fun photographing my local woodland during a foggy morning in November and really liked the arrangement of the trees on the left and right of the frame. These trees almost look as if they are bystanders watching the performer in its “ta-da” pose in the middle. I love the muted tones, carpet of dull orange ferns and that mist is the icing on the cake. I’ll talk more about this photo in an upcoming Weekly Photo post in 2021.
At this point, I normally talk about what I have planned for next year but to be honest, I just don’t know. Yes, I’ll continue to photograph London and the South East of England, I’ll continue to write my Weekly Photo posts and I’ll certainly be back photographing the woodland but other than that, with all that’s going on, we will just have to see what the year brings.
Thanks to all of you that have visited my website, supported me on social media and written to me with words of support and encouragement, it all means a lot and it really does motivate me to keep writing these articles.
I wish you all a 2021 that’s full of renewed hope, freedom and above all else, good health.
Until next year,
Trevor

A Christmas Gift Guide for Landscape Photographers
If you’re looking for some gift ideas for the landscape photographer in your life, then look no further as regardless of your budget, I have put together a useful list of great gifts to help you this Christmas.

Christmas is just around the corner and if you have a landscape photographer in your life, then this list will help you find the perfect gift. No matter what the subject, there’s no shortage of Christmas gift guides out there and although there are plenty of gift guides for photographers, I have decided to share a list that has some gifts aimed squarely at the landscape photographer. No matter what your budget, this list will you help you from inexpensive stocking fillers to something a lot more substantial. This Christmas gift guide for landscape photographers will provide you some much needed inspiration.
If you have a strict budget in mind, I’ve made it easier by separating this list into 3 price brackets, under£20, under £100 and £100+, so without further ado, lets jump into my Christmas gift guide for landscape photographers.
Stocking filler Gifts under £20 for Landscape Photographers
Easy Off Unisex Skiing and Photography Gloves

Landscape photographers are a funny bunch. We like to be out in the great outdoors when it’s cold, misty and frosty and avoid warm sunny days so what better gift for a landscape photography at Christmas than a pair of Easy Off Gloves. These gloves are a perfect, inexpensive gift for landscape photographers as the index and thumb pull back allowing them to operate the camera without needing to remove the gloves, ensuring their fingers stay nice and toasty.
Water Resistant JJC SD Card Holder
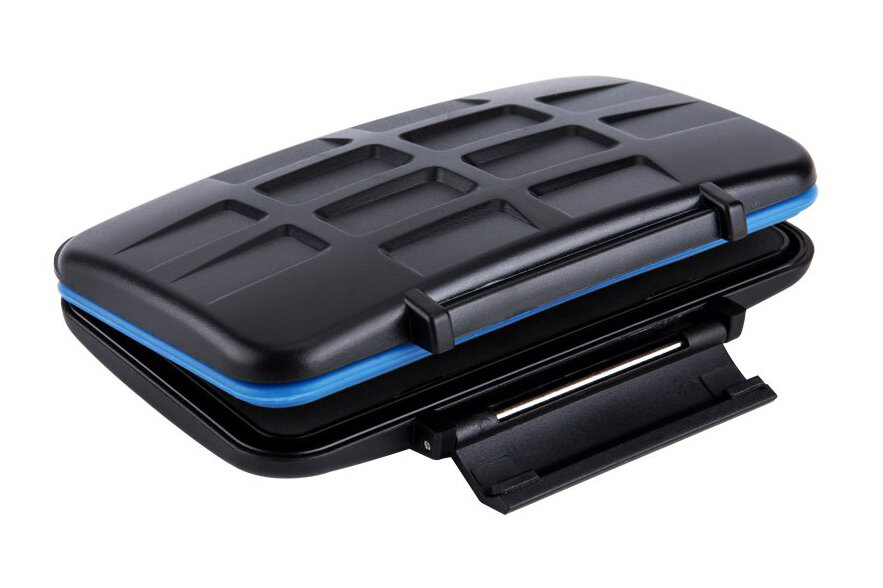
The photos we take are the single most important thing to us while on a shoot so it’s important we keep them safe so this rugged, waterproof memory card case is a perfect addition to any landscape photographer’s bag. Just check beforehand what cards the photographer you are buying for uses, just to make sure you get the right one!
Thermos Stainless King Flask, Matt Black, 470 ml

I have one of these and it comes with me for all of my woodland photography adventures. It keeps my coffee hot for hours and doesn’t leak at all. A perfect gift for any landscape photographer to keep them warm on those cold, winter mornings.
APUNOL 2Packs Head Torch, Rechargeable Waterproof Headlamp LED Headlight

Getting up for those sunrise shoots can mean some dark, treacherous walks across uneven ground to get on location so having a good head torch is a must to enable any landscape photographer to see and equally important to be seen in the dark. These head torches need not be expensive but being rechargeable, lasting many hours and having adjustable strength means this pack of two torches is a fantastic stocking filler gift for any landscape photographer.
Giottos AA1900 Rocket Air Blower

This Giottos Rocket Air Blower is a must have accessory for any landscape photographer’s bag. It’s always better to remove dust and grit from your lens with a puff of air rather than a cloth to avoid scratching the glass and the one-way filter in the Giottos AA1900 Rocket Air Blaster ensures that dust and debris isn’t blown over your gear.
Manfrotto PIXI Mini Tripod

If you check out my “Whats in my camera bag post” you will see I have one of these and carry it around in my lightweight kit. The Manfrotto PIXI is small but strong enough to support my Fujifilm XT2 and standard lens and perfect for any landscape photographer to support their camera in situations a full-size tripod can’t be used. From personal experience, I find it particularly useful in London as there are many places full size tripods cannot be used.
Premium Microfibre Cleaning Cloths

Photographers can always use more microfibre cleaning cloths to clean or dry our gear and this set is a perfect stocking filler gift for your landscape photographer friend.
Gifts under £100 for Landscape Photographers
Masters of Landscape Photography Book

If it’s inspiration you’re after then look no further as this book is crammed full of it and will make a great gift for any landscape photographer. It is a collection of the world’s best landscape photographers showcasing their work and sharing their “behind the photo” stories and technical information. I thoroughly enjoyed reading this book and found it incredibly inspiring.
Hoya 72 mm Pro ND 1000 Filter

This was the first 10-stop neutral density filter I brought and it got me hooked on long exposure photography. If your landscape photographer friend is looking to dip their toe into the creative world of long exposure photography then this is a great option. It’s a high-quality filter without any observable colour cast and at a fraction of the cost of the professional filter kits on the market. Before you buy, check the maximum thread size needed, that way it can be used for all of the lenses with a few cheap step-up rings.
Instax Link Smartphone Printer

Ok, not strictly for landscape photographers but I just love printing on these Fujifilm Instax printers and have them on display all over the place. These fun, portable little printers allow you to print photos from your phone or tablet using their smartphone app while travelling, out in the field or even create an instant memento of you and your family or friends rather than have the photo stuck on the phone like everyone else.
SanDisk Extreme PRO 128 GB SDXC Memory Card

Although not particularly sexy, all photographers need memory cards so these make perfect gifts for landscape photographers. Just make sure you check which cards your photographer friend uses so you buy the right ones. I’ve been using SanDisk cards for as long as I can remember and they have never let me down. SanDisk are industry standard so you can’t go wrong if you buy these.
Peak Design Capture Clip v3
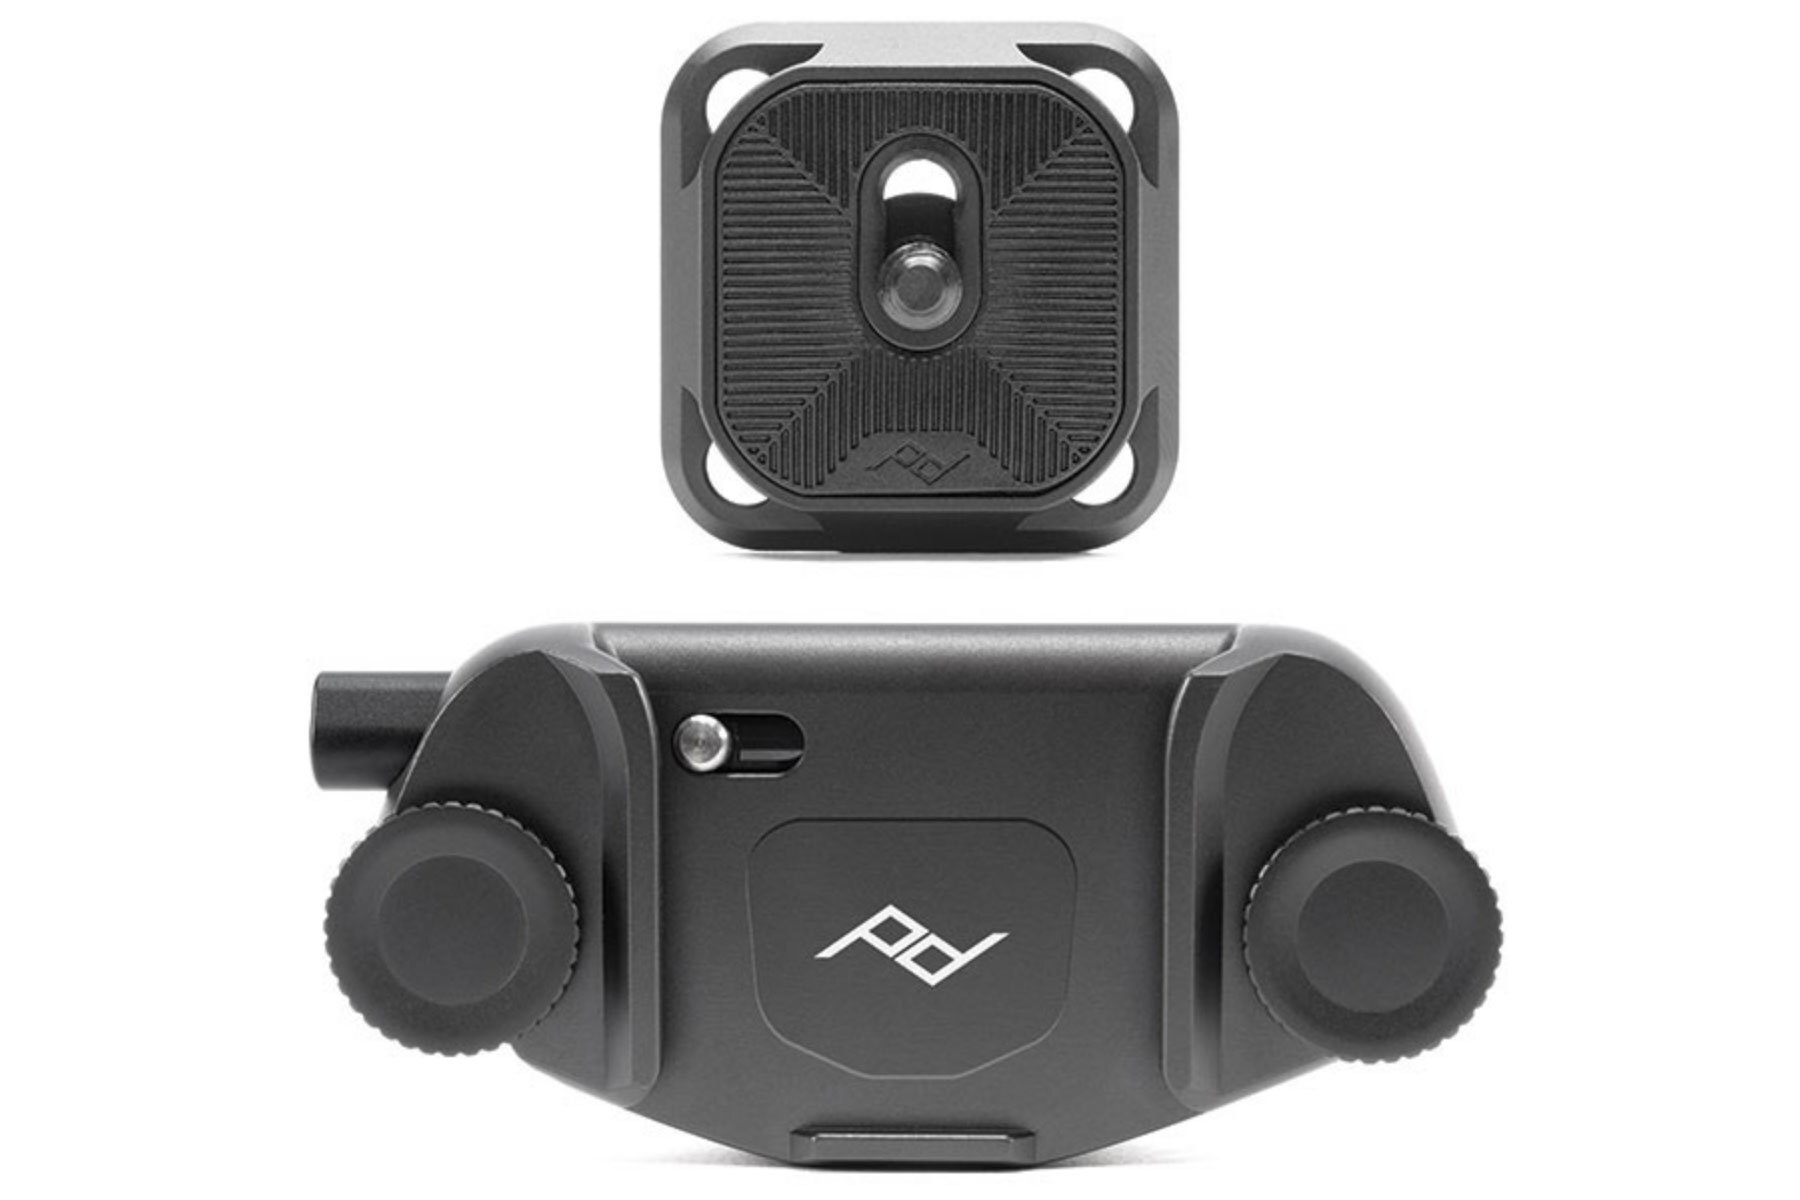
The Peak Design Capture Clip v3 is such a clever little device as it essentially acts as a third hand while out in the field taking photos. By allowing you to swiftly clip your camera to your bag’s strap or your belt, it frees up your hands while keeping the camera close by and ready to grab if a photo opportunity arises using the one-handed quick release. Unlike camera straps, it keeps your camera rigidly stable so it’s not flopping around. It holds over 200lbs. which means it can hold even the heaviest of camera + lens combinations, for any kind of photography.
A Photobook Gift Certificate

If you read my blog, you will know I am a massive fan of printing photos. It brings them to life from a digital image on a screen to a tangible photograph you can touch and admire so if the landscape photographer in your life has a collection of images that need to be freed from the harddrive they reside on, then why not buy them a photobook gift voucher. Photobooks are a fantastic way to print a collection of photos and when I want to print my photos in the highest possible quality, I use Whitewall. They are not the cheapest out there but I feel they provide the best bang for the buck when it comes to balancing quality with cost. I’m not affiliated with Whitewall in any way, I just love the books I have made using their service.
3 Legged Thing QR11- LG universal L bracket

The L-Bracket is such a useful gadget for us landscape photographers as it makes it easy to quickly switch between a horizontal or vertical orientation without adjusting the tripod at all. This for many is a bit of a game changer and I for one won’t go on a shoot without it. It may seem a little pricey for what is essentially an L-shaped piece of metal but think of it more in terms of how useful it is, not what it looks like. If the landscape photographer in your life doesn’t have one, this will make an excellent Christmas gift.
Joby GorillaPod 3K

Sometimes a standard tripod just won’t do. It may be too big, too heavy or just not bendy enough. The Joby GorillaPod 3K is a great tool in a landscape photographer’s arsenal as it allows the camera to be supported on uneven ground or wrap around various objects. It also comes with magnetic feet, an advanced feature which allows you to stick the tripod to metal surfaces. All of this means getting that shot from a different angle or perspective and coming away with some unique photos. The Joby GorillaPod 3K can support the heaviest of mirrorless camera and most DSLR style cameras so you can’t go wrong gifting this to you landscape photographer friend.
£100+ Gifts for Landscape Photographers
Kase Wolverine Magnetic Circular Filters

First up as we move into the £100+ price bracket is the Kase Wolverine Magnetic Circular Filters. These innovative filters are made of both toughened glass and leave no noticeable colour cast but their real party trick is that they are magnetic rather than screw-in so they can be fitted and removed in a pinch and even better, stacked on top of each other. This set of filters includes a circular polariser to cut the glare and give photos a punch of contrast and various strength neutral density filters which can be used for streaky clouds of silky-smooth water. This set may seem pricey but when it comes to filters, quality is everything. As with the 10-stop filter mentioned previously, it’s important to buy the right size so make sure you get the set that is the same or larger than the maximum lens thread size, that way it can be used for all of the lenses with a few cheap step-up rings.
SanDisk Extreme Portable SSD 1 TB

Upgrading from a standard hard drive to an SSD like this will supercharge any photographers portable photo editing experience. Buying this drive for the landscape photographer in your life will save them so much time as they are lightning quick and all in a package not much bigger than a credit card.
Canon PIXMA Pro 10S Printer

I mentioned before about how important I think it is for photographers to print their photos so although it’s on the more extravagant end of the budget spectrum, what better gift is there than a high quality A3 professional grade photo printer so their photos can be unleashed from that hard drive and experienced in all of their tactile glory. I have one of these Canon PIXMA Pro 10S printers and it really is an excellent printer so I can personally recommend it!
Book a Photography Workshop

OK, no link for this one and without doubt this one will take a little research but for any budding landscape photographer, gifting them a spot on a workshop lead by one of their favourite photographers really is a top gift! So, what to do? First off, you need to find out who they follow on the usual social channels like Instagram or Facebook, who they admire and who’s work they have already brought. Then once you know, why not pop by that photographer’s website and see if they offer tuition or workshop sessions. If they don’t have anything bookable on their website, don’t stop there, make contact with them and see what they offer. If you pull this off, it could be quite a special gift.
Adobe Creative Cloud Photography Plan

Last but not least is an Adobe Creative Cloud photography plan. If your landscape photography friend uses or wants to start using Adobe’s flagship photography editing suit, then this is the perfect gift for them. Whether they have an existing account or not, this 12 month subscription plan means a further 12-months of photo post processing joy!
I know we landscape photographers can be a difficult bunch to buy for so I do hope this Christmas Gift Guide helps inspire you to find the perfect present for the landscape photographer in your life.

On Location Photographing Eastbourne Pier and Beachy Head
A collection of photos I took while on a sunrise shoot on the Sussex coast down here in the South of England. Featuring photos of Eastbourne Pier and Beachy Head.
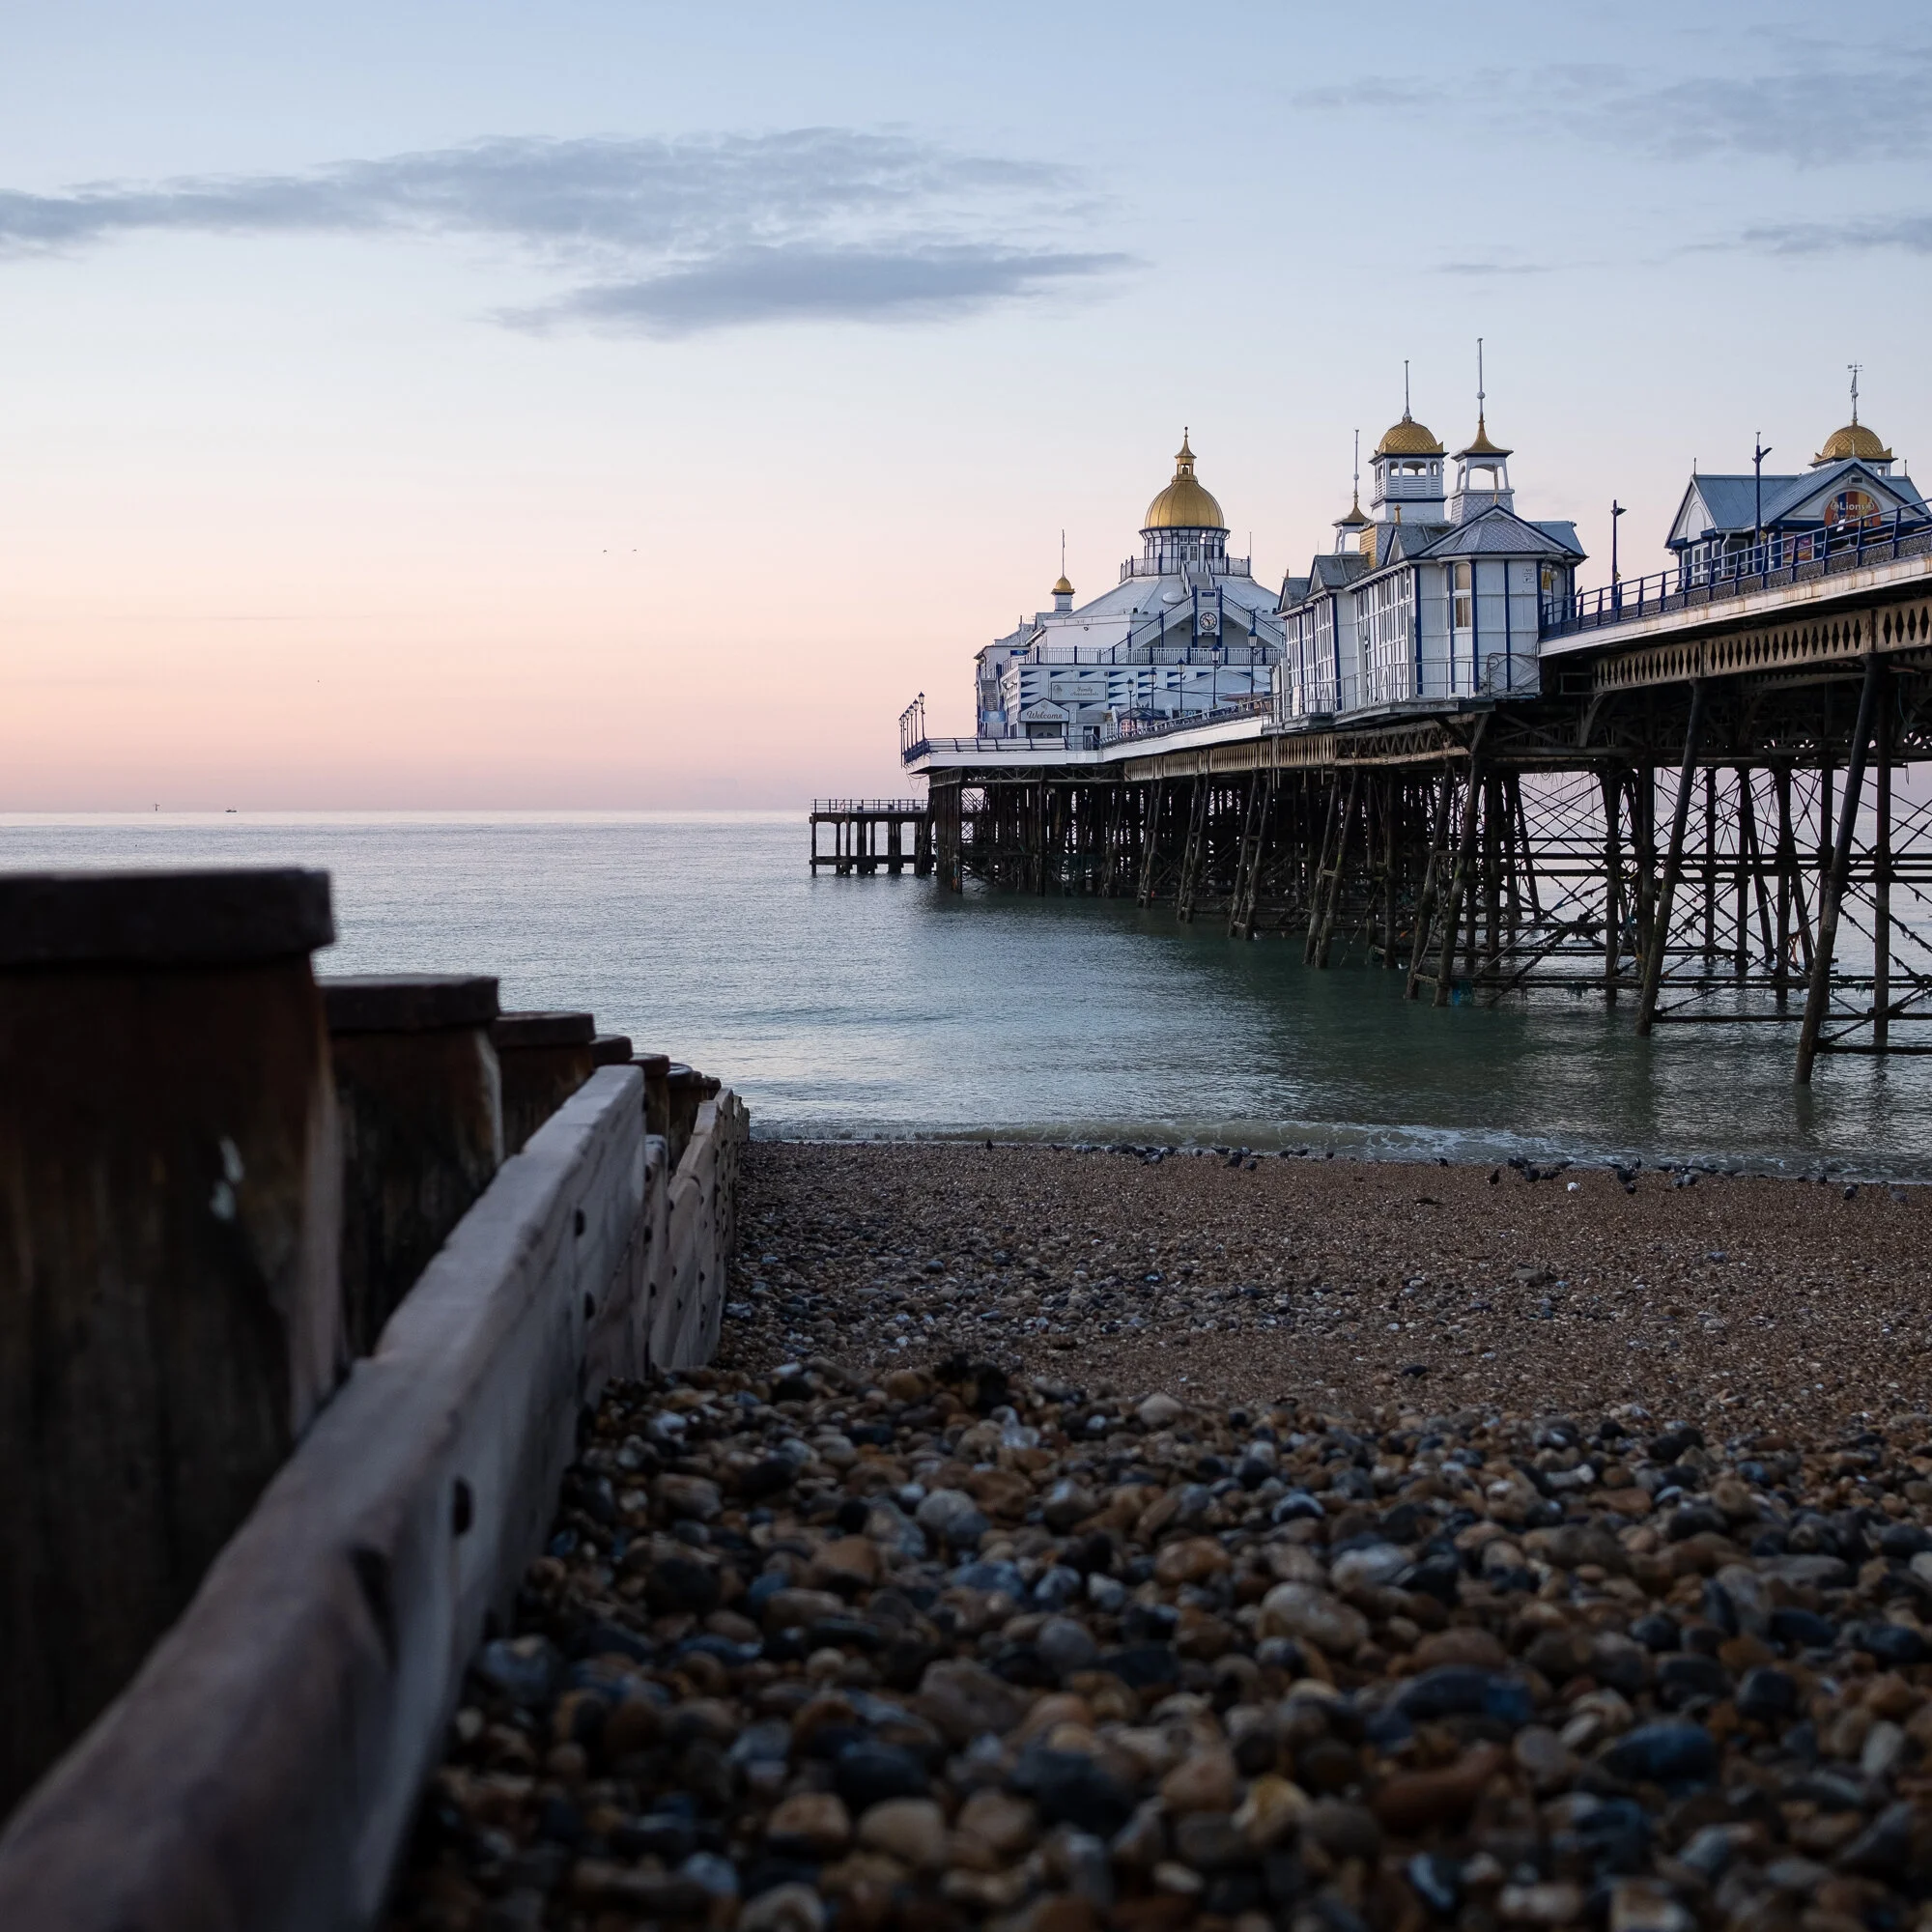
Photographing Eastbourne Pier

A few weeks ago I decided to drive down to the Sussex Coast for a sunrise shoot at the pier in Eastbourne. I’ve visited the south coast with the camera many times before but this was the first time I’ve taken the camera to Eastbourne to photograph the pier. Personally, I think this is the most photogenic pier along this particular stretch of the southern coastline as despite suffering a fire in 2014, it still has a lot of its original Victorian features and hasn’t been overrun by fair rides and illumination so I was pleased to finally be able to get down there and capture it.
After arriving and finding my first composition, I placed the bigger Fujifilm XT2 camera onto the tripod and took a couple of long exposure photos (I will share one of two of them on my site sometime soon) and used my pocket rocket X-T30 to take some handheld shots as I wandered around seeking out alternative compositions and it’s these photos I have shared below.
In the first couple of photos, I used the wooden groynes that line the beach to help with the composition and lead the eye towards the pier and although there wasn’t much in the way of a pre-sunrise show in the sky, I still really like the cool pastel tones I managed to capture.
As the sun started to rise, I made my way down to the water’s edge, right beside the pier to get a better sense of scale and to use the reflections on the wet sand as some foreground interest.


Photographing Beachy Head
After an hour or so, I was finished with the pier but not finished taking photos so I took a 10-minute drive up to Beachy Head to take a few more photos along the cliff’s edge where I spent some time playing with different compositions of the lighthouse and views out to sea using the Fujifilm X-T30 and 23mm F2 camera and lens combo.
While trying to use some of the wildflowers as foreground interest in the photos I took of the lighthouse, it was pretty obvious that I was too late in the year and most of the plant-life was long gone which means I will make a point of getting back to Beachy Head a little earlier in the year next time so there should be a lot more wildlife to choose from.


It’s posts like this that make having a blog so useful as I’m able to share a collection of photos that tell a better story of the shoot which in my opinion doesn’t work so well on social media. It’s not all about the technical details or techniques I used, it’s just a good way to share a few different shots from a shoot displayed in a way think works best for the photos.
I have a couple of posts lined up from some recent trips back into London which I will share in the next few weeks.
Take care
Trevor

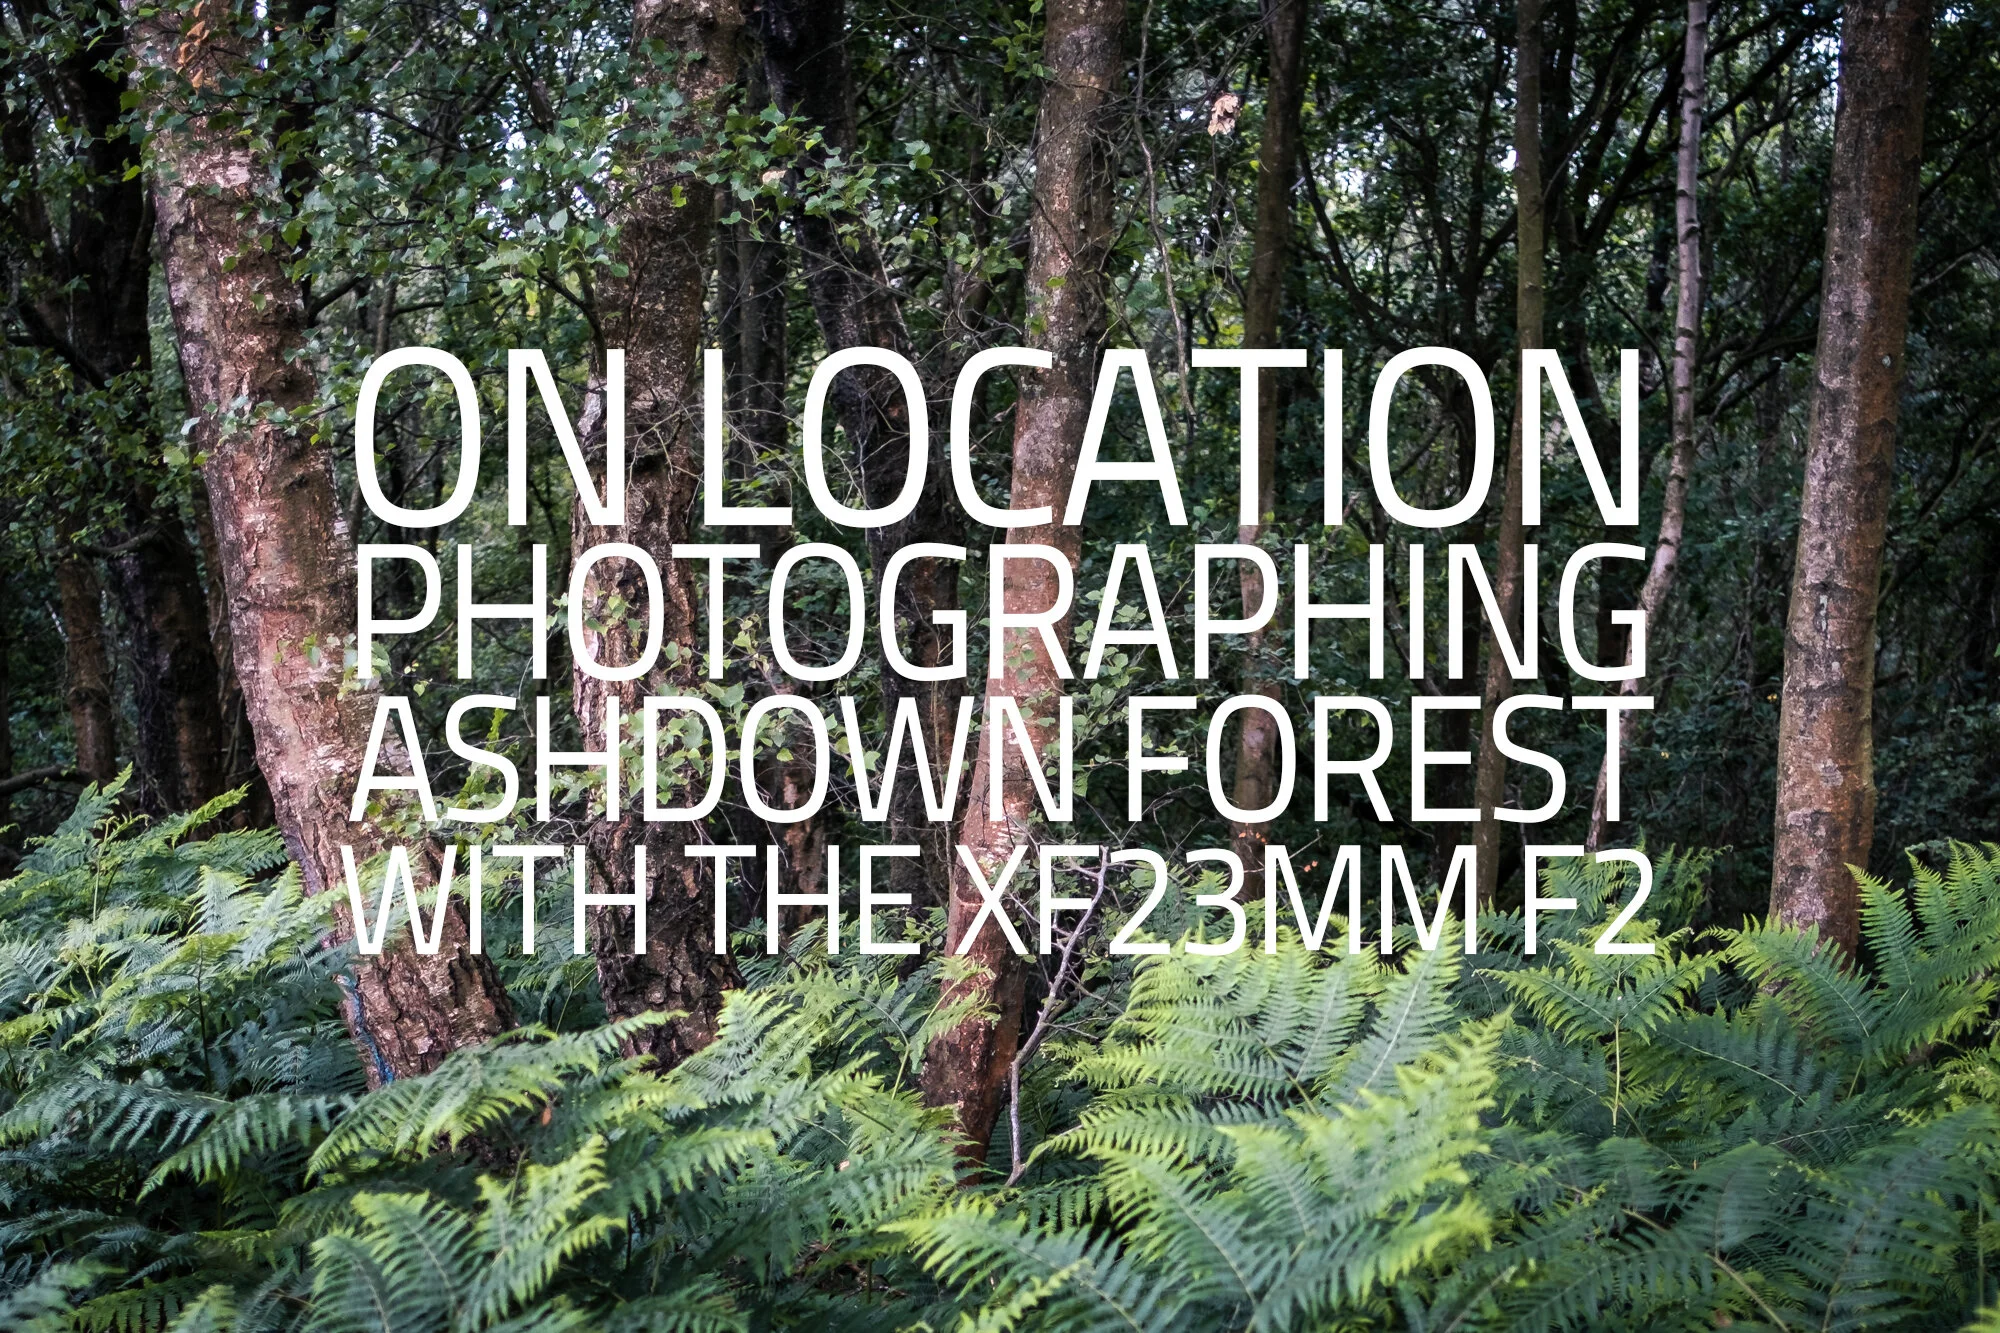
On Location Photographing Ashdown Forest with the XF23mm F2
Here are some photos of Ashdown Forest, taken while I was on a walk with Holly (my dog) capturing photos of the forest with my Fujifilm X-T30 and XF23mm F2 prime lens.
A few weeks ago, I ventured out into the forest with my dog, Holly and Fujifilm X-T30 camera. Apart from taking Holly for a nice long walk, I wanted to try out my new Fujifilm XF23mm F2 prime lens I had recently bought to go with my other two 16mm and 35mm prime lenses. This line of Fujifilm prime lenses are fantastic. They are well made, fast focusing, light, and weather-resistant. All bases covered when needing a light-weight walkabout camera kit.
To test the camera, I decided to head into the forest and make a series of photos that told the story of the place I was in, the time of year and the conditions we had. I wasn’t looking for a portfolio worthy photo, I knew the conditions weren't great for some fine are woodland photography such as a recent image I shared here Forest Bliss | Weekly Photo #58. I just wanted to document my walk with Holly, play with a bit of depth of field, and have a bit of fun with the new lens.
I’ve not yet introduced you to Holly so here’s a little bit about her. Holly has been with us since December 2019. We’re not sure what breed she is but she is a rescue dog, brought over from Romania by a charity that looks to rehome dogs away from some quite awful conditions. Holly came to us underweight, riddled with flees and feeling quite sorry for herself but after a visit to the vets, the groomers, and a lot of love from her new family, she has settled in and is now loving her new life with us. Holly will undoubtedly become a regular feature on future posts.
After my walk, I wanted these photos to look like they belonged together. As I mentioned, none of these are portfolio worthy, alone they might look rather average but bringing them together as a sum of multiple parts makes the entire collection stronger in my opinion.
There were a few things I did in Lightroom to make them feel a part of the set. Firstly, I focused on colour and tones. I edited the first image in the set, played with the HSL sliders to get the colours the way I liked such as the deep, summer greens on the ferns, and the rich oranges and purples in the flowers. I then applied the same edits across all of the photos and tweaked each one individually to match the rest of the set. Next, I cropped each one to a square format, again, to help uniform the look of the photos and make them appear to be a part of this set.
With the sky full of dense cloud, light levels were really poor, especially amongst the trees in the forest so this was a really good test for how my new prime lens coped. Close focusing was a bit of a problem at the widest apertures but its far from a macro lens so that is easily forgiven. That aside, the camera and lens never missed a beat. Across all of the photos, the only setting I changed was the aperture. I set the camera to aperture priority, a target shutter speed of 1/125th second, and auto-ISO was set to a max of 800. I would then tweak the aperture depending on the light and look I was trying to achieve. You can select each image to get a larger view and see the settings that were used for each photo.
I’m pleased with the final collection of photos and hope to share more, presented in a similar way in the future. I would love to hear what you think about picture storytelling, this particular collection, or just to say you like dogs too!
Until next time.
Trevor

My Top 10 Landscape Photography YouTube Channels
I’ve cultivated a healthy list of great landscape photographers so I decided to share with you my top 10 landscape photography YouTube channels that I will always watch when a new video is released.
Over the last few years, I’ve drawn so much knowledge from some of the world’s most well-regarded landscape photographers by watching them go about their craft on YouTube. YouTube has become one of the world’s top resources for information about pretty much anything you want to learn. Type in “How do I do this?” or “How do I fix that?” and you can be pretty confident someone has already been there, made the video and posted it on YouTube.
I’ve cultivated a healthy list of great landscape photographers, some will post the occasional video that piques my interest enough to watch it, but there are just a few YouTubers that I subscribe too that I look forward to and for one reason or another, will always try to watch the content they release. I decided to share with you my Top 10 Landscape Photography YouTube Channels.
Before we dive in, do remember to balance watching videos about landscape photography with actually going out and practising it yourself. Try to use the videos you watch to inspire and motivate you and not replace your creative outlet entirely.
In no particular order, here are my Top 10 Landscape Photography YouTube Channels.
#1 Fototripper
Fototripper is a channel run by Gavin Hardcastle, a landscape photographer from the UK, now living in Canada. Gavin is a great landscape photographer, an excellent teacher, and a really funny guy. If you want a great mix of landscape photography and comedy, this is the channel for you.
#2 Henry Turner
Henry is a bit of a rising star in the YouTube/Landscape photography field. Henry is a natural in front of the camera and has an incredibly open and honest approach to the way he goes about making videos and taking photos. Although he doesn’t have the subscriber numbers of some of the big hitters in this list, I’m confident it’s only a matter of time until he does.
#3 Joe Allam
I’ve been watching Joe’s YouTube channel for a few years now and although not strictly a landscape photographer, his usual travel photography includes plenty of natural and urban landscapes. Not only is Joe a fellow Fujifilm shooter, but his videos are always nicely polished and have a nice mix of both travel photography and graphic design content.
#4 Kim Grant
I’m so pleased I was able to include a female landscape photographer in the list as there seems to be a shortage of them out there but make no mistake, Kim makes my list because she is an incredibly talented photographer, an accomplished YouTuber who makes some truly engaging videos covering her photography journey around her native Scotland.
#5 Nigel Danson
Nigel is one of the best landscape photography teachers on YouTube. His videos provide a great mix of on-location photography and studio-based talks and tuition. He is particularly good at examining and critiquing his own work so others can learn the same lessons he does.
#6 Simon Baxter
Simon Baxter has been an inspiration to me since I started to take woodland photography more seriously. I have watched his channel for some time now and he really is the master of seeking out compositions amongst the forests and landscapes and importantly, talking you through the scene, communicating his thought process.
#7 Thomas Heaton
Thomas should not need any introduction. He’s a bit of a superstar amongst the YouTube landscape photography community and for good reason. He has a huge following, an honest and unpretentious manner, and makes fantastic videos from all over the world. Thomas seems to be able to find a photo out of nothing and even when he can’t he is content to come home empty-handed due to his “good shot or not shot” approach.
#8 Andy Mumford
Apart from being a fellow Fujifilm shooter (I know, it’s not all about the gear.. blah blah), Andy is an incredibly talented travel and landscape photographer. Andy frequently visits the Dolomites and his photos and videos created there are both engaging and always polished. Andy doesn’t make videos as regularly as others but when he does, they go straight onto my watch list.
#9 Ben Horne
If you are after a pure photography experience, look no further than Ben Horne. He shoots wilderness photography on large format film at places like Zion and Death Valley National Park. Ben will regularly head out on a trip and document his journey as he seeks new and different compositions and to match his apparent minimalist photography. After the trip, he continues to present some image review photos in his usual chilled out way.
#10 Chris Sale
Last but not least we have Chris Sale. Chris is another up and coming landscape photography YouTuber who predominantly shoots in and around the Lake District. His videos are his own documented journey from amateur to pro landscape photographer and he is very honest about his ups and downs while he navigates his way towards making his business a success.
So that was my list. I’m currently subscribed to 111 photography related YouTube channels and I must admit, I skip many more videos than I watch but having a good selection of channels allows me to watch just the very best shows that peak my interest so you can’t have too many in my opinion. With that in mind, feel free to share your favourite channels in the comments.

My Top 5 Free Rooftop Locations to Photograph London
I showcase what I consider my top 5 rooftop locations to photograph London. For each location, I will showcase some photos, location information, and top tips to get the very best photos during your visit.
As a photographer, I am always on the lookout for fresh, unique views of London and one of the best ways to achieve this is to get up high and photograph the city from the rooftops.
With the pressure now on property developers to incorporate public spaces into new developments, getting up high to enjoy these rooftop views of London has never been easier but the majority of these locations come at a cost or are not very photographer friendly.
With this in mind, I have created this list of my top 5 free rooftop locations to photograph London that are both easy to find and photography friendly. In this post, you will read a bit about each location, see a few photos and find a Google Maps link to help you get there.
My Top 5 Free Rooftop Locations to Photograph London
#1 One New Change
Number one on my list of rooftop locations to photograph London is the 6th floor at One New Change, a shopping centre located right next to St Paul’s Cathedral. Although this location isn’t particularly high compared to some of the others listed below, once up there, you will see why this is such a popular spot as you are greeted by some of the best, close-up views of St Paul’s Cathedral and its famous dome.

Google maps location: One New Change
booking required? No
Nearest tube station: St Pauls (Central Line)
Tripod rules: No tripods allowed
Opening hours can be found on their website https://onenewchange.com
#2 Sky Garden
The second rooftop location I recommend to visit is the Sky Garden which sits atop the Walkie-talkie building, over 30 stories high at 20 Fenchurch Street and provides some of the best rooftop views of London you can get for free. Apart from the countless photo opportunities the Sky Garden provides, it’s a great place to have a drink or enjoy a meal while enjoying some spectacular views of the city. Of the 5 locations listed here, it is the most popular and for good reason but that does mean you will need to book your visit on their website but it is free to visit.
See a previous sunrise shot from this location here: Good Morning London | Weekly Photo #37
Top tip: The glass can get rather dirty and to avoid the dirt showing up in your photos, set your aperture as wide as you can as this will render the dirt invisible when shooting through the glass.


Google maps location Sky Garden
booking required? Yes
Nearest tube station: Monument Station (Circle and District Line)
Tripod rules: No tripods allowed
Opening hours and booking information can be found on their website https://skygarden.london/booking
#3 The Garden at 120
A relative newcomer to the party, the Garden at 120 opened in 2019 and is located upon the 16th floor over at 120 Fenchurch Street. Nestled amongst the taller buildings in the city, this particular location is a breath of fresh air when it comes to photography as they take a more pragmatic view of the use of tripods and as long as you are sensible and keep out of the way of the other visitors, they can be used.
Here’s another photo that was taken from this location featuring the building at 20 Fenchurch Street mentioned above: Rooftop Reflections | Weekly Photo #30


Google maps location Garden at 120
booking required? No
Nearest tube station: Monument Station (Circle and District Line)
Tripod rules: Tripods can be used but be respectful of other visitors
Opening hours can be found on their website https://www.thegardenat120.com
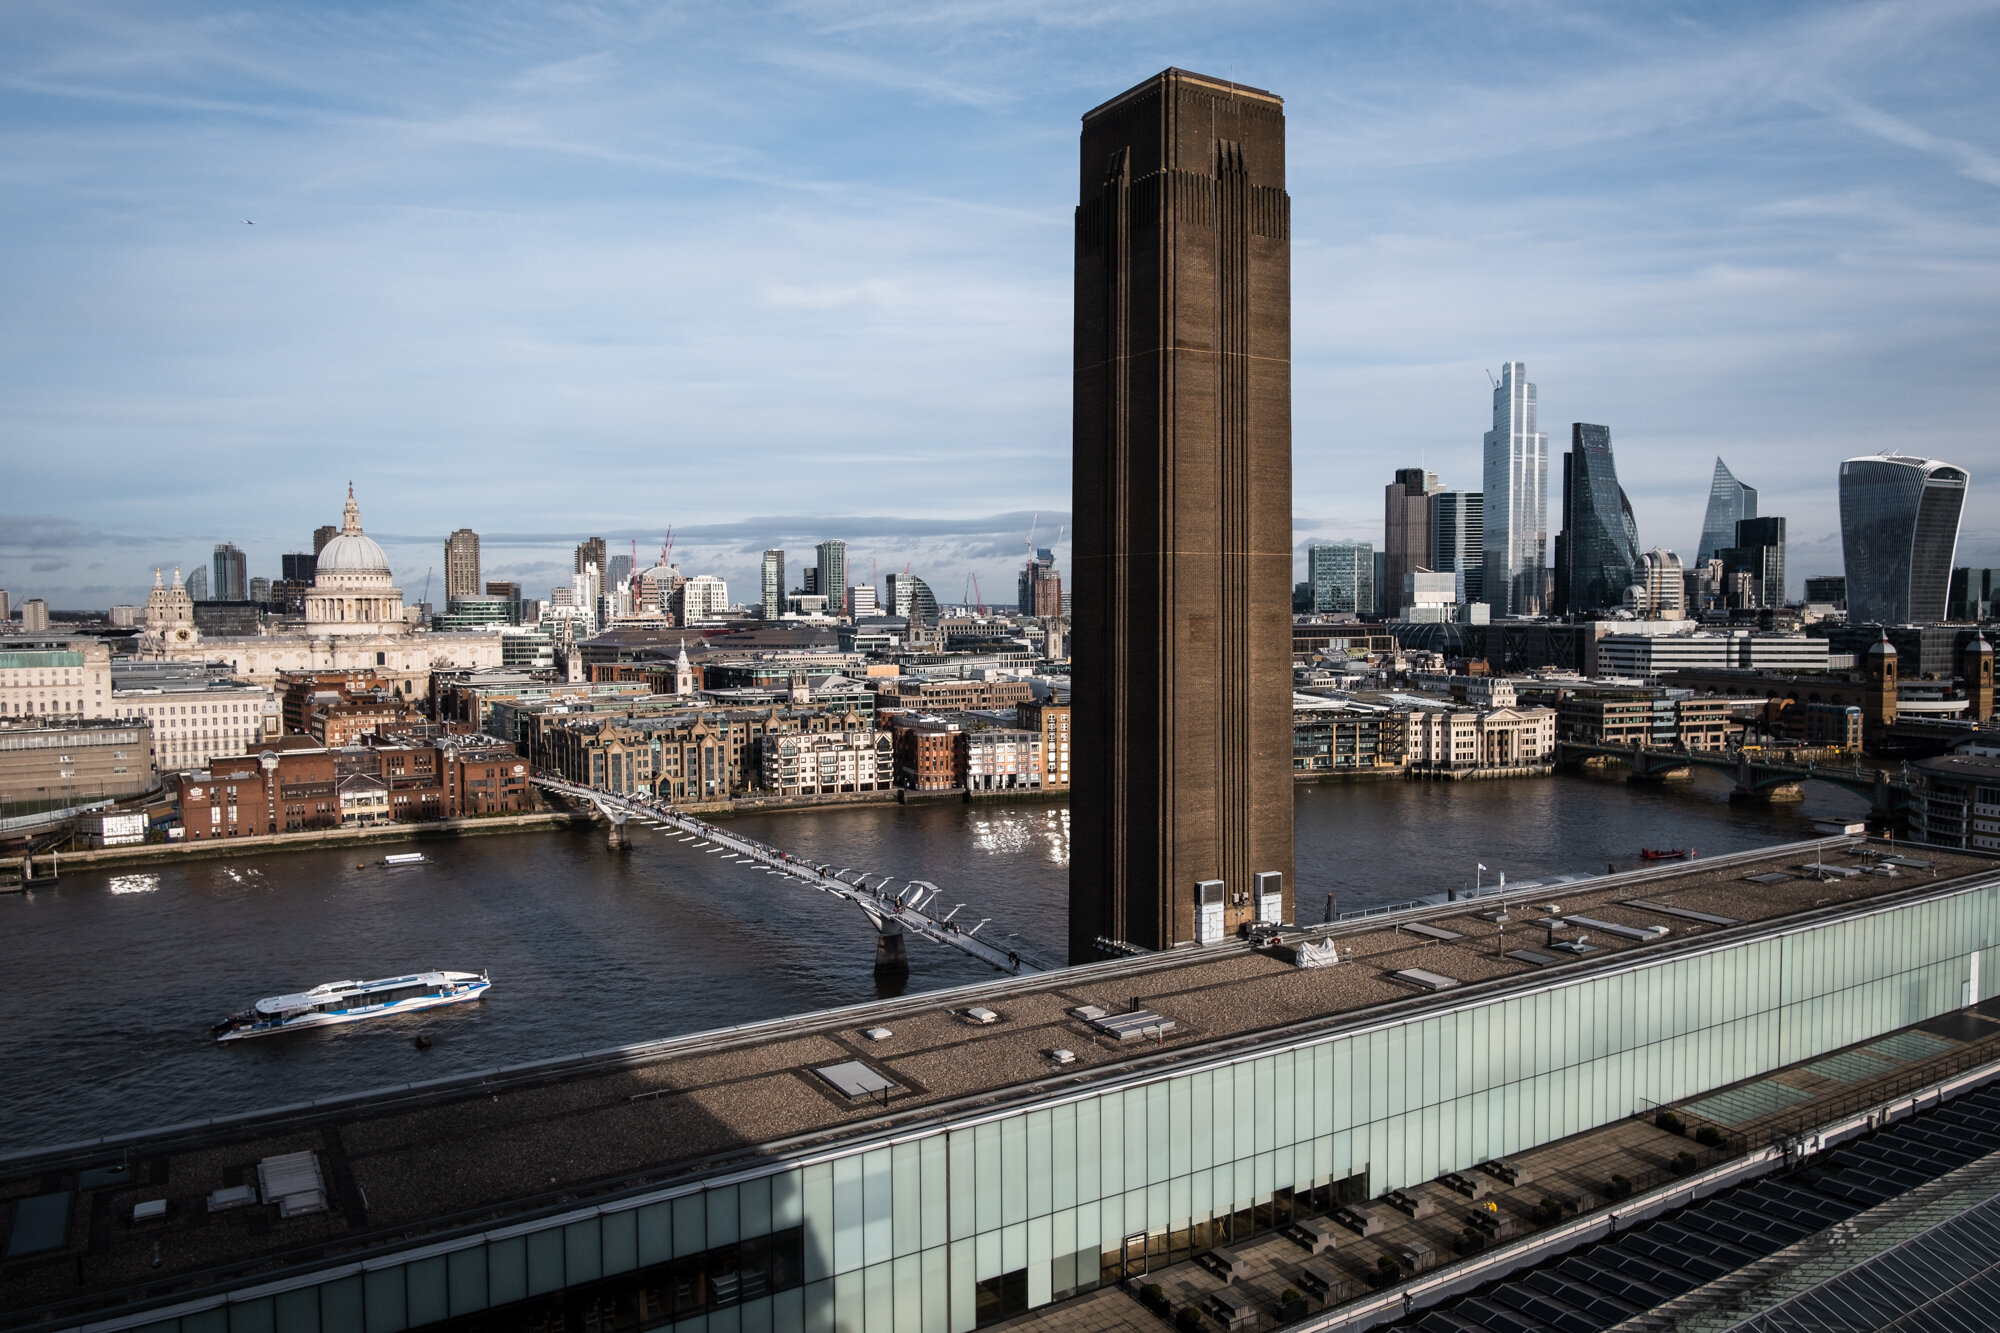
#4 Tate Modern Viewing Platform
Number 4 in this list of top rooftop locations to photograph London is the Tate Modern viewing gallery. Positioned to the rear of the famous turbine hall is a 10 story tower that provides 360-degree views of the city. The highlights are the unobscured view of St Paul’s Cathedral and the high rise buildings over in the city.
While up at the viewing gallery, you can grab a coffee from the cafe and wander around the outer edge out in the fresh air and take in the different views on offer.
Top Tip: During the warmer months when the days are longer, you can grab a great sunset shot of the city by visiting on a Friday or Saturday night as the museum closes later.

Google maps location Tate Modern Viewing Platform
booking required? No
Nearest tube station: Blackfriars (Circle and District Line)
Tripod rules: No tripods allowed
Opening hours can be found on their website https://www.tate.org.uk/visit/tate-modern
#5 No 1 Poultry
The last but not least location in this list is the garden terraces atop No 1 Poultry building in the city, right next to Bank Station. This relatively modern building is liked and loathed equally but what it does offer is a great view up towards Bank with the high rises of the city providing an epic backdrop.
Up at the roof terraces is a bar/restaurant called Coq D’Argent which hosts live music events in the summer which creates a great vibe if you're looking for a bit of music to accompany your photography but if this isn’t your thing, make sure to check their website below so you know the best time to visit that suits you.

Google maps location No 1 Poultry
booking required? No
Nearest tube station: Bank (Central Line)
Tripod rules: No tripods allowed
Opening hours can be found on their website https://www.coqdargent.co.uk/find-us/
Those were my top 5 rooftop locations to photograph London but if you are looking for more and happy to book or pay, there are countless others such as The Shard, The London Eye, St Paul’s Cathedral and the list goes on, so, next time you are in London and looking for some inspiration, try one of these rooftop locations as I’m sure you won’t be disappointed.

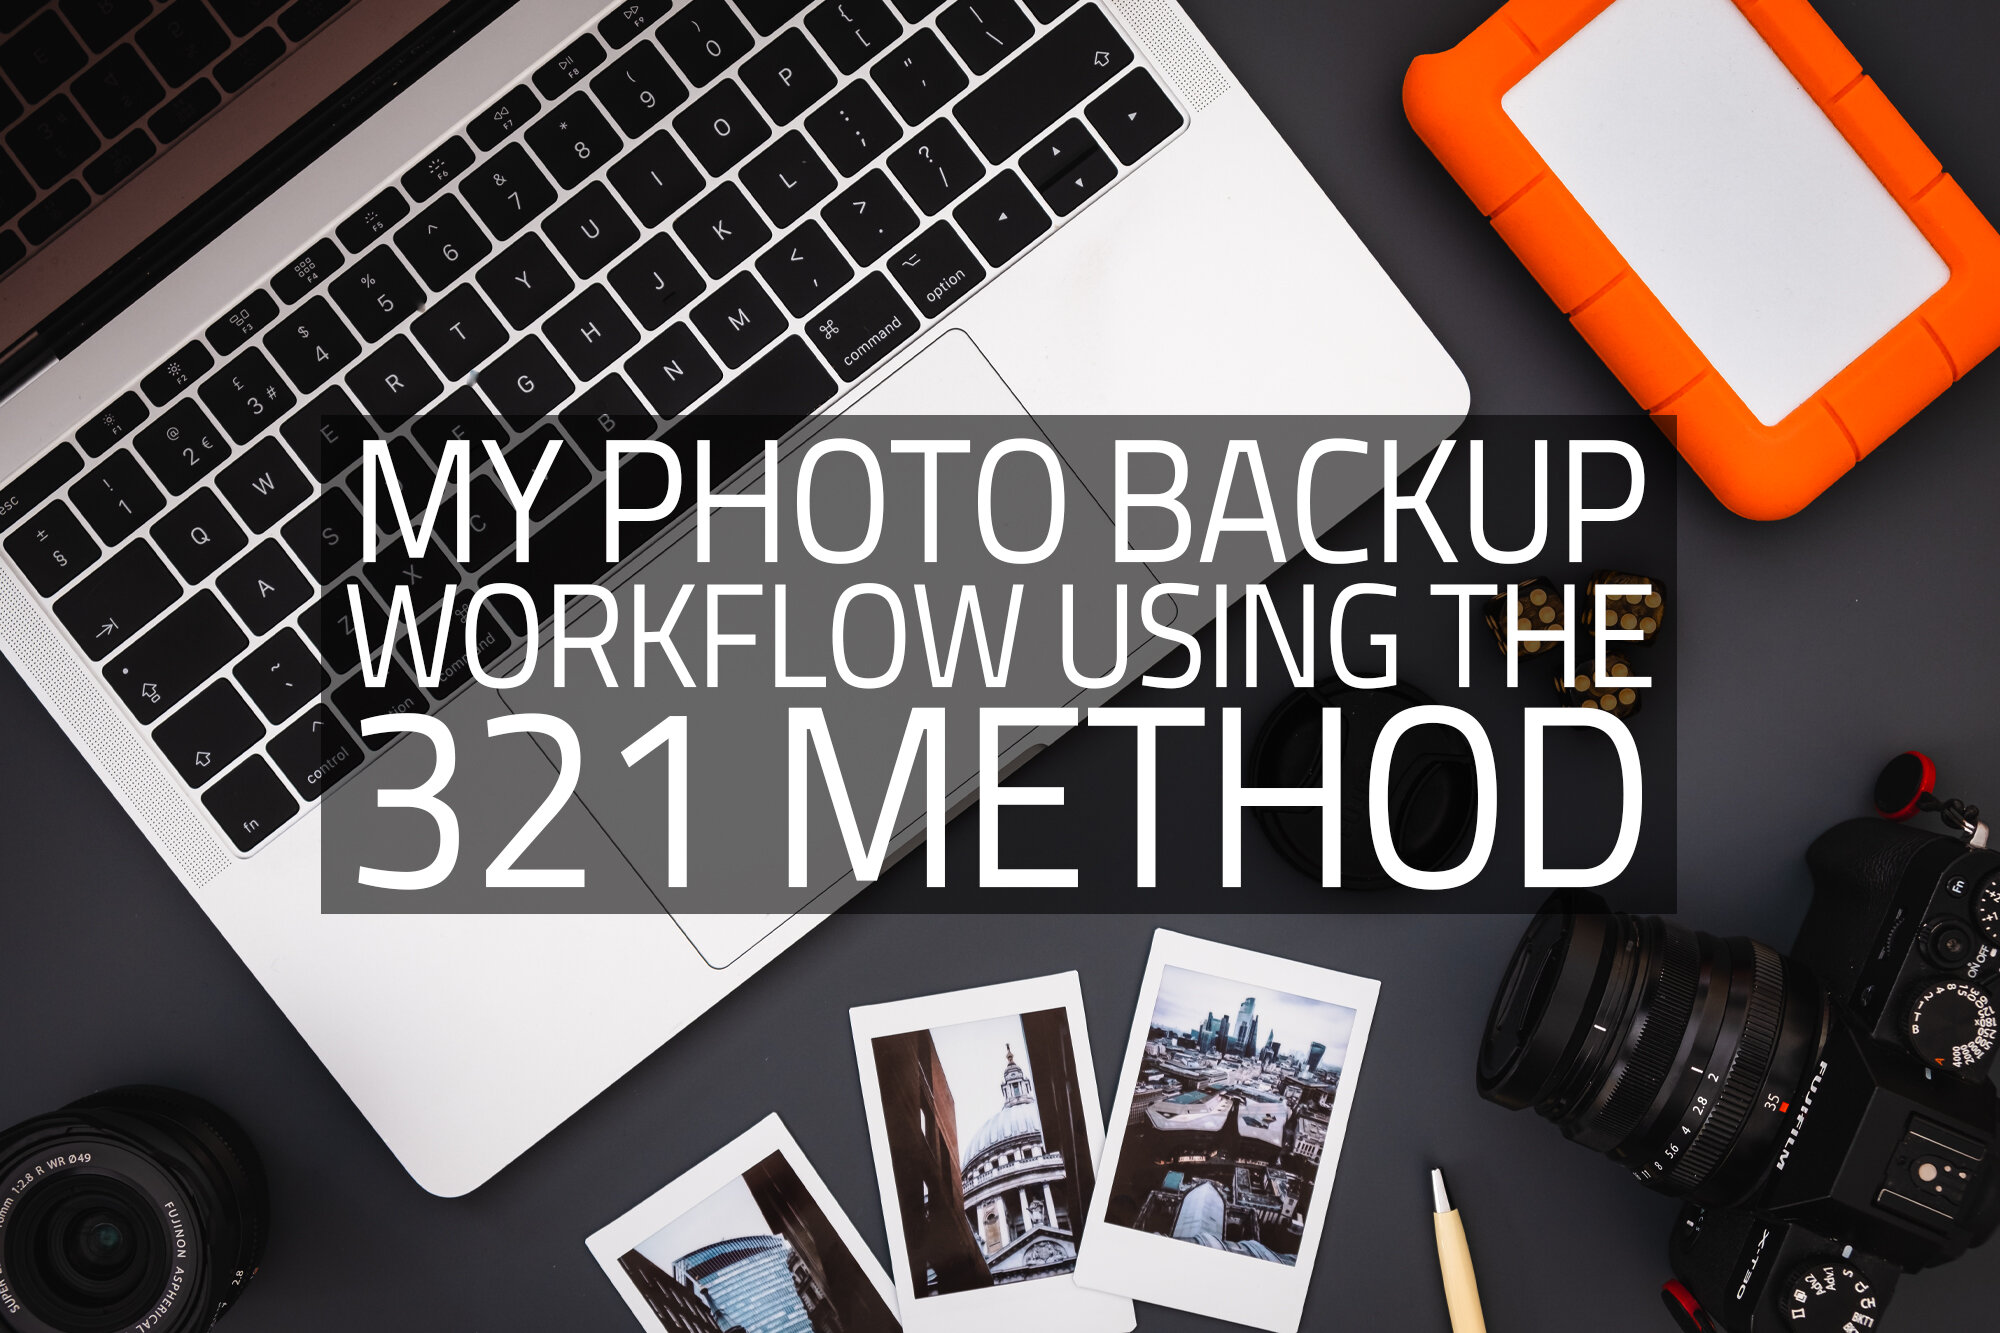
My Photo Backup Workflow
Having a reliable backup workflow for your photos is critical if you want to ensure they are protected and, in this post, I talk about why the 321 backup method is still considered one of the best to get started and how I have adapted it to back up my own photos.
Whether you take your photos professionally or for fun, how many of you out there can truly say you’re are happy with your photo backup strategy? If a drive was to fail, will you lose any photos? If you have a house fire or was to be burgled, do you have a copy elsewhere? As a photographer, I want to spend as much time as I can actually taking photos but the more photos I take, the more data I generate and subsequently need to store and protect and I for one would hate to lose any of them because I didn’t have a robust backup workflow.

For those of you that don’t know, I am an IT Professional and with the help of my team, we manage large enterprise-grade storage systems with petabytes of creative data and I have to ensure this data is backed up. I am employed to ensure all of this data is fully secured, redundant and protected from all types of threats and I take this incredibly seriously as I know without data, no company can function. Just as my company’s data is important to them, my photos are important to me so I employ a similar approach to ensure my pictures are protected throughout my own workflow allowing me to sleep easy at night knowing my most treasured data is safe and secure.
I get it. Getting your backup processes in place is a bit boring and not very creative but the more seriously you take your photography, the more you need to have a robust workflow in place. So, in this post, I want to run through my own strategy, explain a bit of the geeky jargon and suggest a few different backup options you could adopt, depending on time and budget.
If you’re already familiar with backup technologies and jargon and want to skip directly to my backup workflow, click here. Otherwise, feel free to read on.
The 321 backup strategy

You can’t research photo backup strategies online without coming across references to the 321 Backup Strategy. Put simply, the 321 backup strategy provides an easy to remember approach to how many copies of your data you should have and where those copies should be stored in order to protect against the most likely threats to your photos such as drive failure and house fire, etc.
Before we get stuck in, it’s worth noting that there is no such thing as a perfect backup system. It is impossible to predict and protect against all possible eventualities but this is a great starting point for anyone be it individuals or small businesses to get a solid workflow in place in order to protect their photos.
3 (copies of your data)
Including your working copy of data, it is recommended having at least 3 separate copies of your photos. Why 3 copies? 3 copies are the minimum number needed to be able to fully adhere to this 321 strategy. You will see why as get to the following points but it’s important to note that having 3 copies is just the minimum, which means you really don’t have to stop there. If you can manage more, and it gives you extra peace of mind then go ahead and create more but just be careful around creating an overly complex system as you’ll read a little later, keeping things simple is the name of the game here.
2 (different media or hard drives)
This point is important to avoid what we in the business call a “single point of failure” which means the last thing you want to do is store all copies of your photos on the same drive, only for that drive to fail and take all your photos with it. So, what you should do is ensure that all three of your copies of data are stored on separate devices so that if one fails, the remaining copies are completely unaffected.
1 (copy of your photos in another location)
So far, you’ve created 3 copies of your data and stored them across separate, individual hard drives but all of that means nothing if they are all sitting on the same shelf when a nasty burglar breaks into your home and takes all of your valuable electronics, including all copies of your photos. It’s for this reason, it is recommended to have at least one copy of your data in another location. This might seem a little difficult to achieve but I run through a few simple options further down in this article.

Let’s break down the jargon
As much as I want to keep this post as simple and jargon-free as possible, there’s no way to fully avoid including some of the technical components involved in creating a good photo backup workflow so to help those less familiar, I have tried to explain some of these in the simplest way I know.
What’s an internal hard drive? (Internal HDD)
When referring to internal storage, this means the hard drive which is installed inside your laptop or desktop computer. When you buy a new computer, you normally choose the size such in either gigabytes or more likely these days it will be Terabytes and when you save files onto your computer’s desktop or “My Documents” folder, that is normally stored on your built-in/internal storage.
What’s an external hard drive? (External HDD)
To expand your computer’s storage capacity, you can buy external drives which plug into your computer’s USB, USB-C or Thunderbolt port. These days, external drives come in in terabytes rather than gigabytes.
HDD (hard drive) vs SSD (solid-state drive)
Although I don’t really talk too much about SSDs in this article, it is worth knowing the difference when deciding which to buy. Here’s a simple comparison.
HDD: Hard drives are an older technology and with a spinning drive inside, are more prone to physical failure but being an older and more developed technology, they currently have more capacity and cheaper to buy. With the advantage of being able to store more data, HDDs are still the go-to technology for backing up your data.
SSD: Solid-state drives are the modern equivalent to the HDD. The main advantages are that they read and write much faster and with no moving internal parts, are less prone to failure. The downside is that for now at least, SSDs are considerably more expensive than HDDs. With less capacity, SSDs are not widely used for high capacity backup locations but rather with their superior read/write speed, they are more commonly used as a computer’s main drive where speed is much more important than capacity.
What’s a NAS? (Network Attached Storage)
NAS stands for Network Attached Storage and that’s essentially what it is. Instead of having your files and folders on a locally attached drive that only one computer can access at a time, a NAS can store your files somewhere on your home or office network and providing they have access, anyone on your network can edit and store files on it.
What’s RAID? (Redundant Array of Inexpensive Disks or Drives)
This is where things get a little technical but stay with me here. Most people do not need to know how a RAID works but when you buy a NAS which can hold multiple drives, you have the option to configure the drives in a way which means your data will be protected even if you suffer a failed drive. The two most common options to use are either a RAID5 or RAID6.
RAID5 - This option protects you against a single drive failing but of the two means you have more usable space on the RAID to store your files.
RAID6 - With this option, you can lose up to 2 drives and your data will still be safe so it is more resilient but the trade-off is that it will eat into your useable space on the RAID meaning not as much space to store your photos and other data.
So, depending on how much space you need and the size of the drives you can afford, you need to choose the best option that fits your needs from a capacity and protection point of view.
What’s Cloud Storage?
Simply put, cloud storage is a place on the internet where you can store your photos and other data away from your home and as long as you have a good internet connection you can essentially access your files from anywhere. You can get a small amount of space for free with services like Gmail or Outlook but if you take lots of photos and want to store them in the cloud, then you may need to pay for the amount of space you need. Although paid cloud storage services tend to require a monthly subscription, these days it can be pretty inexpensive.
In addition to services that just offer space to store your files, there are also dedicated cloud backup services such as Backblaze and Carbonite etc. These will install software on your computer and automatically upload your files to the cloud for you. Each offers different options so these should be studied carefully to make sure they fit your individual needs.
How I Backup My Photos
Hopefully, you are still with me and I didn’t bore you too much so far but what I want to do now is run though how I backup my photos. I won’t go into too much detail and to avoid too many words, I have created a simple diagram for you but if you need me to expand on anything I talk about here, just pop a question below in the comments.
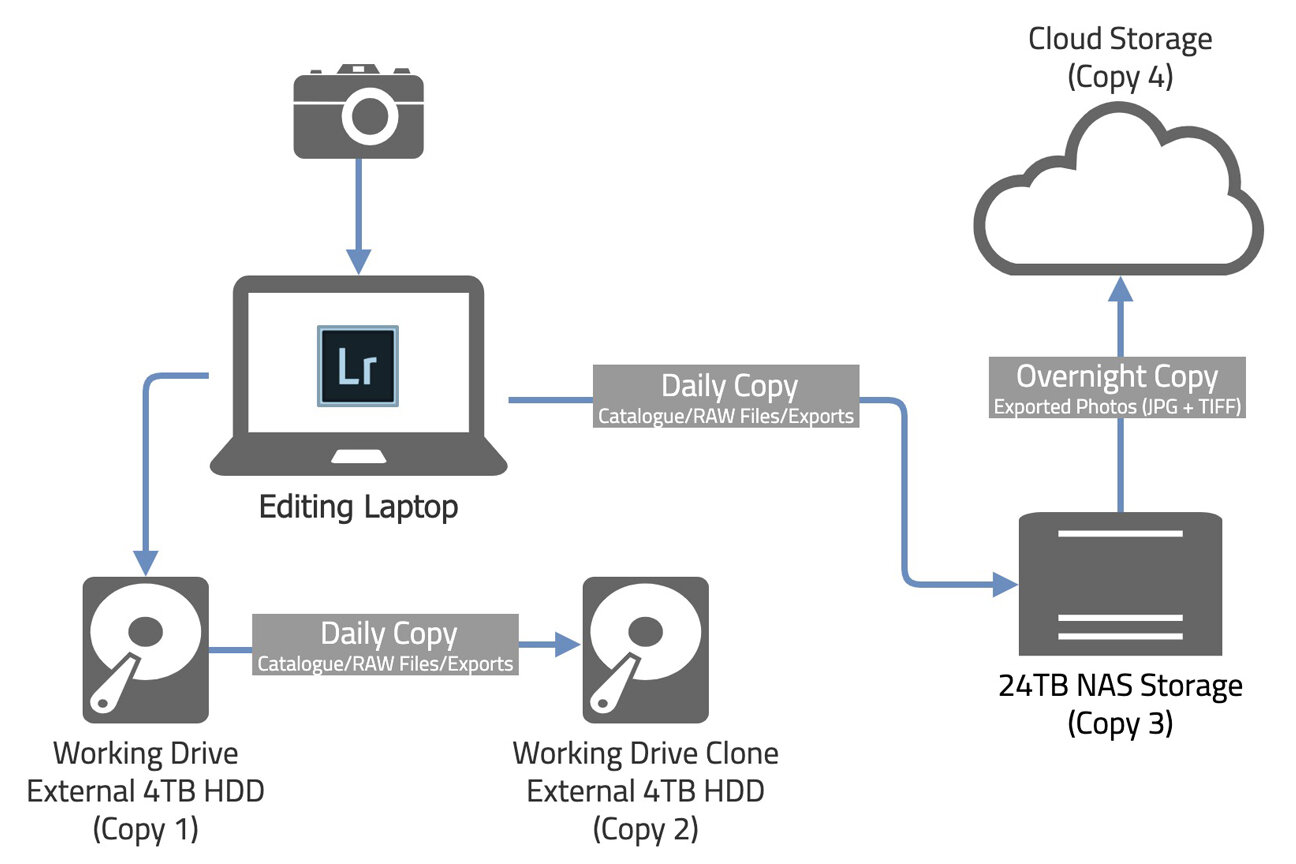
Although this approach follows the 321 backup workflow, for my own peace of mind, it goes a little further by having 4 copies on 4 devices but as I mentioned previously, the 321 backup system is a great starting point but once in place, there is nothing to stop you going further to make it even more robust. To help read the diagram above, I have summarised each copy in the process below.
Copy 1:
Once I get home after a shoot, the first thing I do is copy my photos to my working drive. This is an external 4 Terabyte Lacie Rugged hard drive (the orange and silver device you can see in the photo above) which I use to store and edit my photos.
Copy 2:
As soon as I have the photos stored on my working drive and in Lightroom, I immediately make a clone of my working drive to an exact replica 4TB Lacie Rugged drive. I clone the drive daily from that point to ensure any new edits and new photos I export are quickly protected just in case my working drive fails.
There are so many tools out there for Mac or Windows to help copy your data and as I edit on MacOS, my tool of choice is Carbon Copy Cloner. It’s inexpensive and easy to configure and importantly, it just works.
Copy 3:
Next up, using Carbon Copy Cloner, I make a daily copy over my network to my NAS storage. I use a 6 bay QNAP device with 6x 6TB (terabyte) drives installed. I have configured this as a RAID5 which means I lose the space of one of the 6TB drives resulting in 24TB of usable space on my NAS.
So, at this stage of my workflow, I now have 3 copies of my photos and only now will I go ahead and format my memory cards that held the original photos.
Copy 4:
Copy 4 is my offsite backup. I don’t pay for a dedicated backup software but instead, utilise the 1TB of space in OneDrive I get with my Microsoft account and unlimited photo storage Amazon offers their Prime members.
Top Tip: Many people subscribe to Amazon Prime and know that they offer unlimited photo storage with the subscription but what you may not know is that they count RAW files as photos too, so I automatically sync terabytes of RAW photo files with no additional costs to my standard Prime subscription.
If you own a NAS drive, take a look at the features it has as many will allow you to set up and schedule copy tasks that will sync your photos to your cloud storage automatically for you. I have a daily task that synchronises a selection of my folders from my NAS up into OneDrive and Amazon Photos. That way, I never have to worry about forgetting to do it. The more automation you can introduce, the more reliable your backups will be.
Alternative 321 Backup Options
That was a quick run-through of my workflow and I accept with the 2x 4TB drives and the 24TB NAS, it’s not a cheap one so I have also come up with a couple of workflows below that don’t require the purchase of the NAS system but will still be robust enough to protect those precious photos following the 321 backup approach.
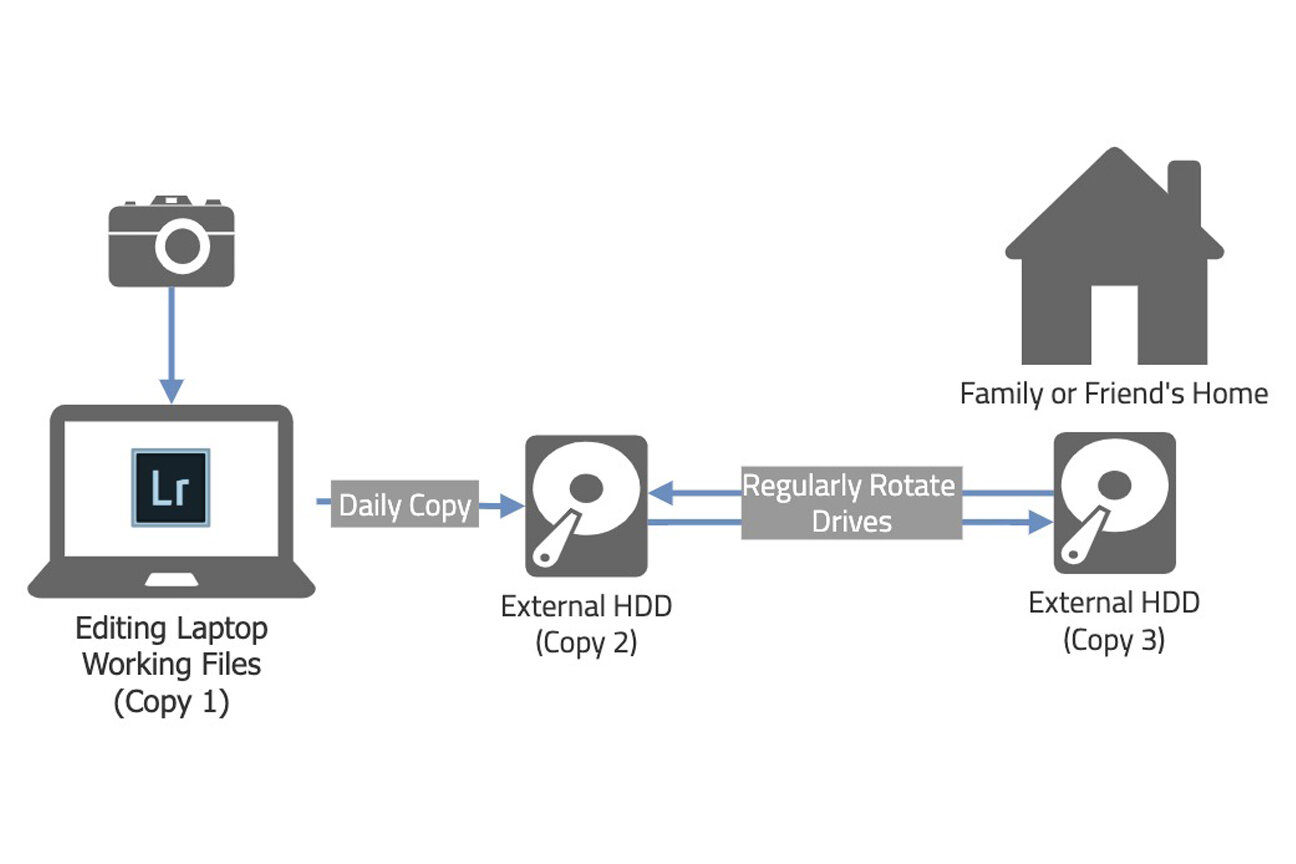
Alternative option 1 - Backup drive rotation
A fairly simple backup strategy is to make a copy of your photos onto a separate external drive and storing it at a family or friend’s home and every now and then, bringing it back to update with your new photos. This process only needs 2 or 3 backup drives which are relatively inexpensive these days (depending on how large your collection is) but is very manual so you would need to adopt a disciplined approach to ensure new photos are protected.
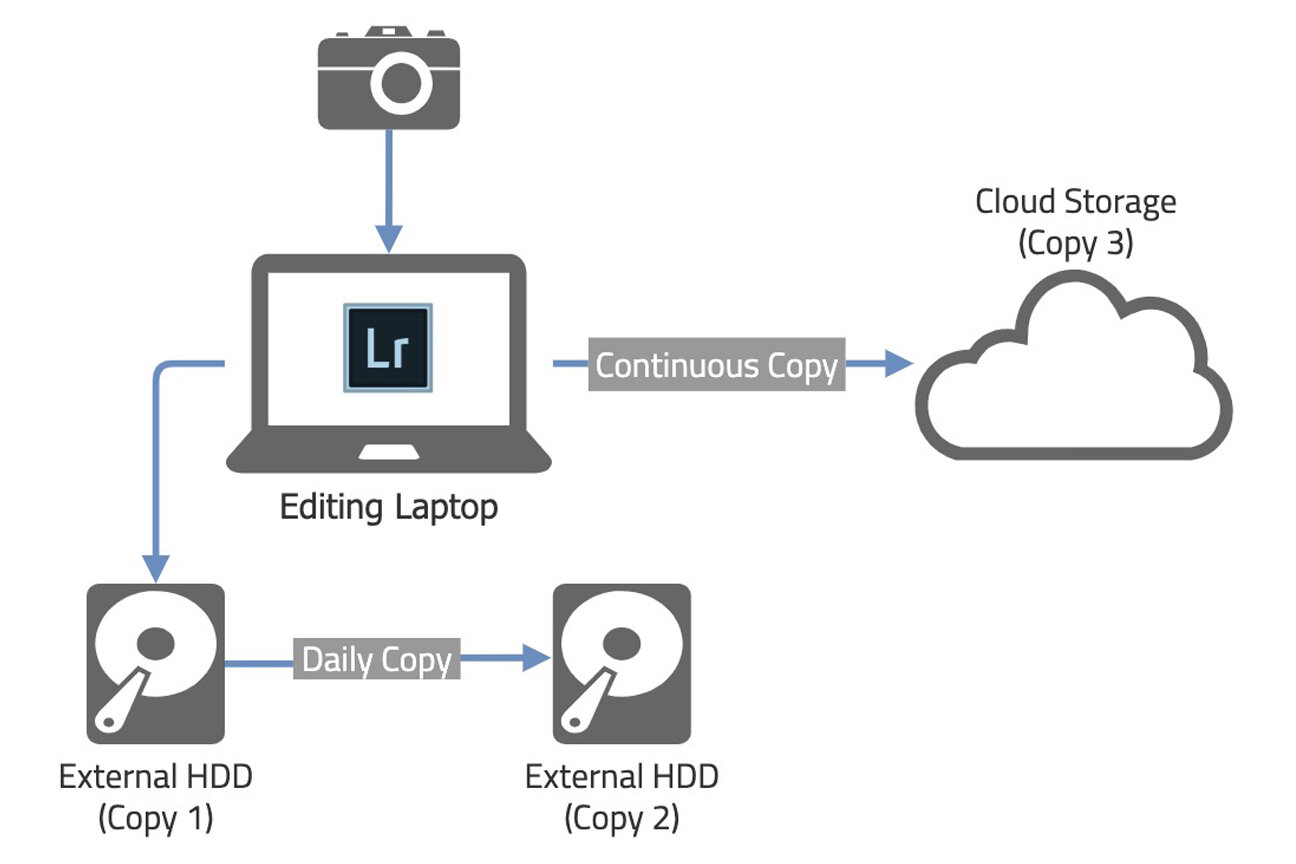
Alternative Option 2 - Cloud Backup
You can still achieve the 321 backup workflow by having a local copy on a separate external drive and a remote copy synchronised to cloud storage or an inexpensive cloud backup service such as Backblaze. This option is dependent on your internet speed and cloud storage space, especially if you want to send large amounts of data over but is a great option with a small amount of upfront cost.
The reason I suggest Backblaze is that they have an inexpensive unlimited plan which also allows you to back up a connected external drive. Many providers don’t offer this so it’s worth looking about for the best option for your needs.
Backup Workflow Top Tips
To finish up, I wanted to leave you with a few tips that may help you create and maintain a successful backup workflow.
#1 Keep your files organised
The reason this is important is that if your files are all over the place, some of them might not be included in the backup so try to keep your entire photography workflow in just one location so you know all of your precious files are safely protected.
#2 Keep it simple
Keeping your workflow simple and introducing as much automation as possible will help you stay on top of the process. If backups are time-consuming or you need to retrain yourself every time you attempt it, the reality is, it just won’t get done. Trust me, I’ve been there.
#3 Don’t just think about your photos
I have many other files that I need such as templates, fonts, spreadsheets etc, all relating to my craft. Consider all the files you will miss if lost when choosing what data needs to be protected. Everyone’s needs are different so protect the files that are important to you.
#4 Buy enough memory cards
As I mentioned previously, I don’t wipe a memory card until the photos are protected so I need to make sure I have plenty of cards so this can happen. Cards are cheap so make sure you have enough so you’re not forced to format them until you are happy your photos are protected.
#5 Test Test Test!
How do you know your backups will save you if you don’t test them every now and then? Make sure you check the backups are working and on occasion restore some files so you can be confident it will all come together when you really need it.
There are many different ways to back up your photos, from the basic process of swapping drives to the more involved, technical workflows, full of automation and scripts, but the most important message I can convey is to find the right approach that suits your workflow and skillset so you can be confident that your system works and your most important photos and data are protected.
I hope you found this article useful and I was able to introduce you to a few different backup concepts or maybe it helped you re-affirm your confidence in your existing approach but please do leave a comment below if you have any other tips and tricks to help others with their own backup workflow.

My 10 top tips for photographing London
In this article, I list my 10 top tips for getting the very best photographs of London from the ideal locations to essential techniques for capturing some epic pictures of this great city.
London is one of the most photographed cities in the world and with so many inspiring views from epic cityscapes to ornate details, after just a short time out with your camera, you will be hard beat to come away without a good crop of photos. That being said, with just a few useful pointers that will help you plan and inspire while out in the city, you can increase your chances of going from taking a few OK photos to taking a few great photos of London.
One thing to note before we dive in is that although some of these tips are specific to photographing London such as some of the locations I mention, most of the tips can be used in any city or town you happen to be in so just because you might not be photographing London, it doesn’t mean you can’t take some of these ideas and apply them locally to you.
So, let’s not waste any time and jump into my 10 top tips for photographing London!
#1 Check where and when you can use a tripod in London
This photography tip is an important one because the use of tripods in London is to some, a contentious topic. Experiences and therefor opinions of when and where tripods can be used will vary so although I won’t be able to say definitively what is or isn’t ok, I will be able to give you some general advice to help you manage this ambiguous subject.
There are some well-known areas of London that have some very strict “no tripod” rules such as the area around County Hall and the London Eye near Westminster Bridge as well as More London and City Hall over by Tower Bridge, as these are all technically private land. There are, however, plenty of places you can still use a tripod to capture some great shots along the Thames. Directly in front of the Tower of London on the north side and the areas around Tate Modern and the Millennium Bridge are good examples to start.

My personal experience has overall been positive. I have taken my tripod into London countless times and can count on one hand how many times I have been approached about the use of my tripod. I tend to stick to the rules and I’m aware of the absolute no-go areas so, overall, I have learned to work around the restrictions avoiding any necessary telling off from the local security guards. Check my advice below so you can be as informed as possible when heading into London with your tripod and remember, the vast majority of outdoor places are ok with tripods providing you act responsibly.
Research the location
Before you travel, do your research. Check the owner’s website if they have one or ask the photography community. Knowing the rules can help if you get approached by someone less informed and in some situations, enables you to reasonably and respectfully stand your ground if you know tripods are allowed.
Look out for the tripod police
If you are unsure of the rules and there are no signs, go ahead and set the tripod up but always be ready to be approached and told to put the tripod away.
Avoid confrontation
If approached, just be polite and respond appropriately. The guards are just following instruction and even if you come across a wise guy, the best thing to do is move on and avoid any unnecessary confrontation.
Be considerate to others
Even if tripods are allowed, remember that you have no right of way over anyone else so try to keep out of the way to avoid your tripod being bumped or worse, someone tripping on one of the tripod legs. Photographers have a hard-enough rep and we certainly don’t want it to be made any worse.
#2 Embrace the grey weather when photographing London

You may notice as you read this post that all the photos have a common grey, almost monochromatic look to them. This was a deliberate choice I made to keep the images consistent but also show that London can still look great in what most consider bad light. London gets cloudy. I mean, like, all the time and anyone who visits the city has a pretty good chance of experiencing this pretty dull weather for themselves. So when heading out with your camera, you have to keep an open mind as to the style of the photos you will likely walk away with and instead of being put off or unmotivated, try to embrace the weather, seek out some interesting shapes and lines and let the darker clouds give your photos a sense of mood rather than let them defeat your inspiration.
In this previous blog post, I talked about how a wet, miserable day in London turned out to be a surprisingly positive shoot: Capturing London on a Cloudy Day.
#3 Photograph London’s financial district on the weekend and don’t forget to look up!
Like most major cities around the world, London has a financial district, well actually it has two. One in the Square Mile (The City of London) and the other over at Canary Wharf just east of the city. The thing about most of these financial companies is that they tend not to work weekends and as such, this part of London pretty much shuts down over the weekend which for street photographers is less fun but if you want to capture some of these cool skyscrapers and empty London streets, it’s a great location to spend a few hours having the place nearly all to yourself.

While surrounded by all these tall buildings, why not have a go at some “Look Up” shots like this one here. Not an original idea but with the ever-changing London skyline, there is always a new view to be captured and best yet, you can take these types of photos any day of the week!
#4 Get out early to photograph London’s popular tourist hot spots
London can get really busy, particularly at the weekend around the popular tourist hot spots and if you are looking to capture the location free of too many people, then you really must avoid daytime and evening visits. Instead, set your alarm for 4 or 5 am and get out to these popular locations before most of the tourists have even sat down for their hotel breakfast.

London’s great for an early start as public transport will be running and you can get anywhere quickly enough. In addition, you get to be out during the very best time of day for photography as the light is always best in the morning, it’s so much quieter and you have the entire place to yourself for a short while.

#5 Get up high for free, without booking and photograph London’s rooftops
Although there are plenty of opportunities to get some cityscape photos from high up above the streets of London, many come at a cost for entry or requirement to buy food or drink but there are a few rooftop photo spots in London that don’t cost or even require advance booking and you can just rock up on the day and take advantage of some of the epic views of the city and start shooting. Below are my top three to get you started.

One New Change (Find it on Google Maps)
Great for fantastic high-up and close-up shots of St Paul’s Cathedral.
Tripods allowed? No.
Tate Modern Viewing Platform (Find it on Google Maps)
Great for elevated views of the modern financial district in the city and fantastic views of St Paul’s Cathedral from across the river.
Tripods allowed? No.
The Garden at 120 (Find it on Google Maps)
Great for a framed view across West London like the one posted above. Also, there are great rooftop views of Tower Bridge, Canary Wharf and St Mary Axe (aka The Gherkin).
Tripods allowed? Yes.
#6 Photograph the London skyline by walking the South Bank
My absolute favourite thing to do with my camera in London is to walk the South Bank between Westminster and Tower Bridge. This stretch of the Thames Path is popular for good reason as you get to experience some of the best views of London’s skyline available. Although the walk itself isn’t too long, you do need to allow a couple of hours at least if you visit for the first time as you will no doubt stop to capture all the great views as you go.

Along with the classics such as Big Ben, St Paul’s Cathedral and the high rises over in the city, the South Bank offers some great opportunities to capture some street photography and architecture too so, like much of London, it has something for all types of photographer.
Bonus Tip: If you have time, walk back along the North Bank. Although a little quieter, you can still grab some great cityscape photos of The Shard, Tate Modern and the London Eye.

#7 Walk London’s streets and photograph the hidden views
Next up in my top tips for photographing London is to get out on foot and find some of the hidden views of London. They are dotted all over the place and provide great opportunities to take cool, framed photos of some of London’s architectural icons.

The centre of London isn’t a huge place and if you're prepared to get your walking boots on and wander the streets you can be rewarded with some great views of the city. Unless I have a planned shoot and need to get somewhere in good time, I would rather wander the streets with my camera instead of missing potential opportunities by rushing across the city on public transport. If you’re short of time, I’ve listed a few of the more popular backstreets that provide great views of London which also include links to Google Maps to help you find them.
Lovat Lane (Find it on Google Maps)
This cobbled street provides a great foreground for this fantastic view of the Shard from across the river.
Watling Street (Find it on Google Maps)
A great view of St Paul's Cathedral where you can make use of the buildings that flank the street to frame the cathedral and the yellow painted lines which provide some great lead-in lines.
St Helen’s Place (Find it on Google Maps)
This is a cute little street hidden amongst the high-rise buildings in the city and provides some classic London architecture with a great view of St Mary Axe (The Gherkin) which towers over where you stand.
Those were three of the more popular hidden views of London but there are so many more which can be found as you wander the street so if you have time, grab some comfy shoes and head out to explore.

#8 Shoot London, whatever the weather
Number 8 in my top tips for photographing London is a bit of an extension of tip #2 as it also talks about the weather conditions but this time, it’s all about having some fun and shooting in the rain.
“Life isn’t about waiting for the storm to pass...It’s about learning to dance in the rain.”
Just like the grey, cloudy weather, there’s always a good chance that you’ll get rained on when in London so my top tip is to embrace the conditions as much as you or your gear will allow so you can capture some really cool shots during or just after the rain.
The photo below is a great example of how the scene changes in the rain. The wet cobbled street in front of the Tower of London provides this cool reflective surface making for a much more interesting foreground.

After mistakenly leaving my weather-sealed camera at home, I took a chance and went for a walk into London after dark to take photos in the rain which you can read all about here: On Location | Photographing London With The Fuji XF16mm F2.8.
There are endless opportunities to get creative by taking photos in the rain such as reflections in puddles or shooting through streaky wet windows so don’t let it put you off and grab your raincoat and hit the streets whatever the weather.
#9 Add people for interest and scale when photographing London
London boasts some of the tallest buildings in Europe but it can sometimes be challenging for those taking the photos to portray the scale and “epicness” of the city to those viewing the image, so, tip number nine is to try including people as a familiar point of reference that will allow the viewer to grasp just how big (or small) the objects in your photo really are. Including just one person, like in the photos below, can add just enough interest, mystery and scale to your cityscape photos without them looking overly cluttered and distracting.

Referring back to previous tips in this post, including just a single person in your composition in one of the busiest cities on the planet can be a tad challenging so as per tip #3, hit the city at the weekend when there are fewer workers around or tip #2 by getting up and out early when most people are still waking up. By doing this, it gives you the best chance of avoiding the crowds and capturing that solitary figure to help you portray the scale in your photos.

#10 Do your research before heading out to take photos in London
This final tip is about what to do before a shoot. Whether you have a particular location and type of photo you want to capture, or you like to just head out into the streets to see what photo opportunities jump out at you, you can always increase your chances of coming away from a shoot with a few good shots if you prepare to some degree.
Scout the location to get the best compositions
If you are after a specific shot of London and have limited time, research the location online before heading out. Use Google Maps, Flickr or Instagram to understand the best place to stand so you don’t miss the best light wandering around searching for that killer angle and not being able to find it fast enough. My website also has lots of London based articles to view and gather useful tips. Check out two of my articles below.

Check the venue information
Check opening times and like in tip #1 above, check the rules and regs they have. Not everywhere is photographer friendly and knowing this before you head out may well save a wasted trip.
Check the weather and conditions
Check the weather before you head out! The conditions, wind direction or angle of the sun can all affect the final image and, in most cases, can make or break the shot. Also, knowing the weather conditions will help ensure you head out with the right clothing and camera gear so you’re not standing there soaked through because you didn’t bring your raincoat rushing your shots so you can get back inside.
Bonus Tip: Stay safe and have fun
It should go without saying but please do not take your safety for granted. Photographers tend to carry quite a bit of valuable gear and not all areas of every city are safe to wander alone so, whatever you do, be discrete, take care of yourself and where possible, take a friend with you, especially at night.
That’s it. My top 10 tips for photographing London has come to an end. I do hope this article comes in useful for anyone looking to come and photograph London in the future or as mentioned earlier, using the transferable tips to photograph your local town or city wherever you live.
If you have any tips you would like to share, feel free to drop them in the comments below so everyone can take advantage and get the very best images when out photographing London.

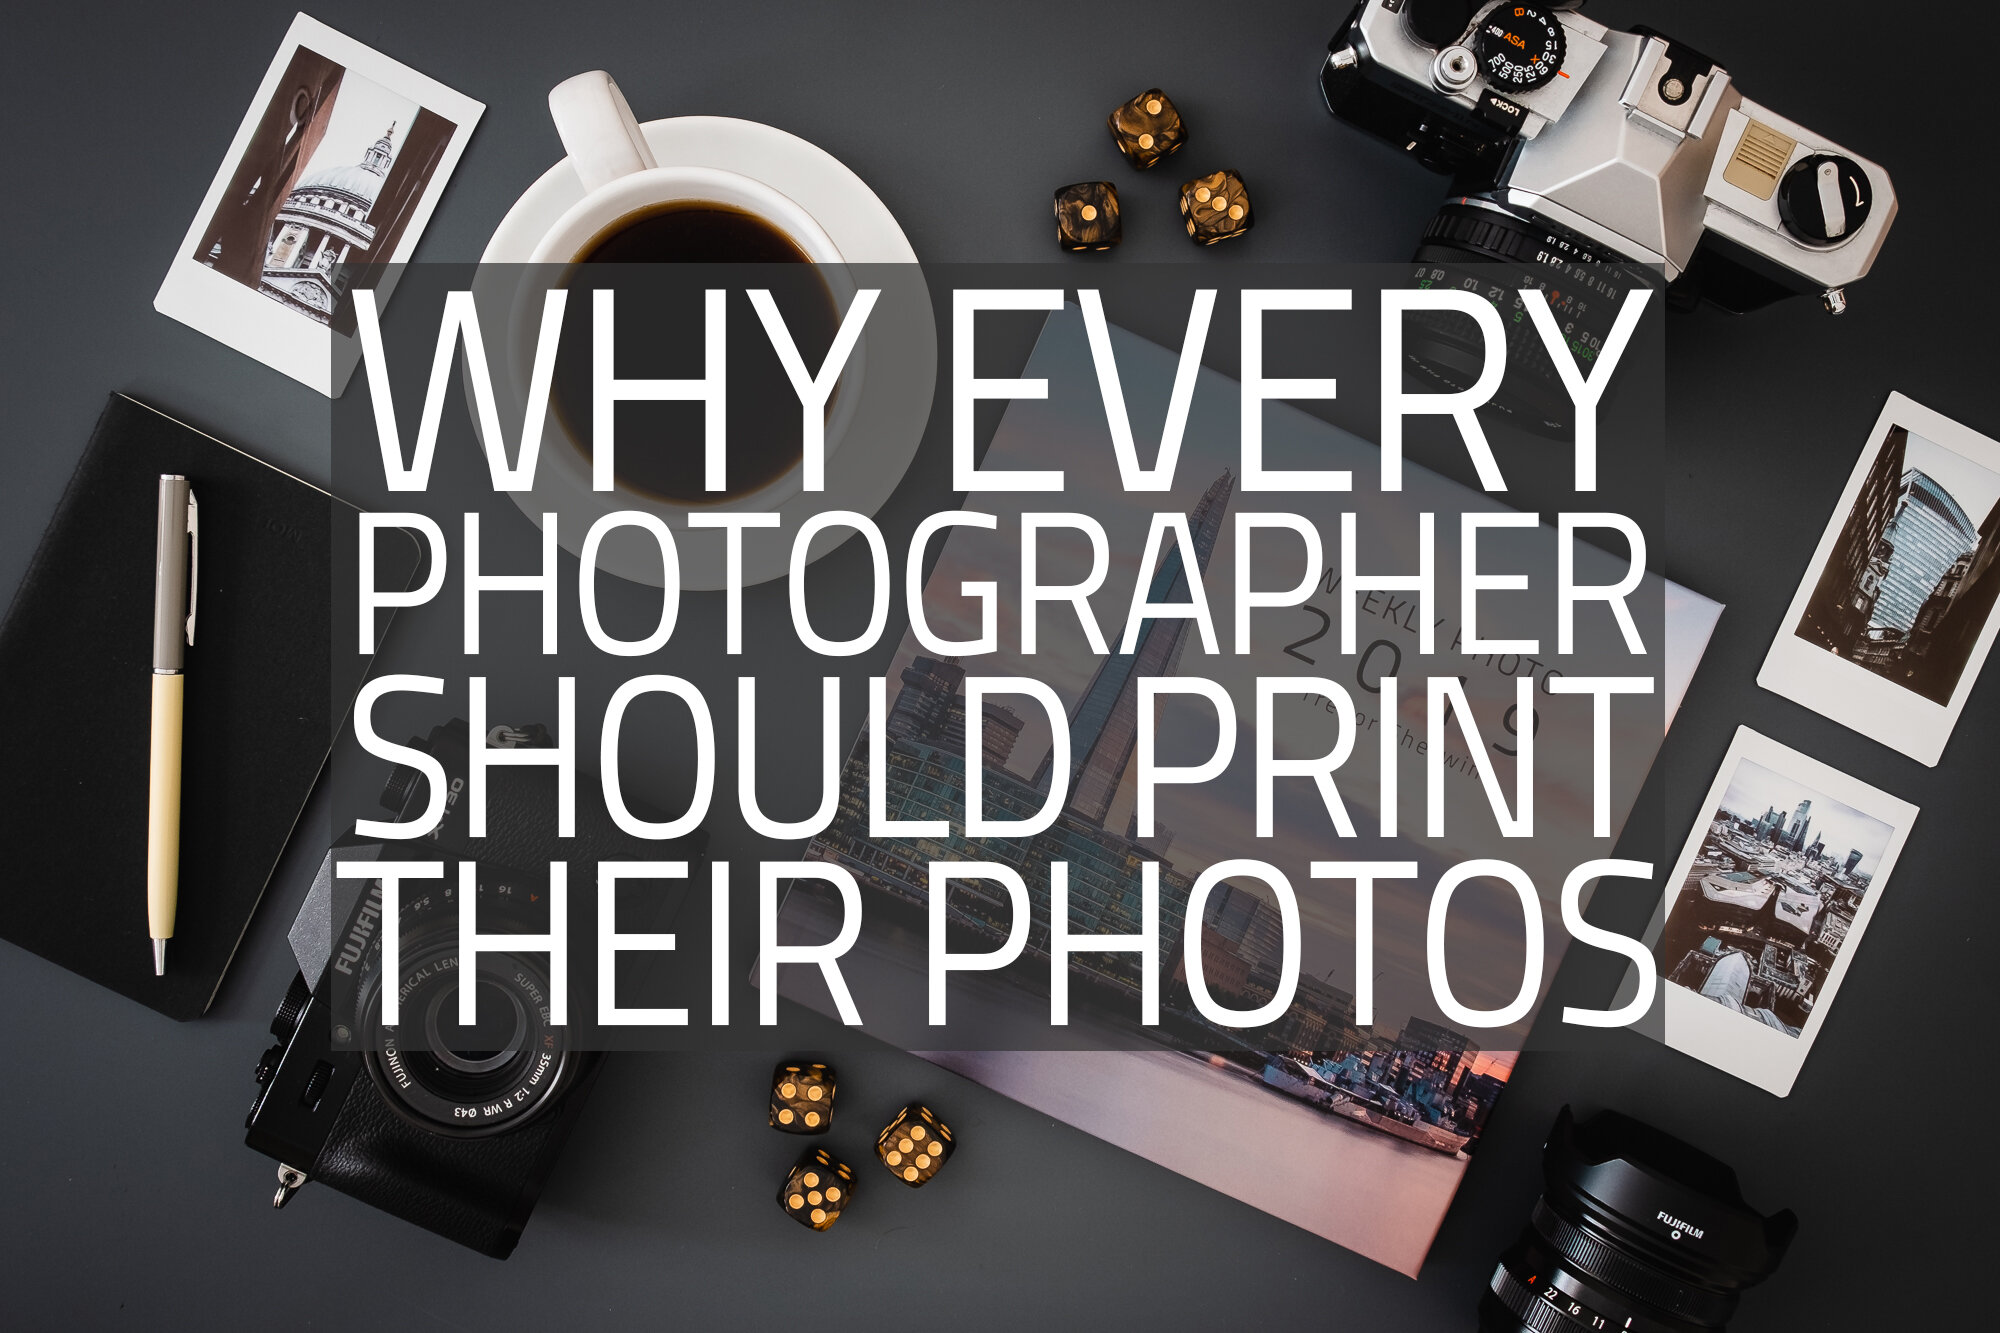
Why Every Photographer Should Print Their Photos
As I embark on my own printing journey, I wanted to share with you what I’ve been printing lately and to help convince other people to get their photos off of their computer and on to paper, I have listed 6 reasons why I feel every photographer should print their photos.
It’s 2020 and the shift to digital photography happened a long time ago. We now take more photos than ever before and nearly all these photos are stored and consumed on our phones and computers. With so many photos to consume, the time we all spend looking at these photos gets shorter and shorter to the point where these days, from the point they are taken, most photos likely never get seen by human eyes at all.
In this post, I’m going to dive into the world of printing and talk about how I currently print my photos and provide my reasons why I believe everyone should be printing their own best work in some form or another. What I won’t cover in detail is how to prepare photos for print and instructions for printing photos at home as that’s an entire topic on its own. I have already written a blog post called How I printed this photo of the Shard, London but that post only really skims the surface of printing at home as I wanted to keep the post light and free from too much jargon so everyone could follow along but there is so much more information that could have been included.
“The negative is the equivalent of the composer’s score and the print the performance.”
How I Print My Photos
I’ve been printing my photos for many years, long before I first took up photography as a creative hobby. When I was young a photo was only a photo when it was physically printed as apart from using a slide film and projector, there wasn’t really any other option. Most of us would head off to the local print lab or drugstore and hand in our film to be processed ad collected 24 hours later. Although times have changed and photos can now be displayed in both digital and analogue form, for me at least, nothing has changed with regards to my desire to commit ink to paper and have my photos printed.
I consider myself lucky to live in an age where there are so many more options when it comes to printing photos, from your standard print to fine art paper, large wall-art such as canvas and acrylic and my personal favourite, the photo book. 20 years ago, when I would pick my prints up from the lab, I didn’t look forward to spending the next few hours sticking them all in an album. It was tedious work, to say the least. These days, photo books are the new photo album and whether it’s using a phone, tablet or laptop, anyone can design and create their own books featuring a collection of photos with relative ease.
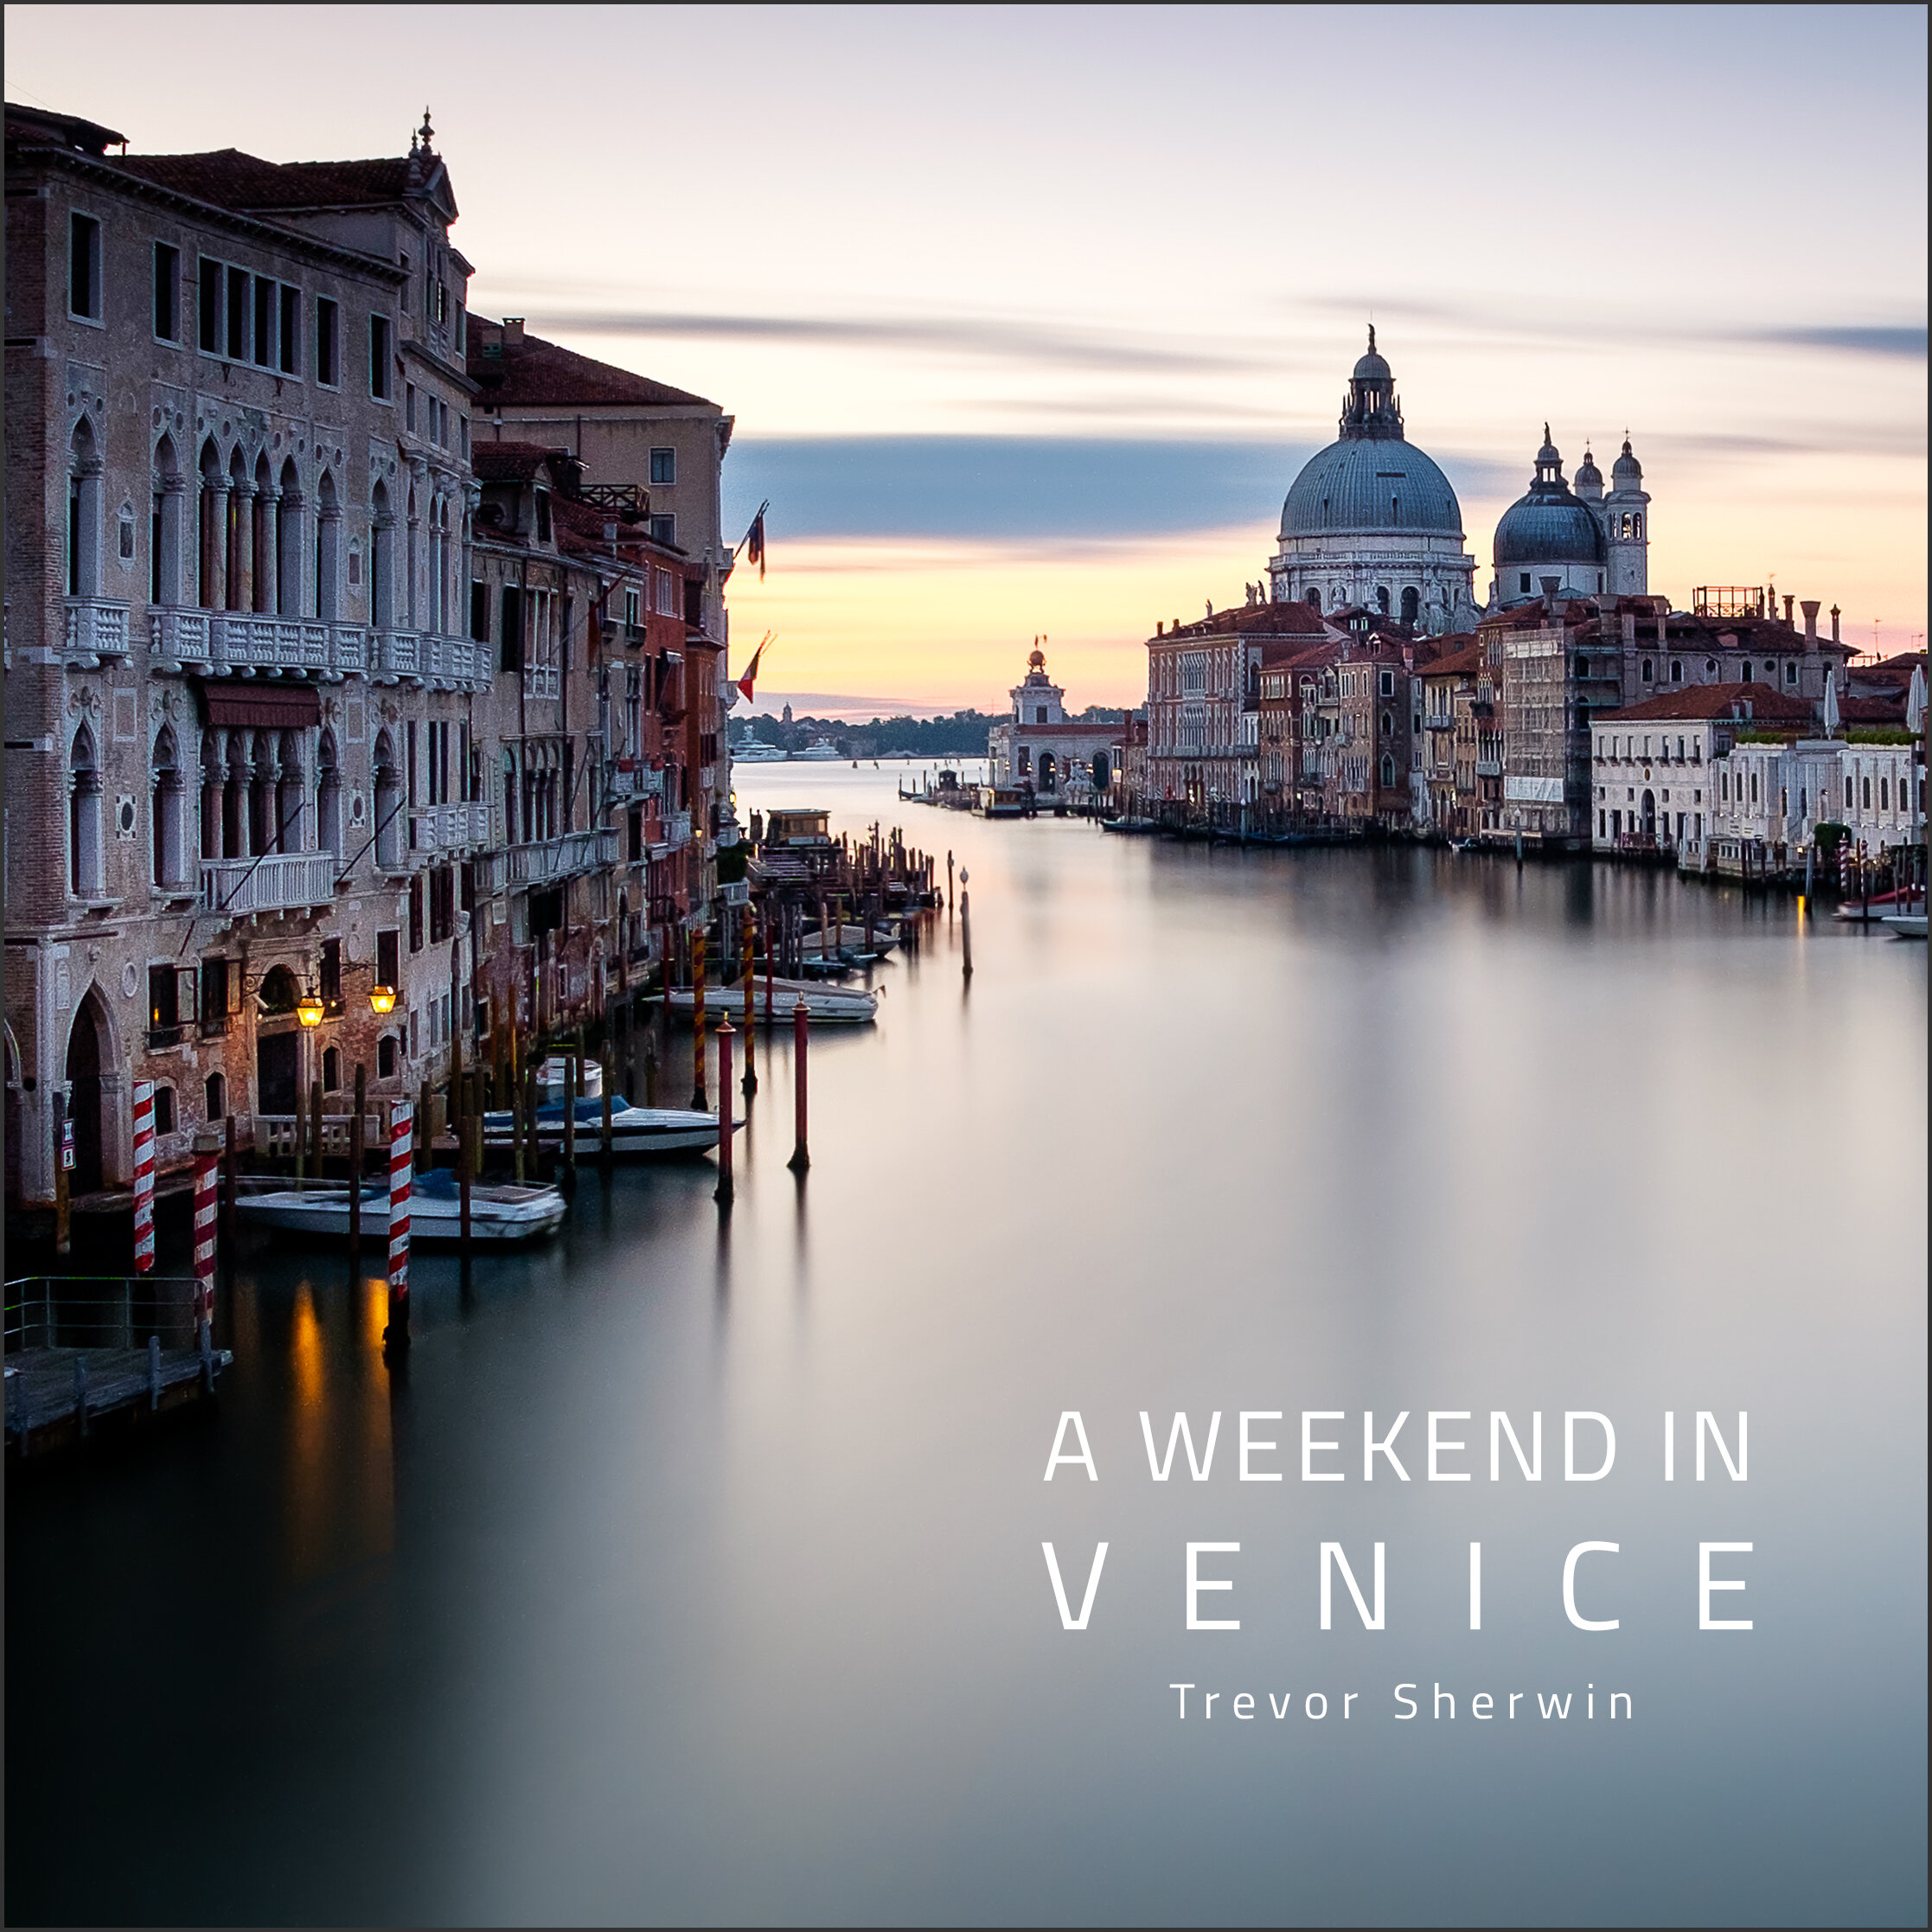
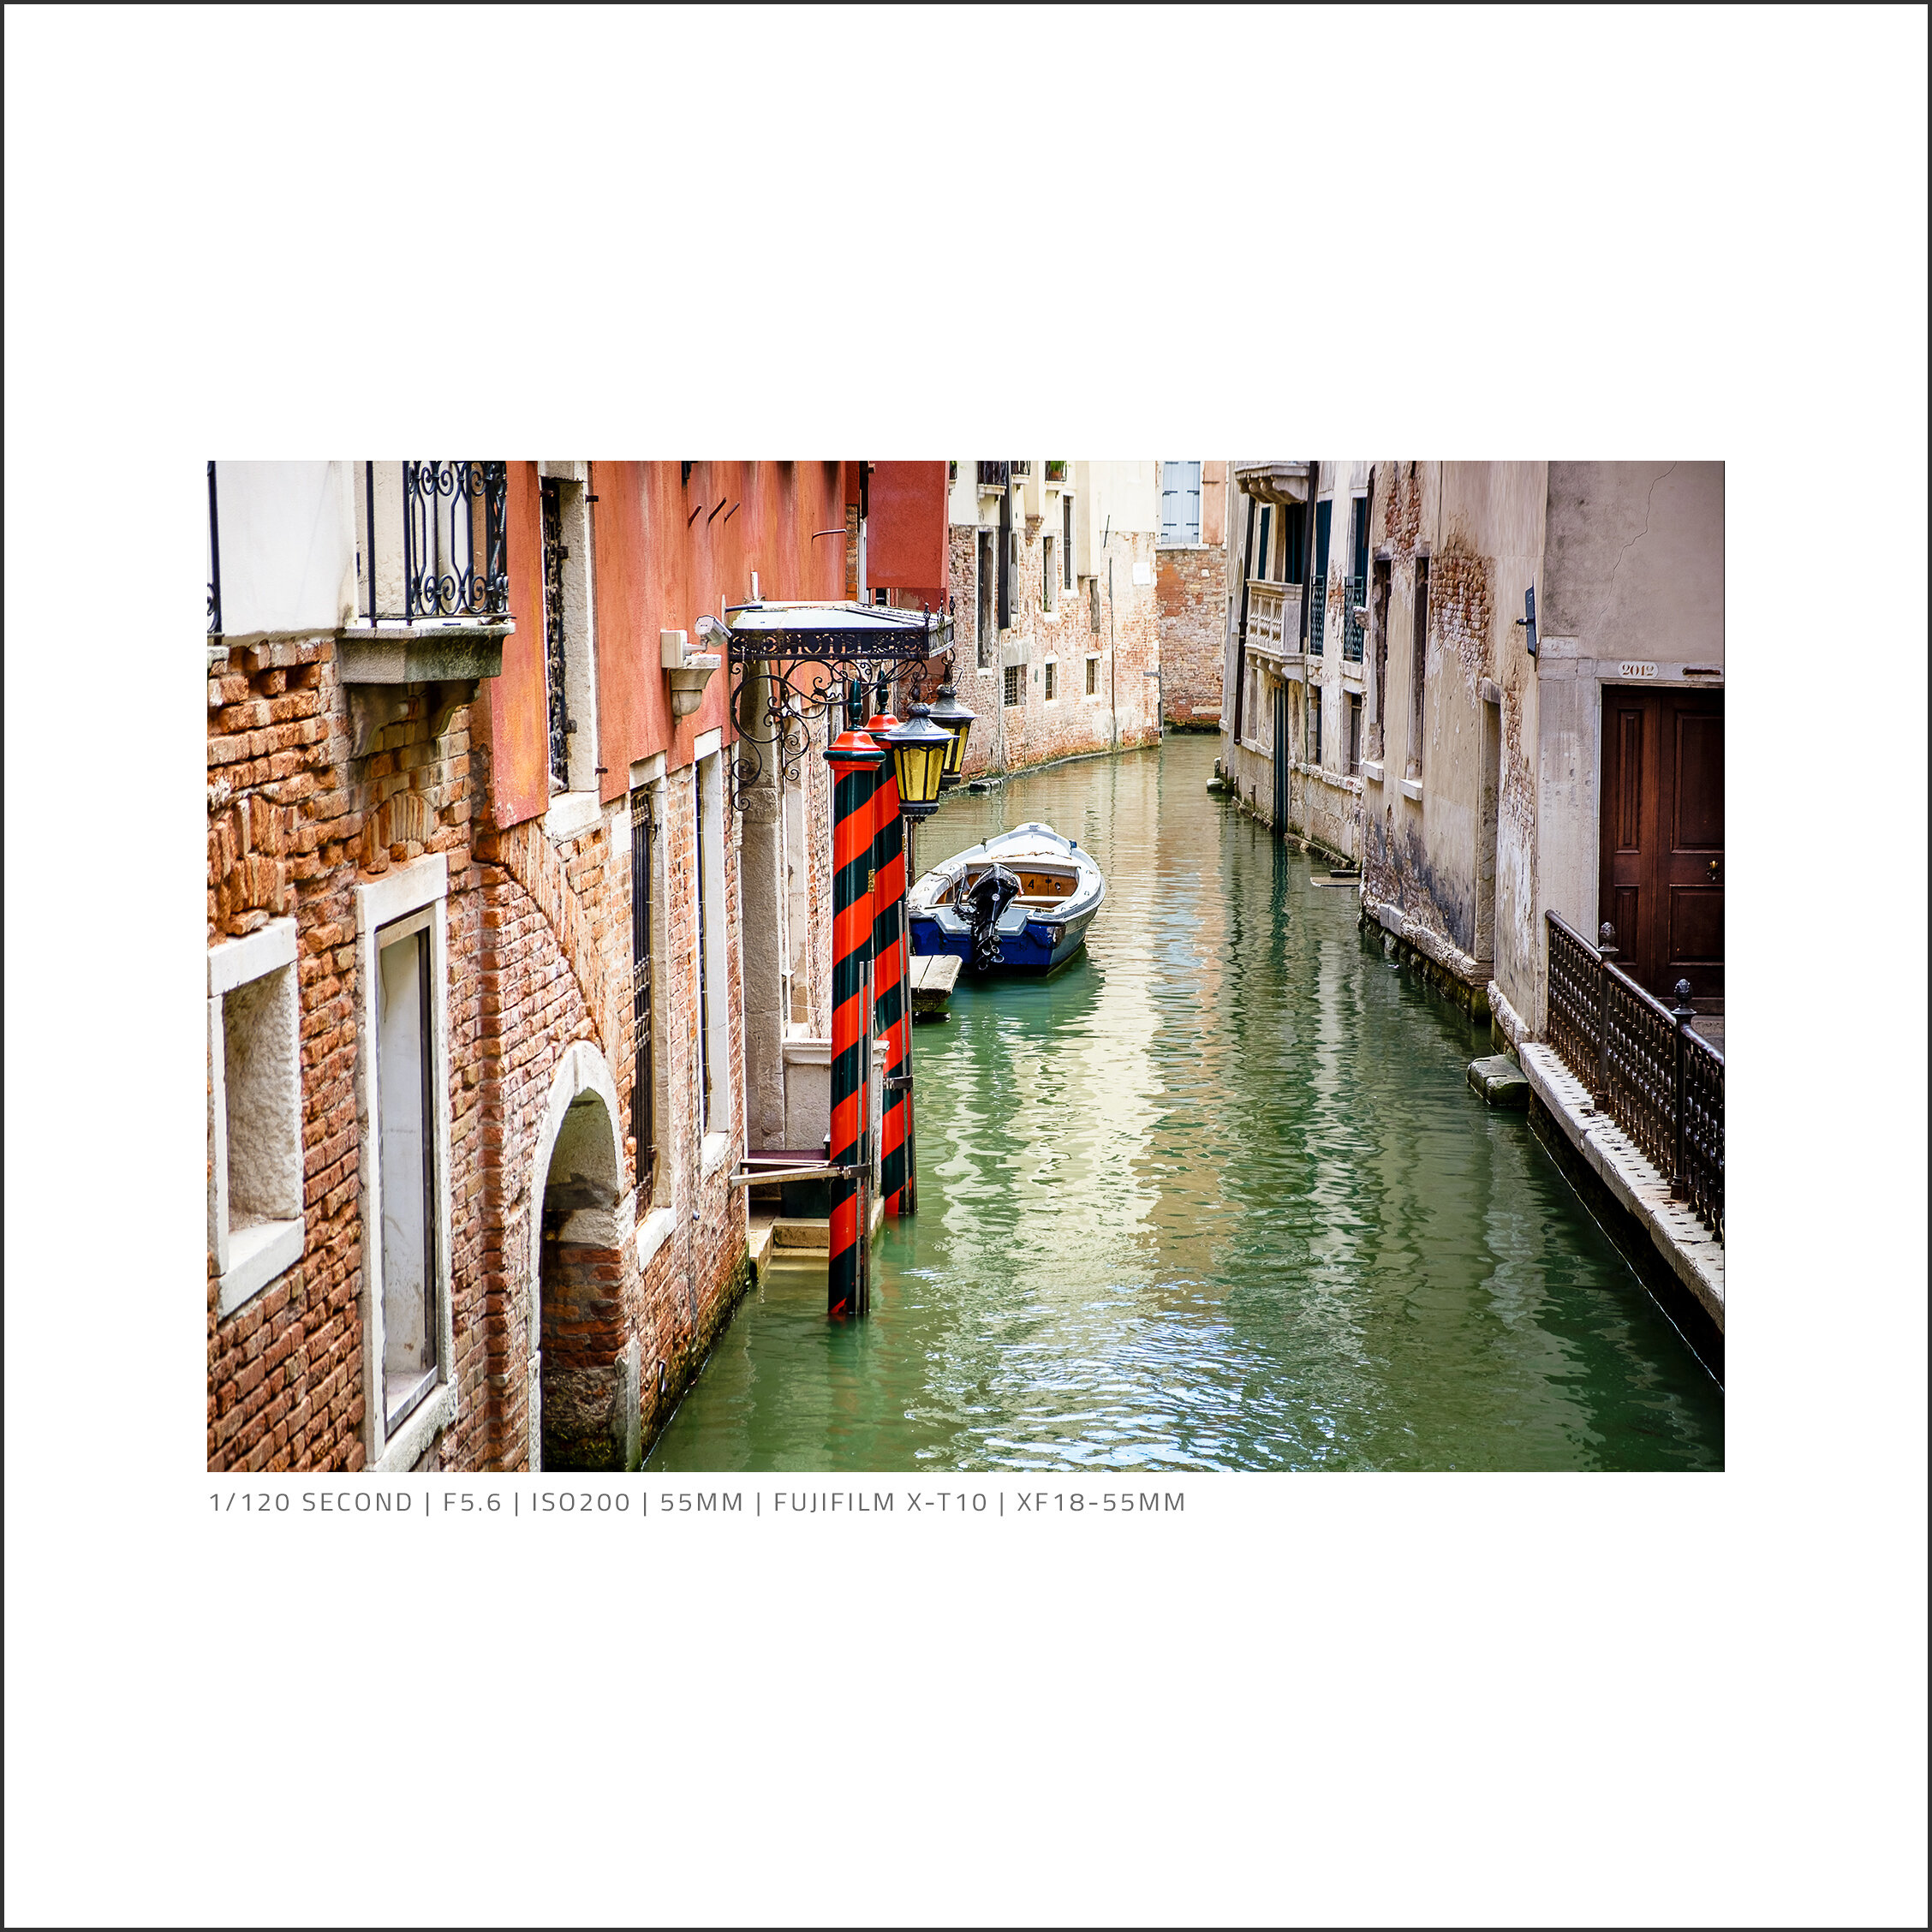
After visiting Venice in 2017, I wanted to round off my amazing trip by printing some of the photos I took. I decided to do two things. First, narrow down my favourite images and present them in a small coffee table style book and second, choose just a small selection to be framed and hung on my wall. I chose around 35-40 photos that were taken across the weekend and designed a book in my usual minimalistic style. I chose to print the book with a quality soft-touch matte cover which oozes quality with the photos printed on the thicker 250g silk matte paper. I could have chosen cheaper paper but this book was for me, a one-off and I wanted it to look and feel great to read.

Scroll through a few pages of the book below to get an idea of the layout and style.

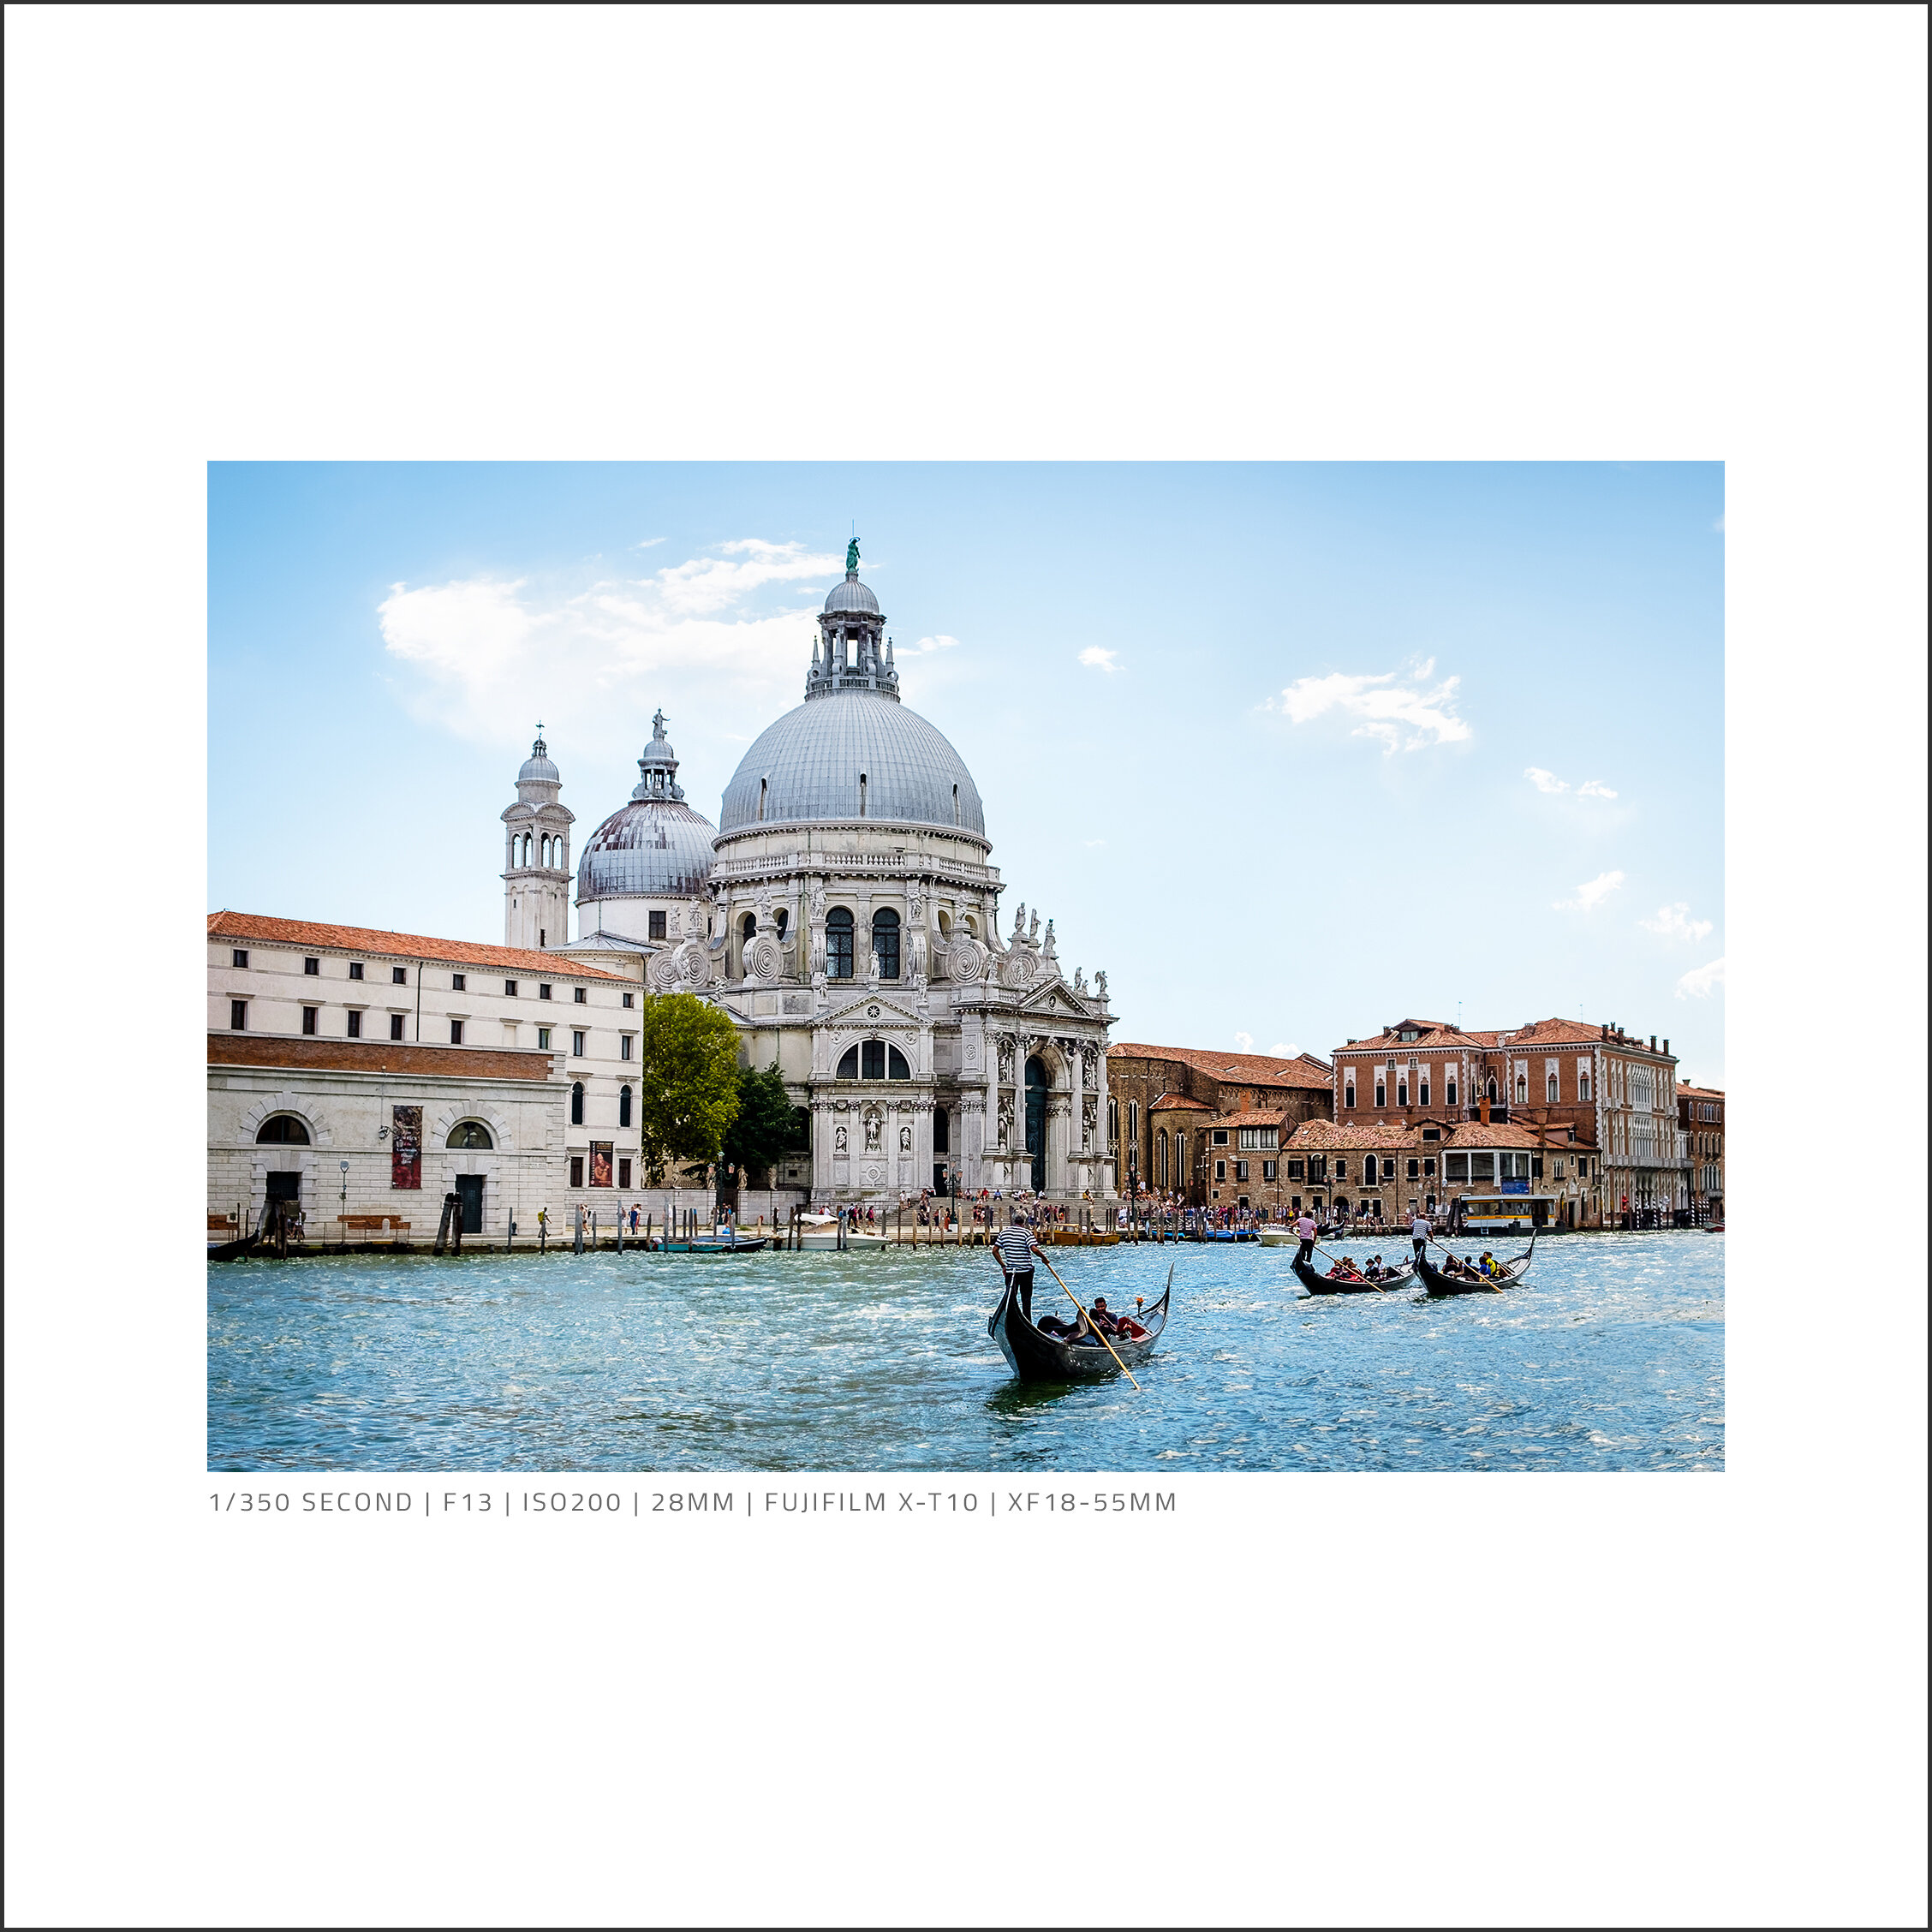
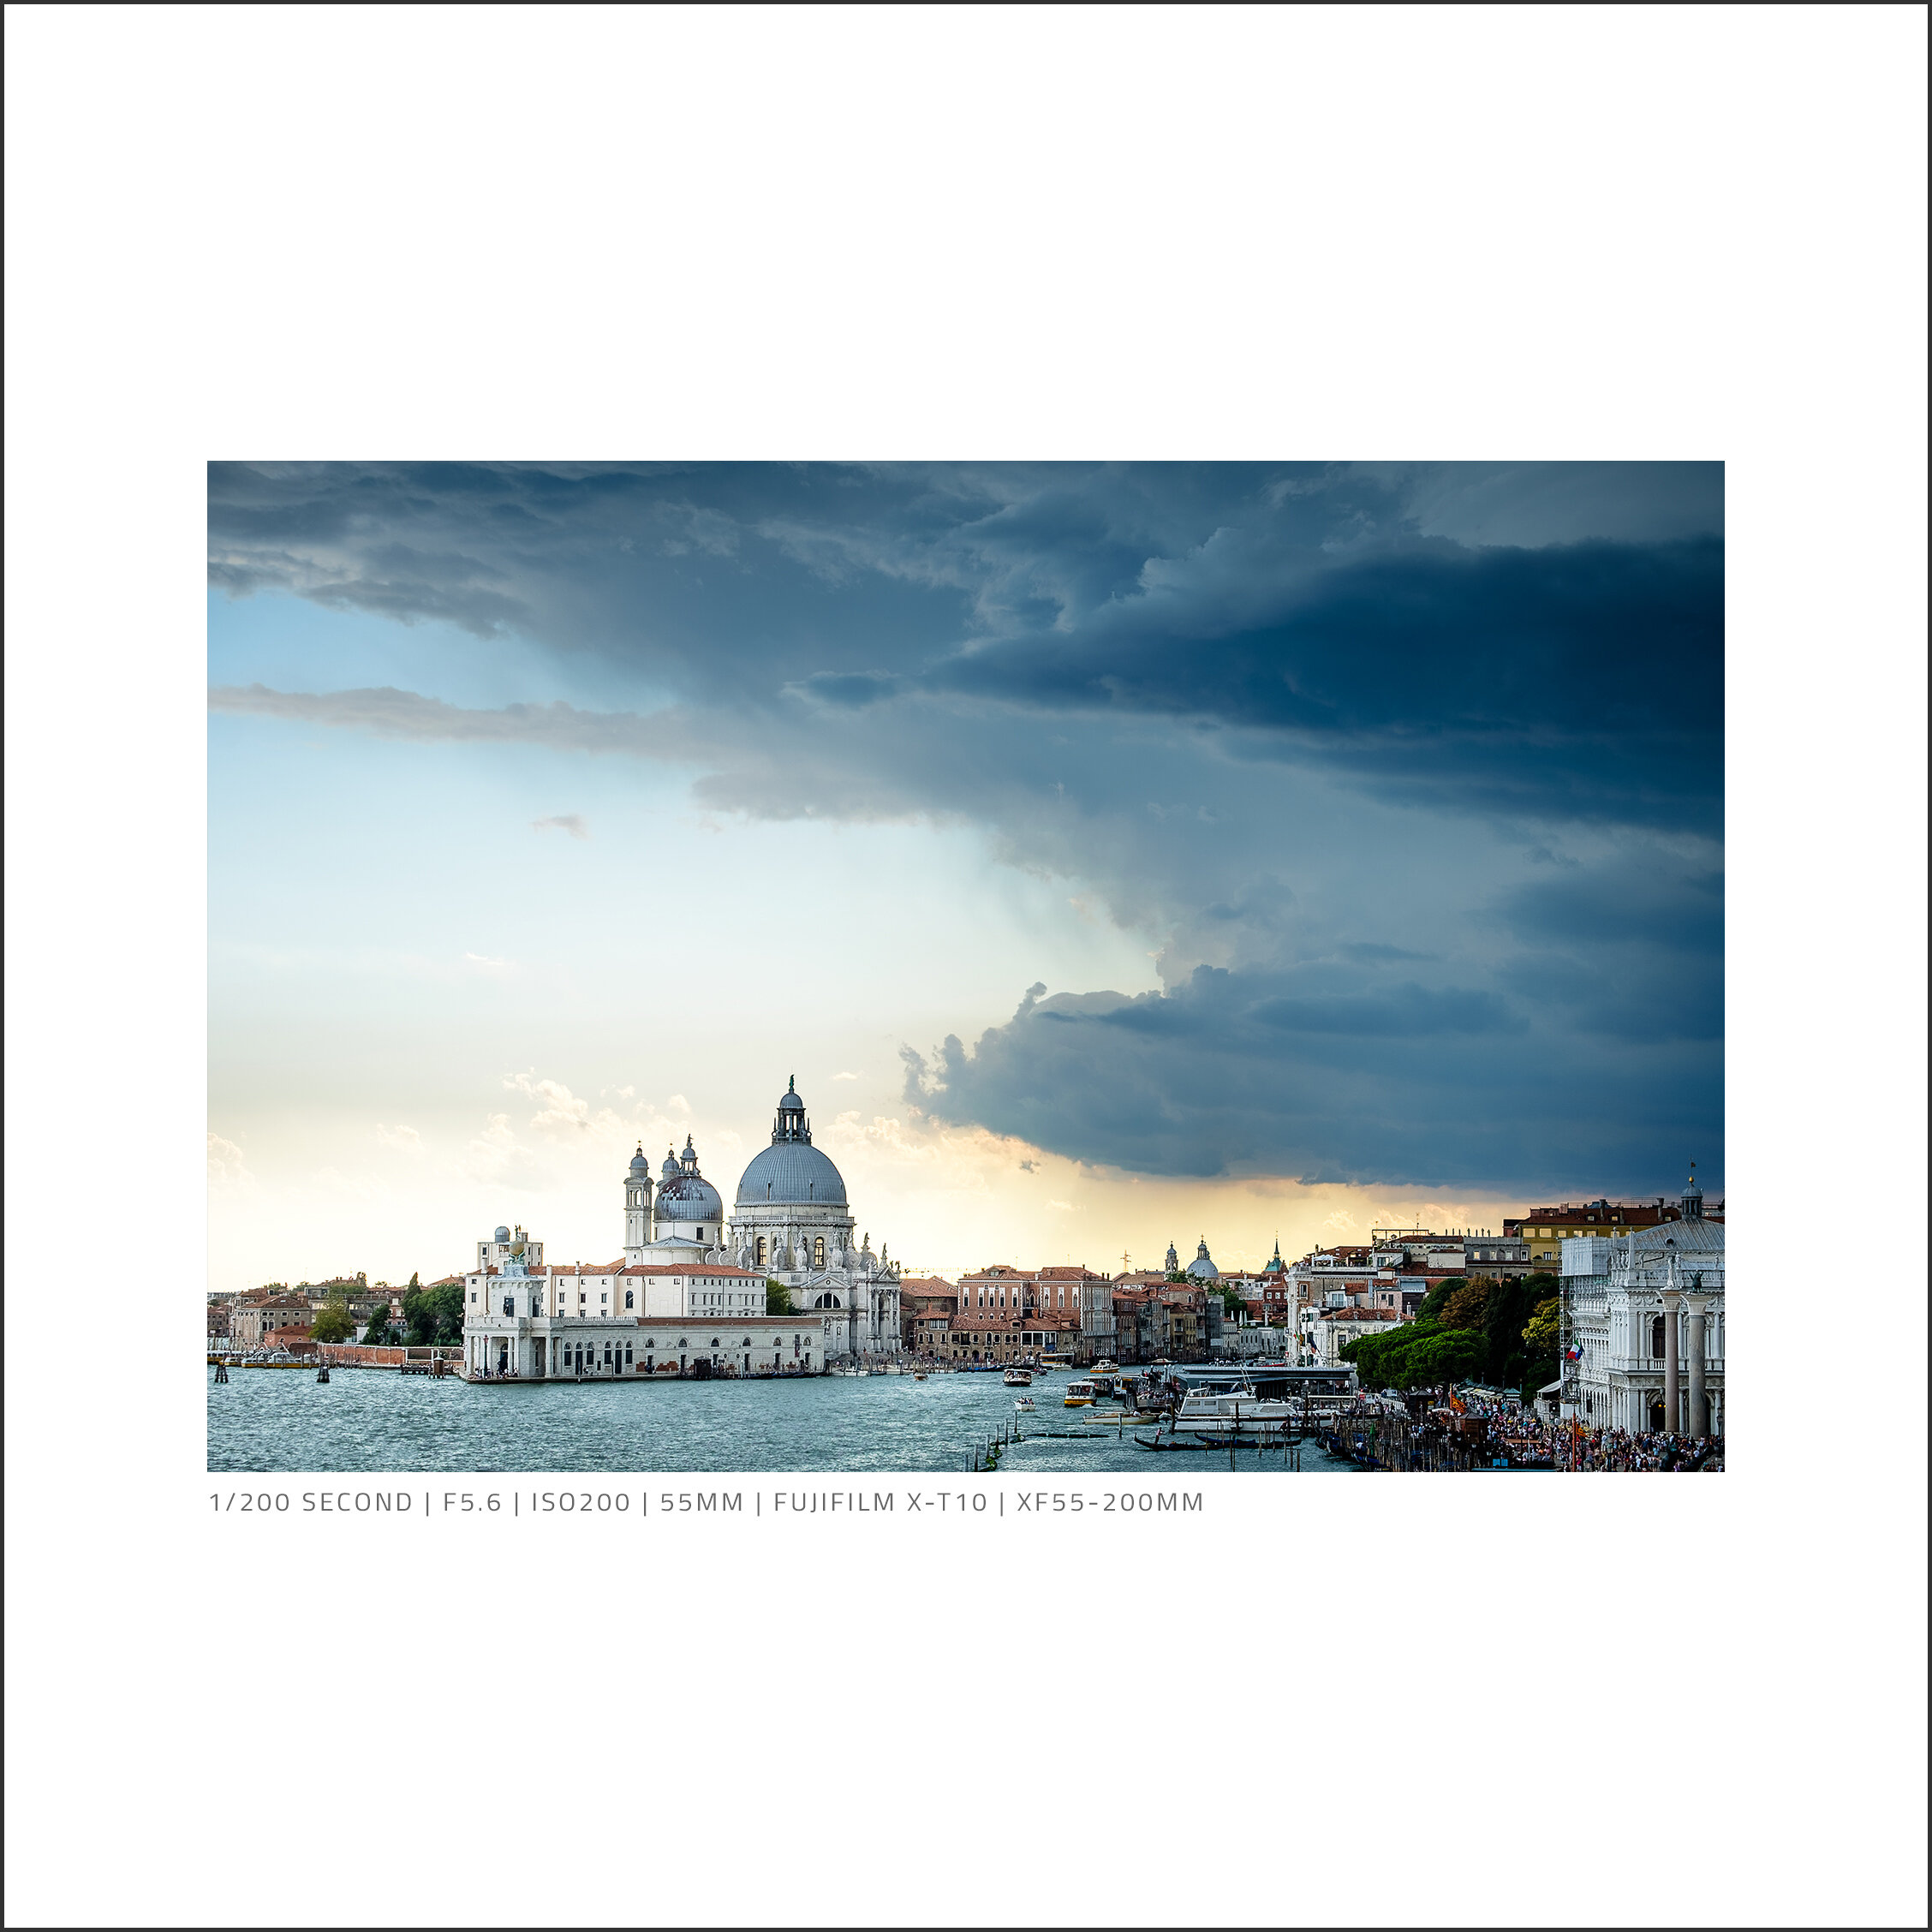
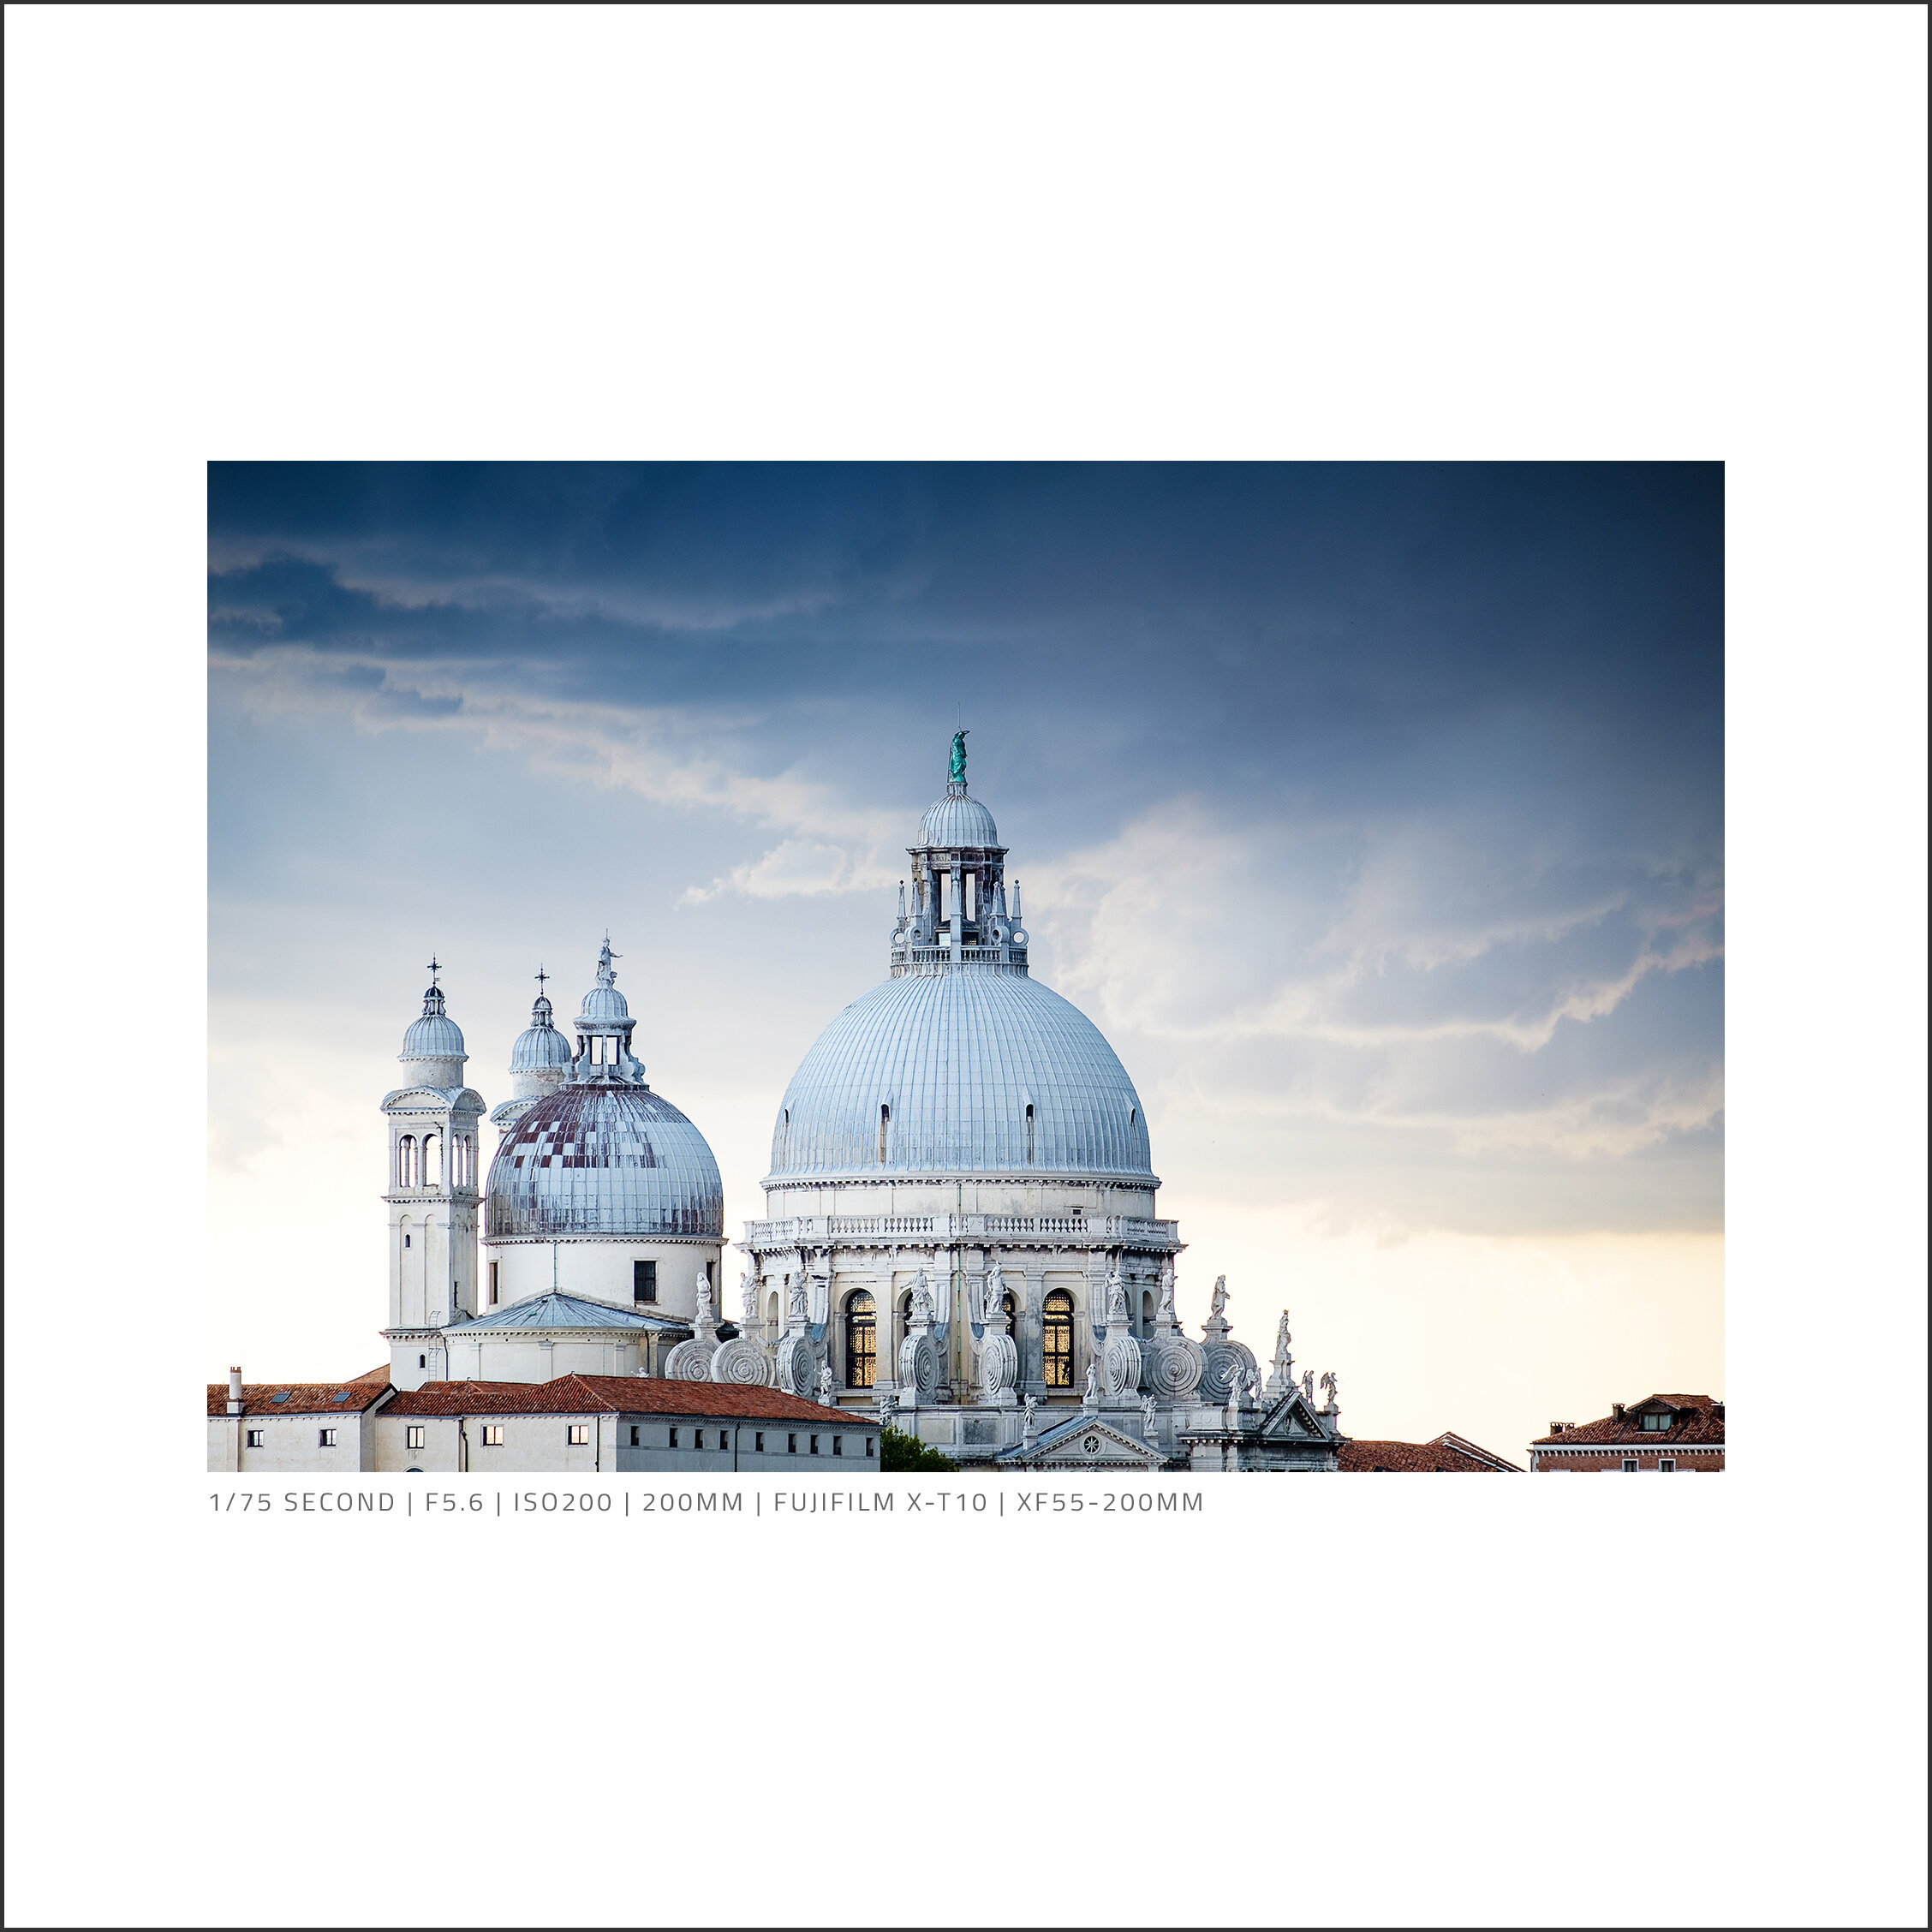
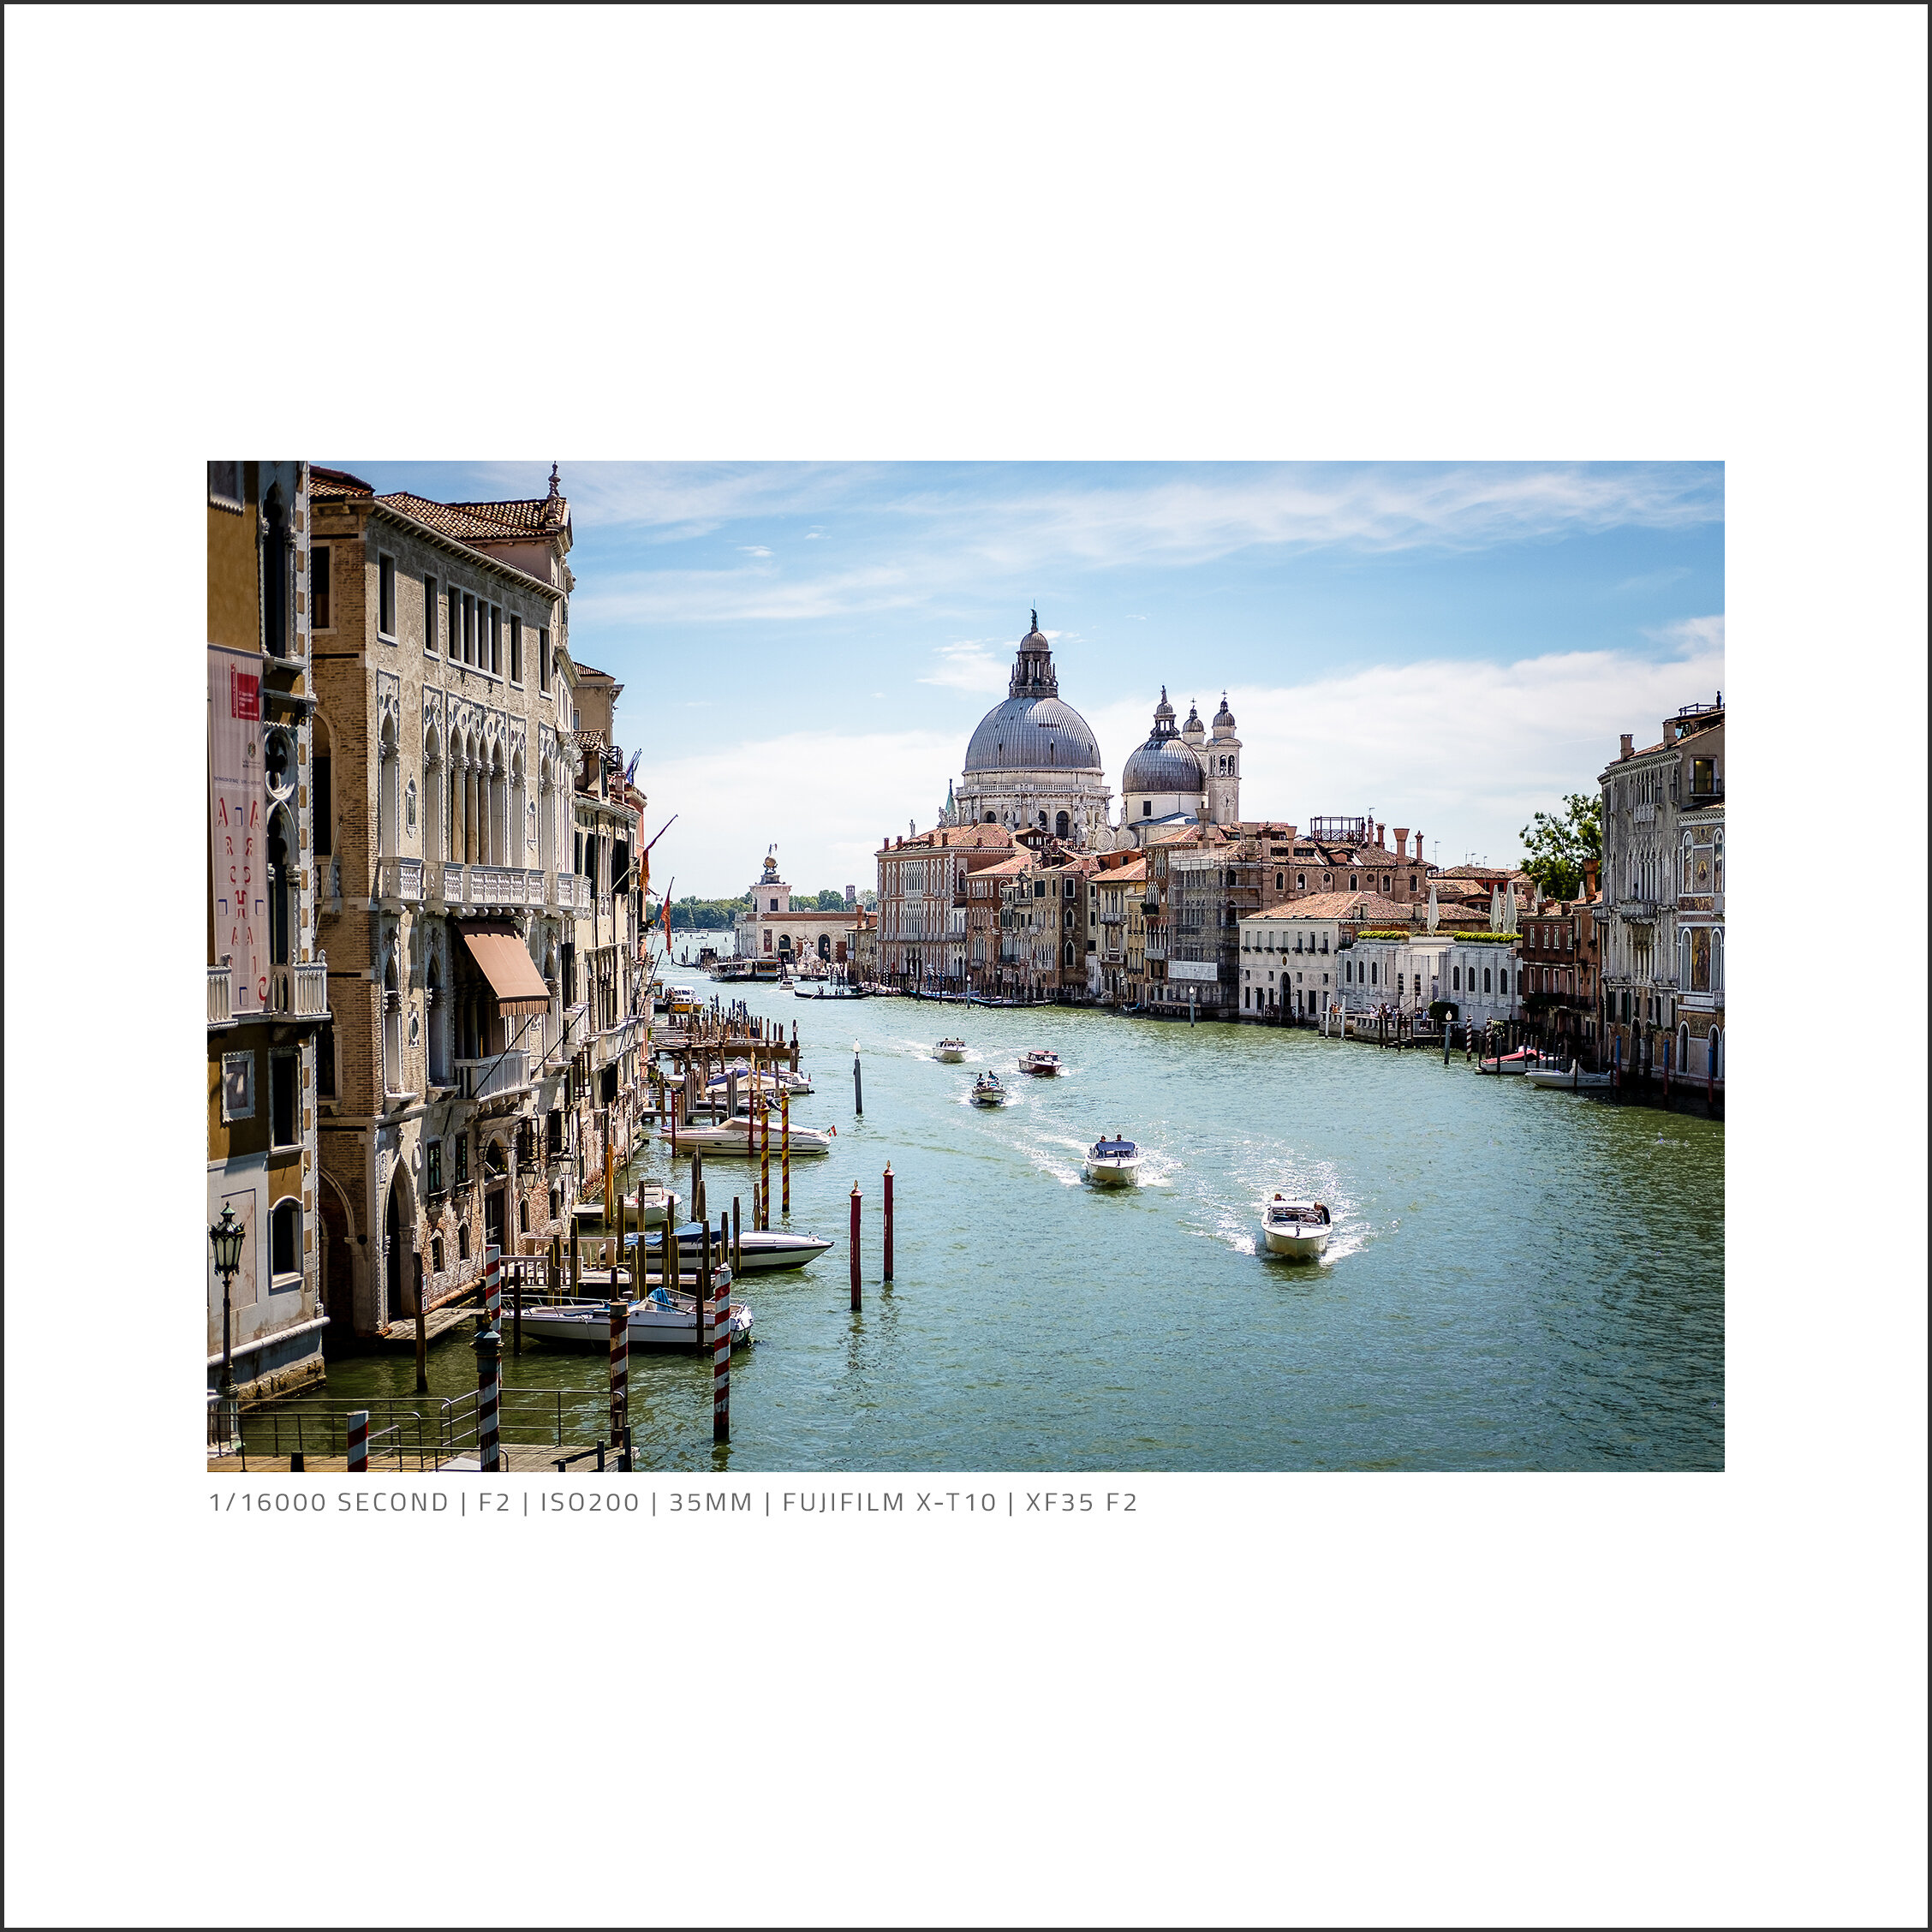
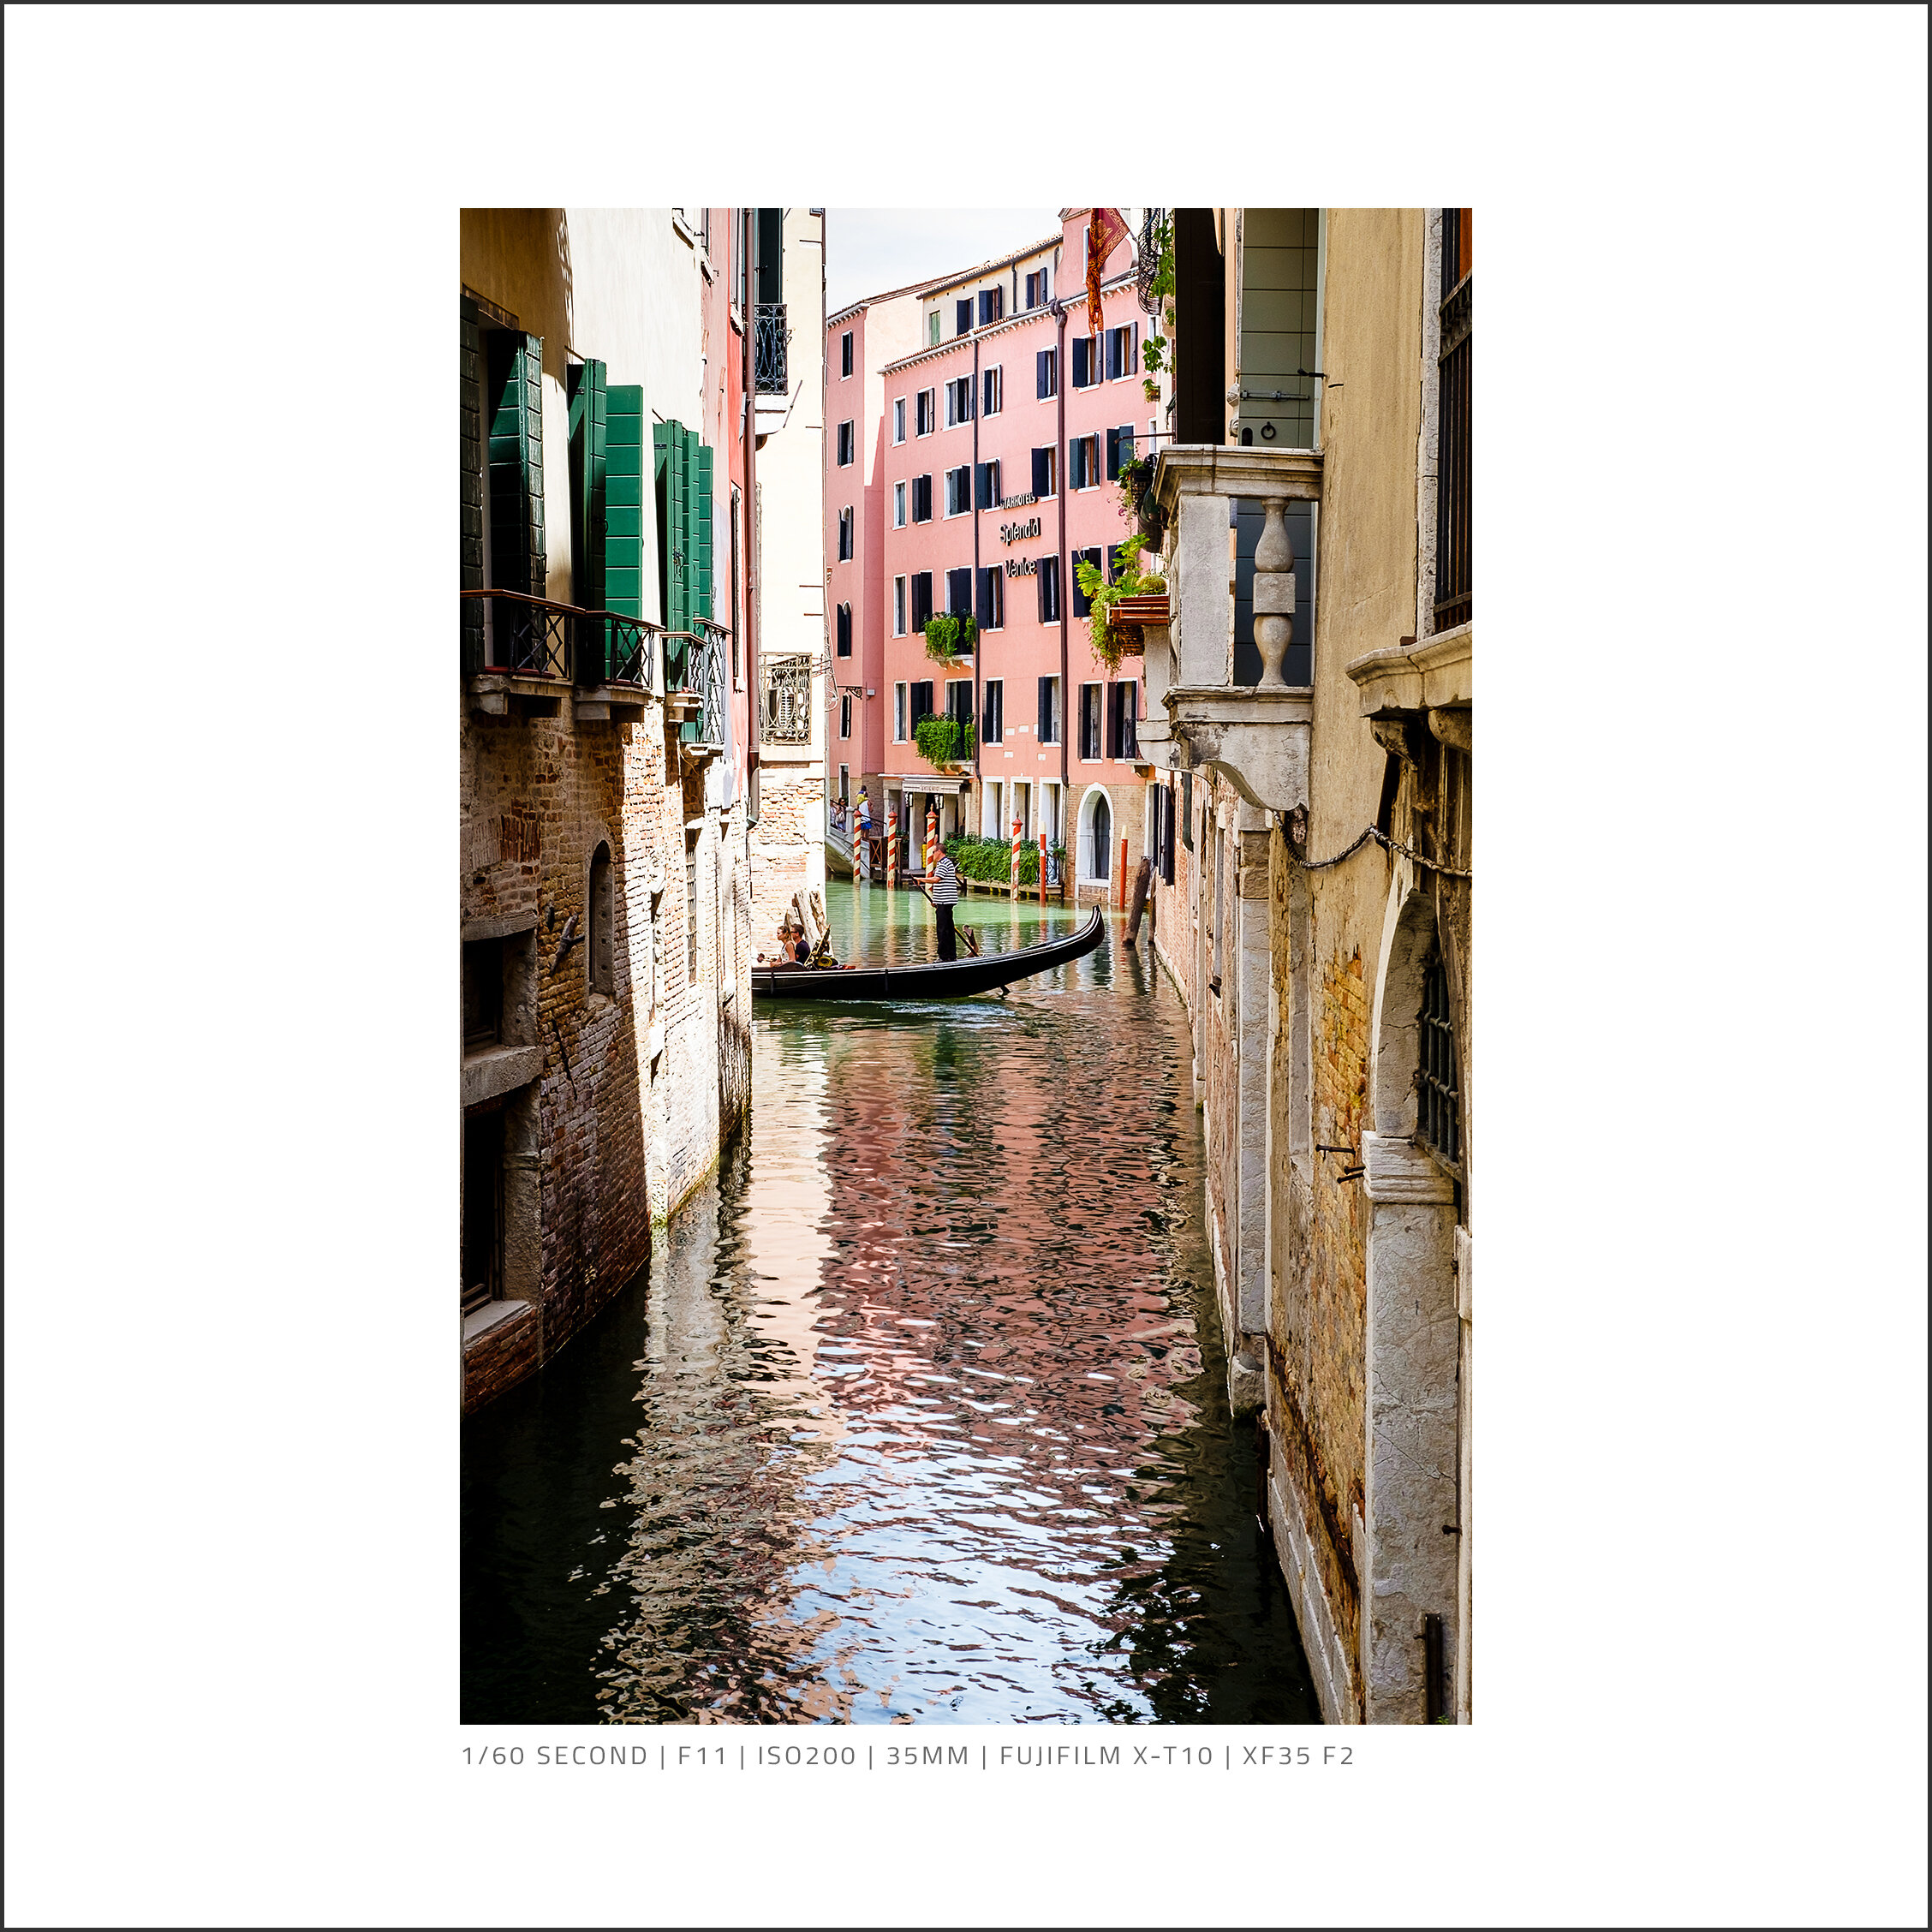
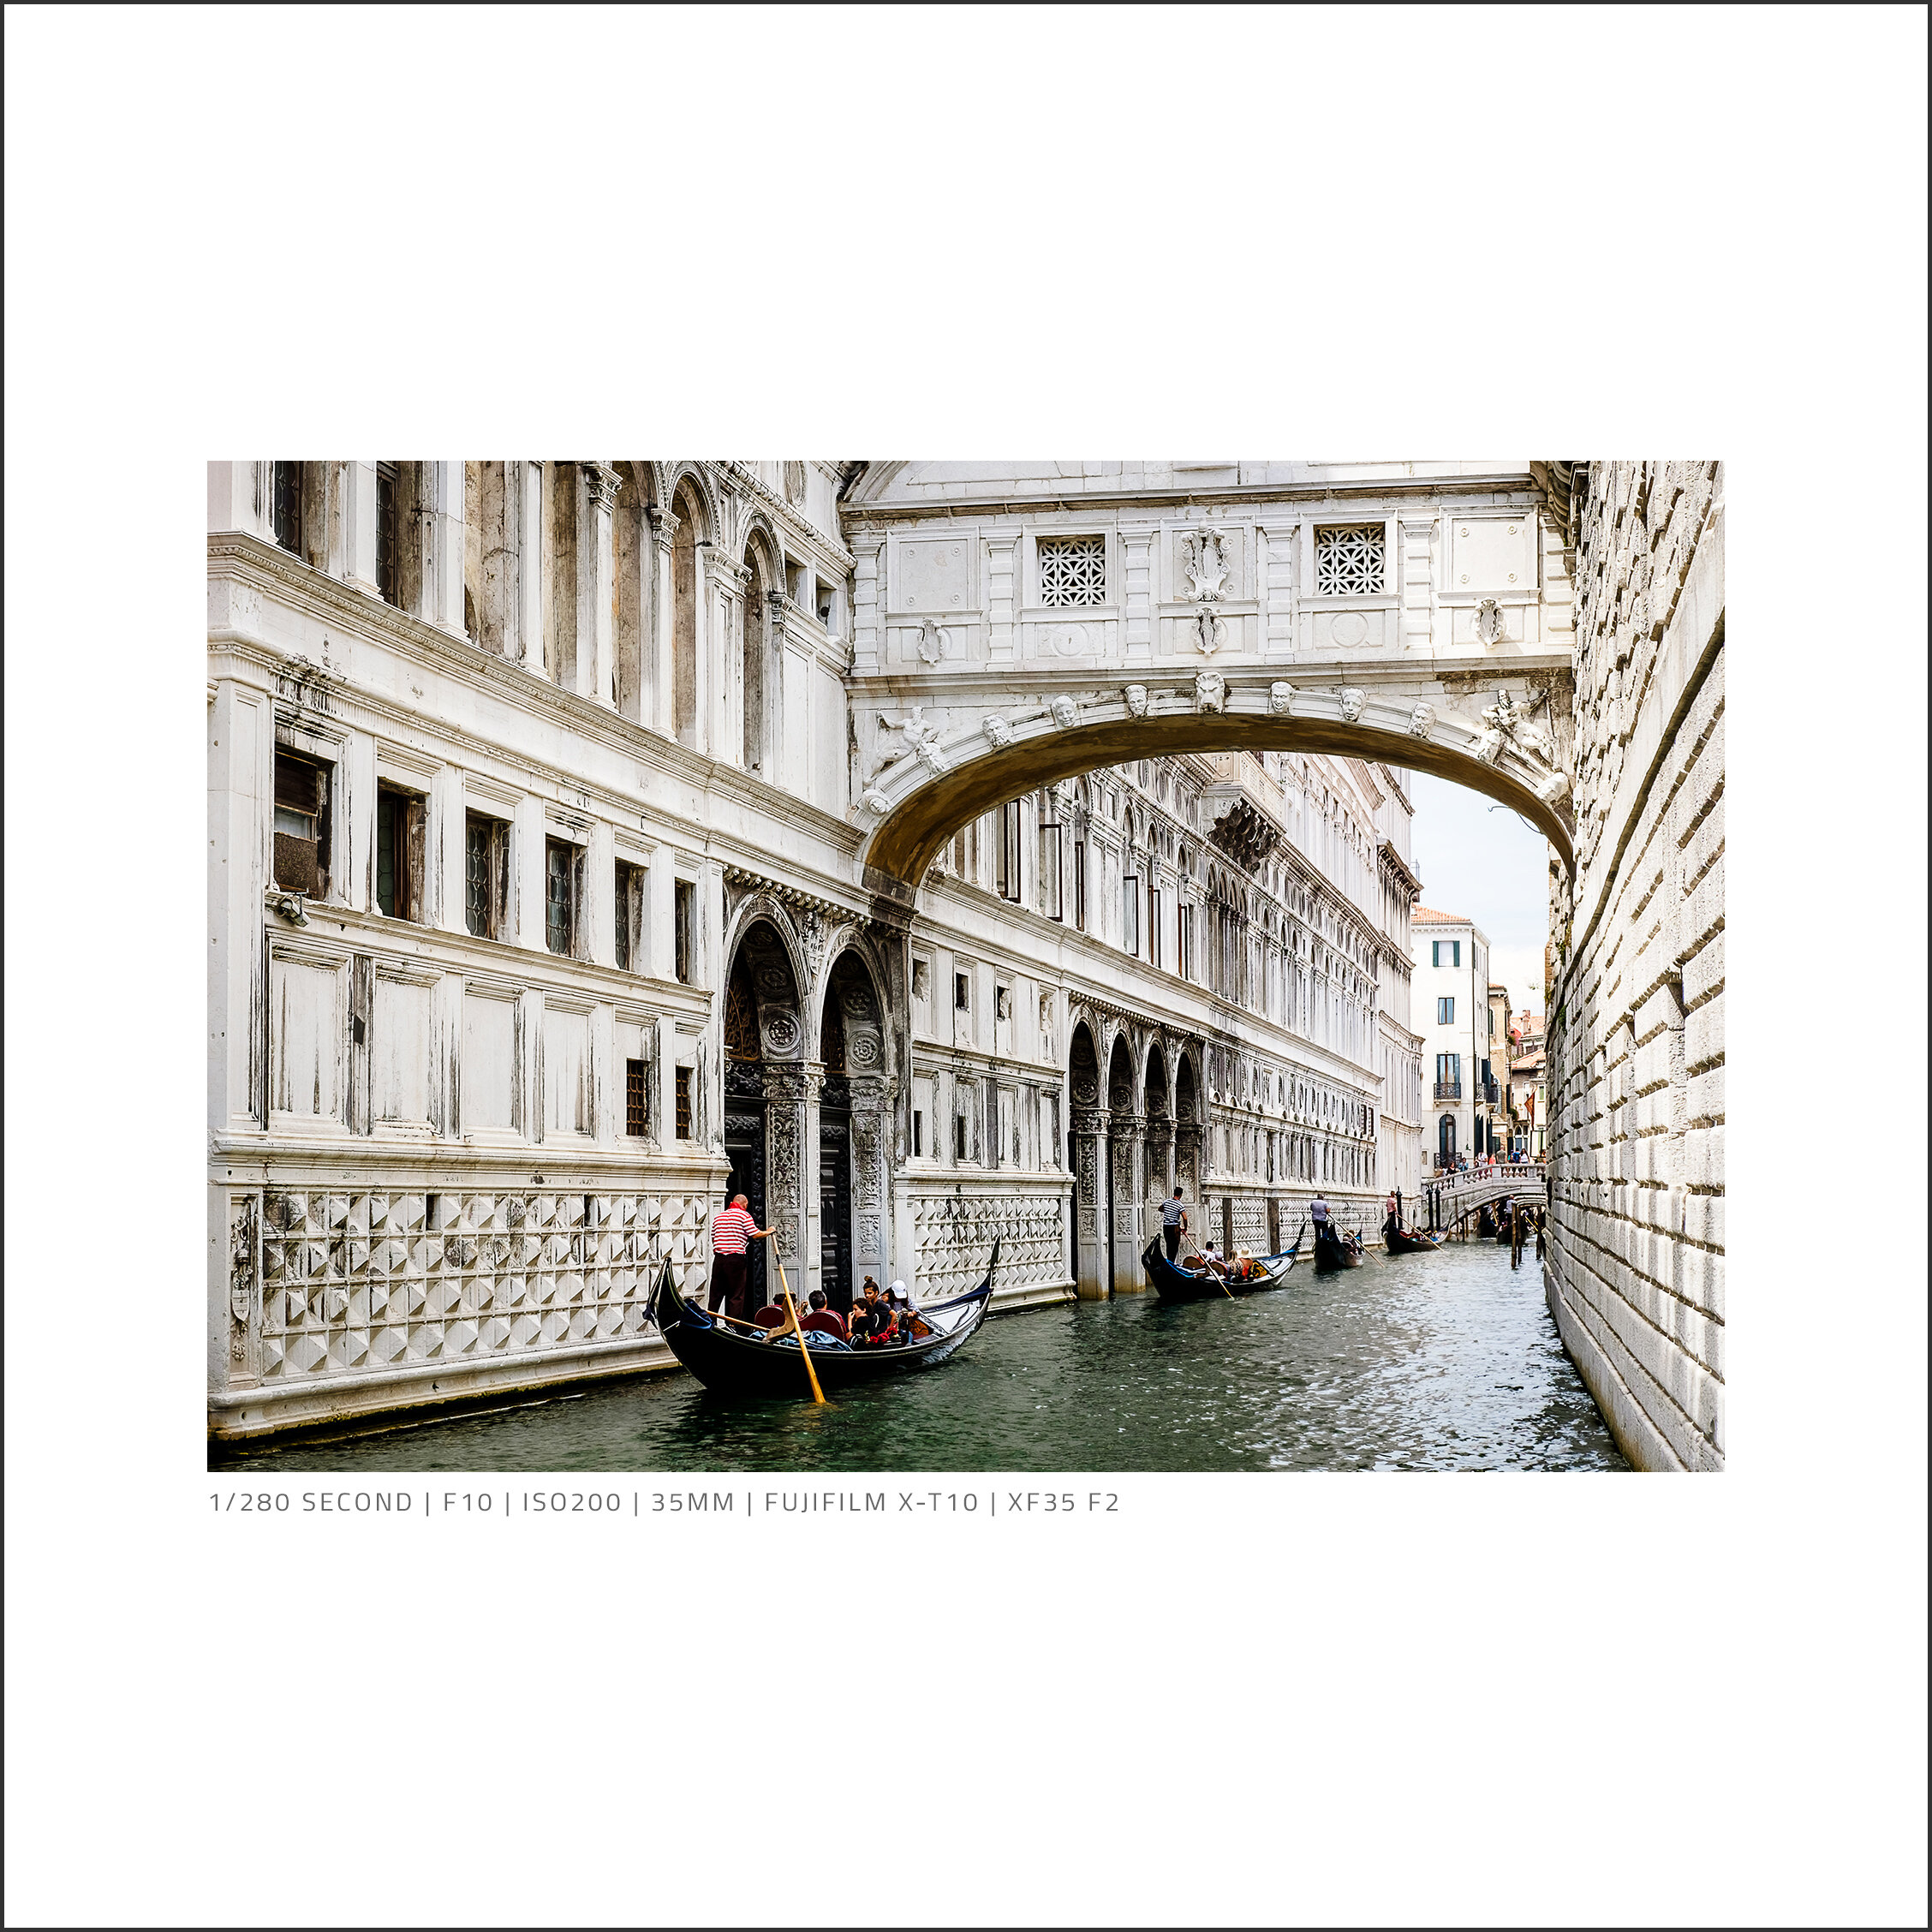
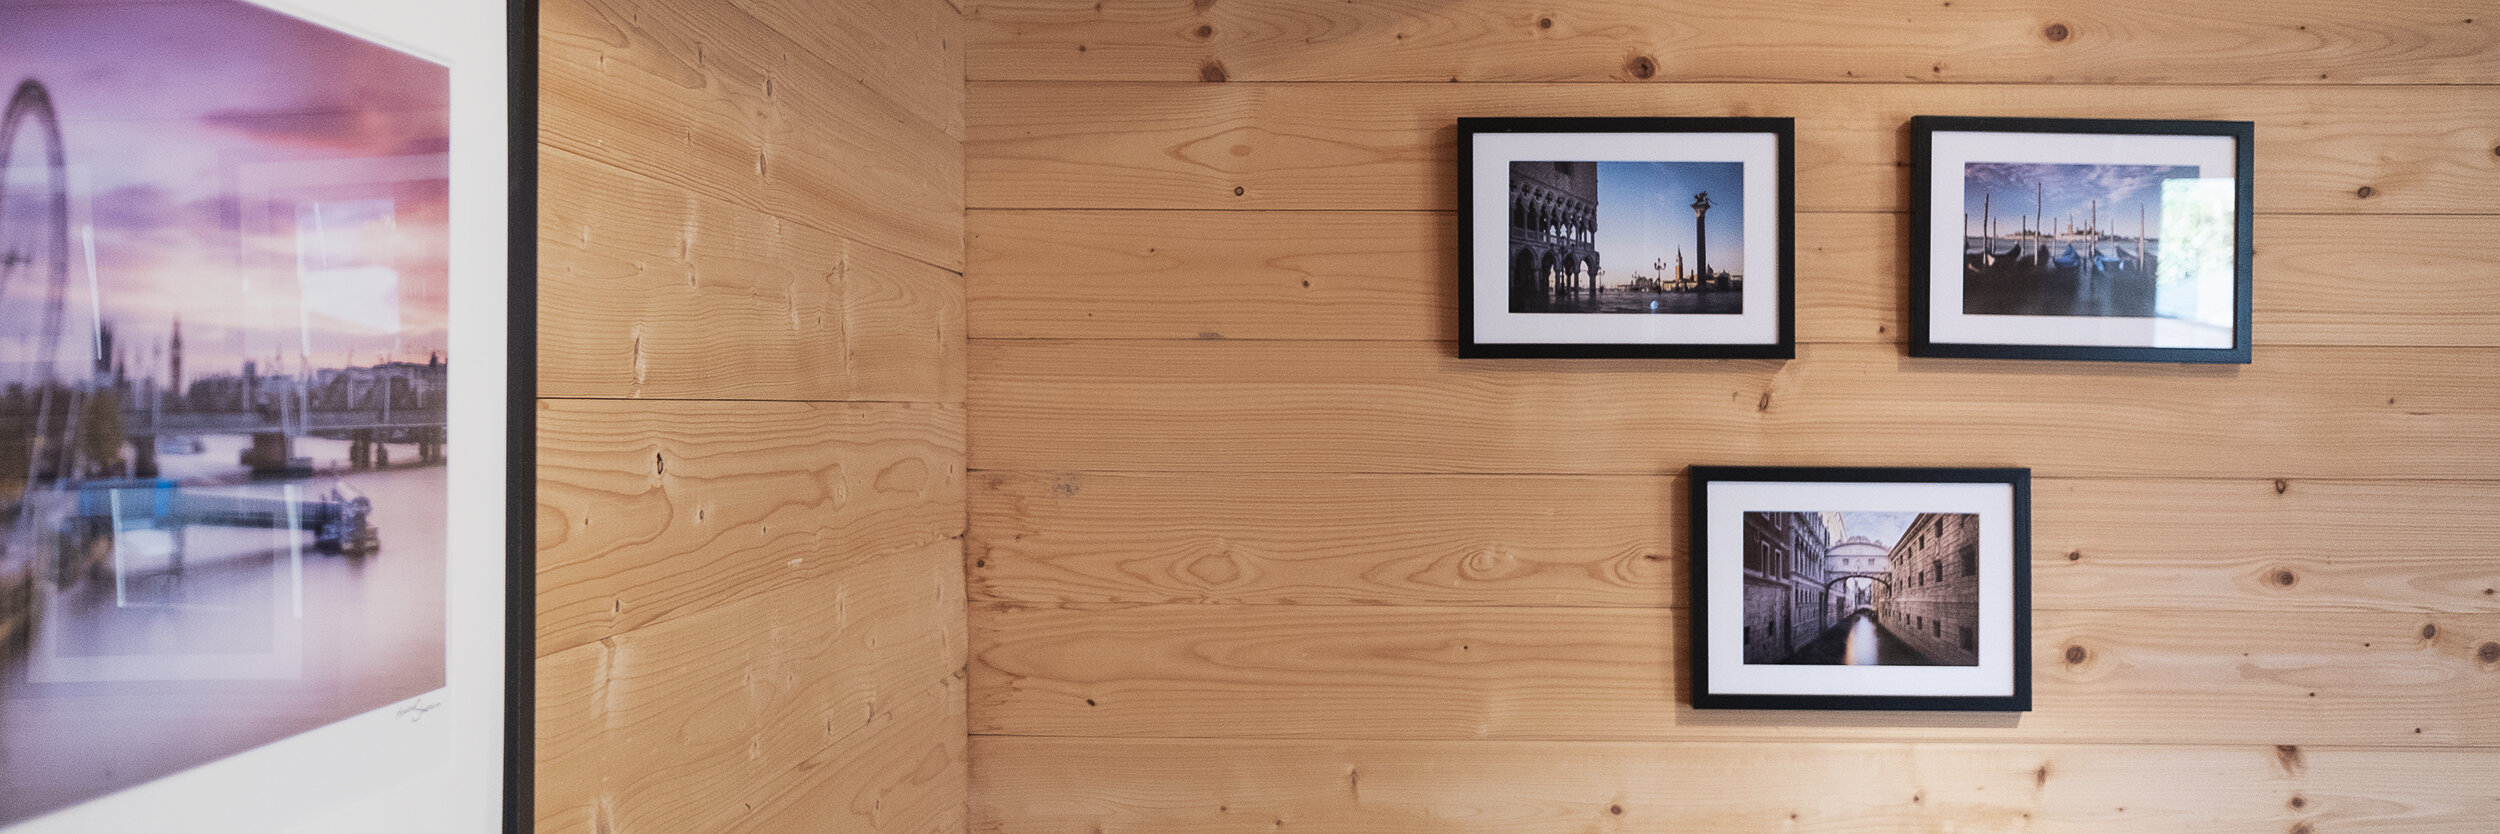
After the book, I wanted to print a few pictures a bit bigger and hang them on the wall in my studio. I chose 3 images that fit together and printed these on my Canon Pro-10s printer. I chose these three images in particular as not only are they photos of what I think shows off the beautiful city, but they also fit well together visually. All three were taken around the same time, early in the morning and each has strong blues from the sky and warm oranges from the rising sun.
While preparing the images for printing, I increased the vibrancy, added a little sharpening and brightened the images by around a stop of light. Once printed, I used frames with mounts in the same style as my other prints on the studio wall and hung them as shown in the photo below.
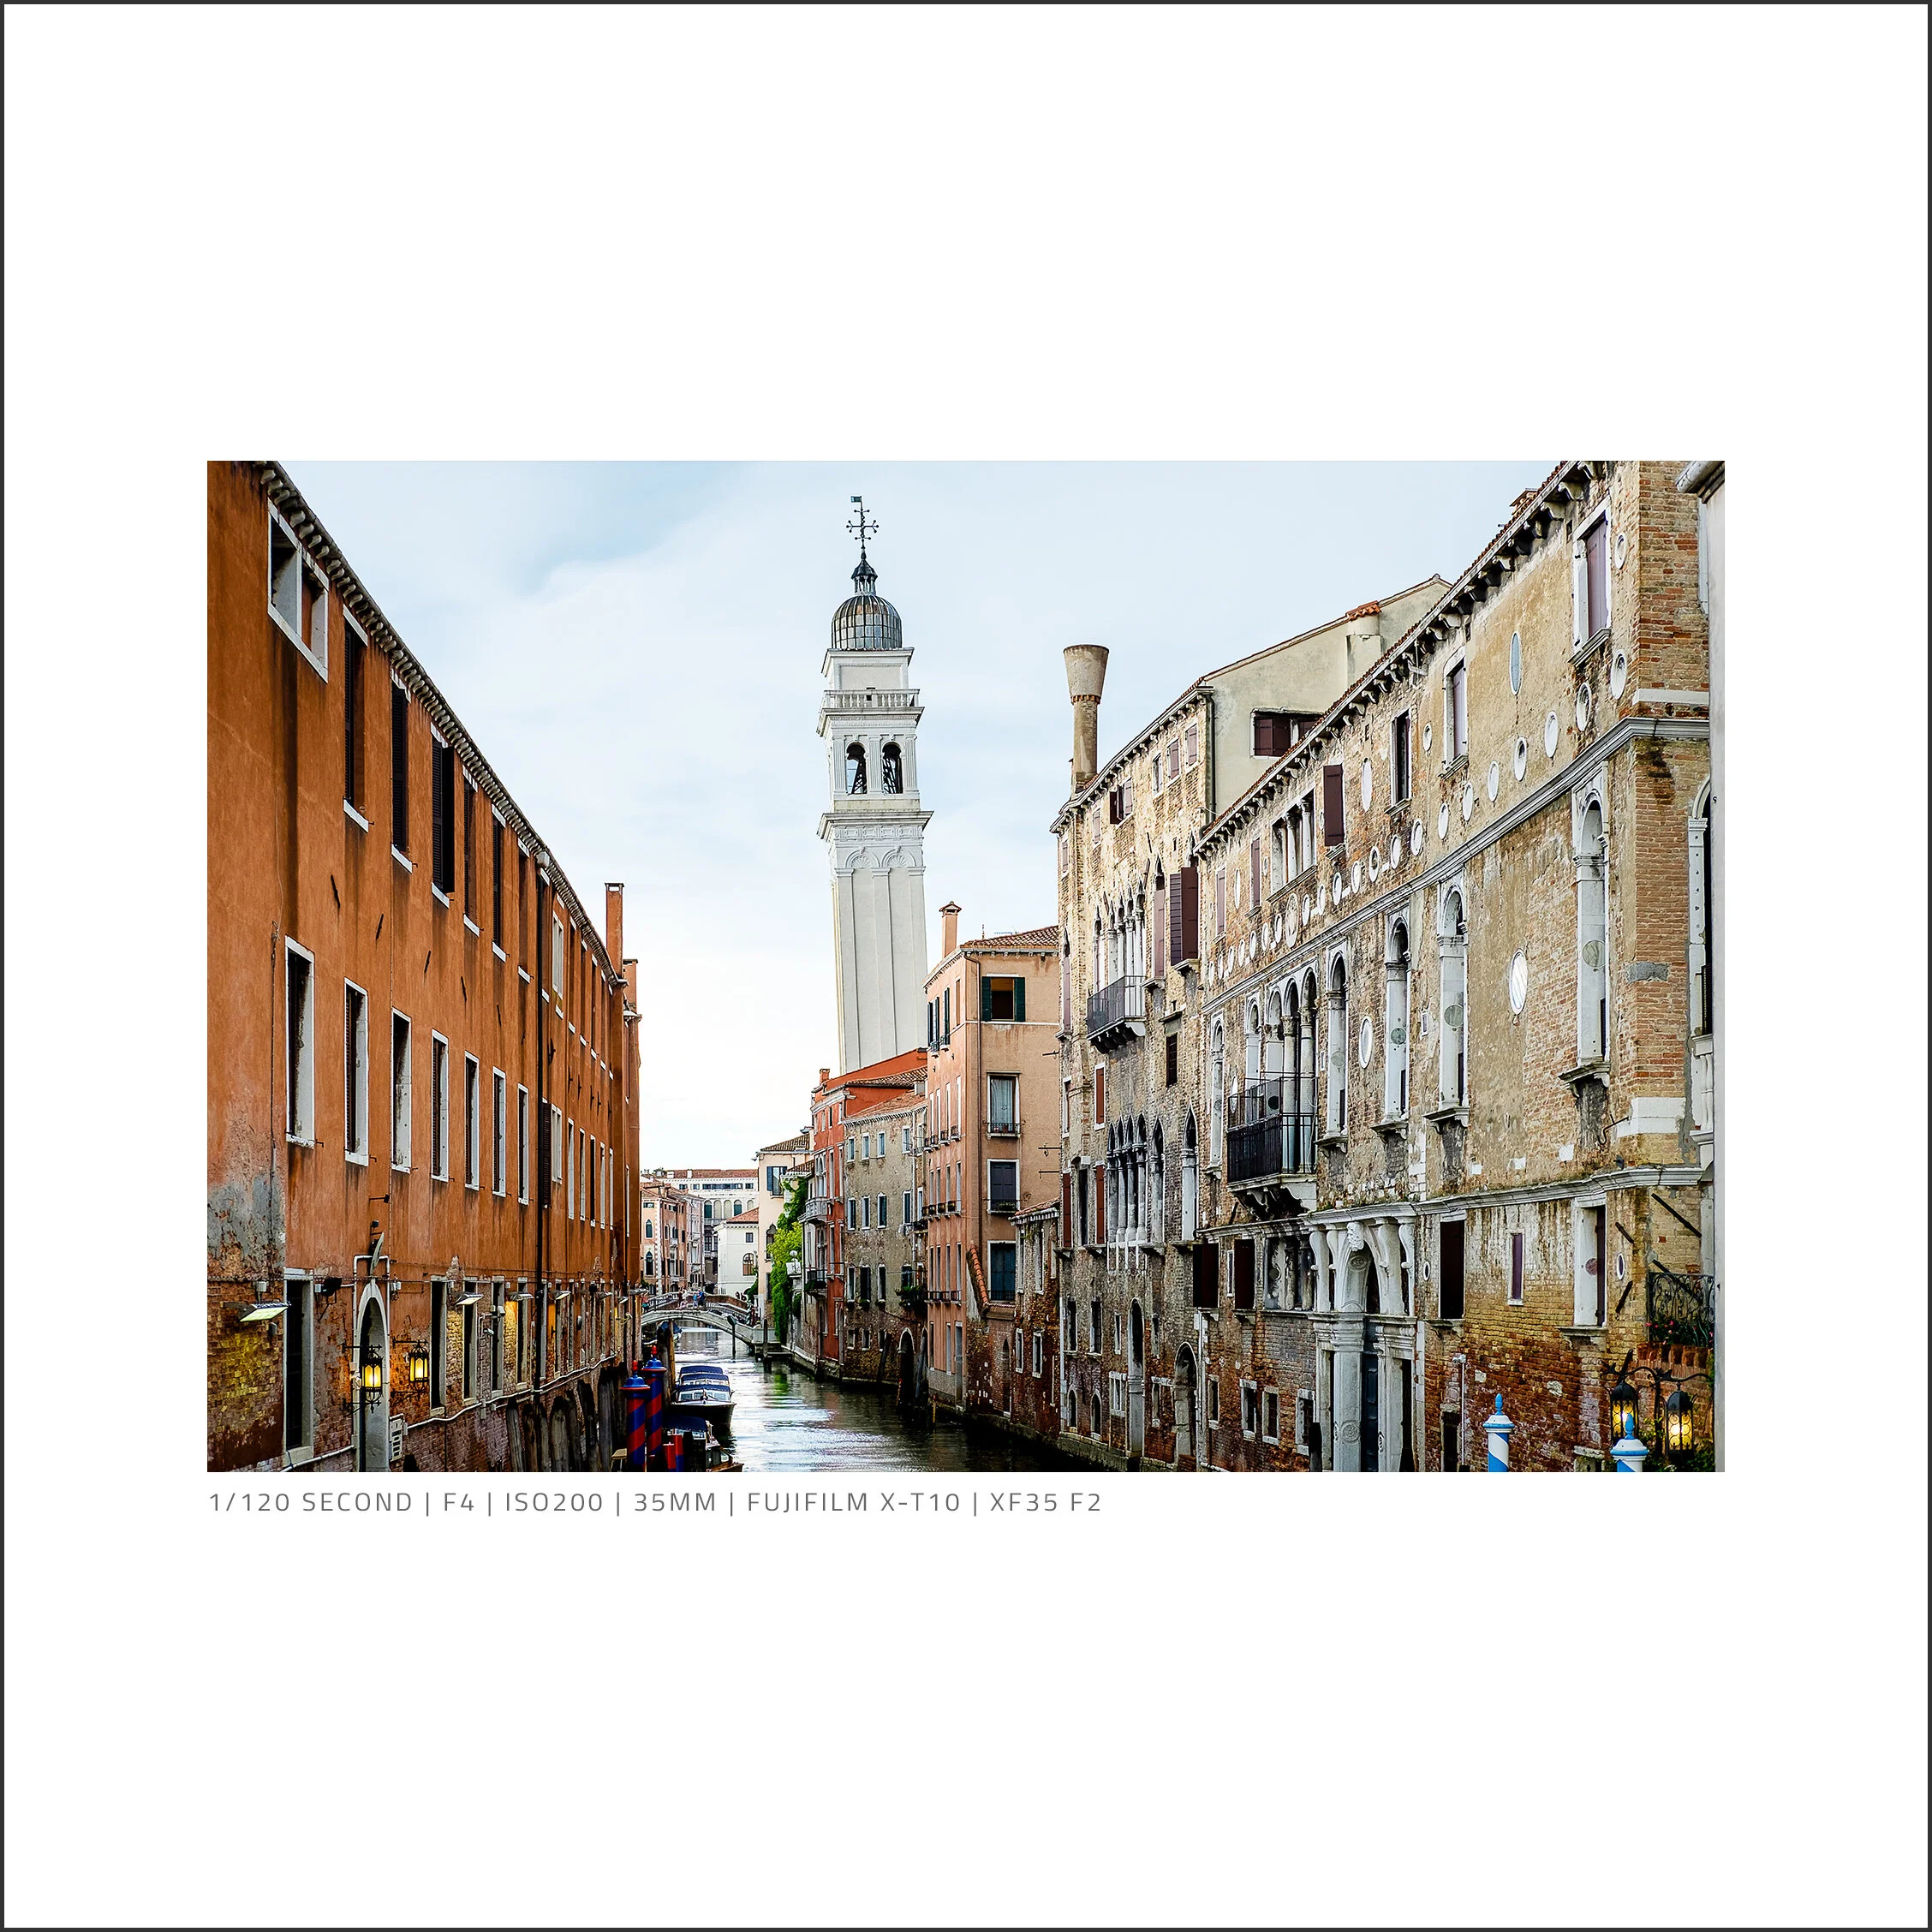
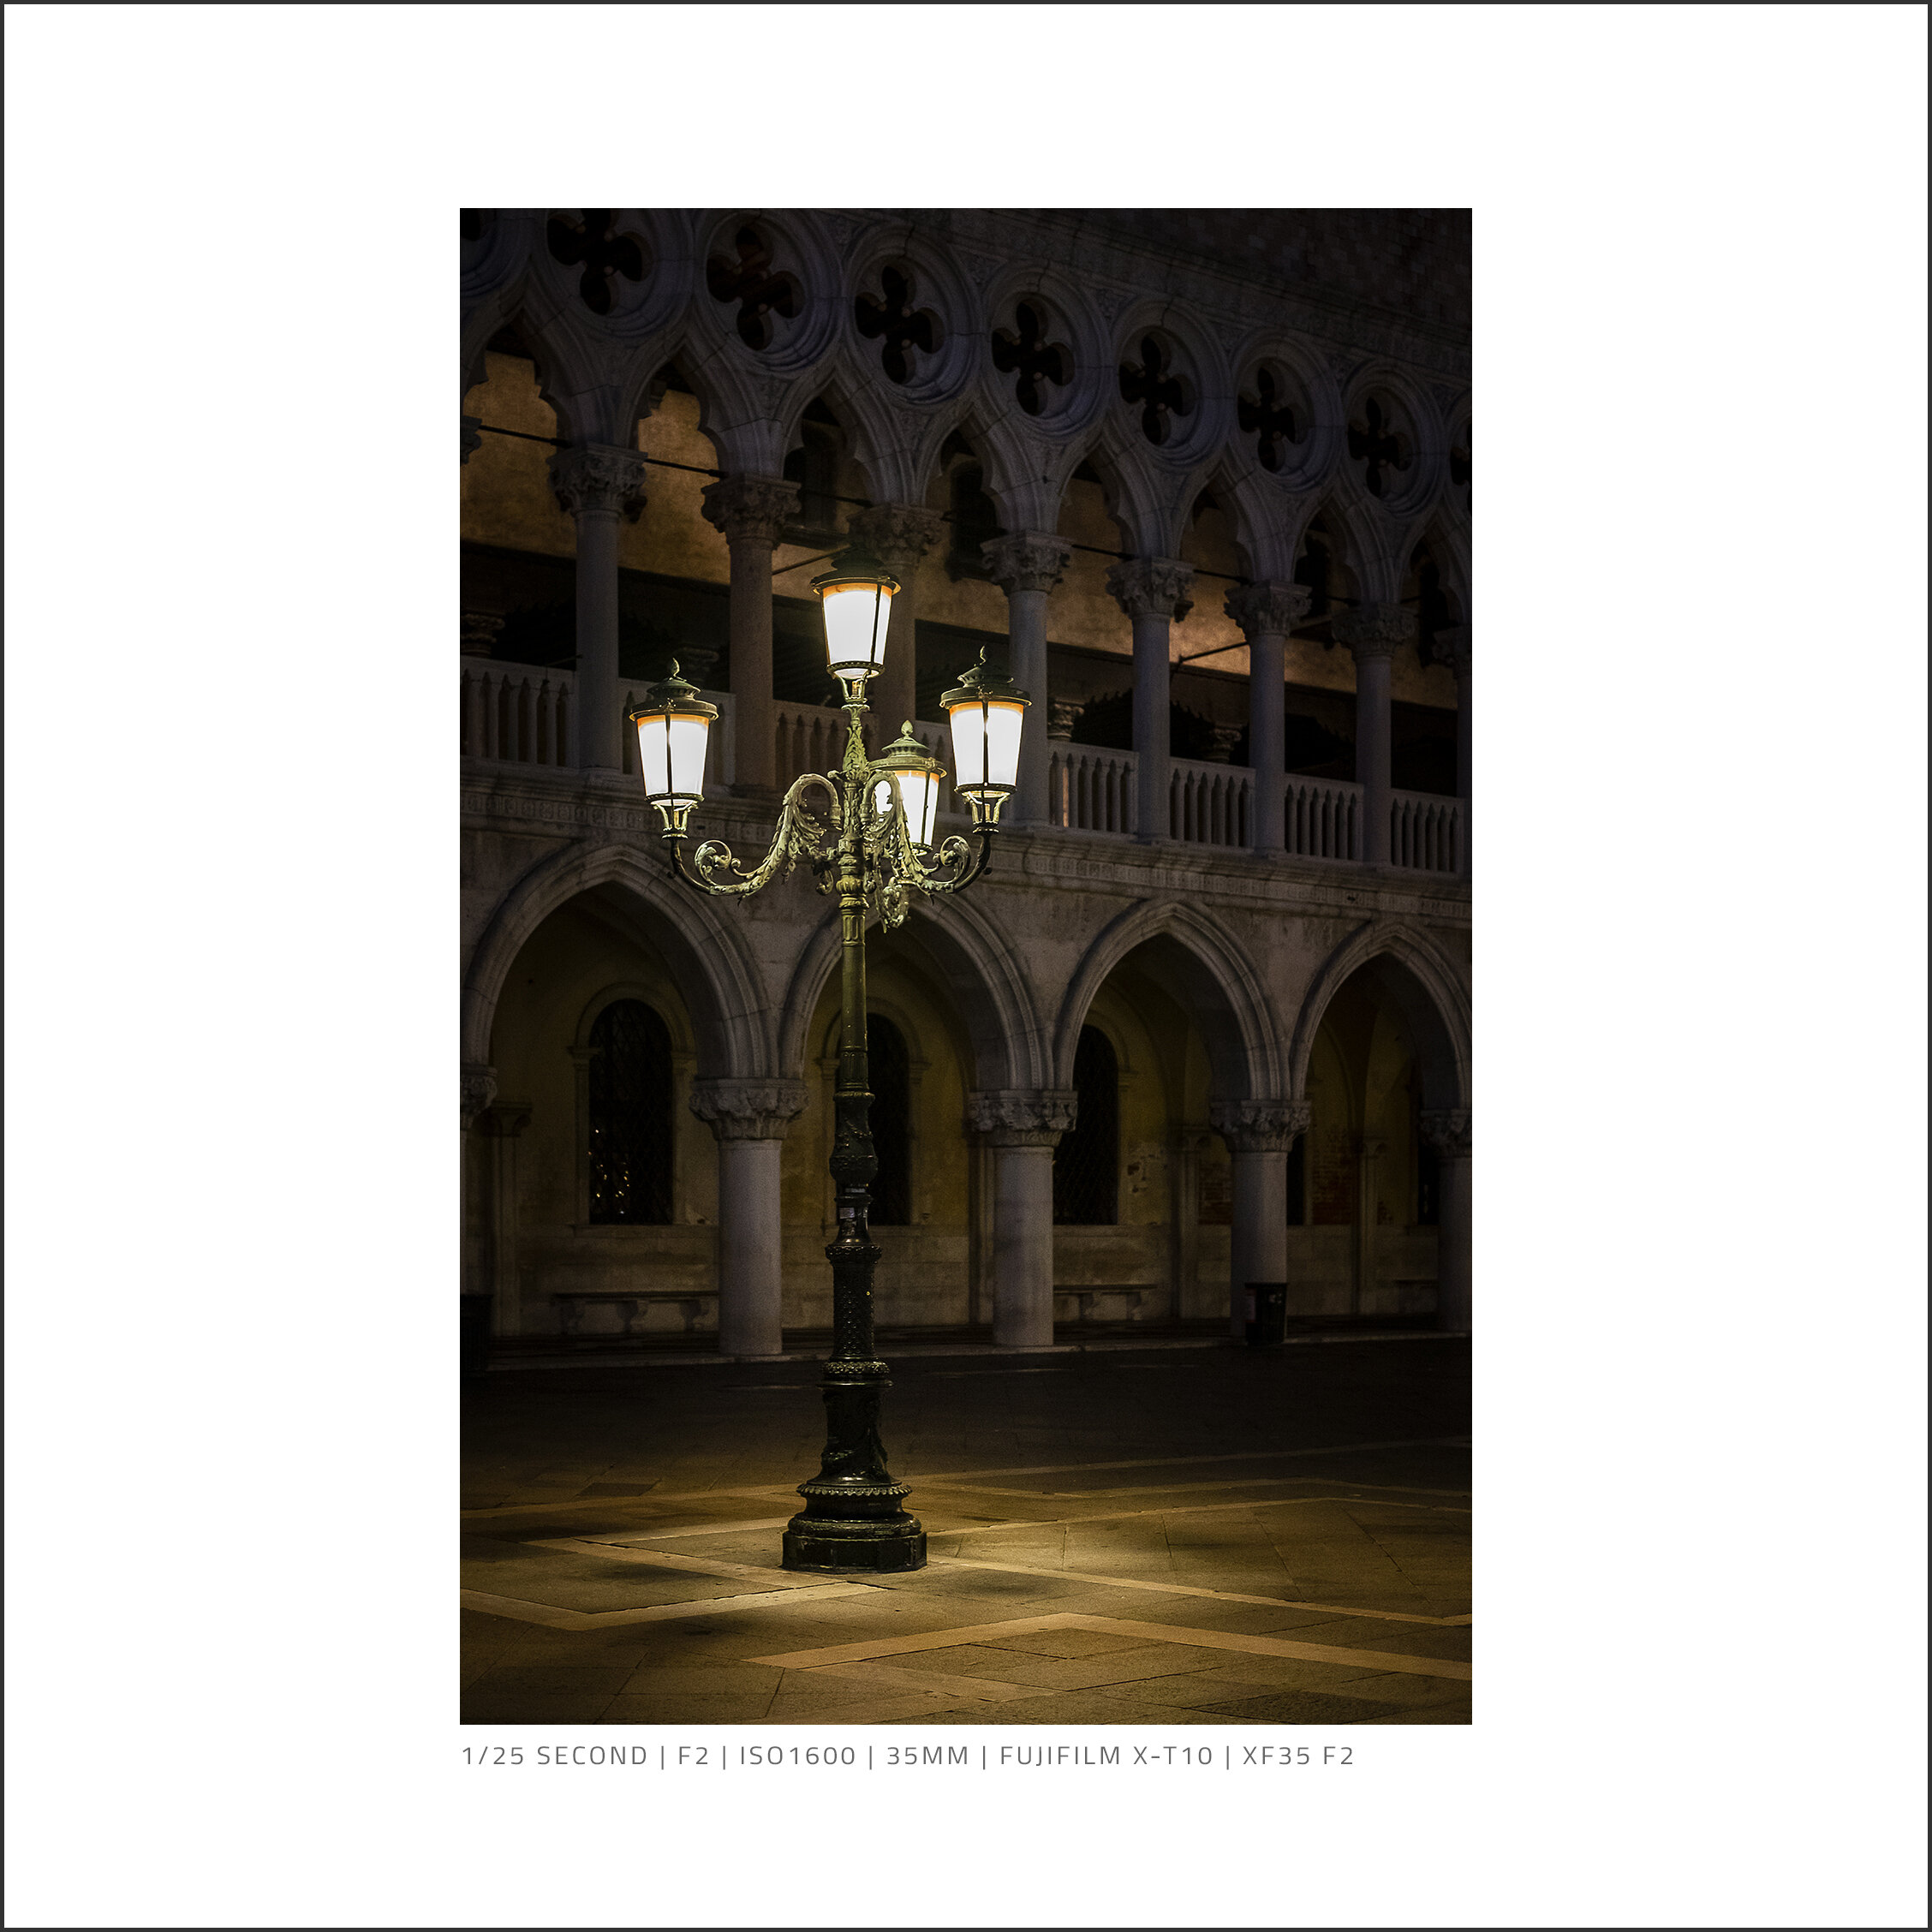
If you want to see more photos I took in Venice, check out my Weekend in Venice project which includes lots more photos and information about the final prints. The project page can be found here: A Weekend Photographing Venice.
Printing my Weekly Photo Series
One advantage of publishing a single photo each week is that the numbers are low enough to make printing the entire collection manageable. When I kick off a project or in this case a photo series, I immediately think about the project end game and that will include what plan I will have for the work I produce.

As with the Weekend in Venice project, I wanted to create something I could grab in a pinch and review all of the photos I produced for the series so, in keeping with the same size and style as before, I put together the Weekly Photo 2019 photo book below.
Although I share a photo on this site and social media each week, this book was for me as above all else, this is still a personal project and for all of the work that goes into producing all of the posts and choosing the photos, I wanted something I could keep and potentially recreate each year as I build up a convenient collection of my work.

I heard a quote on a podcast I was listening to recently from a photographer/teacher called Katrin Eismann and she said: “The truth is revealed when the ink hits the paper” which nicely sums up one of the reasons I also print my photos onto A3 paper.
As with the book, every photo I publish each week also gets printed. Although I love my photo books, seeing and holding your work printed in A3 or larger allows you to appreciate the photos in all of their high-resolution glory but importantly, it highlights issues with the print you may not have noticed on the computer such as compositional distractions or errors introduced when the photo was being processed. I’m no exception as I’ve previously been forced to take an image back into Lightroom or Photoshop to fix a problem found only after I had printed the photo. It’s frustrating at the time but I want these prints to represent my best work.

I print my photos on a Lustre paper which I find suits my style of photography well as the paper is not too glossy but the resulting image still has good contrast and a nice sheen to it and works well when mounted and framed behind glass.
The only problem when printing all of these photos in A3 is how I store and keep them safe. I’m keen to hear what others do to store their prints but currently, I use an A3 black presentation box which has enough room to hold around 60-70 prints all separated by a sheet of acid-free tissue paper. I don’t really know the long-term effects of the photos that sit at the bottom of the pile with all of the weight pressing down but time will tell I guess and for now, it’s the best option I can come up with.
Why every photographer should print their photos
So, I have talked a bit about my personal photo printing but if you still need help convincing to get your images off of the computer and onto paper, then here are some reasons why I think you should give it some serious thought.
#1 There are so many print options to choose from
As I mentioned earlier in this post, when I grew up, print options and finishes were incredibly limited and most photos would end up in a shoebox in a cupboard. We are so lucky to live in an age where there is literally a different print option for every photographer. If you want to create a book like I have, great, what size do you want? How many pages? What cover style? If I wanted to print a single image large and hang it on my wall, do you choose a traditional framed print or do you create a modern, vibrant acrylic or aluminium print? Don’t even get me started on how fun the Fujifilm Instax system is. With so many options, choosing the best format for your work has never been easier.
#2 Prints make a great backup
Now, I don’t strictly buy into the fact that one day all of the electricity can go off and along with it your photos will be lost if not printed as truth be told, if we all suddenly lost power, I would be much more worried about surviving than my photos of London. But that being said, if for some reason I was to lose my digital copies in some freak data loss situation, having my best work printed means they couldn’t be affected and I would still have a copy of my photos should the worst happen.
#3 Making a good print of your work means you get to learn a new skill
Ok, so technically yes, you can just grab one of your photos and upload it to the cheapest online print lab and order without giving it much of a thought and if that works for you, then happy days but, if you really want to make sure your printed work looks its absolute best then learning the steps needed to prepare your files for print is essential. This might include understanding why prints might come out darker than your screen or digging further down into colour science or print profiles. This may all seem a bit complicated to some but for those who want to spend the time to understand all of this will stand the best chance of getting a print that properly reflects the work they see on their screen.
#4 Printing your photos does not have to be expensive
Truth be told, after a very limited amount of research, I can’t find much in the way of what a print costed 20 years ago compared to today but one thing I do know is that you no longer have to print an entire roll of film just to have a few good photos. You can now walk into a high street lab with just a selection of your favourite photos on your phone and hand them over or upload just the photos you want to be printed to an online print lab, confident in the knowledge that the prints you get back will be keepers. This selective approach means you no longer have to waste money on printing photos that end up in a shoebox in the cupboard, never to see the light of day.
On the flip side, printing can be an expensive undertaking. If you choose to print on fine art paper or choose to buy a professional printer and print at home then you are going to make a more considerable investment but, the key-word here is “choose”. You can choose to spend more money but with so many options at either end of the price spectrum, you just don’t have too.
#5 Print for prosperity
Apart from the photo books I mentioned above that showcase my personal work, I have also printed many family albums in the form of photo books covering a great holiday, an event or a period of time. For example, I started creating yearbooks for my kids when they were born, converted my wedding album to a photo book and I now have close to 30 photo books and counting on my shelf which I hope one day will be on the shelves belonging to my children and maybe even their children’s shelves and so on. A photo book won’t suddenly go obsolete because the picture format is no longer supported or the social media platform they are hosted on suddenly shuts down, so, over long periods of time, the only way to ensure your photos remain accessible and if you’re lucky, passed down the generations is to get them printed.
#6 Printing your work can make you a better photographer
I mentioned earlier in this post how printing my photos bigger will emphasise compositional issues, distractions or processing errors and I think that’s a good thing. As you hold your printed work in your hands and study it, what you are doing is logging both the good and the bad within the image so if there is something you spot that works well, you know to continue doing it and on the flip side, learn from any mistakes you made while taking the photo.
When I post photos to social media sites such as Instagram, I know that most people will be viewing the images on a mobile device and this smaller form-factor is far more forgiving to issues within the photo but when I am out taking photos knowing that the photo I take could end up as a large format print, I know I have to take extra care while taking the shot, making sure the photo is as good as it can be as any flaws will be on full show once the ink hits the paper.

Should you print at home or use a professional print lab?
Before I wrap this post up, there is one last point I want to touch on and that’s the decision to print using a professional print lab or to invest in the equipment needed to make prints at home. This is a long, complicated subject but I will try to summarise why you might choose one over the over with as fewer words as possible, so, here it goes.
Printing your photos using a professional print lab
So, let's start with why you might use a professional print lab. When printing using a lab, you are effectively outsourcing the task to print your work which depending on what you are trying to achieve could be a good or bad thing. Although you are giving up the control to someone else to produce the final print, if you prepare the work properly and choose a good lab using recommendations you trust and conducting your own tests, you can end up with some quality prints easily enough. On top of this, compared to printing at home, the initial outlay is low. You don’t have to pre-purchase any equipment which is an advantage but if you have issues with the print, the turnaround time and delivery charges can add up.
Printing your photos at home
Printing at home is initially more time consuming, more technically complicated and certainly carries far higher up-front costs as you need to buy the printer, paper and inks before you can even start. Like photography itself, I regard printing my own work a craft in itself and one that needs time to explore and learn to get the very best out of it which can involve learning topics such as printer profiles, screen calibration, etc. The advantages of printing at home are that you retain full control of your final print and you can get your work printed faster, in particular, if you need to tweak and re-do.
Print your photos and bring them to life
What we do with our digital photos will continue to evolve and who knows what the next best thing will be but one thing I know for certain is that we will all continue to view most of our photos on a screen, in many cases taking only seconds to process the image before we skip to the next.
It doesn’t have to be this way for all of our photos. For those that evoke a special kind of emotion, be it fond memories, loved ones or simply a picture you are proud to have taken, bring those select few to life by making a physical print and displaying it in your home or a book on your shelf rather than being stored and forgotten on your phone or computer lost among the many thousands of other photos you probably have there.
I hope this post has gone some way to both inspire and convince more people to print their work and if you have any more tips or experiences you want to share with the community, feel free to write a comment below.

On Location Photographing A Sunrise in Ghent
In the Summer of 2019, my family and I visited Ghent, Belgium and during our stay, I snuck away for a few hours to capture a beautiful sunrise in the city’s historic district.
I have been sitting on this post since last year, never quite getting around to publishing it but at last, it is finally out in the wild.
In the Summer of 2019, I travelled to the city of Ghent in Belgium with my family to explore what I consider one of Europe’s best-kept secrets. Since falling in love with the chocolate-box city of Bruges during a trip the year before, we were left wanting to see more of what Belgium has to offer.
I won’t be covering the entire trip in this post as I have already done so in a previous blog which you can find here: On Location | Photographing Ghent. Instead, this post will talk about my early morning shoot during which I was lucky enough to capture a beautiful sunrise across this fine city.
Although this trip to Ghent was a family city-break, I still made a point of getting a sunrise shoot in by heading out early on my own to try to photograph the city while looking its best, during the best light and with fewer people around. Getting out earlier gives me a few hours to explore the deserted city, photograph away and have the best compositions to myself.
Contrary to my daytime setup where I had with me the smaller Fujifilm X-T30 camera, for this shoot, I took with me the larger XT2 workhorse which I use for my main landscape/cityscape work. Normally, I wouldn’t have so much gear with me when on a city-break but as we travelled to Ghent by car, I had the luxury of taking as much camera gear as I wanted.
Photographing a Sunrise in Ghent
Before visiting Ghent, I researched the city for photo ideas and had spotted a composition similar to this looking across the bridge towards Saint Nicholas' Church, so, when I arrived in the city, I headed to this spot first. I wanted to incorporate the ornate streetlights that lined the bridge so I looked around for the best composition as I waited for the sky to get a little lighter but wary not to wait too long just in case the lights were turned off before I had the shot in the bag.

Fujifilm XT2 | XF18-55mm | 18mm | 2.6 Seconds | f/11 | ISO200
From the other side of the Bridge and with my wide-angle 10-24mm attached, I managed to capture a few more shots, including this view down the River Leie just as the sky came alive with these fantastic sunrise colours. This stretch of river and between St Michael’s Bridge and Grasbrug is one of the most picturesque areas of the city and where I spent most of the morning with my camera soaking in all of the history during these peaceful early hours.

Fujifilm XT2 | XF10-24mm | 10mm | 1/6th Second | f/7.1 | ISO200
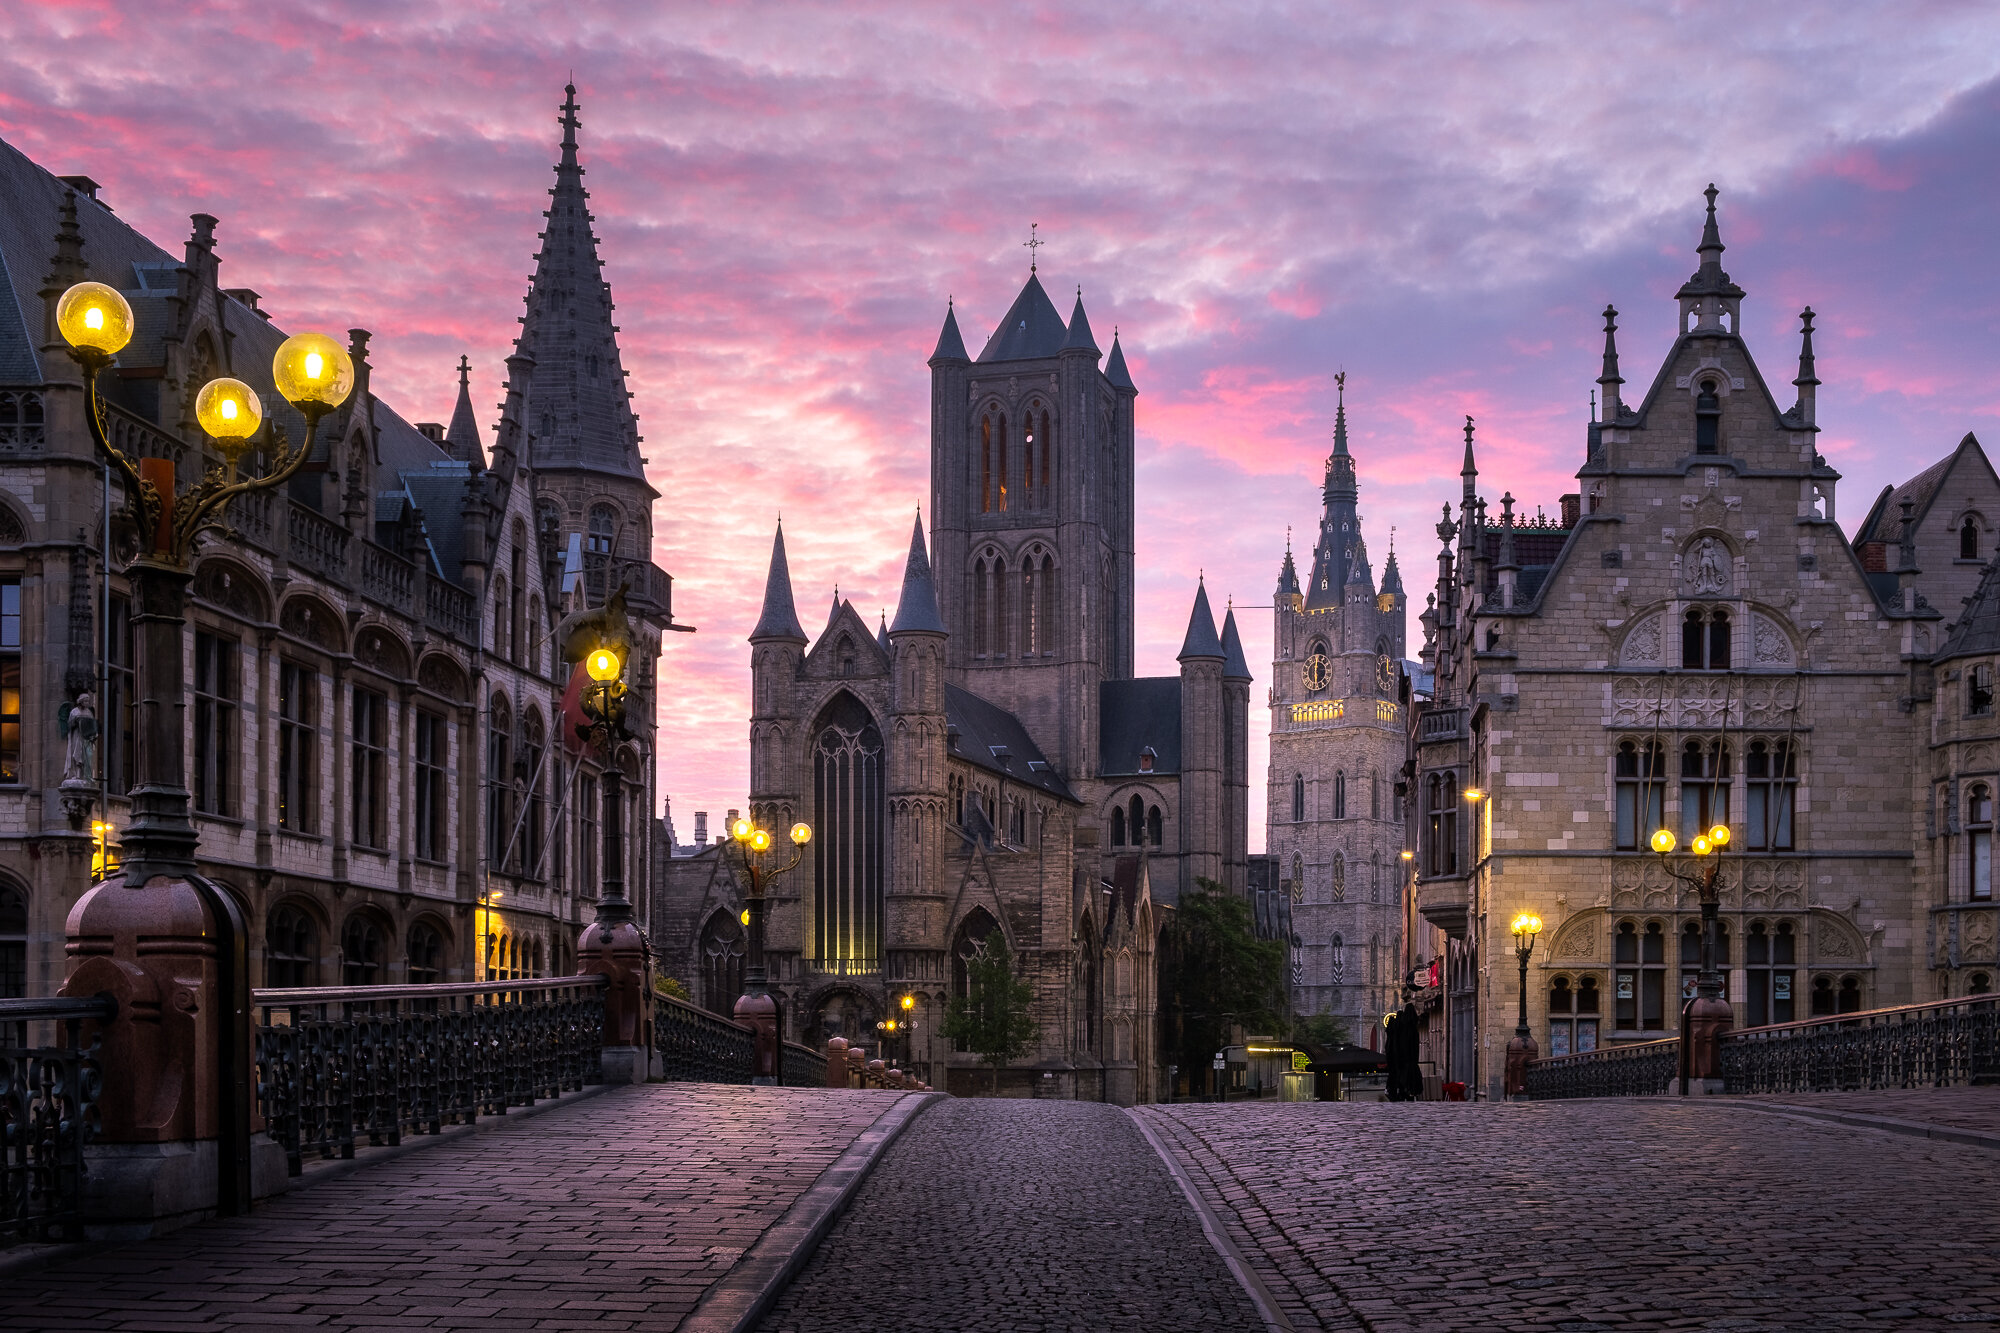
Fujifilm XT2 | XF18-55mm | 25mm | 1/3rd Second | f/11 | ISO200

Fujifilm XT2 | XF18-55mm | 18mm | 0.5 Seconds | f/11 | ISO200
Once done on the bridge, I wandered down to the water’s edge. Having noticed how the disorderly buildings looked as they lined the river and with the 10-24mm lens still attached, I had a go at photographing them front-on and capture some of those great reflections at the same time. Although the light in the sky was amazing, it was all coming from behind the buildings so I had some dynamic range issues to deal with in post-production but the excellent XT2 dealt with it well and I was able to recover a lot of detail from the underexposed buildings. I also struggled to align the composition properly because the building to the left of the clock tower is leaning to the right making the entire scene appear wonky so the final image isn’t quite as good as I was hoping for but I know there is potential there if I visit again, maybe at the other end of the day so the light hits the front of the buildings.

Fujifilm XT2 | XF10-24mm | 11.5mm | 1/12th Second | f/11 | ISO200

Fujifilm XT2 | XF18-55mm | 18mm | 1/8th Second | f/7.1 | ISO200

Fujifilm XT2 | XF18-55mm | 55mm | 1/17th Second | f/7.1 | ISO200

Fujifilm XT2 | XF18-55mm | 36mm | 1/400th Second | f/3.6 | ISO200

Fujifilm XT2 | XF18-55mm | 31mm | 1/1700th Second | f/5.6 | ISO200

Fujifilm XT2 | XF10-24mm | 17mm | 1/400th Second | f/8 | ISO200

Fujifilm XT2 | XF18-55mm | 30mm | 1/340th Second | f/8 | ISO200
When the last of the sunrise colours were gone, I spent some time wandering back along the river and around St Michael’s Bridge taking more photos during the morning golden hour. I had a great time capturing the city while continuing to play with the lead-in lines and reflections along the water’s edge.
If I had one regret after the shoot, it’s that I didn’t take any long exposure photos during this sunrise. In reality, if I had attempted to spend the time to set up the kit, get the filters ready etc, I might have come away with nothing so it was probably the right decision and given that the city is such a short drive from Calais, I can always come back to this charming city and try another time.
It wasn't too much longer before the best of the light was gone which was my cue to leave and meet my family for breakfast at the hotel feeling pretty happy I had a few good shots on my memory card.
I hope you enjoyed this On Location photo travel blog and please get in touch if you have any questions.
Cheers
Trevor

On Location Photographing London With The Fuji XF35mm F2
Join me as I venture into London with my Fujifilm X-T30 and XF35mm F2 lens and capture a few cityscape images along the River Thames during a beautiful sunrise shoot.
Up until about a year ago, I suffered from a condition I can only describe as “Lens FOMO”. The notable symptom is the fear of missing out (FOMO) on the perfect photo because I don’t have the right lens with me. To combat this, I would always carry a full bag of gear so I was ready and prepared to capture any subject in nearly all conditions. This strategy is all well and good, but a full bag is a heavy bag and that weight can get tiresome and the long term effects on my back surely can’t be good, right? Something had to change.
Fast forward to today and things are quite different. I realised some time ago that I needed to relax more. Worrying about missing the shot was taking the fun out of the shoot and being frustrated if I wasn’t heading home with some kind of successful photo was missing the point in a really big way. What many photographers, including myself, realise at some point along their journey is that the hunt can be as satisfying as the catch. When I first took up photography, I was in it just for the photo. In my rather ignorant opinion, that was the be-all and end-all. It goes without saying that catching the killer photo is still the target but these days, the exploration, escapism and creativity are all just as important which is why, when I head out on a shoot, I no longer feel the need to take all of my gear with me and will often just head out with a single camera and one or two small prime lens. With this minimalistic setup, I feel liberated and agile to explore different angles and compositions and best of all, have great fun doing so.
You can read more about the gear I use and how I pack my bag depending on the shoot over in this post: What’s in my camera bag (2020 Edition).
Photographing London with The Fujifilm X-T30 and XF35mm F2
Recently, armed with only my Fujifilm X-T30 and the super light XF35mm F2 lens, I headed out before sunrise for a walk along the river in London to take a few photos. The compact X-T30 combined with any of Fuji’s small prime lenses is such an awesome combination. You get all the latest and greatest tech inside the X-T30 such as Fuji’s latest X-Trans sensor and super-quick autofocusing with a small, fast, high-quality prime lens. With the tactile knobs and dials to play with, for me at least, it is a joy to shoot with.
I also posted a similar article while out in London with another of Fujifilm’s compact prime lenses which you can read all about here: Photographing London With The Fuji XF16mm F2.8
I had no plan to shoot anything in particular nor any idea as to what the weather had in store. I just wanted to be out with the camera and see what I could capture. Starting off near London Bridge, I ventured over to More London and captured a few of the classic compositions before heading along the river towards Bankside and the Millennium Bridge. With such a small set-up, I started to look for new, creative compositions and had a lot of fun opening up the aperture and playing with a shallow depth of field.
Below are a few of the photos I captured during the shoot.

Fujifilm X-T30 | XF35mmF2 | 35mm | 1/20th Second | f/2 | ISO800

Fujifilm X-T30 | XF35mmF2 | 35mm | 1/13th Second | f/2 | ISO160

Fujifilm X-T30 | XF35mmF2 | 35mm | 1/20th Second | f/2 | ISO160

Fujifilm X-T30 | XF35mmF2 | 35mm | 1/280th Second | f/4.5 | ISO160

Fujifilm X-T30 | XF35mmF2 | 35mm | 1/45th Second | f/2 | ISO160

Fujifilm X-T30 | XF35mmF2 | 35mm | 1/125th Second | f/2.8 | ISO160

Fujifilm X-T30 | XF35mmF2 | 35mm | 1/750th Second | f/2 | ISO160

Fujifilm X-T30 | XF35mmF2 | 35mm | 1/450th Second | f/2 | ISO160

Fujifilm X-T30 | XF35mmF2 | 35mm | 1/70th Second | f/5 | ISO160

Fujifilm X-T30 | XF35mmF2 | 35mm | 1/1,100th Second | f/5.6 | ISO160

Fujifilm X-T30 | XF35mmF2 | 35mm | 1/3,200th Second | f/5.6 | ISO160
Although the single camera, single lens strategy is not just limited to prime lenses, I wanted to just touch upon why I have a couple of them in my bag. Unlike a zoom lens which allows you to get closer or further away from the subject while keeping your feet rooted to the spot, prime lenses have a fixed focal length which means you have to zoom with your feet (as in walk closer or further away from your subject). Zooming with your feet doesn’t work in all situations and may sound restrictive to some, but it’s that limitation coupled with typically wider apertures and increased image quality that attracts so many to them. Primes tend to simplify the process, stripping away the compositional decisions around the focal length. What you see is what you get. This for some is far more liberating than having a zoom lens.
Overall, it was a great morning to be out photographing the city. I had some nice light and had some fun with the wide aperture and shallow depth of field. I still occasionally head out with a full bag of gear, particularly if I have a shot in mind such as a long-exposure, cityscape image for which I need extra equipment but I do so much less frequently these days. With only a single camera and lens, I feel free to wander the streets and find angles and unique compositions that I just wouldn’t think to look for when weighed down by a big heavy bag on my back.
Speak to you soon.
Trevor

10 Top Tips For Taking Great City Photos
My top 10 tips for taking great cityscape photos is for those that are looking to take their cityscape photography to the next level and take better photos of their local town or city.
With so many people living in and around cities, it’s no wonder that cityscapes are a popular subject for many photographers but taking great cityscape photos doesn’t always come easy so, if you’re a beginner looking to give cityscapes a go or an experienced photographer in need of a bit of inspiration, here are my 10 top tips to help any photographer be successful in capturing their own amazing urban cityscape photos.
Before we start, I thought I’d just mention that although all of the example images were taken in my home town of London, these tips to can be used when visiting any city and in fact, some of them are transferable to other genres of photography such as natural landscapes and even street photography.
#1: Look for lead-in lines in your cityscapes
First off, let’s start with a classic compositional tool. I introduce to you the much talked about, famous amongst photographers, ever-reliable lead-in line!! OK, tongue and cheek aside, the lead-in line is a classic for a reason as they help lead the viewer’s eye around the frame, taking them on a journey which should eventually end at the main subject. Take the photo below, the lead-in line is created by the wall in the foreground which takes the eye from the bottom left to the right-hand side and up towards the main focal point which in this case are the high-rise buildings over in the city.

#2: Use people in the photo to add interest
Although I don’t consider myself to be a street photographer, I will on occasion include people in the frame to add another element of interest into my cityscape photos. You can use people as compositional subjects like in the shot of St Paul’s below where this man is placed in the opposite corner to the cathedral’s dome which helps to balance the scene. Alternatively, including a smaller, silhouetted figure like in the second image can add a little mystery to your photo so, think about how you can incorporate people into your cityscapes in the future.
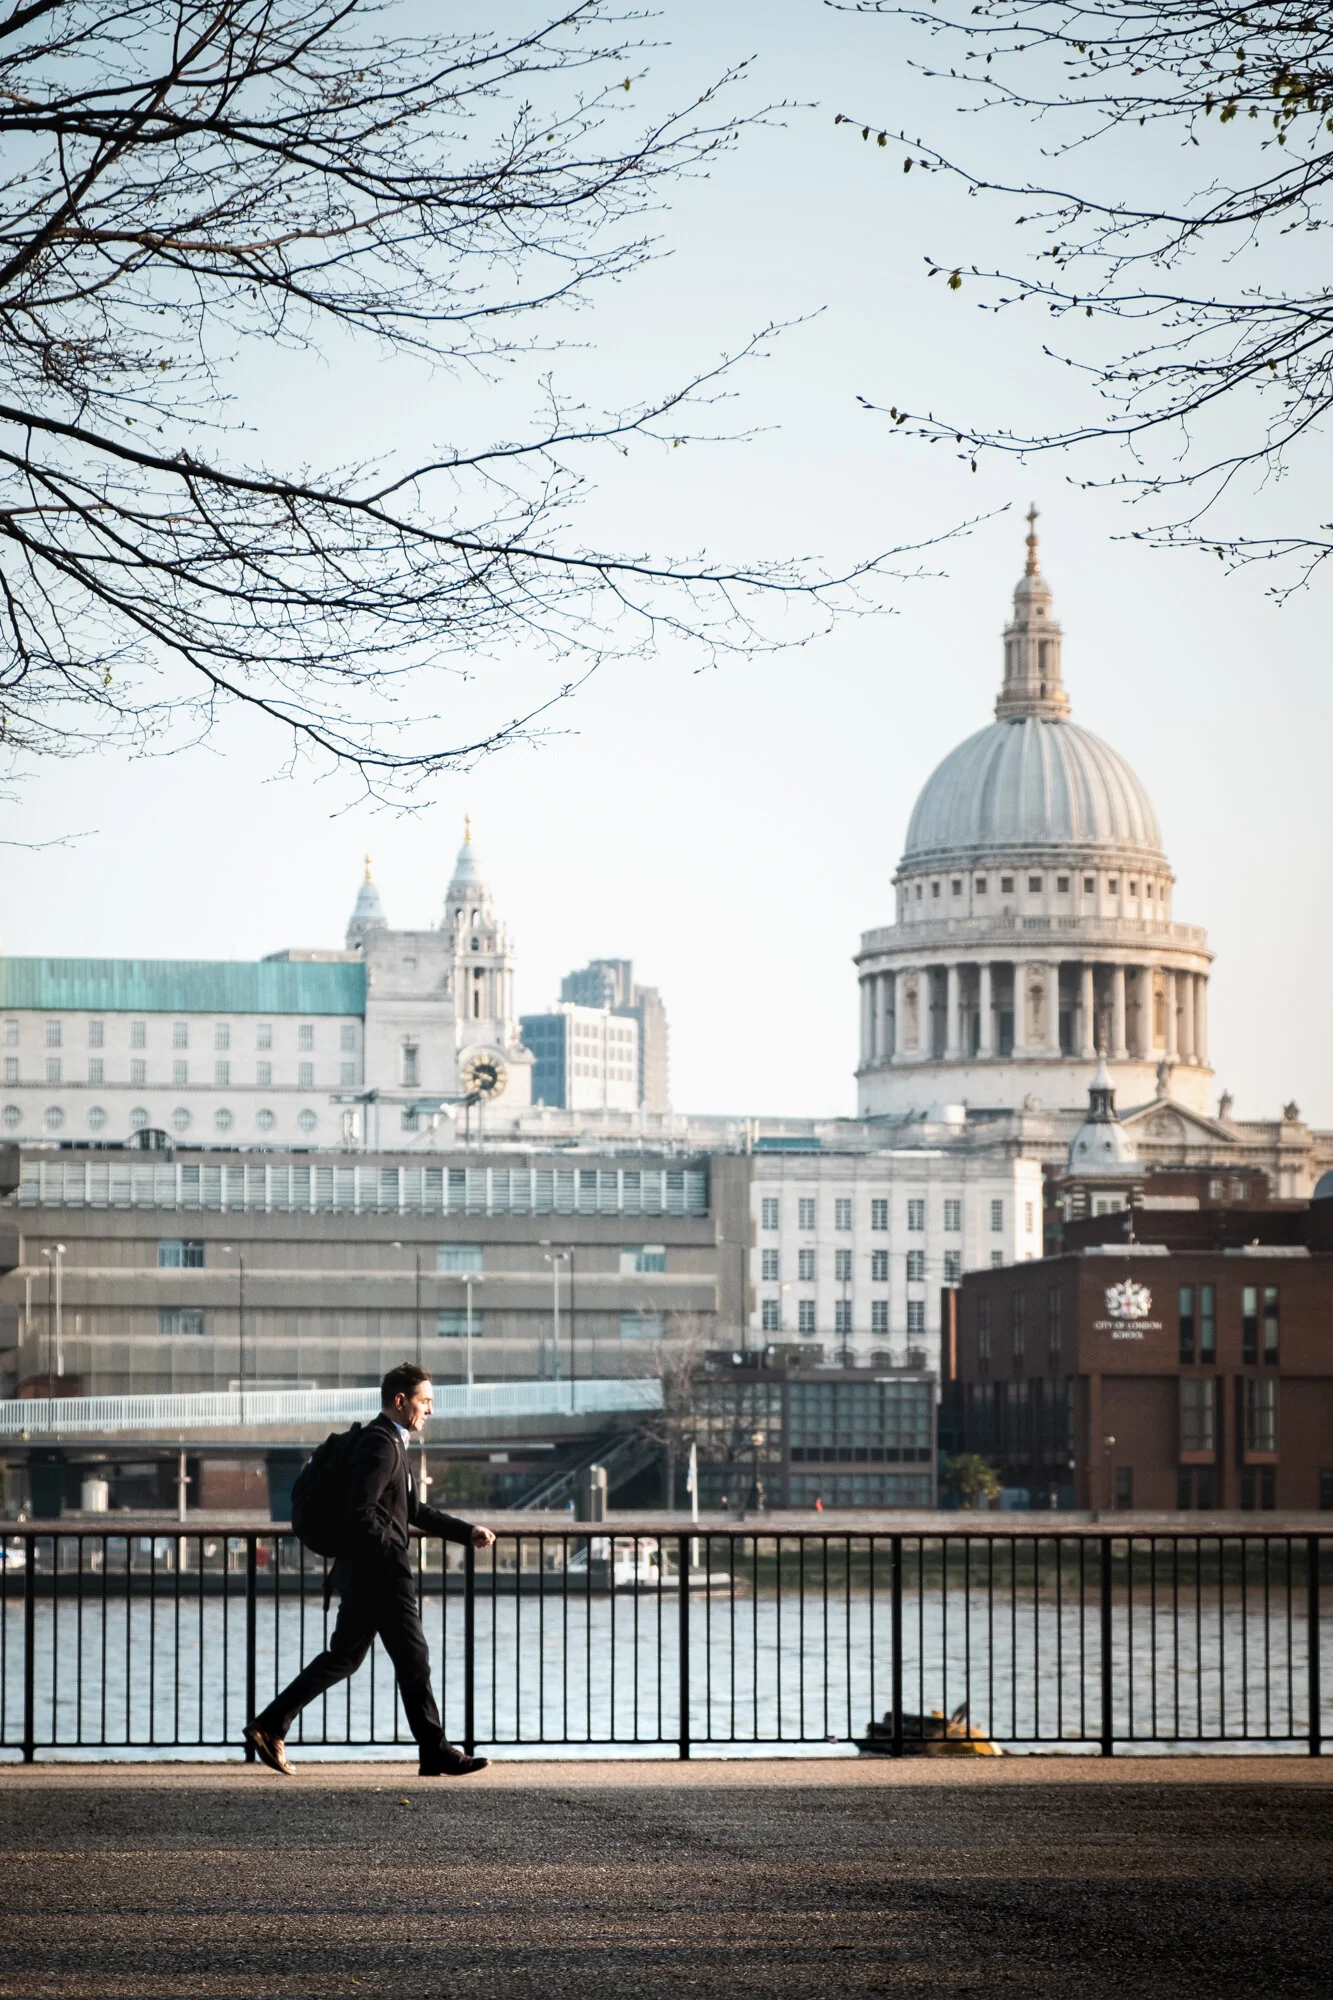
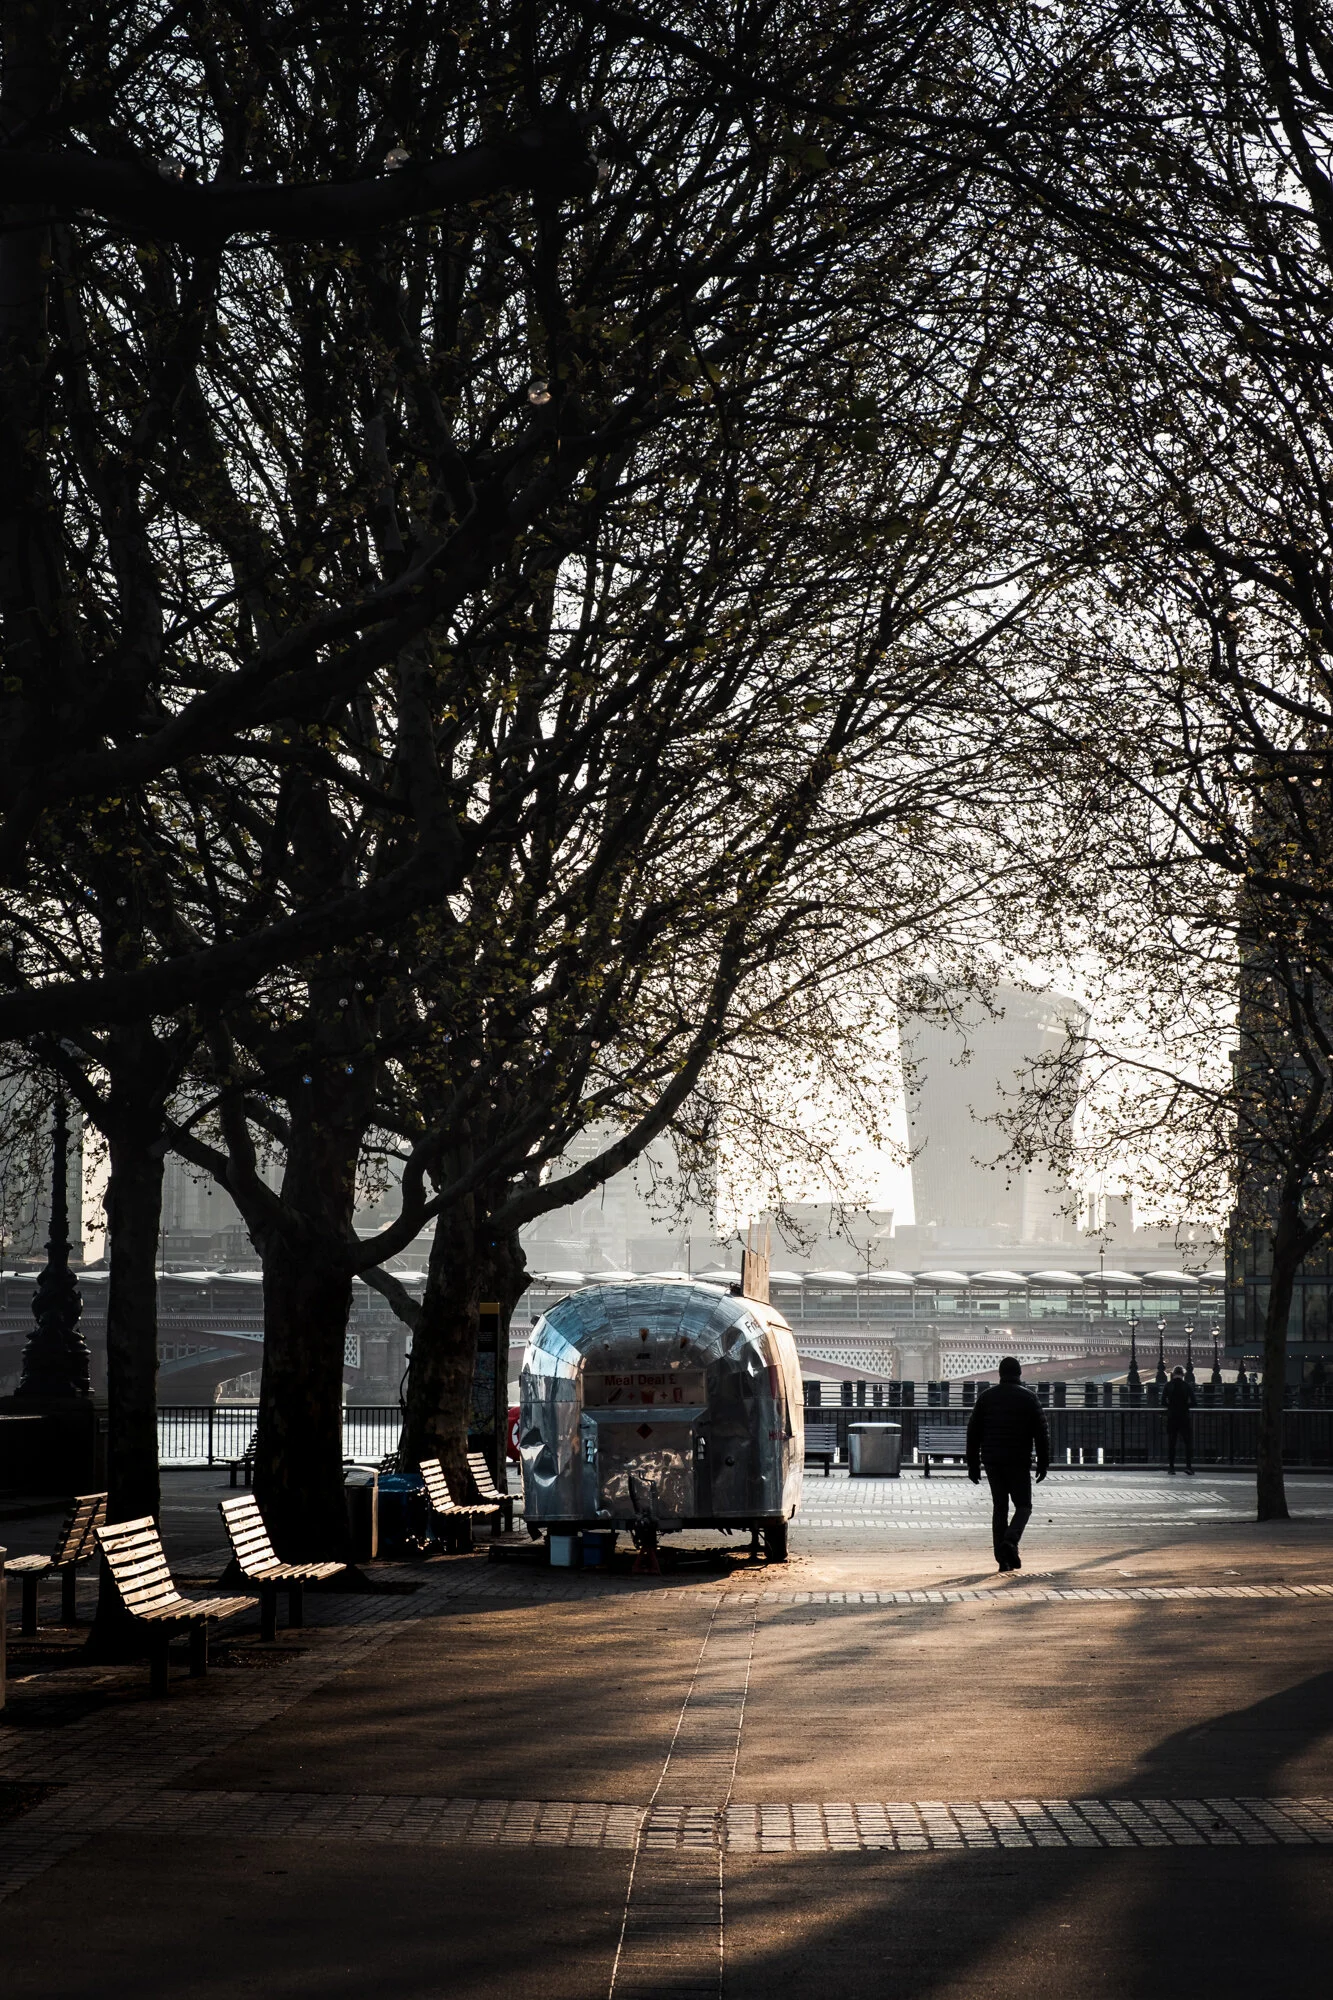
#3: Try a long exposure to create a unique cityscape photo
Those that follow my work know I take long exposure photos of London’s skyline and one of the reasons I do so is that it provides a unique view of the cityscape which cannot be seen with the naked eye. If you are looking for that something a little different or want to simplify the scene somewhat, then try a long exposure image.
Top tip: Although long exposure photography can be a little daunting at first, I have created a useful 10 step guide to creating successful long exposure photos which you can download when you sign up to my newsletter here.
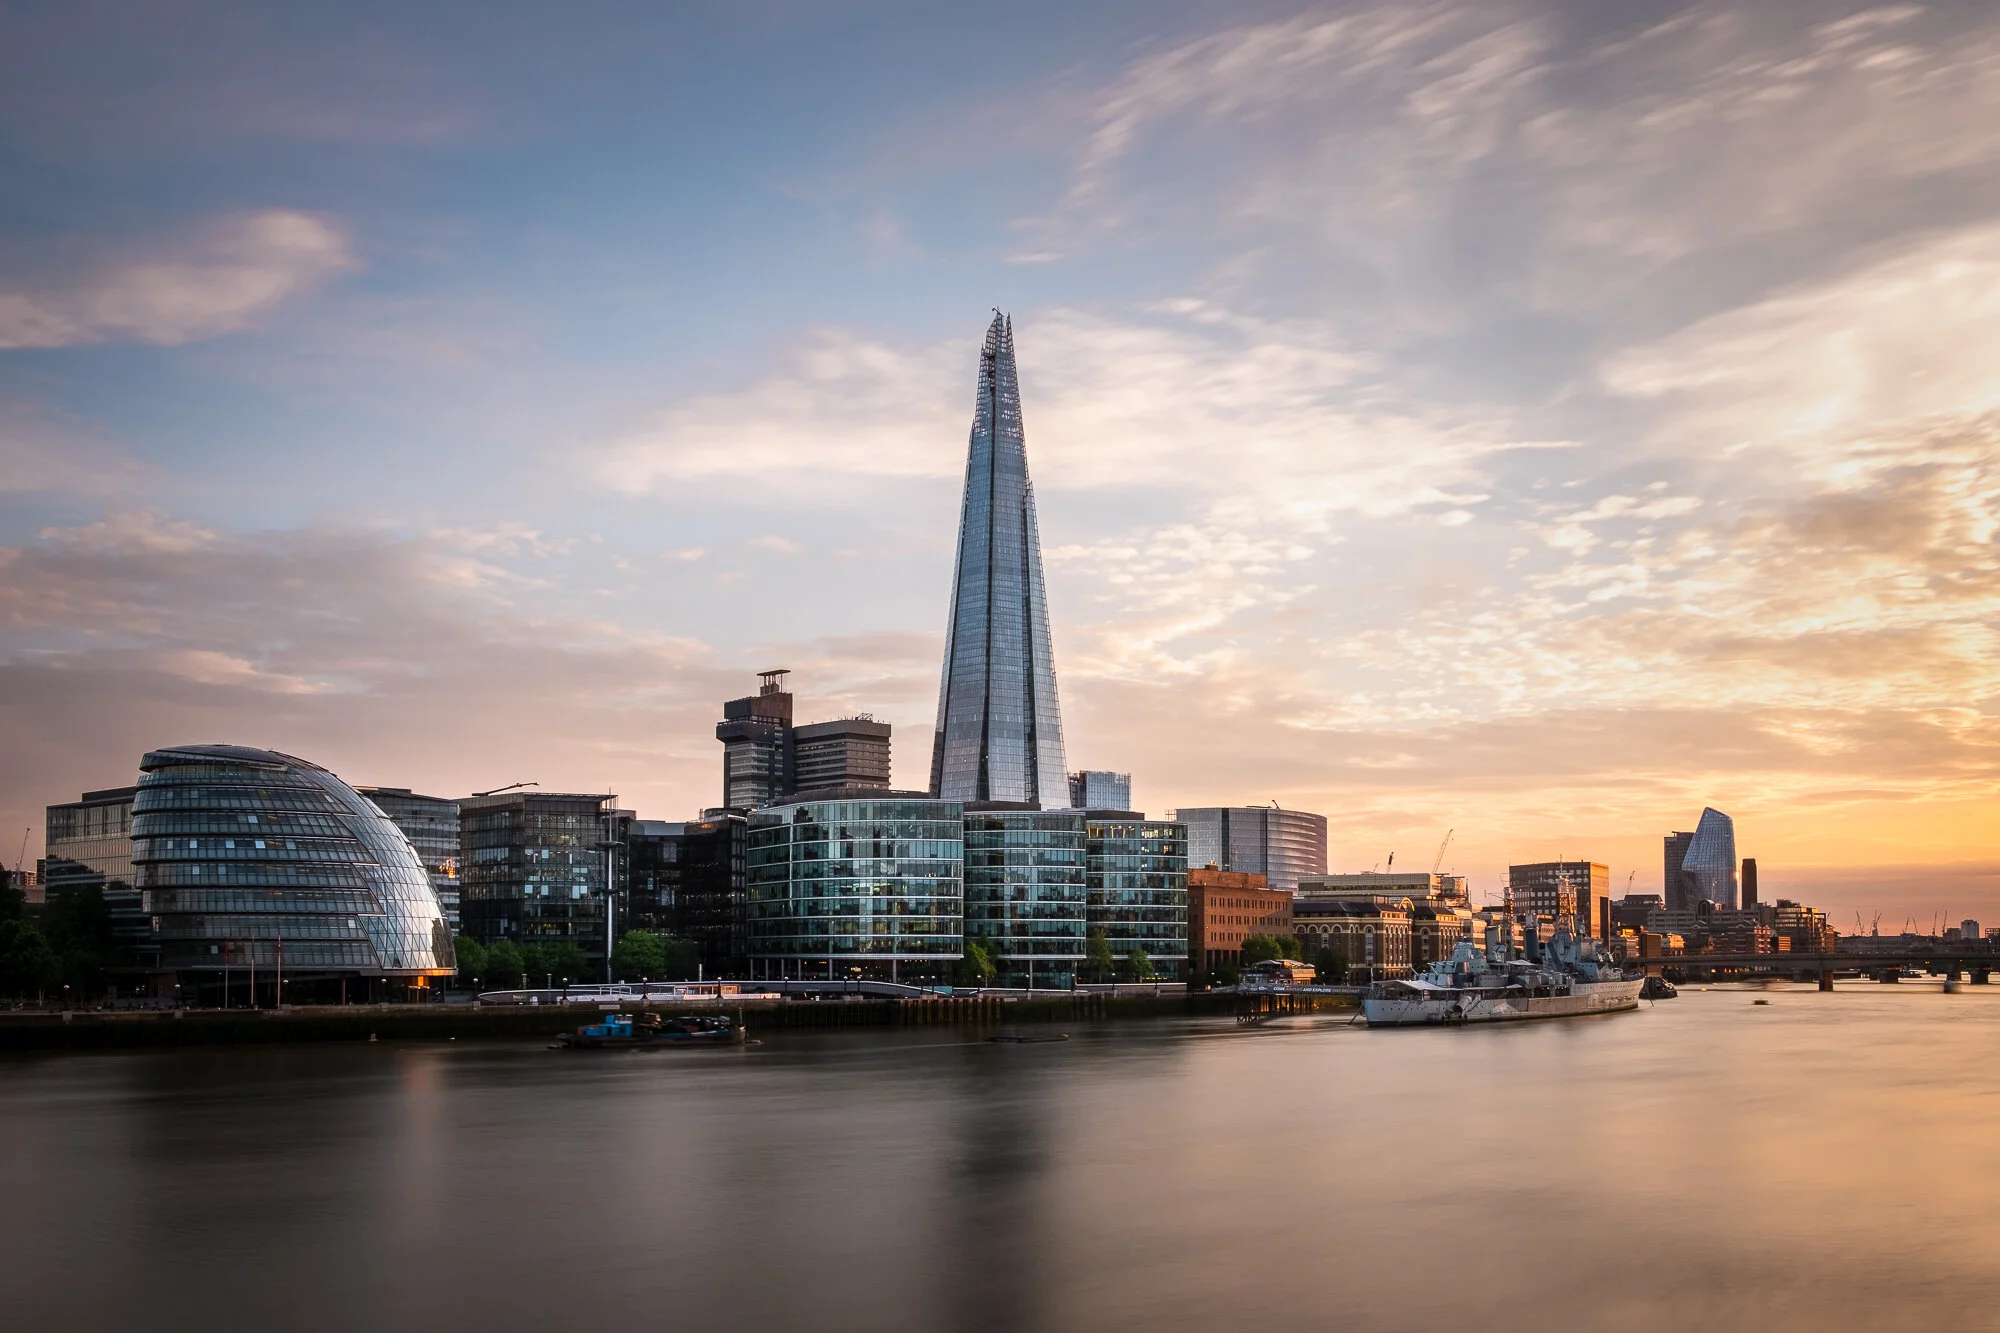
#4: Get creative and use a shallow depth of field
Opening up that aperture and getting creative with shallow depth of field is a great way to get a unique look in your cityscape photos. You don’t necessarily need a professional lens with a super-wide aperture such as f/1.4 or f/1.8 as it all depends on the distance your focus point is from your lens. Take the photo below for instance. This was shot with an aperture of f/5 with is achievable for nearly all lenses but because the focus point is close to the lens, the background is rendered out of focus.

#5: Have fun and frame your subject
Frames are a great compositional tool as they help to draw the viewers eye straight onto the main subject. You can have so much fun finding different ways to frame the subject so next time you are out capturing cityscapes, try looking for doorways, arches or even gaps in the railings to shoot through.


#6: Climb up high and photograph the rooftops
There is an ever-increasing number of high vantages points that provide stunning views of the city and although this trend is not just unique to London, I do know that in London planning rules require public viewing galleries to be incorporated into new high-rise buildings which means the number will only go up over the coming years. This is great news for photographers on the hunt for great cityscape photos as from this high up you get an entirely different perspective and the resulting images can be quite awe-inspiring when the conditions are right.
Top tip: There are a few tricks you can use to capture clean, sharp photos when photographing your cityscapes through the glass of a high-rise building which you can find in one of my previous posts here: London in the Mist | Weekly Photo 13

#7: Get really wide to capture a dynamic photo of the city
By using a wide-angle lens, you can have a bit of fun and capture some unique perspectives such as the one below of Canary Wharf over on the Isle of Dogs. Having a wide-angle lens enabled me to include the steelwork and chains into the scene which add interest, lead-in lines and a handy frame around the main subject.

#8: Capture the cityscape during blue hour
Photographing the city at blue hour can help create some unique cityscape photos as this is the only time of day when the ambient light is low enough for the city lights to be switched on but still bright enough for there to still be detail in the sky. This view of London’s Square Mile financial district was taken from the top of St Paul’s Cathedral and is a great example of how the city can look during the blue hour.
Top tip: Capturing the blue hour can be tricky if you are not prepared and ready, so, research the time of day the sun sets and blue hour starts in advance to ensure you are ready to capture your photo in plenty of time.

#9: Go for a cityscape at sunset
Sunsets are beautiful and here’s a newsflash, people like looking at beautiful things so when you have a great cityscape coupled with an awesome sunset then you have all the ingredients needed to capture something quite special. Although the sun rises and sets every day, a good, dramatic sunset doesn’t happen too often and when they do, they come and go quickly so do your research. Check what time sunset takes place, check the weather and cloud cover so when you head out, you give yourself the best opportunity to capture Mother Nature’s greatest show.

#10: Shoot the city lights at night!
I guess I could have used this image in the first tip above as it has a fantastic lead-in line (bonus tip: look for bridges as compositional subjects) but this tip is about going out after dark and capturing the city at night. London, like many other cities, takes on a whole new identity at night. 10 years ago, London’s skyline would consist of just dull orange lights but these days, with the modern high-rise buildings and projects such as the Illuminated River Project, London has made a great effort to spice things up and add a splash of colour to the city at night.
Top Tip: Close down the aperture to create cool starburst effects like those shown in the photo below.
A quick note about safety. It should go without saying but please do not take your safety for granted. Not all areas of every city are safe to wander alone so, whatever you do, take care of yourself and where possible, take a friend with you, especially at night.
Now, get out and shoot!
The most important tip of all is to actually get out and start taking photos. So, armed with these 10 top tips for successful cityscape photography, I urge you to go and give them a try in your nearest town or city and take your own great cityscape photos.
If you have any tips you want to share or if you have any other thoughts on this post, please post your comments below and feel free to share this article so that others might see and take advantage of these tips for when they are out photographing their local city.

What's In My Camera Bag? (2020 Edition)
“What camera did you use to take that shot?” “What filter did you use for that long exposure?” These are just a couple of the questions I regularly receive when people see my photos, so, for those interested, here is my own What’s in my camera bag? 2020 edition.
“What camera did you use to take that shot?” “What filter did you use for that long exposure?” These are just a couple of the questions I regularly receive when people see my photos, so, for those interested, here is my own What’s in my camera bag? 2020 edition.
Before I start, it is worth noting that I firmly believe it’s the photographer that has the vision, chooses the subject and creates the image. There are many photographers that successfully shoot with a single body and lens, a compact camera or even just their camera phone and still produce quite stunning work so don’t get fixated on the photography gear, always fixate on the craft and seeking to create your own artistic style.
“The single most important component of a camera is the twelve inches behind it.” - Ansel Adams.
That being said, if you are shooting with intent and have particular style of image you want to capture, then the right equipment can remove all of the friction in the process and allow the photographer to focus on the creative instead of working overly hard to get the shot and maybe even taking some of the fun out of the process.
Lastly, this is not going to be an overly technical post. It won’t be about the features and specifications, just what gear I am currently using and why.
Cameras

Fujifilm XT2
Those that have followed me for some time know I am a Fujifilm shooter and this XT2 is my primary camera. Unless I am travelling super light (more on that below) I take this capable camera. It may no longer be the latest model but it is still super-fast, very capable and not going anywhere yet!

Fujifilm X-T30 (NEW for 2020)
When I moved over from Nikon to Fujifilm in 2016, I bought the X-T10 and I instantly fell in love with it. I loved the tactile dials and buttons, it literally changed my photographic life. Since the X-T10 was getting a little long in the tooth, last year I reluctnatly upgraded to the X-T30 which to all intents and purposes is the same camera but with upgraded internals. I wrote a blog post about the switch which you can find here.
Camera Lenses

Fujifilm XF 18-55mm f2.8-4 R LM OIS
This was the first Fujifilm lens I brought as it came with the X-T10 and is regarded as it’s kit lens. This may be true but normally kit lenses are considered entry level and not able to match the quality of more expensive lenses. The XF18-55mm breaks that mould as it has excellent image quality and a fantastic standard zoom. This versatile lens ca be found on my camera more often than any other.

Fujifilm XF 55-200mm lens f/3.5-4.8 lens OIS
For the weight and size, this is a fantastically compact zoom lens with great image quality to go with it. When I first purchased this lens, I was concerned as I had previously brought similar lenses for similar money when I shot Nikon and image quality was quite poor. This lens is different, it’s IQ is great and the optical image stabilisation is a godsend, especially at those longer focal lengths.

Fujifilm XF 35mm F2 WR
This 35mm F2 is one of Fujifilm’s “f2” range and it truly is a great lens. It may not be as fast as the f1.4 35mm Fujifilm also make but this compact little lens packs a punch and coupled with my X-T30 means I have a very lightweight system to wander around with and when used with my XT2 I have a full weather resistant system.

Fujifilm XF 16mm F2.8 WR (NEW for 2020)
This is the newest lens in my lineup. I really enjoy using my 35mm prime (above) but wanted something wider to go along with it in my lightweight kit. Since buying this lens I have put it through its paces and really like the results. Some of which you can see on this post here.

Fujifilm XF 10-24mm lens F4 OIS
A great and versatile wide-angle lens. Great for architecture and cityscapes, this lens will often come on a shoot with me. Not the fastest lens at f4 but I rarely shoot landscapes that wide and the OIS certainly helps when shooting handheld in low light situations.
Tripods

MeFoto Roadtrip
I don’t own any big, bulky tripods. This is as heavy as it gets for me which is all I need to capture my long exposure and low light photography. This will be in my bag if I know my photo shoot will include some extensive tripod use. The ball-head is strong enough to hold the weight of my heaviest combination which is the XT2 and 55-200mm lens.

Manfrotto Compact Light
I brought this tripod just before I took my first trip to Venice. I knew that tripods would be difficult in such a crowded place so a lightweight tripod seemed an ideal compromise between weight and frequency of use. Since then I now carry it as a part of my lightweight kit (see the differing kits below).
2020 Update: I will be looking to replace this tripod during 2020 as although I like the tripod, the ball head is starting to fail and needs replacing.
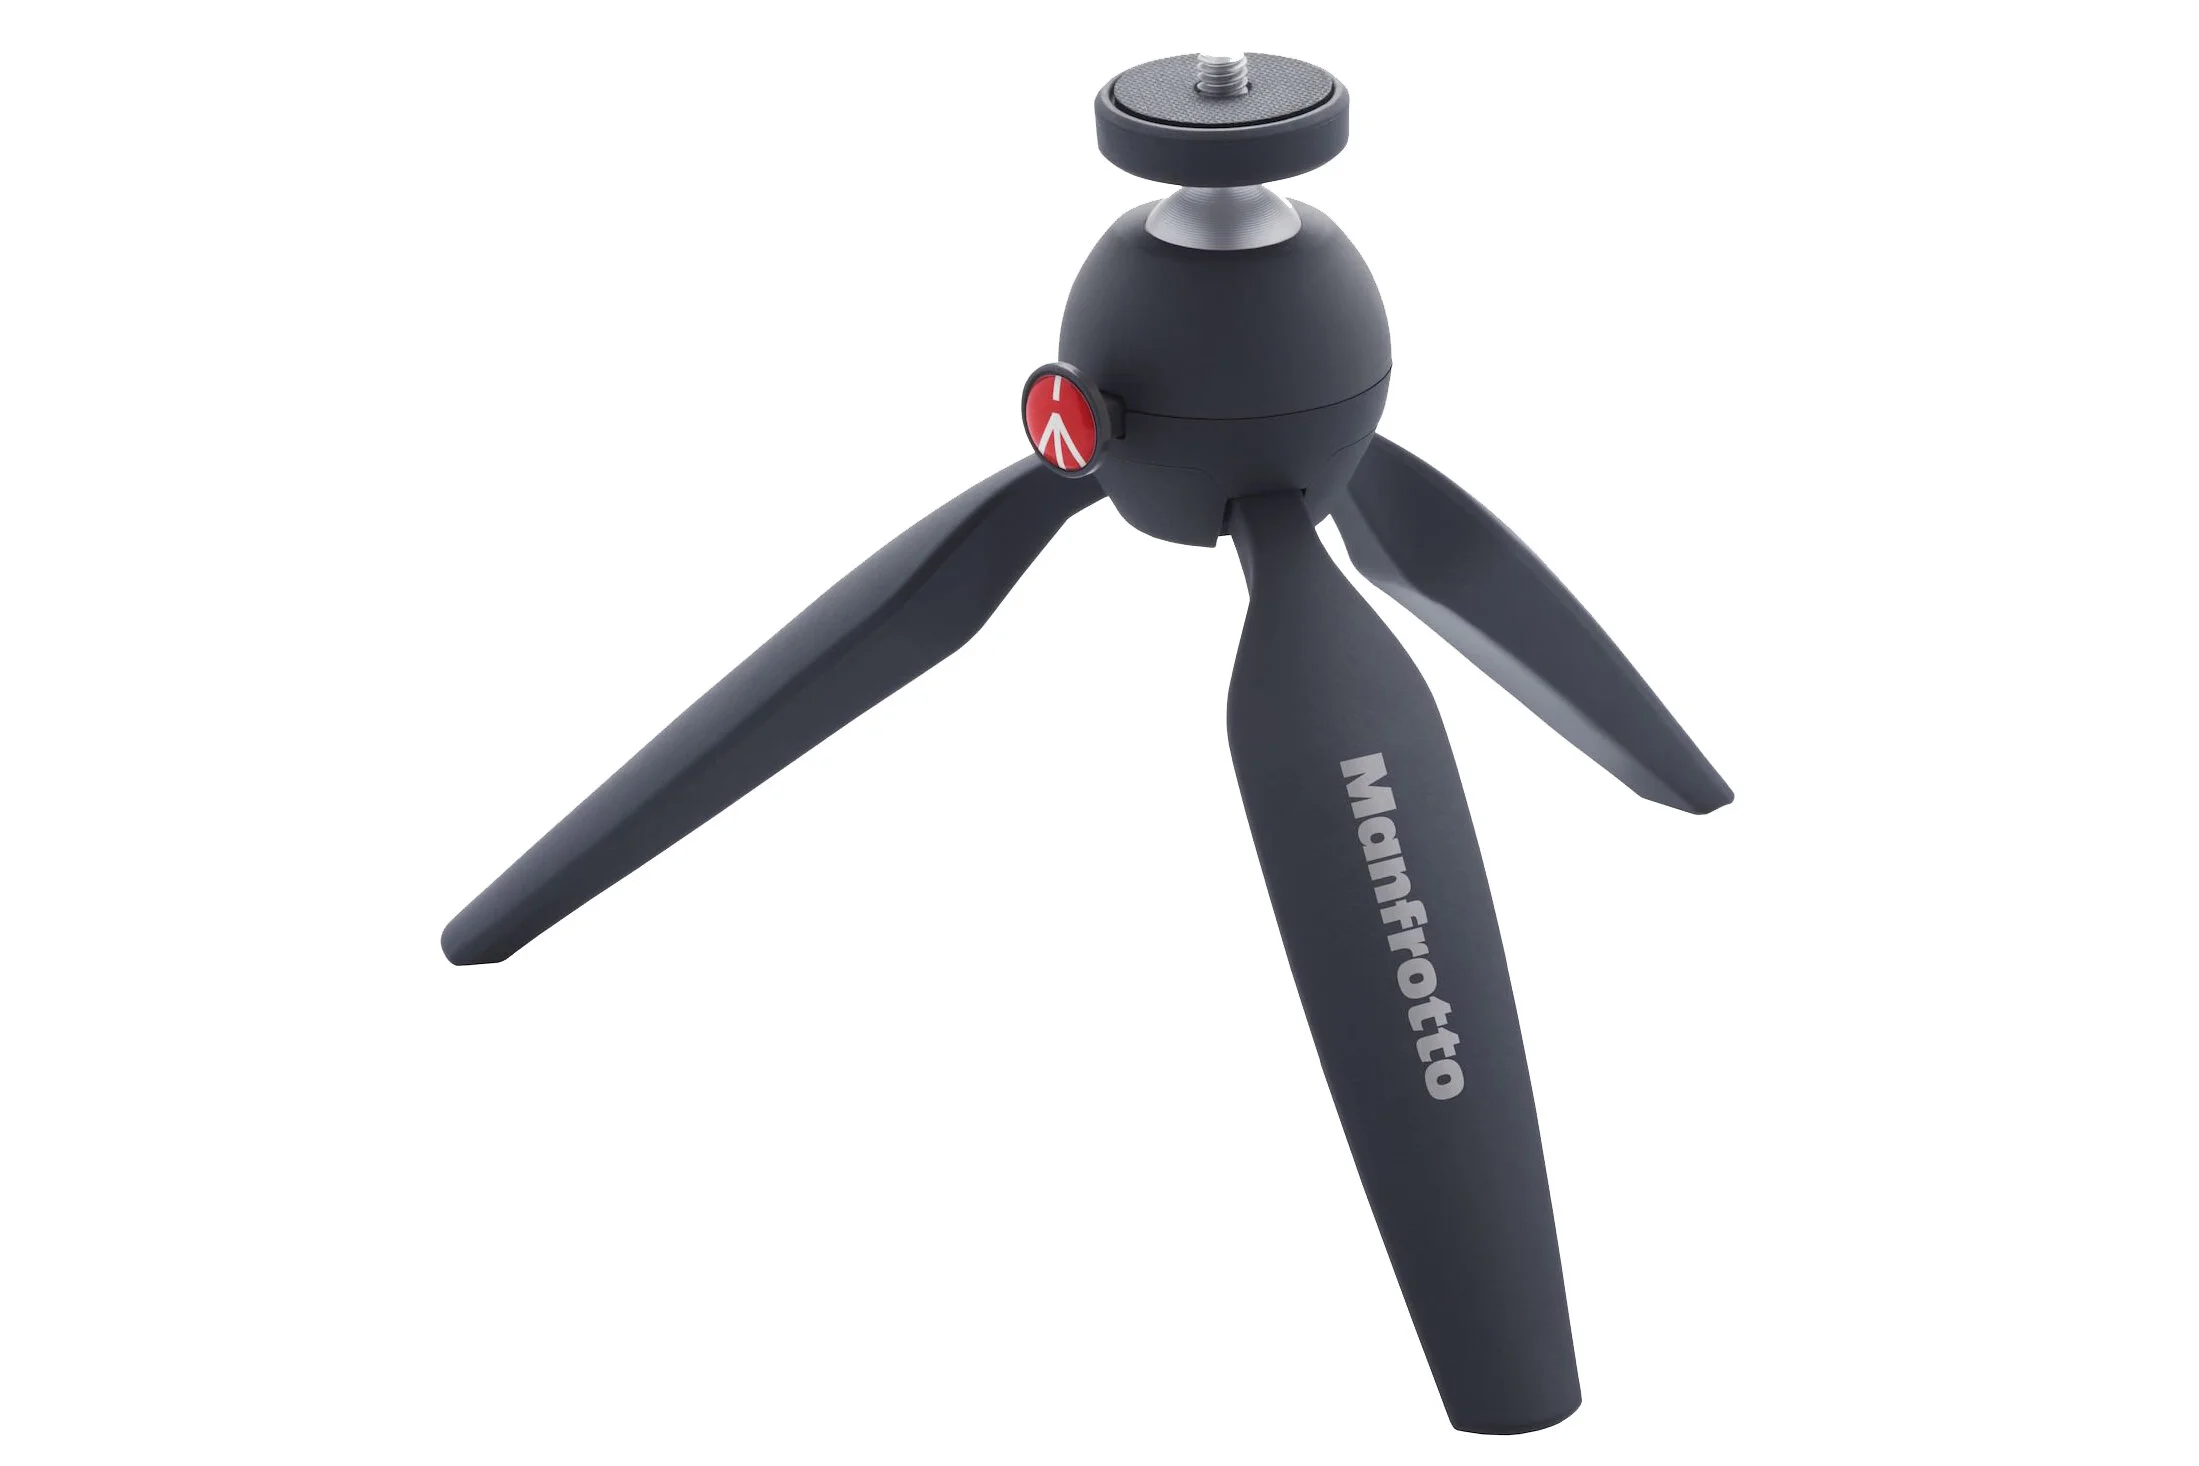
Manfrotto Pixi
This little table top tripod is excellent. It is super strong and super light and perfect to carry around for those just in case moments you need a little stability while out shooting.
Filters

Formatt-Hitech 85mm Filters
A great set for landscape and long exposure photography. The 85mm filters are perfect for the Fuji mirrorless system and more than big enough for all of the lenses with one small exception. The 10-24mm, which at its widest has a little vignetting at 10mm when the filters are attached. Currently, I have a 10 stop ND filter and a set of three ND graduated filters for those landscape photos where the dynamic range is too high.
Camera Bags
Manfrotto Mover-30 Manhattan Backpack (NEW for 2020)
I brought this bag in 2019 as I was after a bag which was large and comfortable enough to carry my lightweight, city gear but look a little more subtle so it didn’t draw as much attention and I could blend in a bit more as I walked about the city. At the time of writing, I’ve had this bag about a month and so far, enjoyed using it.
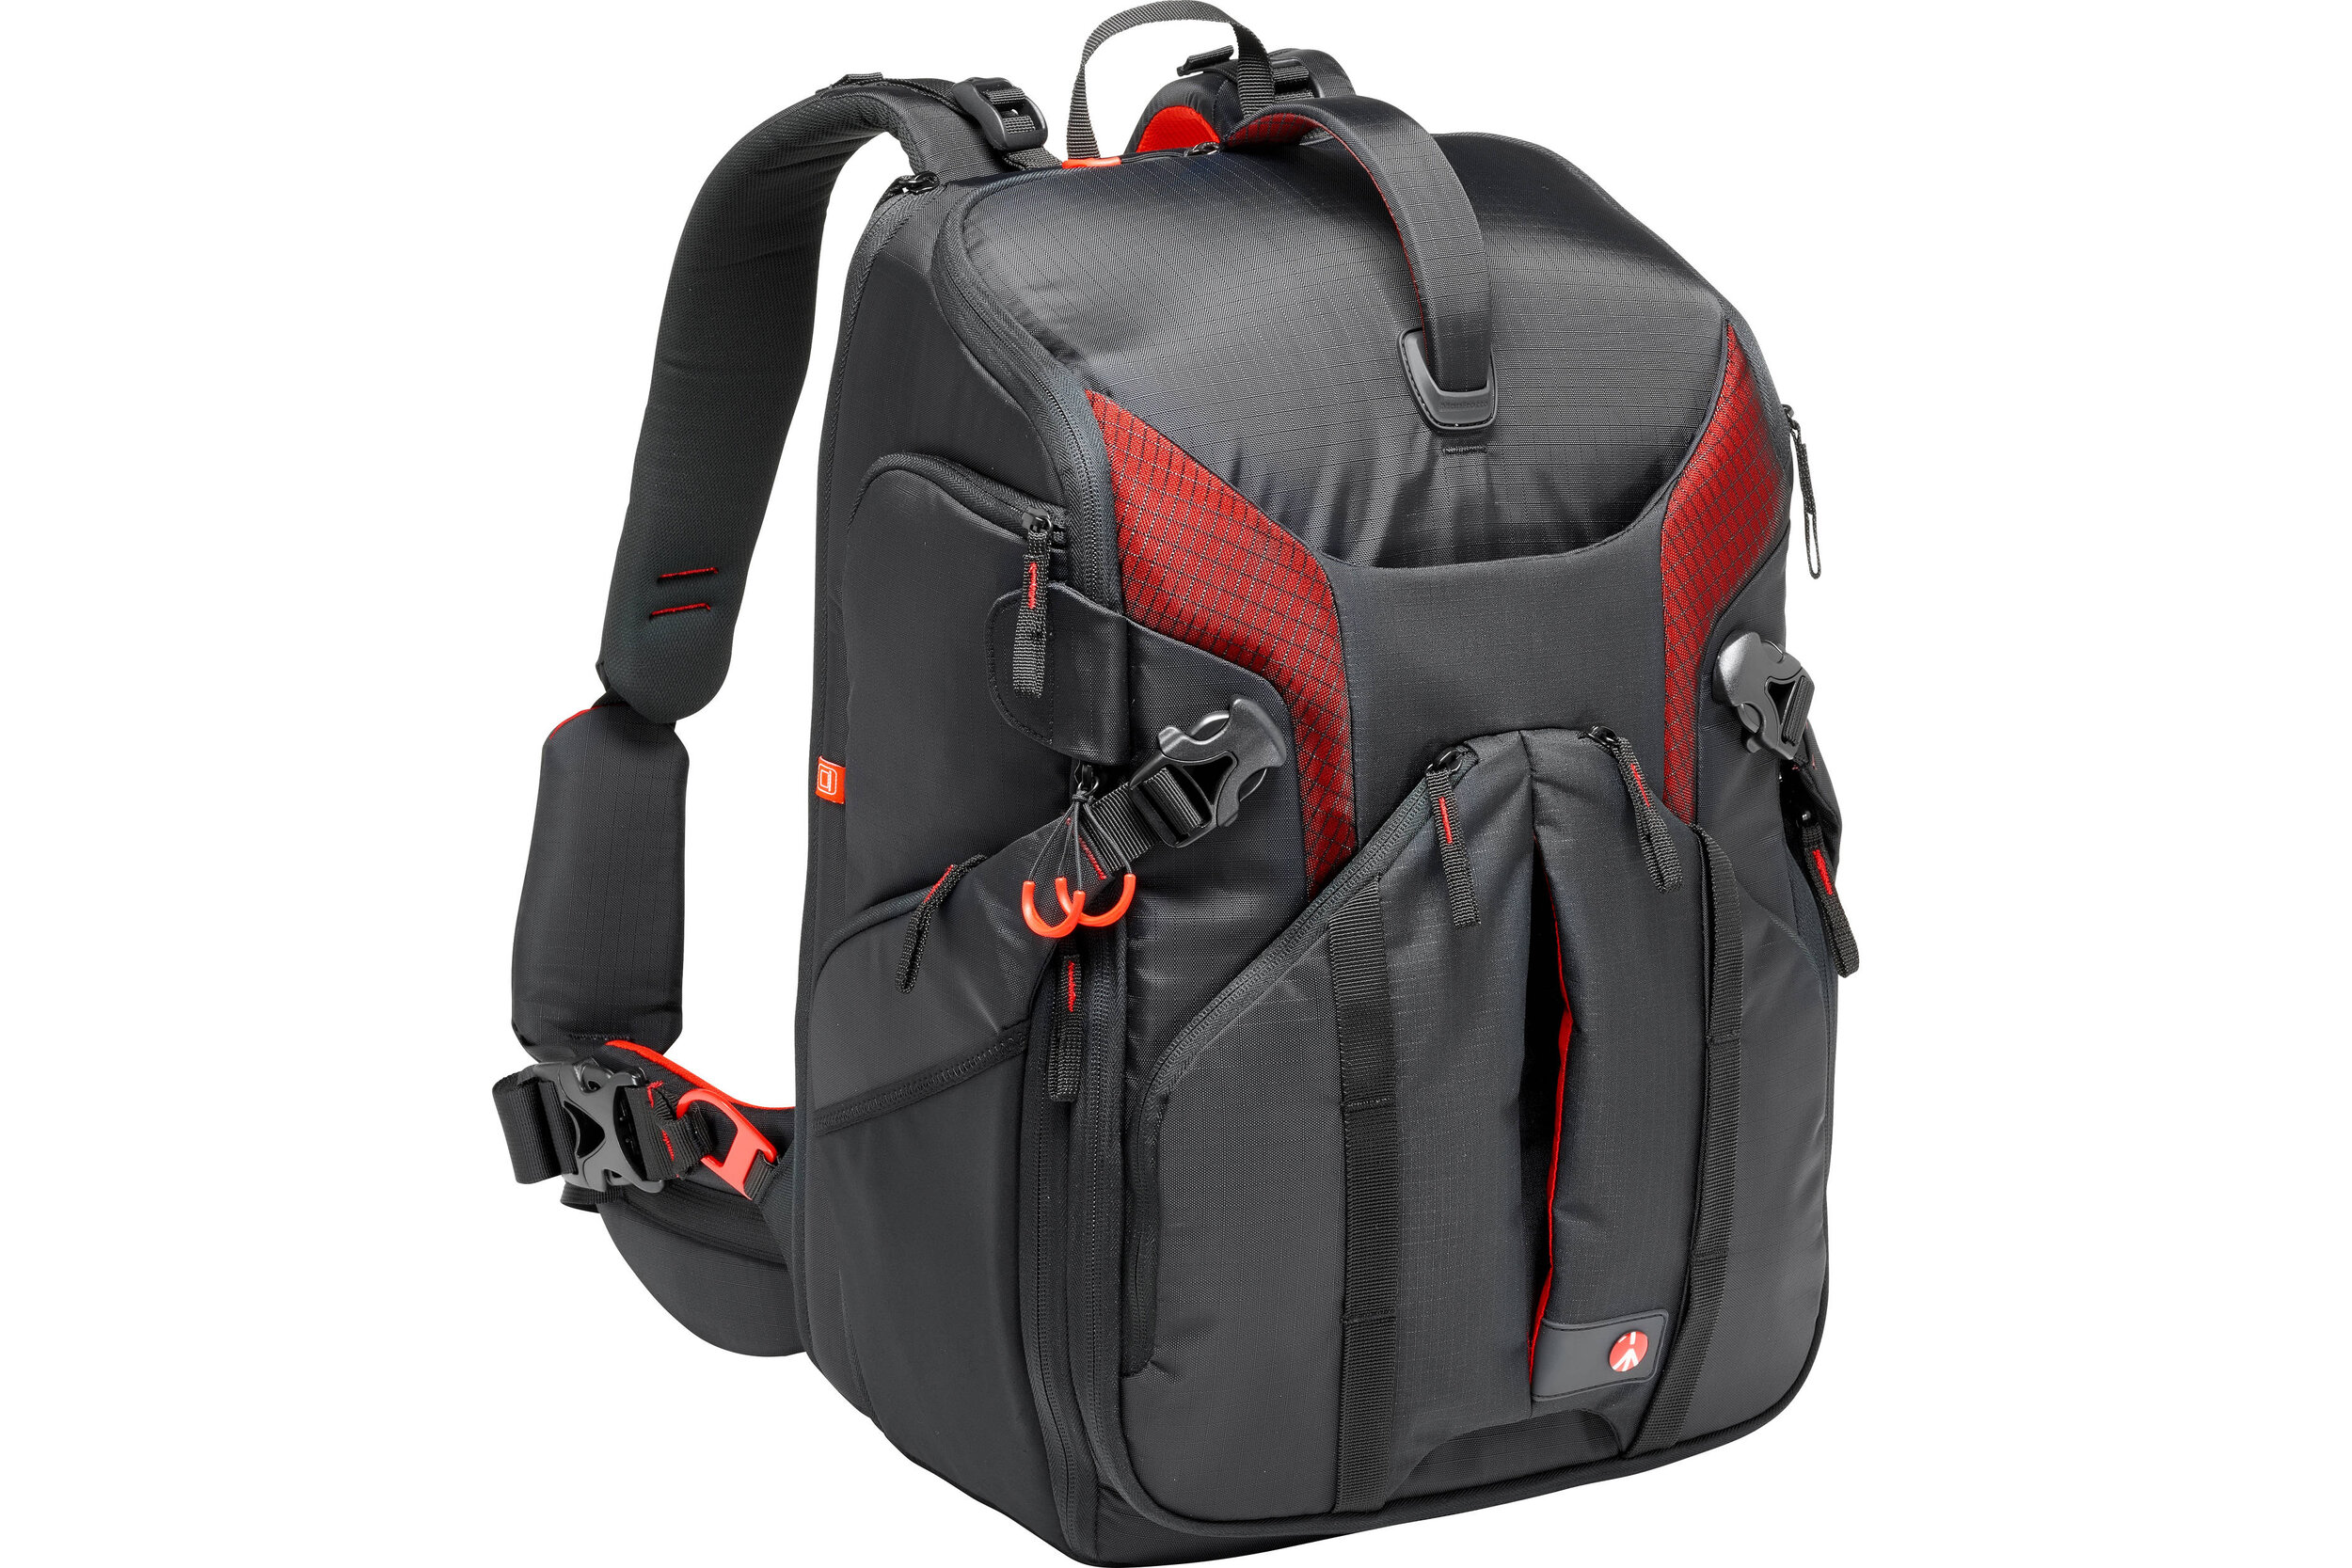
Manfrotto Pro Light Backpack
Having a mirrorless system means the size and weight of my kit is kept a little lower and that means I don’t need a huge bag to carry it all. I chose this bag as it both carries all of the kit I would take on a shoot with its multiple configuration options and it also allows me to carry my biggest tripod centrally to keep the bag balanced and takes the pressure off my back.

Manfrotto Street Backpack
I use this bag when I need to travel light or I need to carry other bits as well as some camera equipment. This easily fits a camera and a couple of lenses leaving enough room in the top compartment for clothes and laptop etc.
Accessories

3 Legged Thing L-Bracket
Perfect to quickly switching between landscape and portrait while using the tripod.

3 Legged Thing Toolz
Quite a critical tool as the 3 Legged Thing L-Bracket covers the battery compartment on my XT2 so when the battery needs changing, out comes this tool to quickly remove the L-bracket.

Ultimate Lens Hood
Perfect to help cut out those reflections when shooting through glass. I used the ULH when I was on this sunrise shoot in London.
Remote cable Shutter Release
Critical to ensure no camera shake happens when pressing the shutter or keeping the shutter open during long exposure shoots.

Peak Design Slide
This is a great camera strap, it’s comfortable and the quick release anchors mean it can be removed with minimal fuss.

Sandisk Memory Cards
I use Sandisks memory cards because so far, during all of the years I have been photographing, I have not had one failure. I do retire cards when they start showing any sign of wear which I am sure helps avoid failures.

Fujifilm NP-W126s Battery
On a long shoot, I will go through many batteries. One downside of mirrorless is still the battery life. It is improving but still nowhere near what it was when I shot with a DSLR.

BC-W126s Charger
The charger comes with me on longer photography trips when I know my batteries might not last the entire time.

Puridea S2 10,000mAh
This neat little battery pack can charge my phone 4 times or using my other USB charger, can charge 6 or 7 camera batteries. An incredibly useful gadget.
So, how do I pack all of this gear in my bag?
Although I have a healthy collection of camera gear, I certainly wouldn’t bring it all with me to each shoot. Below are 3 of the most common ways I pack my bag, depending on the type of photography I intend to do.

FULL LANDSCAPE/ CITYSCAPE
When I am on a long shoot, capturing long exposure images, high level cityscapes or grabbing the odd time-lapse, this is the kit I will usually pack. There is not a lot of room left in the bag and it’s my heaviest configuration but at least I am prepared for anything.

LIGHTWEIGHT CITY/TRAVEL
Much more suitable for a long day walking around the city or while traveling where there will be a mix of intimate and sweeping landscapes to photograph. The shoulder strap for walking about and the very lightweight Manfrotto tripod to take photos in low light. Depending where I go and what I intend to shoot will depend on the combination of lenses I take.

ULTRA LIGHT-WEIGHT WALKABOUT/STREET
I tend to have this kit with me when I’m shooting handheld around the streets of London or when my primary focus for the day isn’t photography but I may sneak in an hour or two. Although I may pack the kit in my Manfrotto Street backpack to travel with, I will tend to leave the backpack in the car and take just the camera and strap out with me and keep the spare prime lens and tiny tripod in a pocket so I can travel as light as possible.

So, there you have it, all of the gear I take with me as of January 2020. I mentioned above that I plan to upgrade my Manfrotto Compact Light tripod this year but other than that, I don’t foresee any major upgrades in the camera and lens department…well, unless Fujifilm does something special with the XT4 that is. Never say never and all that!!
As my equipment evolves, I will try to refresh this post each year.
Until next time.
Trevor