
BLOG ARCHIVE

Why Every Photographer Should Print Their Photos
As I embark on my own printing journey, I wanted to share with you what I’ve been printing lately and to help convince other people to get their photos off of their computer and on to paper, I have listed 6 reasons why I feel every photographer should print their photos.
It’s 2020 and the shift to digital photography happened a long time ago. We now take more photos than ever before and nearly all these photos are stored and consumed on our phones and computers. With so many photos to consume, the time we all spend looking at these photos gets shorter and shorter to the point where these days, from the point they are taken, most photos likely never get seen by human eyes at all.
In this post, I’m going to dive into the world of printing and talk about how I currently print my photos and provide my reasons why I believe everyone should be printing their own best work in some form or another. What I won’t cover in detail is how to prepare photos for print and instructions for printing photos at home as that’s an entire topic on its own. I have already written a blog post called How I printed this photo of the Shard, London but that post only really skims the surface of printing at home as I wanted to keep the post light and free from too much jargon so everyone could follow along but there is so much more information that could have been included.
“The negative is the equivalent of the composer’s score and the print the performance.”
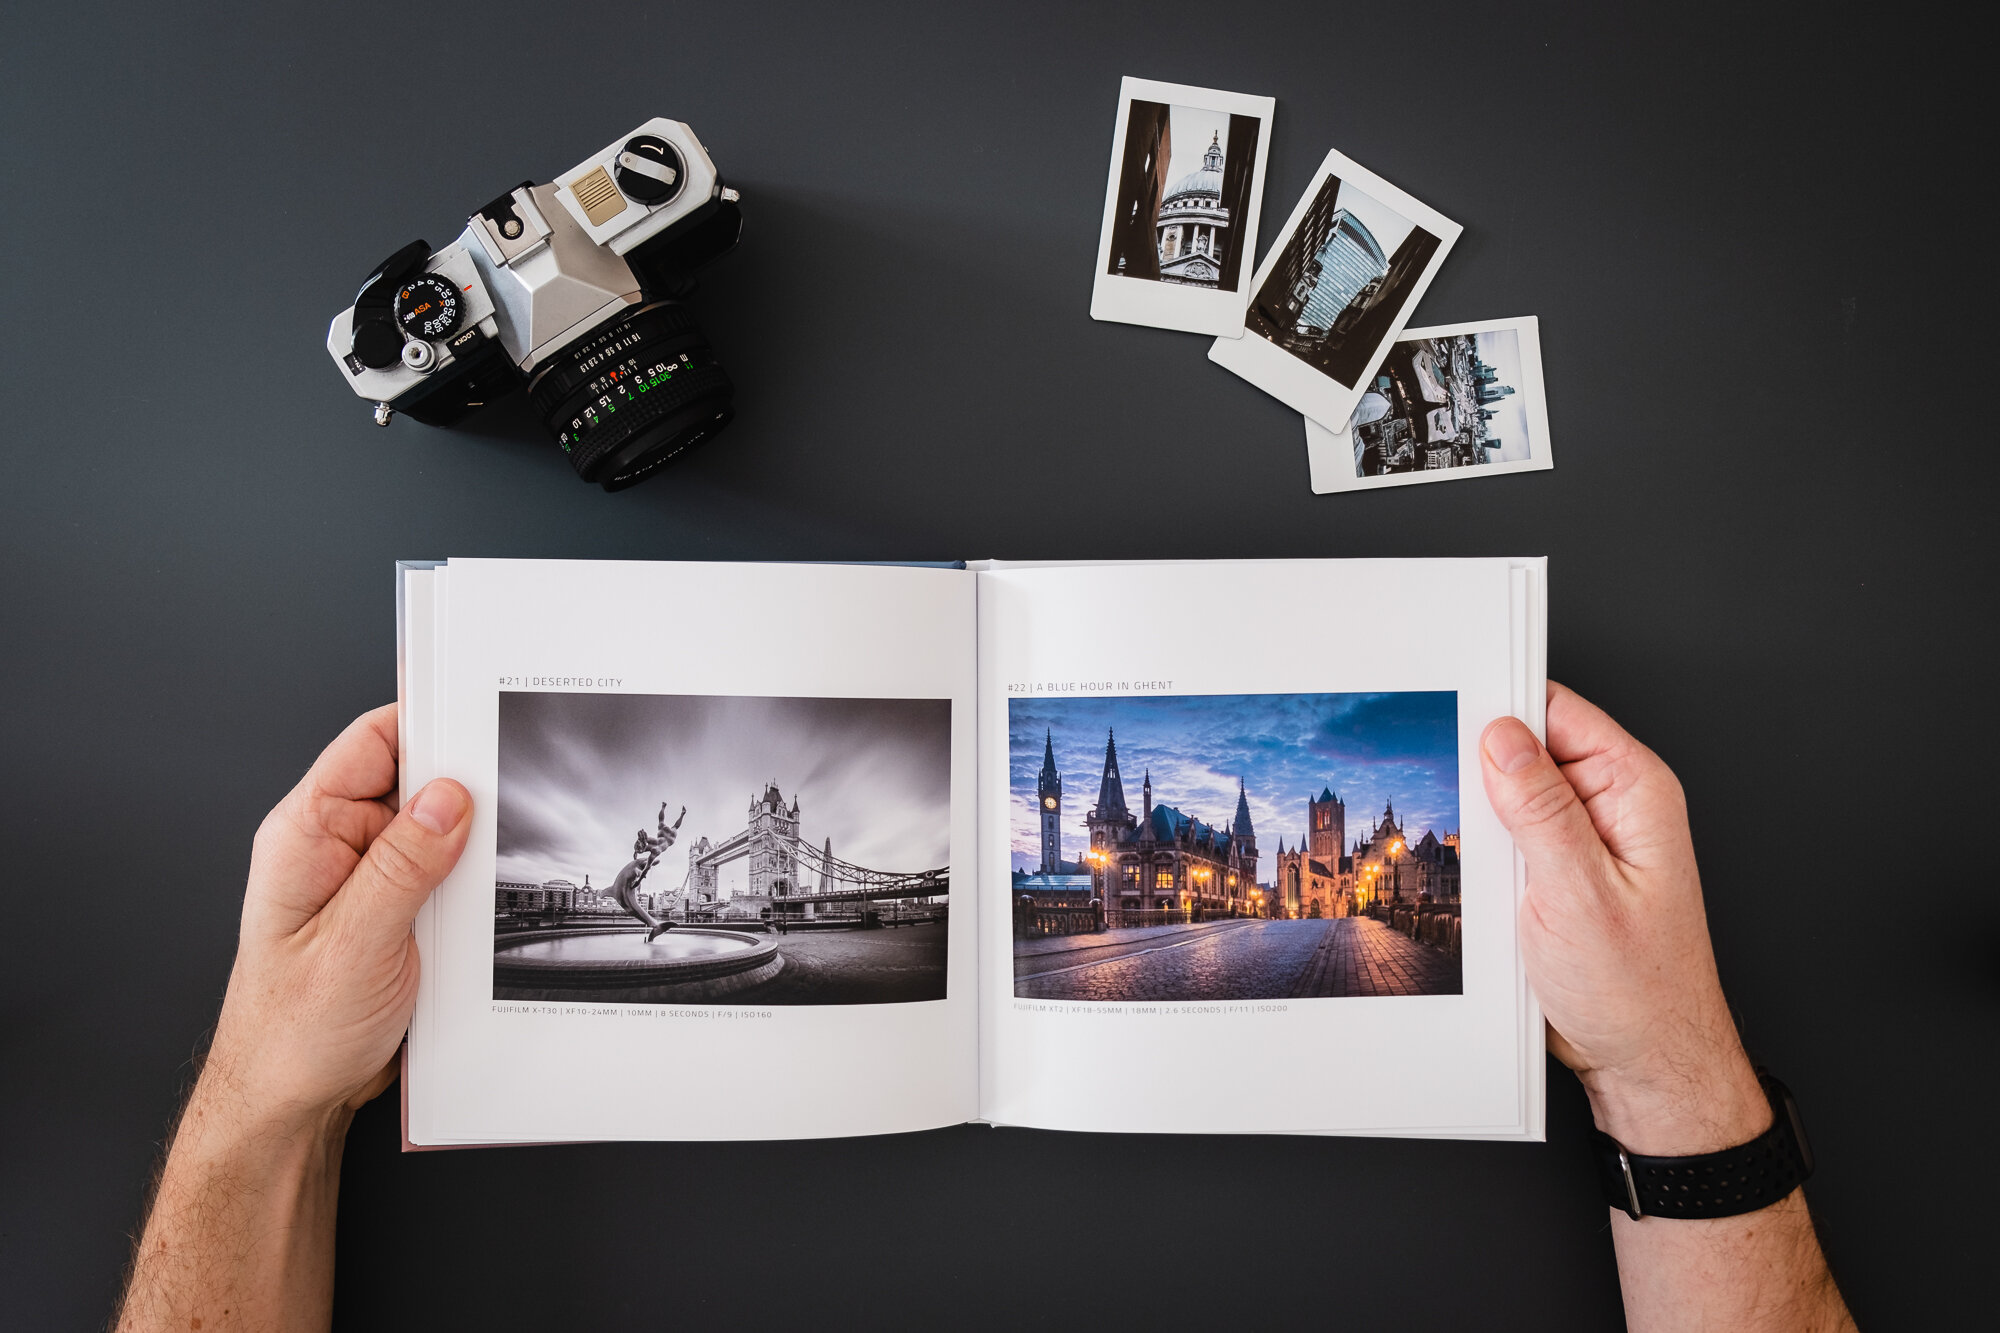
How I Print My Photos
I’ve been printing my photos for many years, long before I first took up photography as a creative hobby. When I was young a photo was only a photo when it was physically printed as apart from using a slide film and projector, there wasn’t really any other option. Most of us would head off to the local print lab or drugstore and hand in our film to be processed ad collected 24 hours later. Although times have changed and photos can now be displayed in both digital and analogue form, for me at least, nothing has changed with regards to my desire to commit ink to paper and have my photos printed.
I consider myself lucky to live in an age where there are so many more options when it comes to printing photos, from your standard print to fine art paper, large wall-art such as canvas and acrylic and my personal favourite, the photo book. 20 years ago, when I would pick my prints up from the lab, I didn’t look forward to spending the next few hours sticking them all in an album. It was tedious work, to say the least. These days, photo books are the new photo album and whether it’s using a phone, tablet or laptop, anyone can design and create their own books featuring a collection of photos with relative ease.
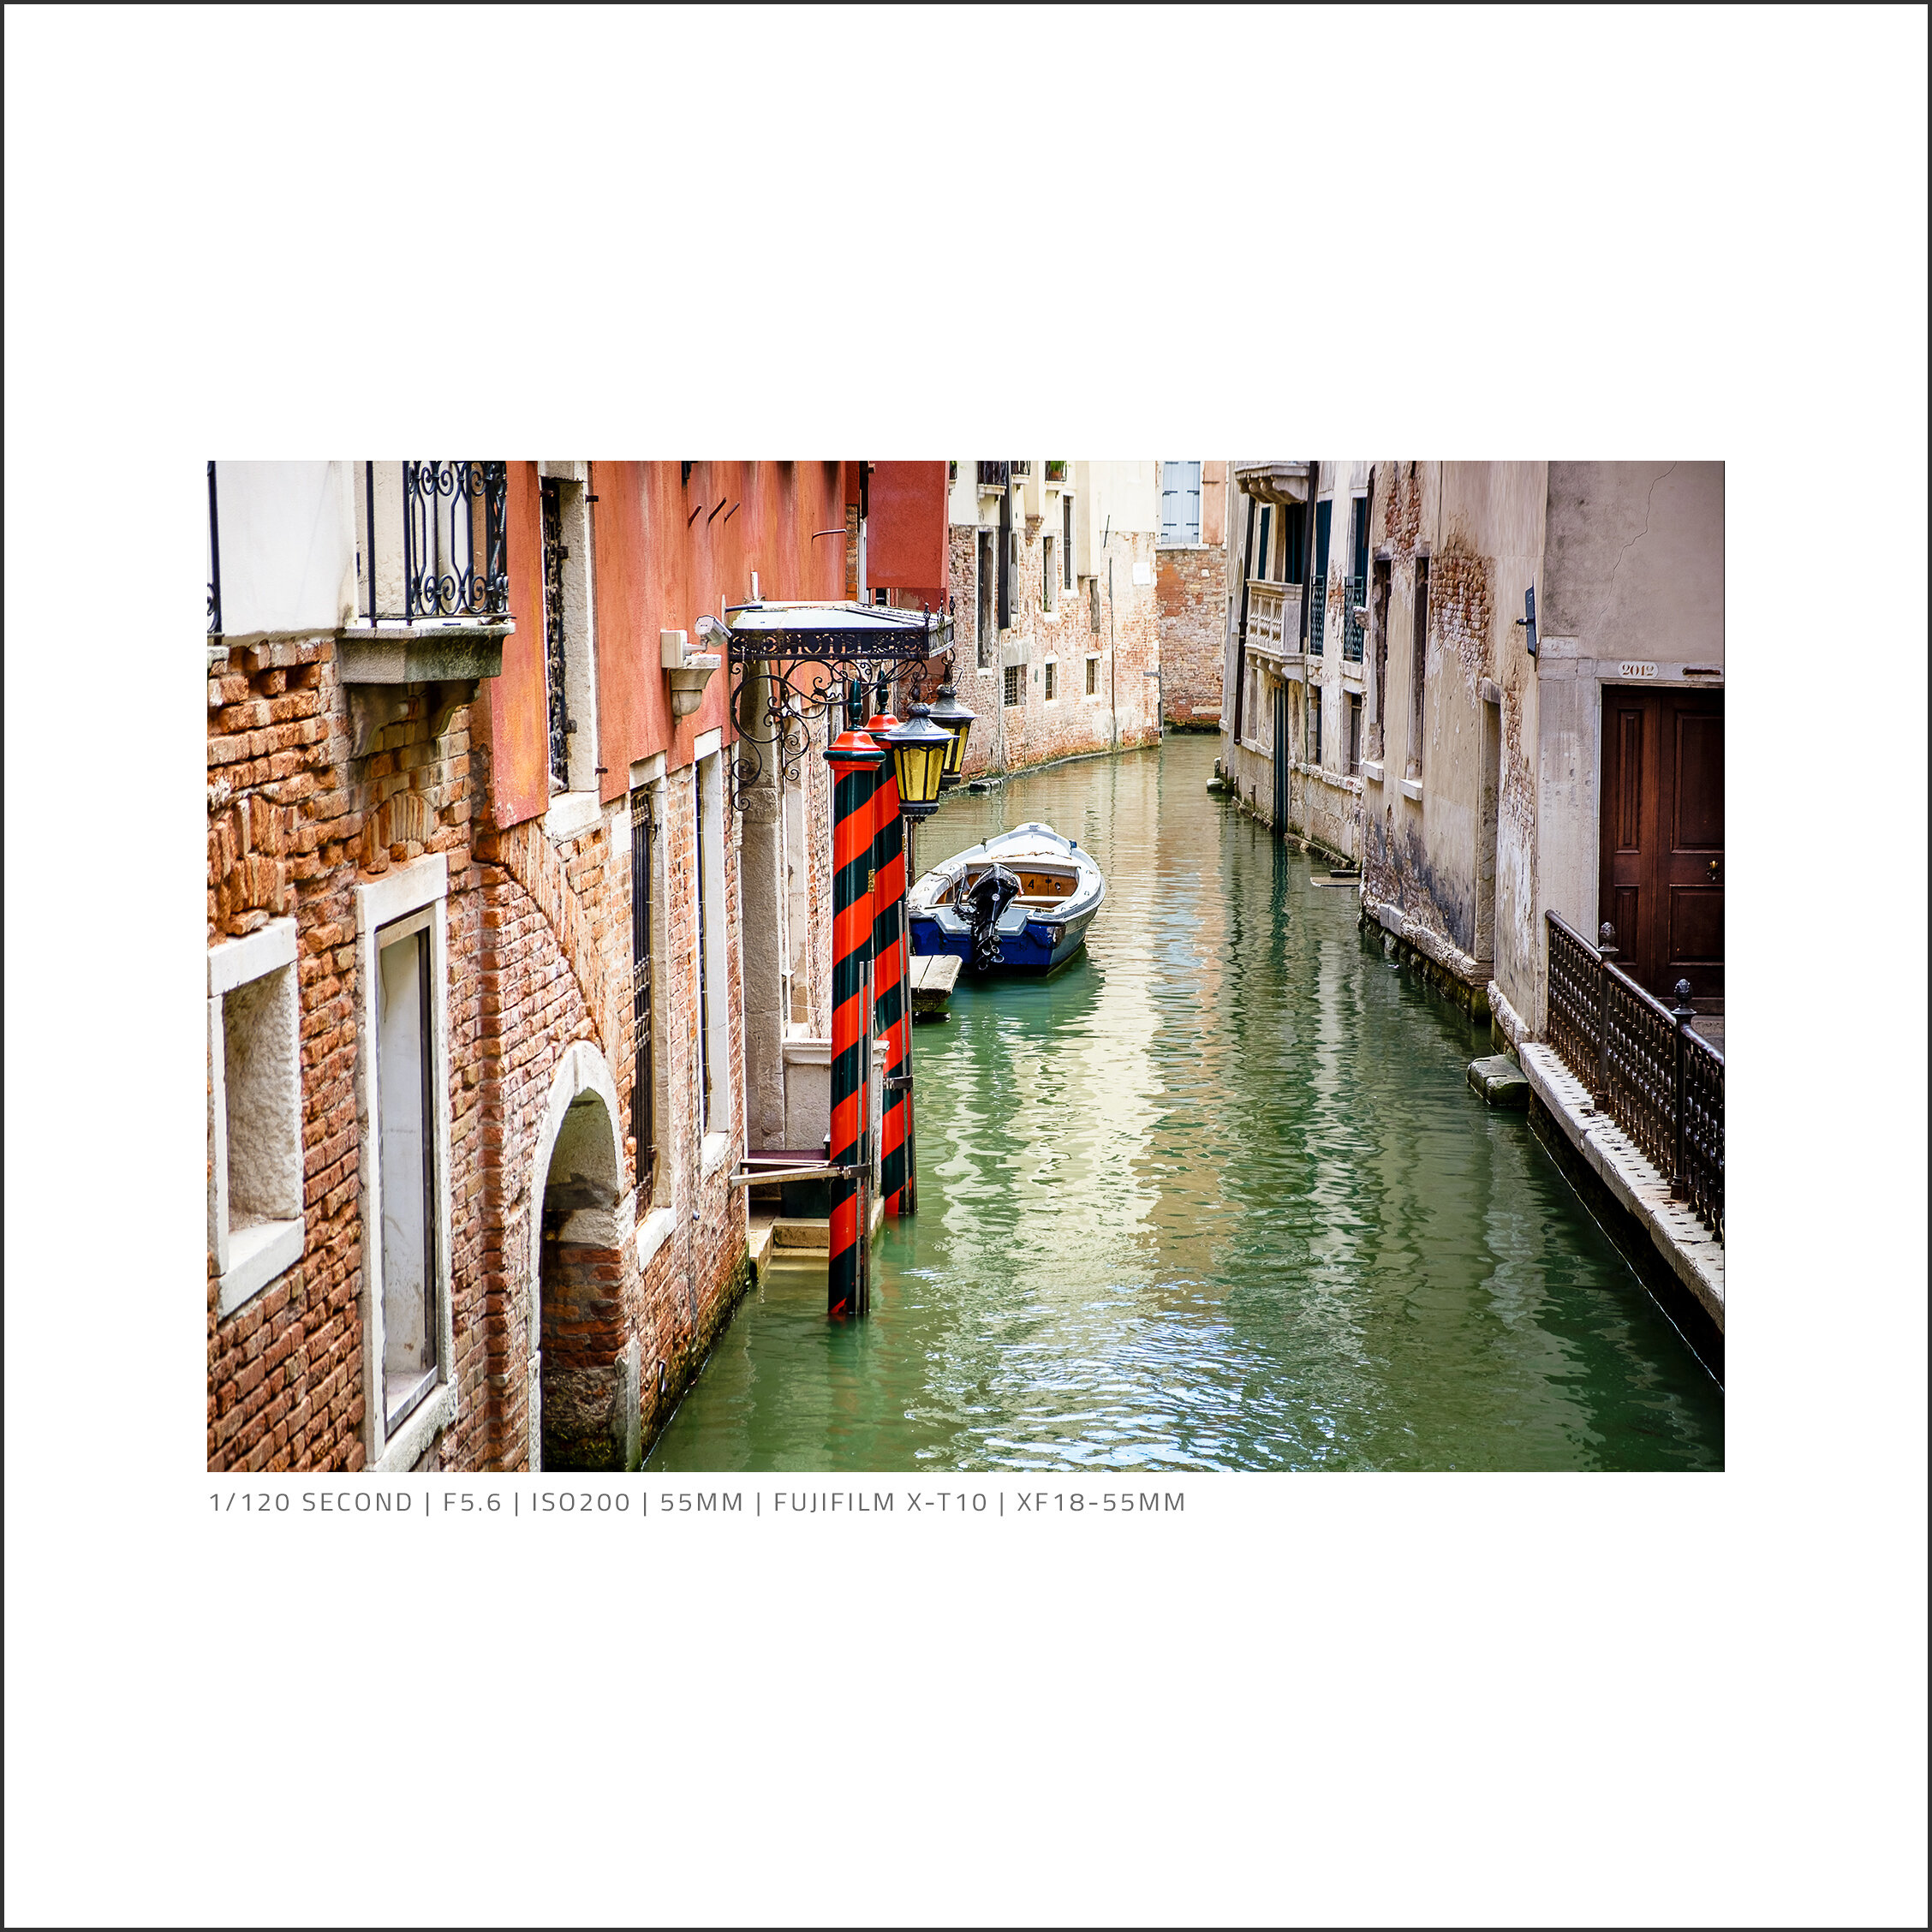
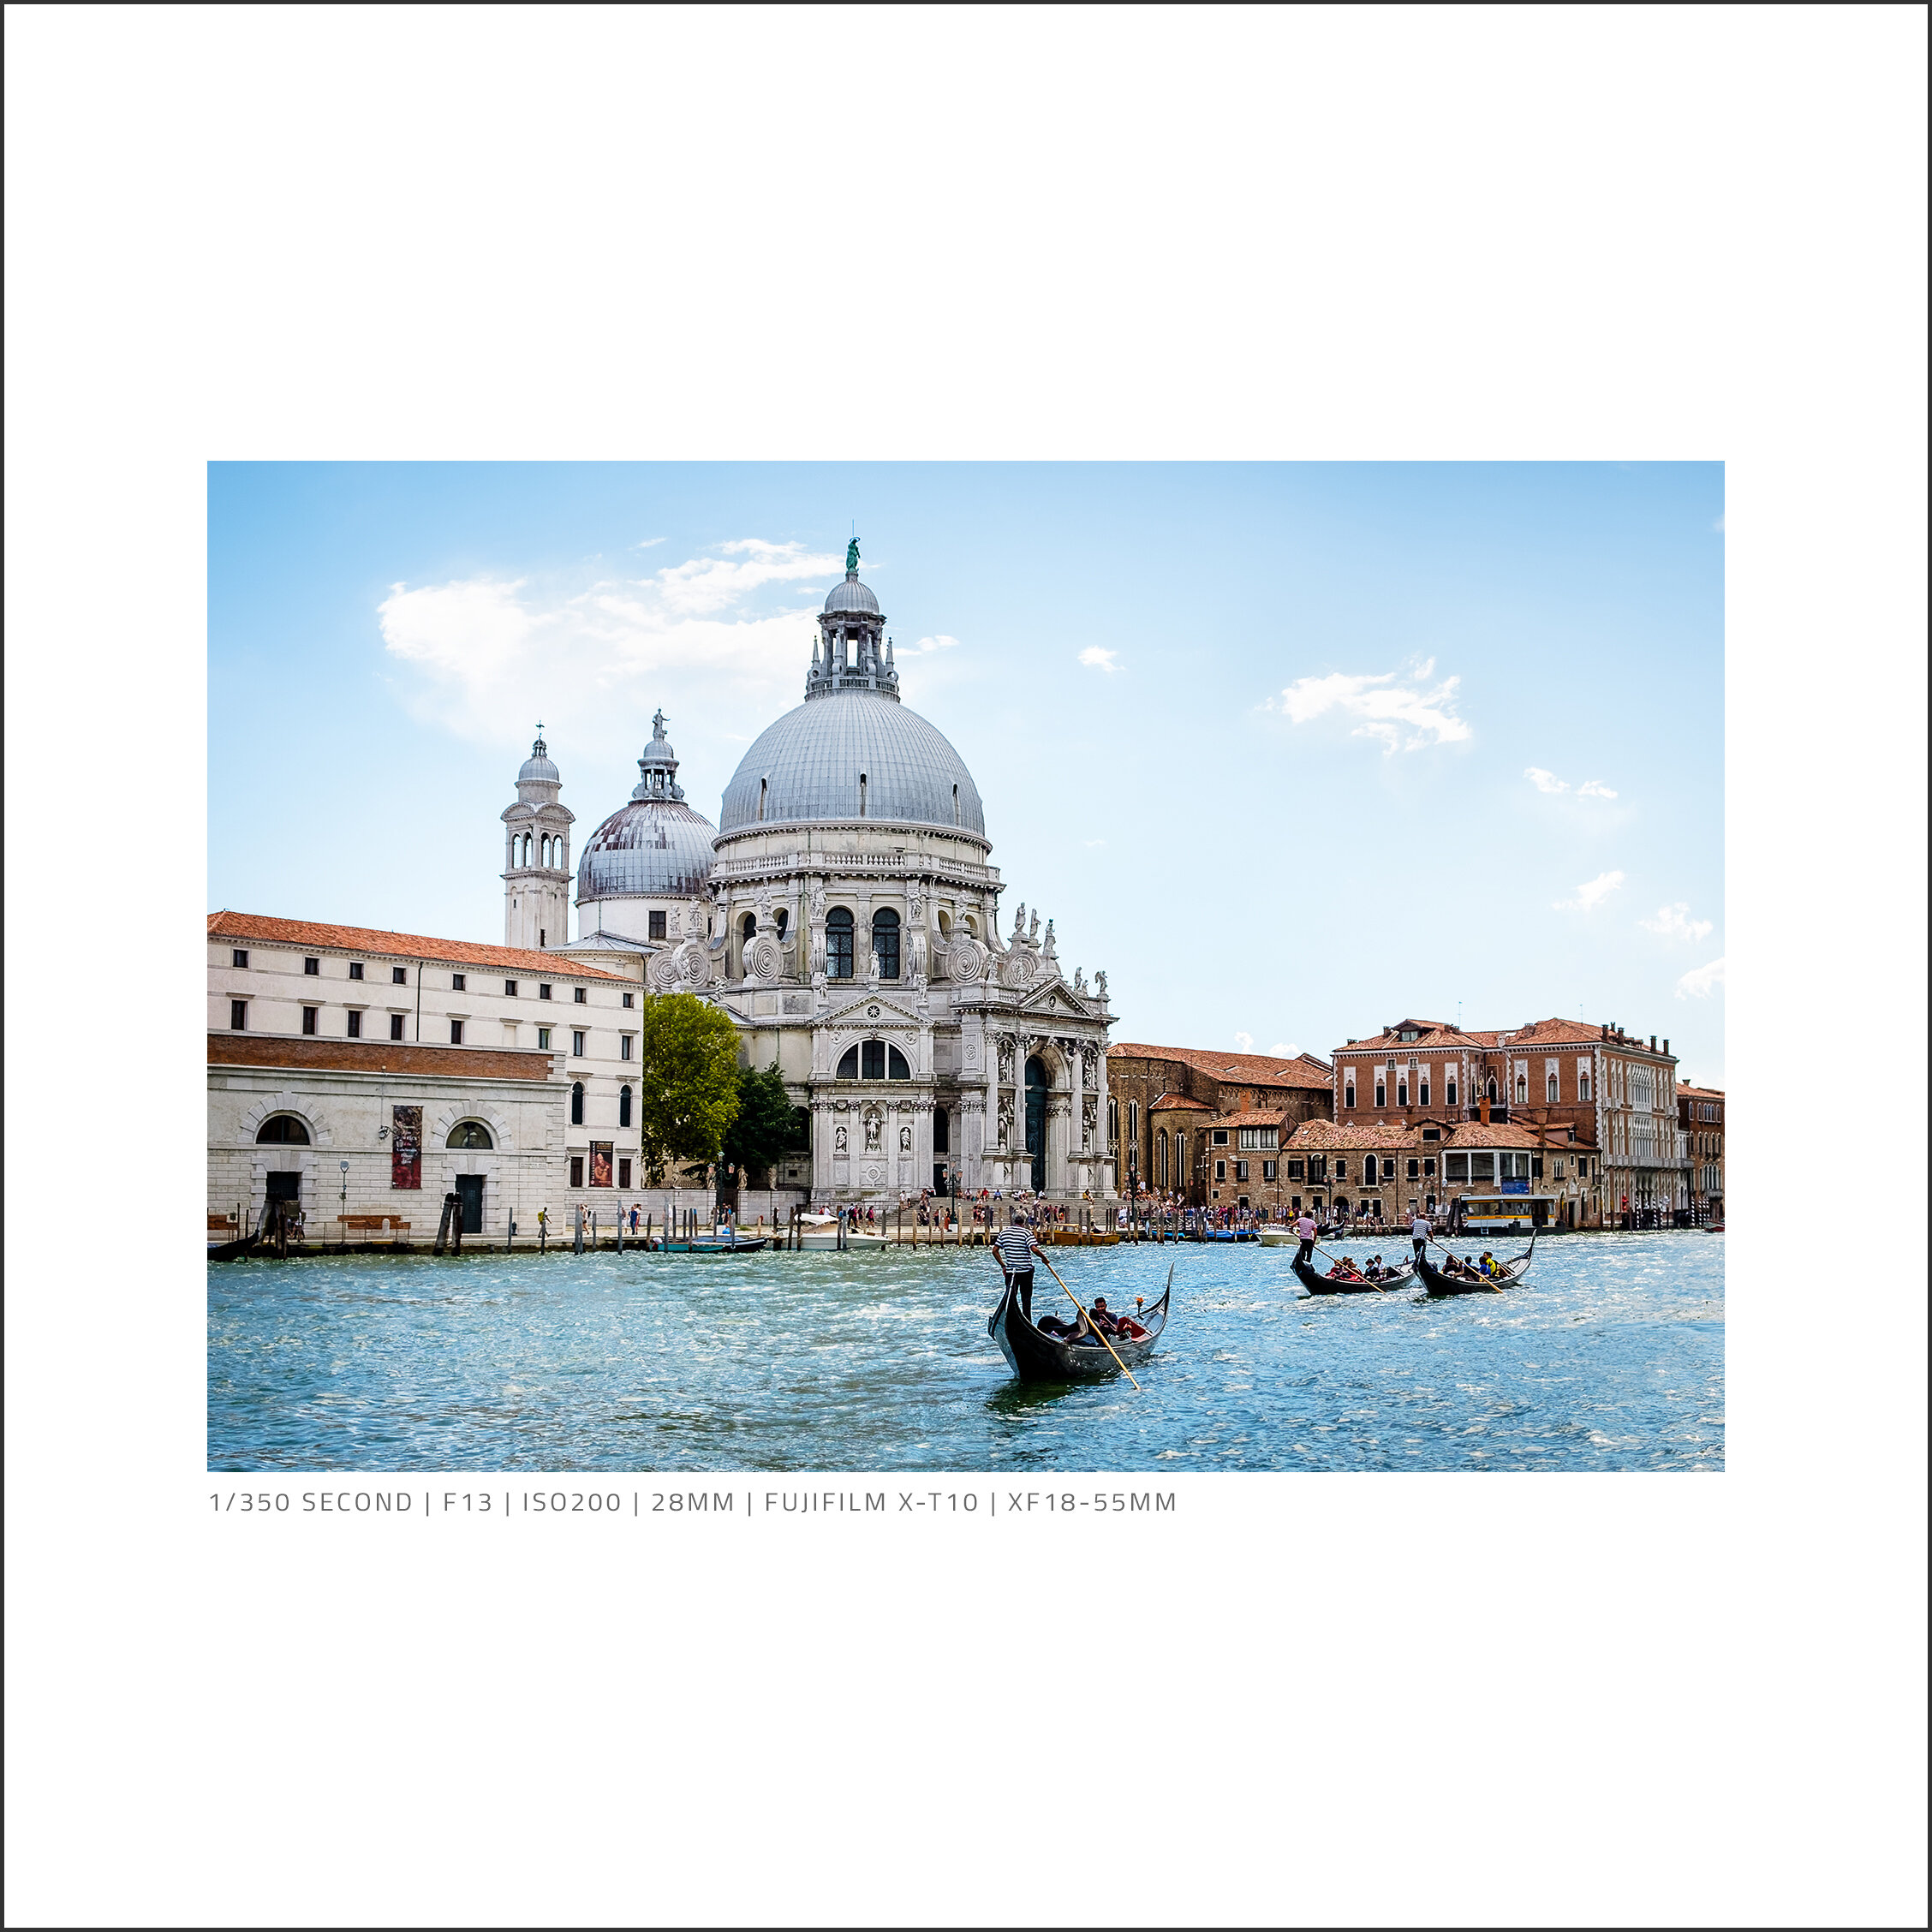
After visiting Venice in 2017, I wanted to round off my amazing trip by printing some of the photos I took. I decided to do two things. First, narrow down my favourite images and present them in a small coffee table style book and second, choose just a small selection to be framed and hung on my wall. I chose around 35-40 photos that were taken across the weekend and designed a book in my usual minimalistic style. I chose to print the book with a quality soft-touch matte cover which oozes quality with the photos printed on the thicker 250g silk matte paper. I could have chosen cheaper paper but this book was for me, a one-off and I wanted it to look and feel great to read.

Scroll through a few pages of the book below to get an idea of the layout and style.
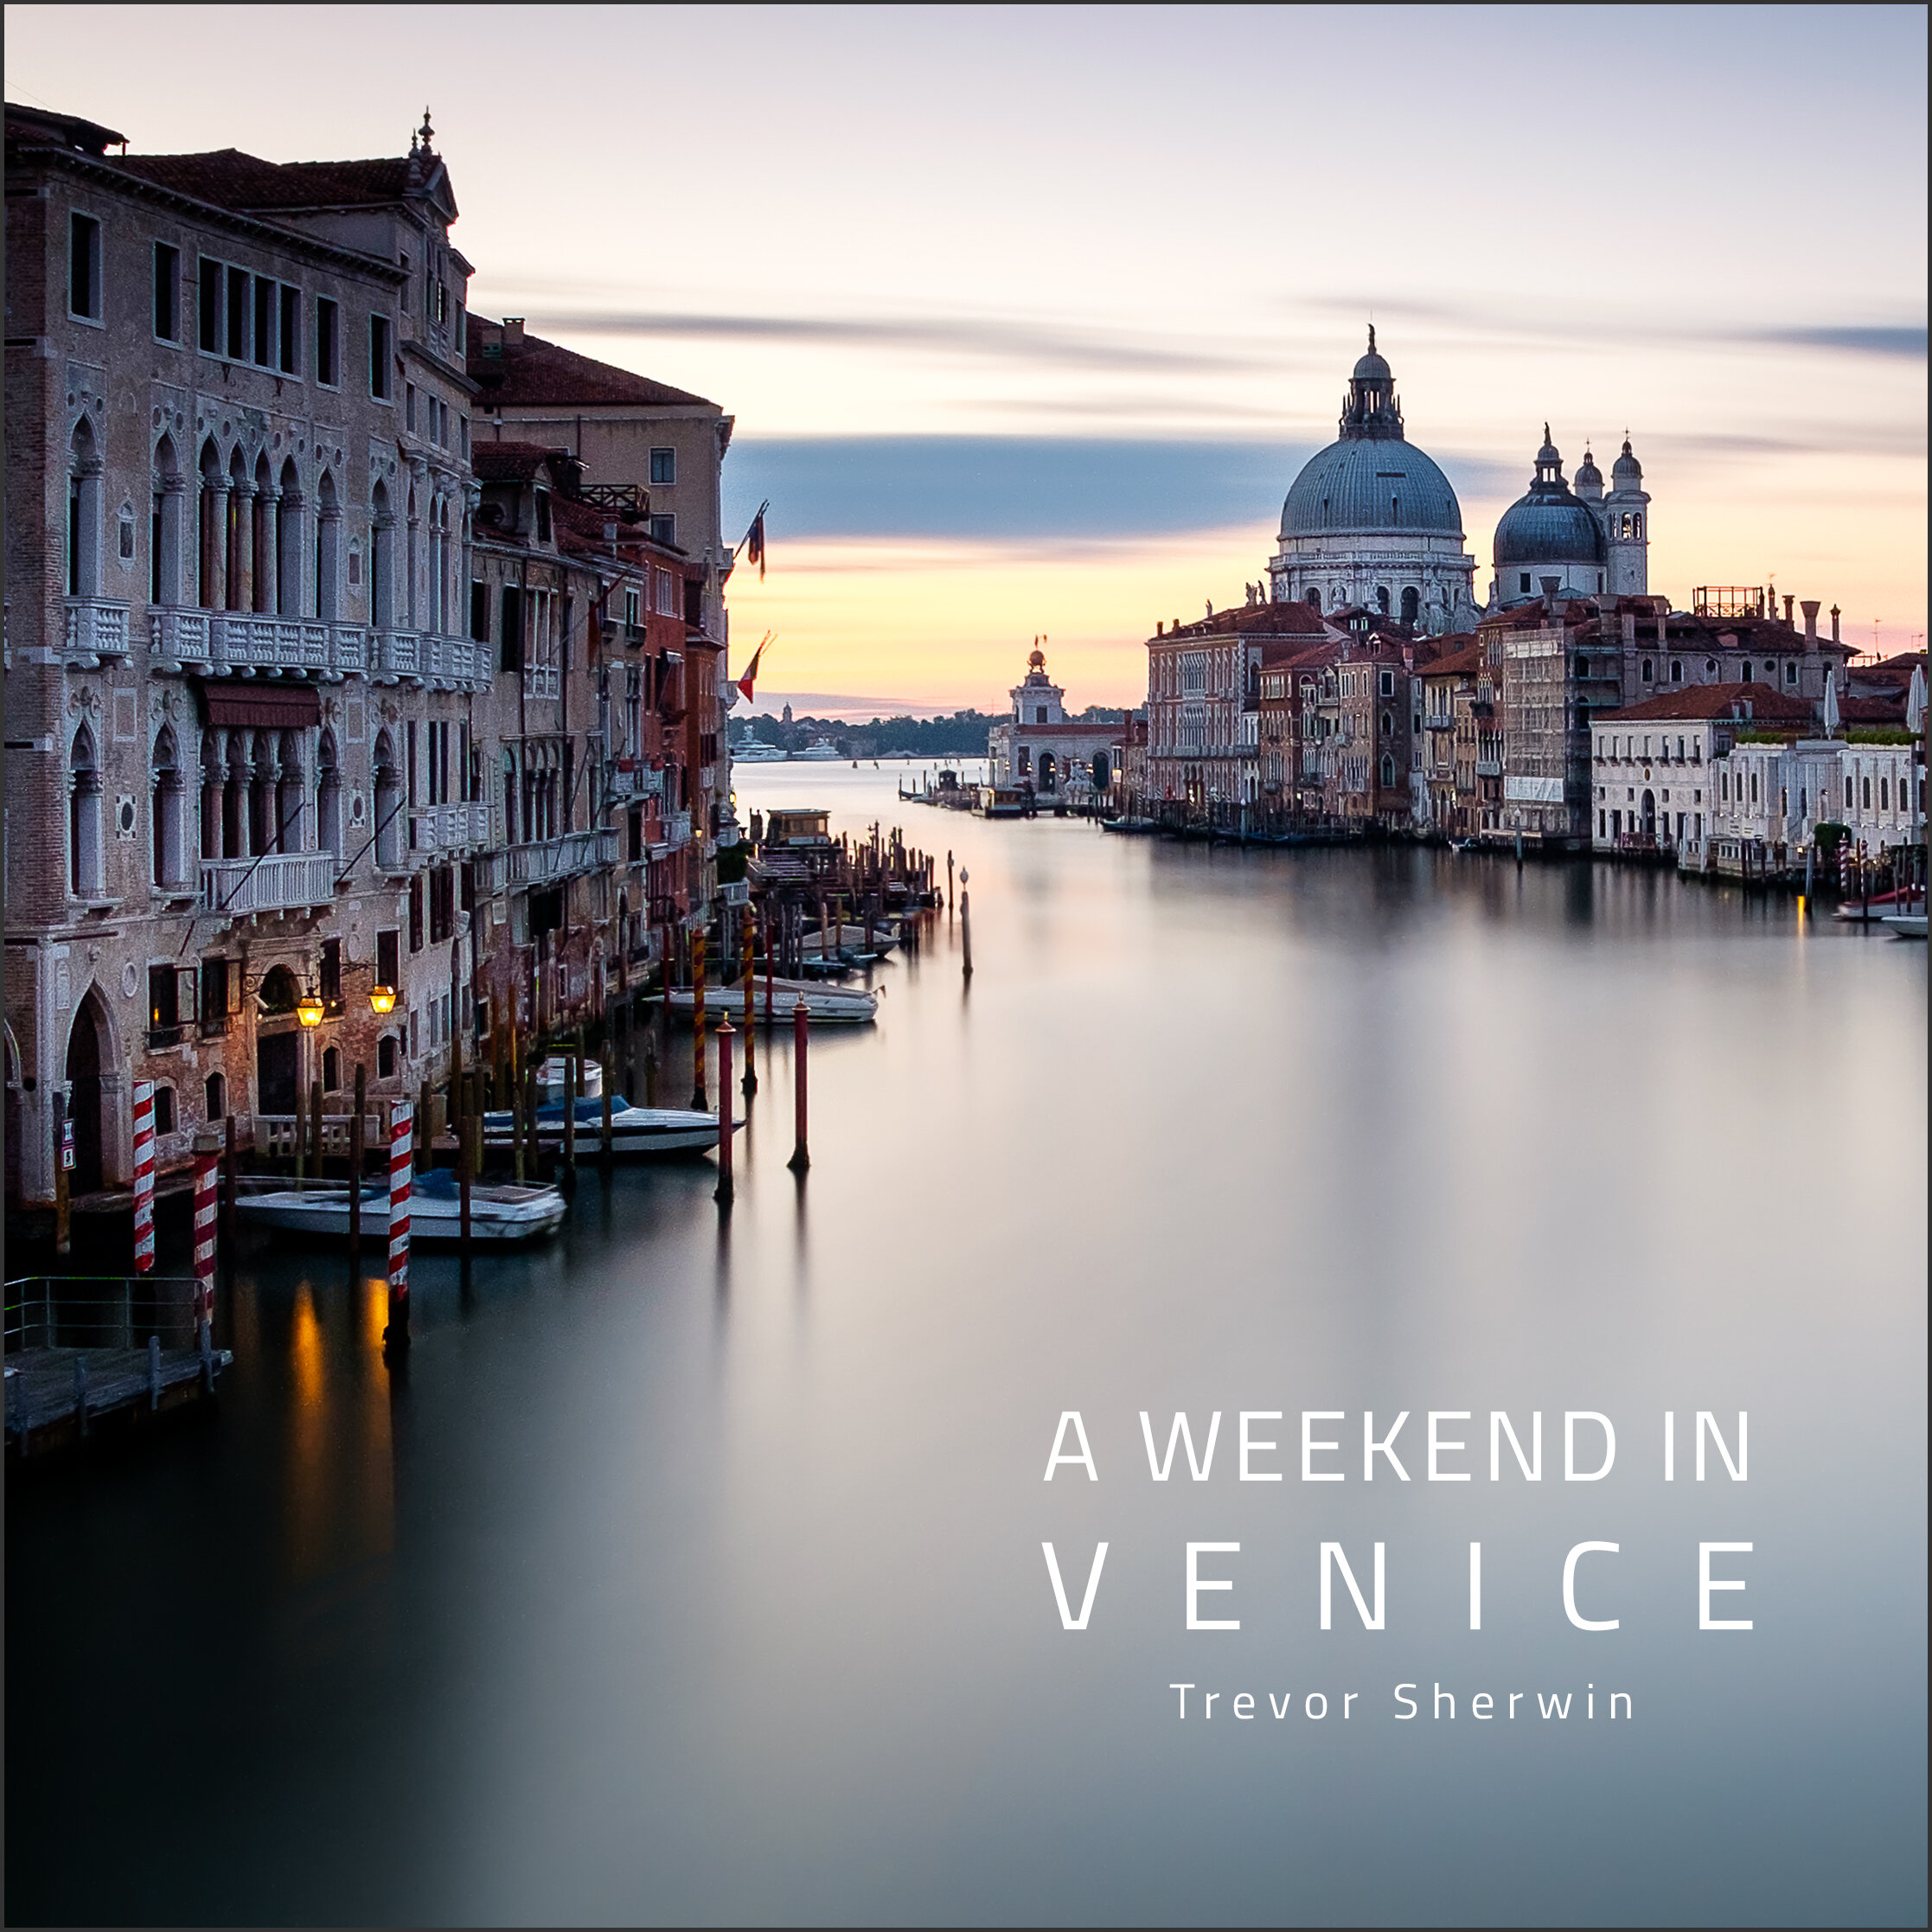

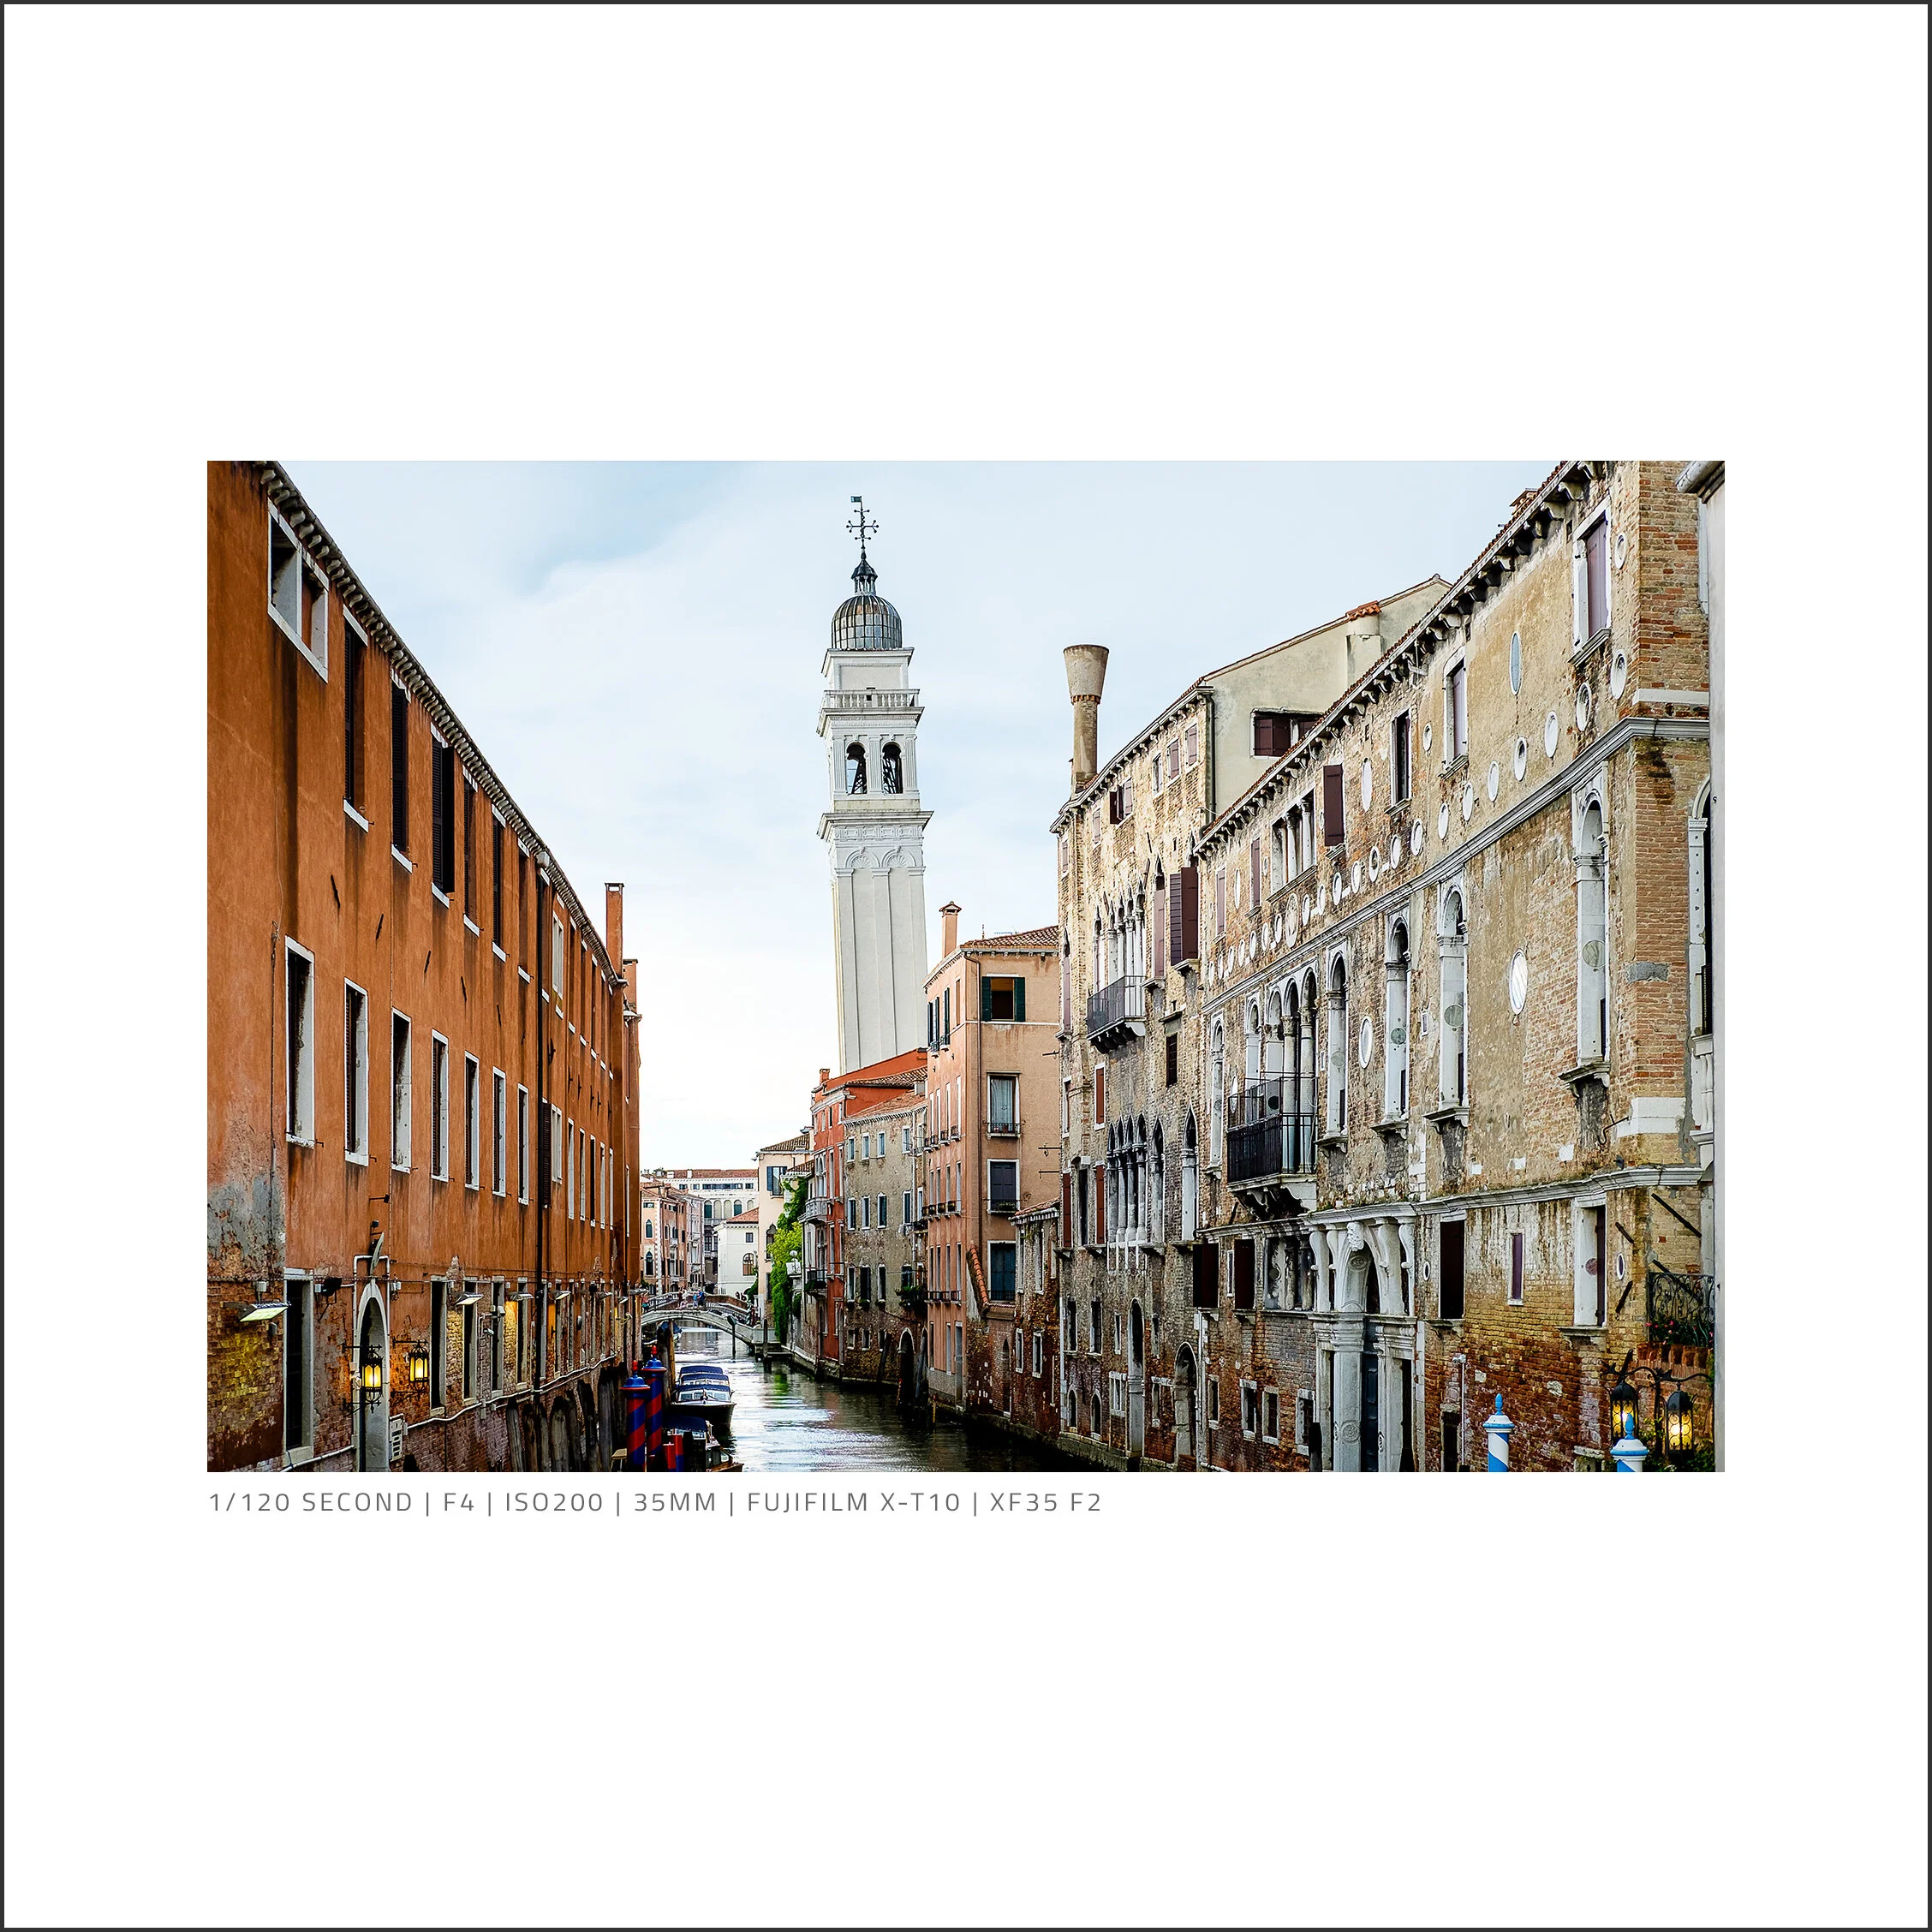
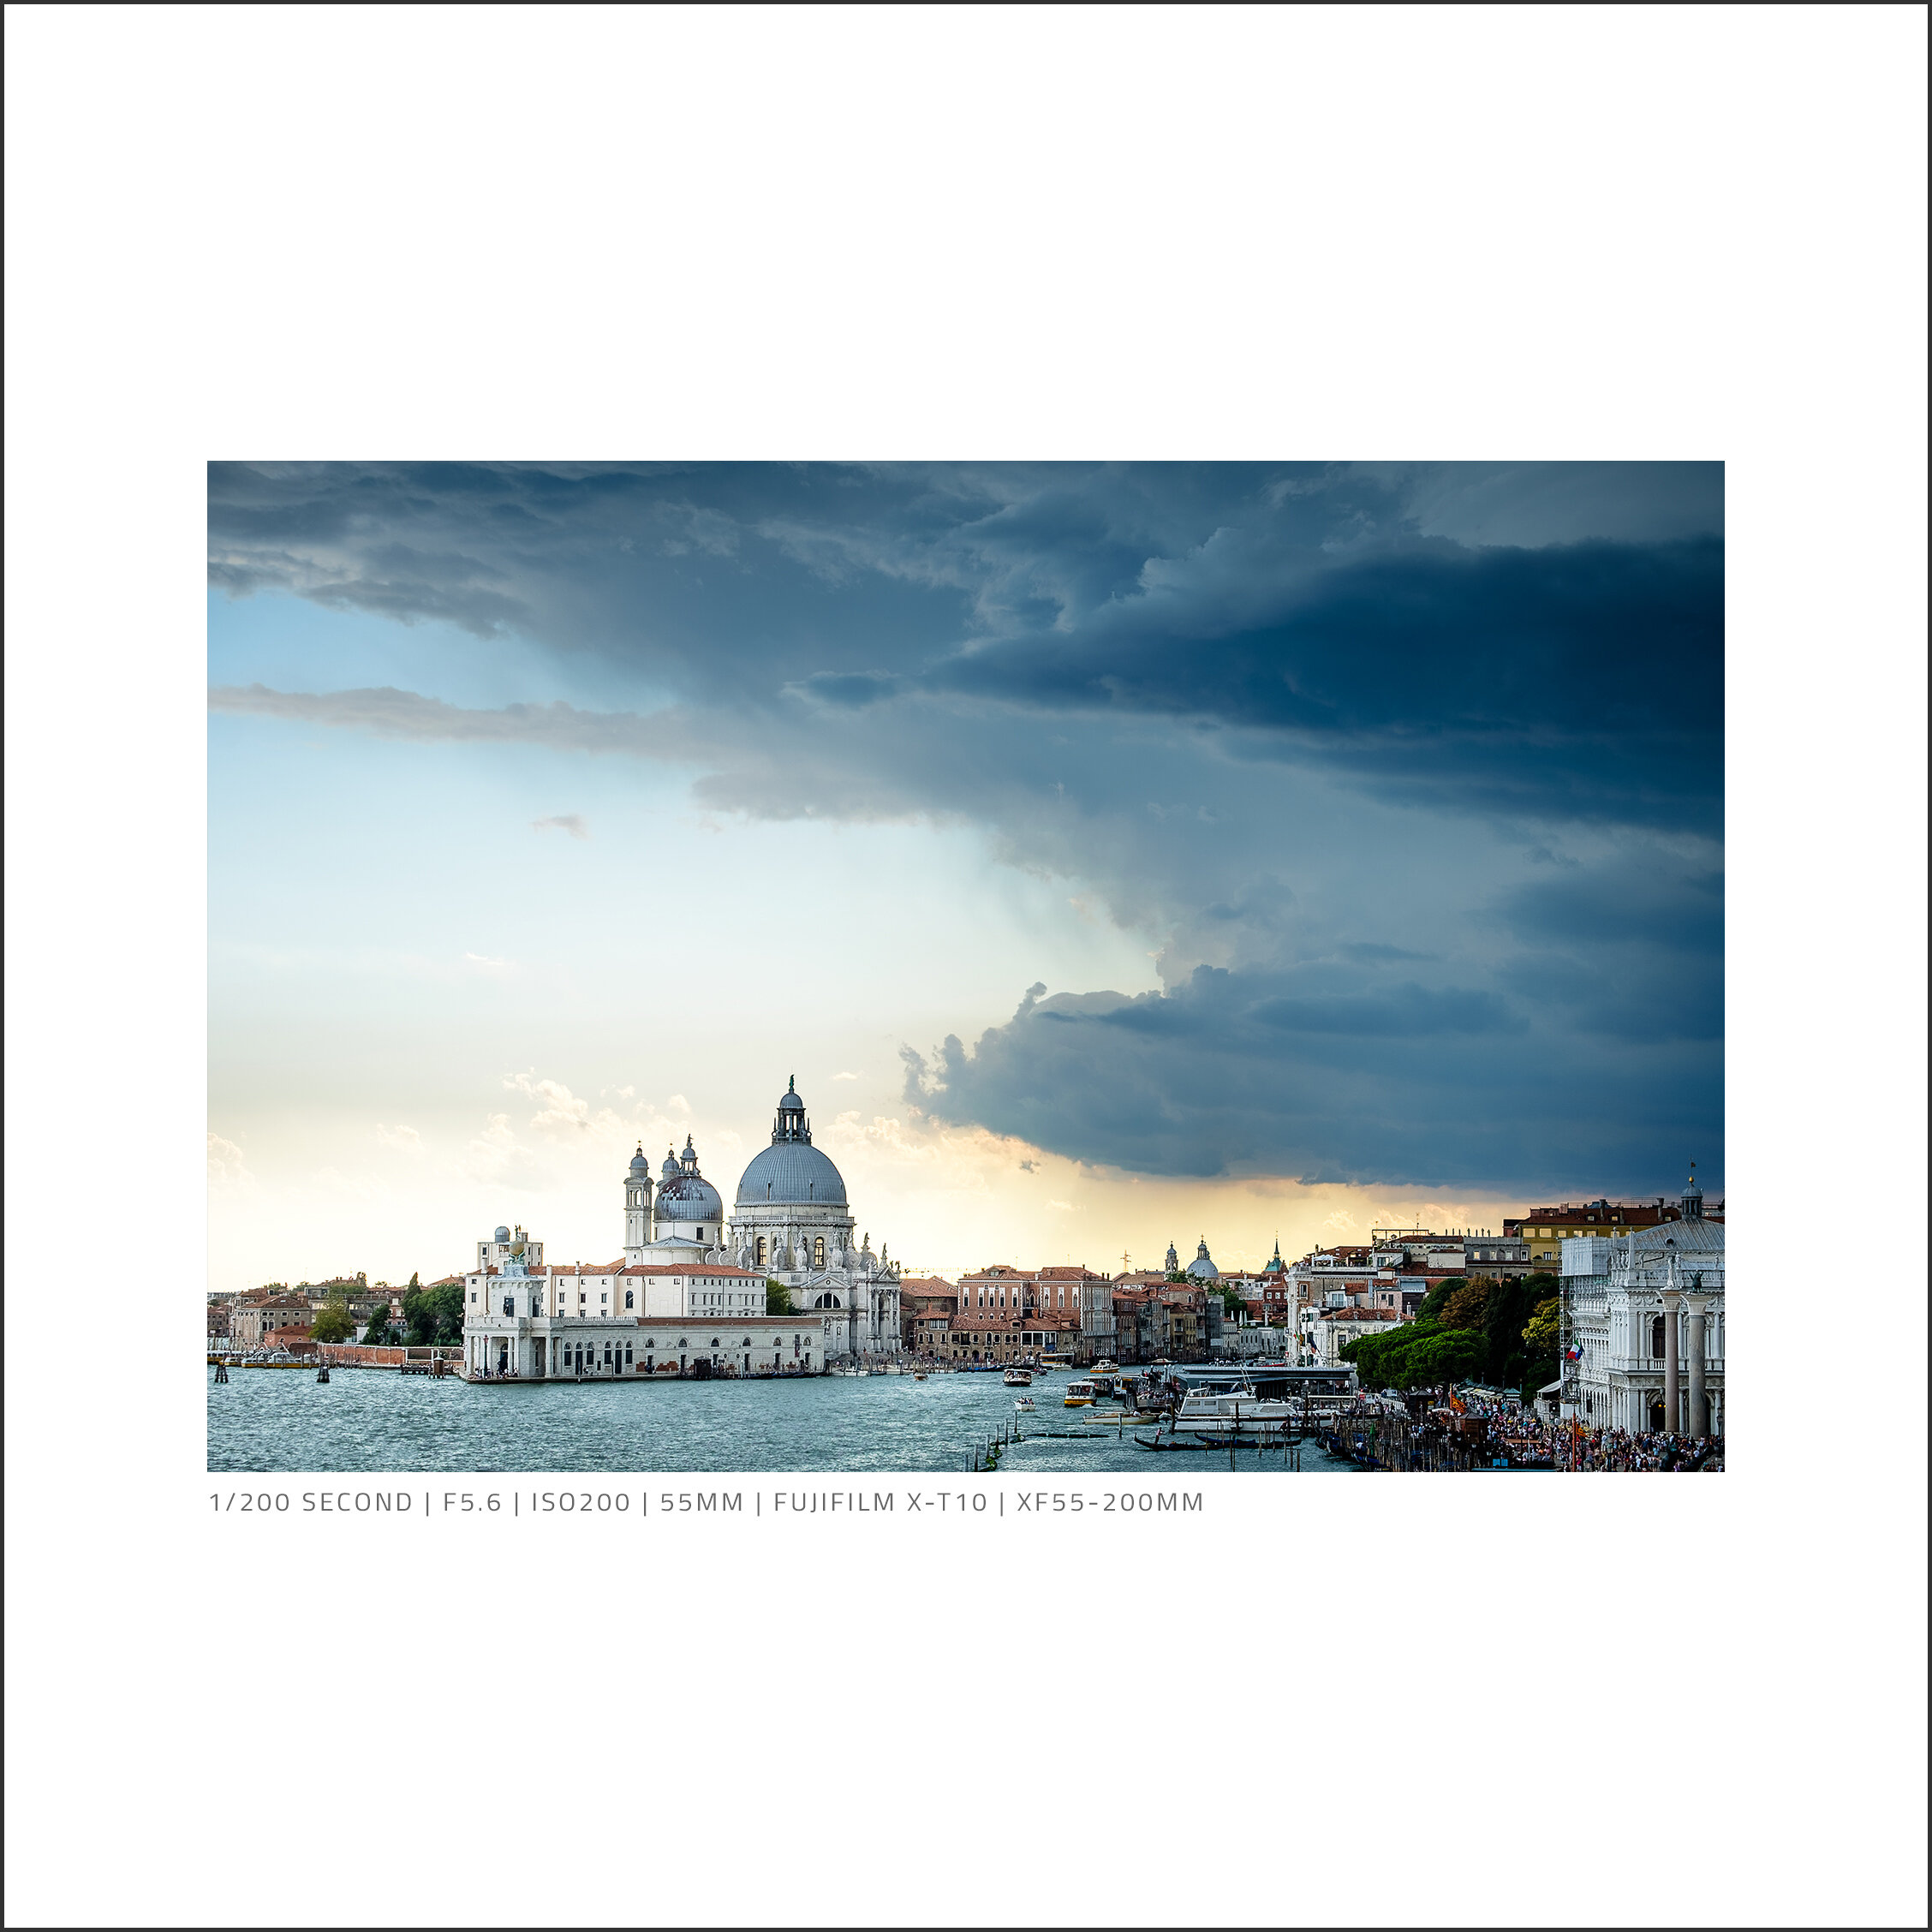
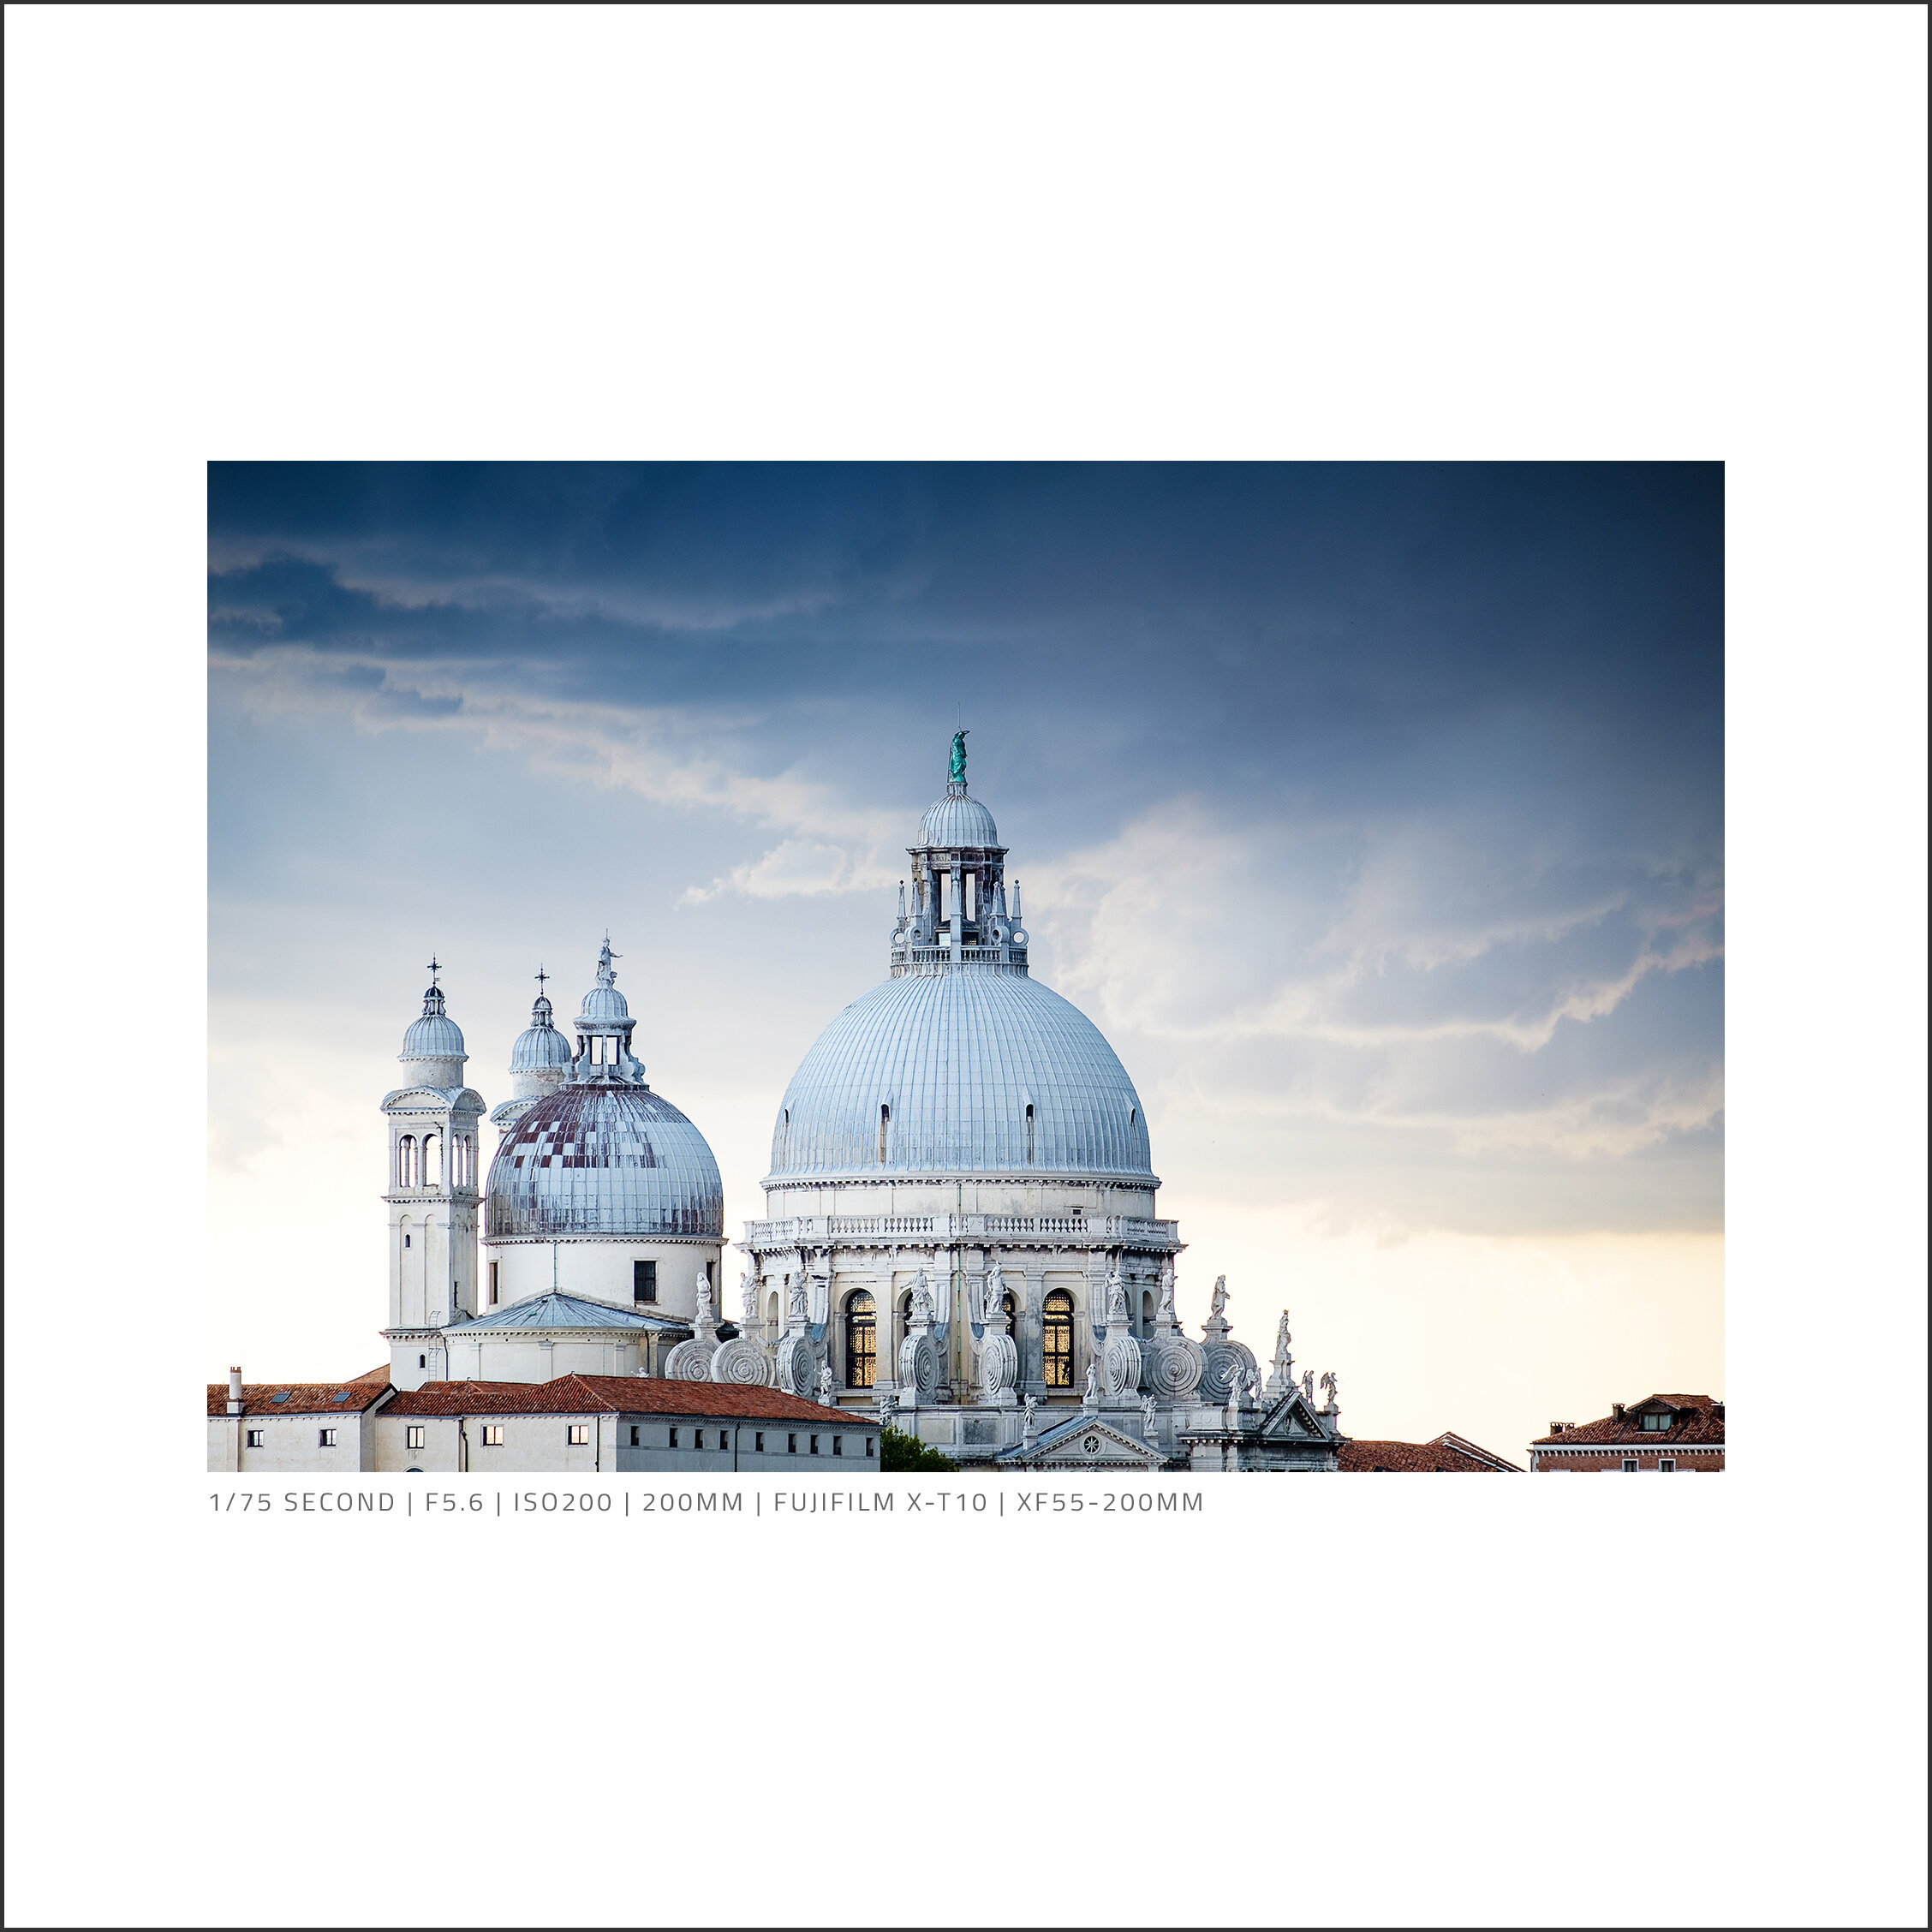
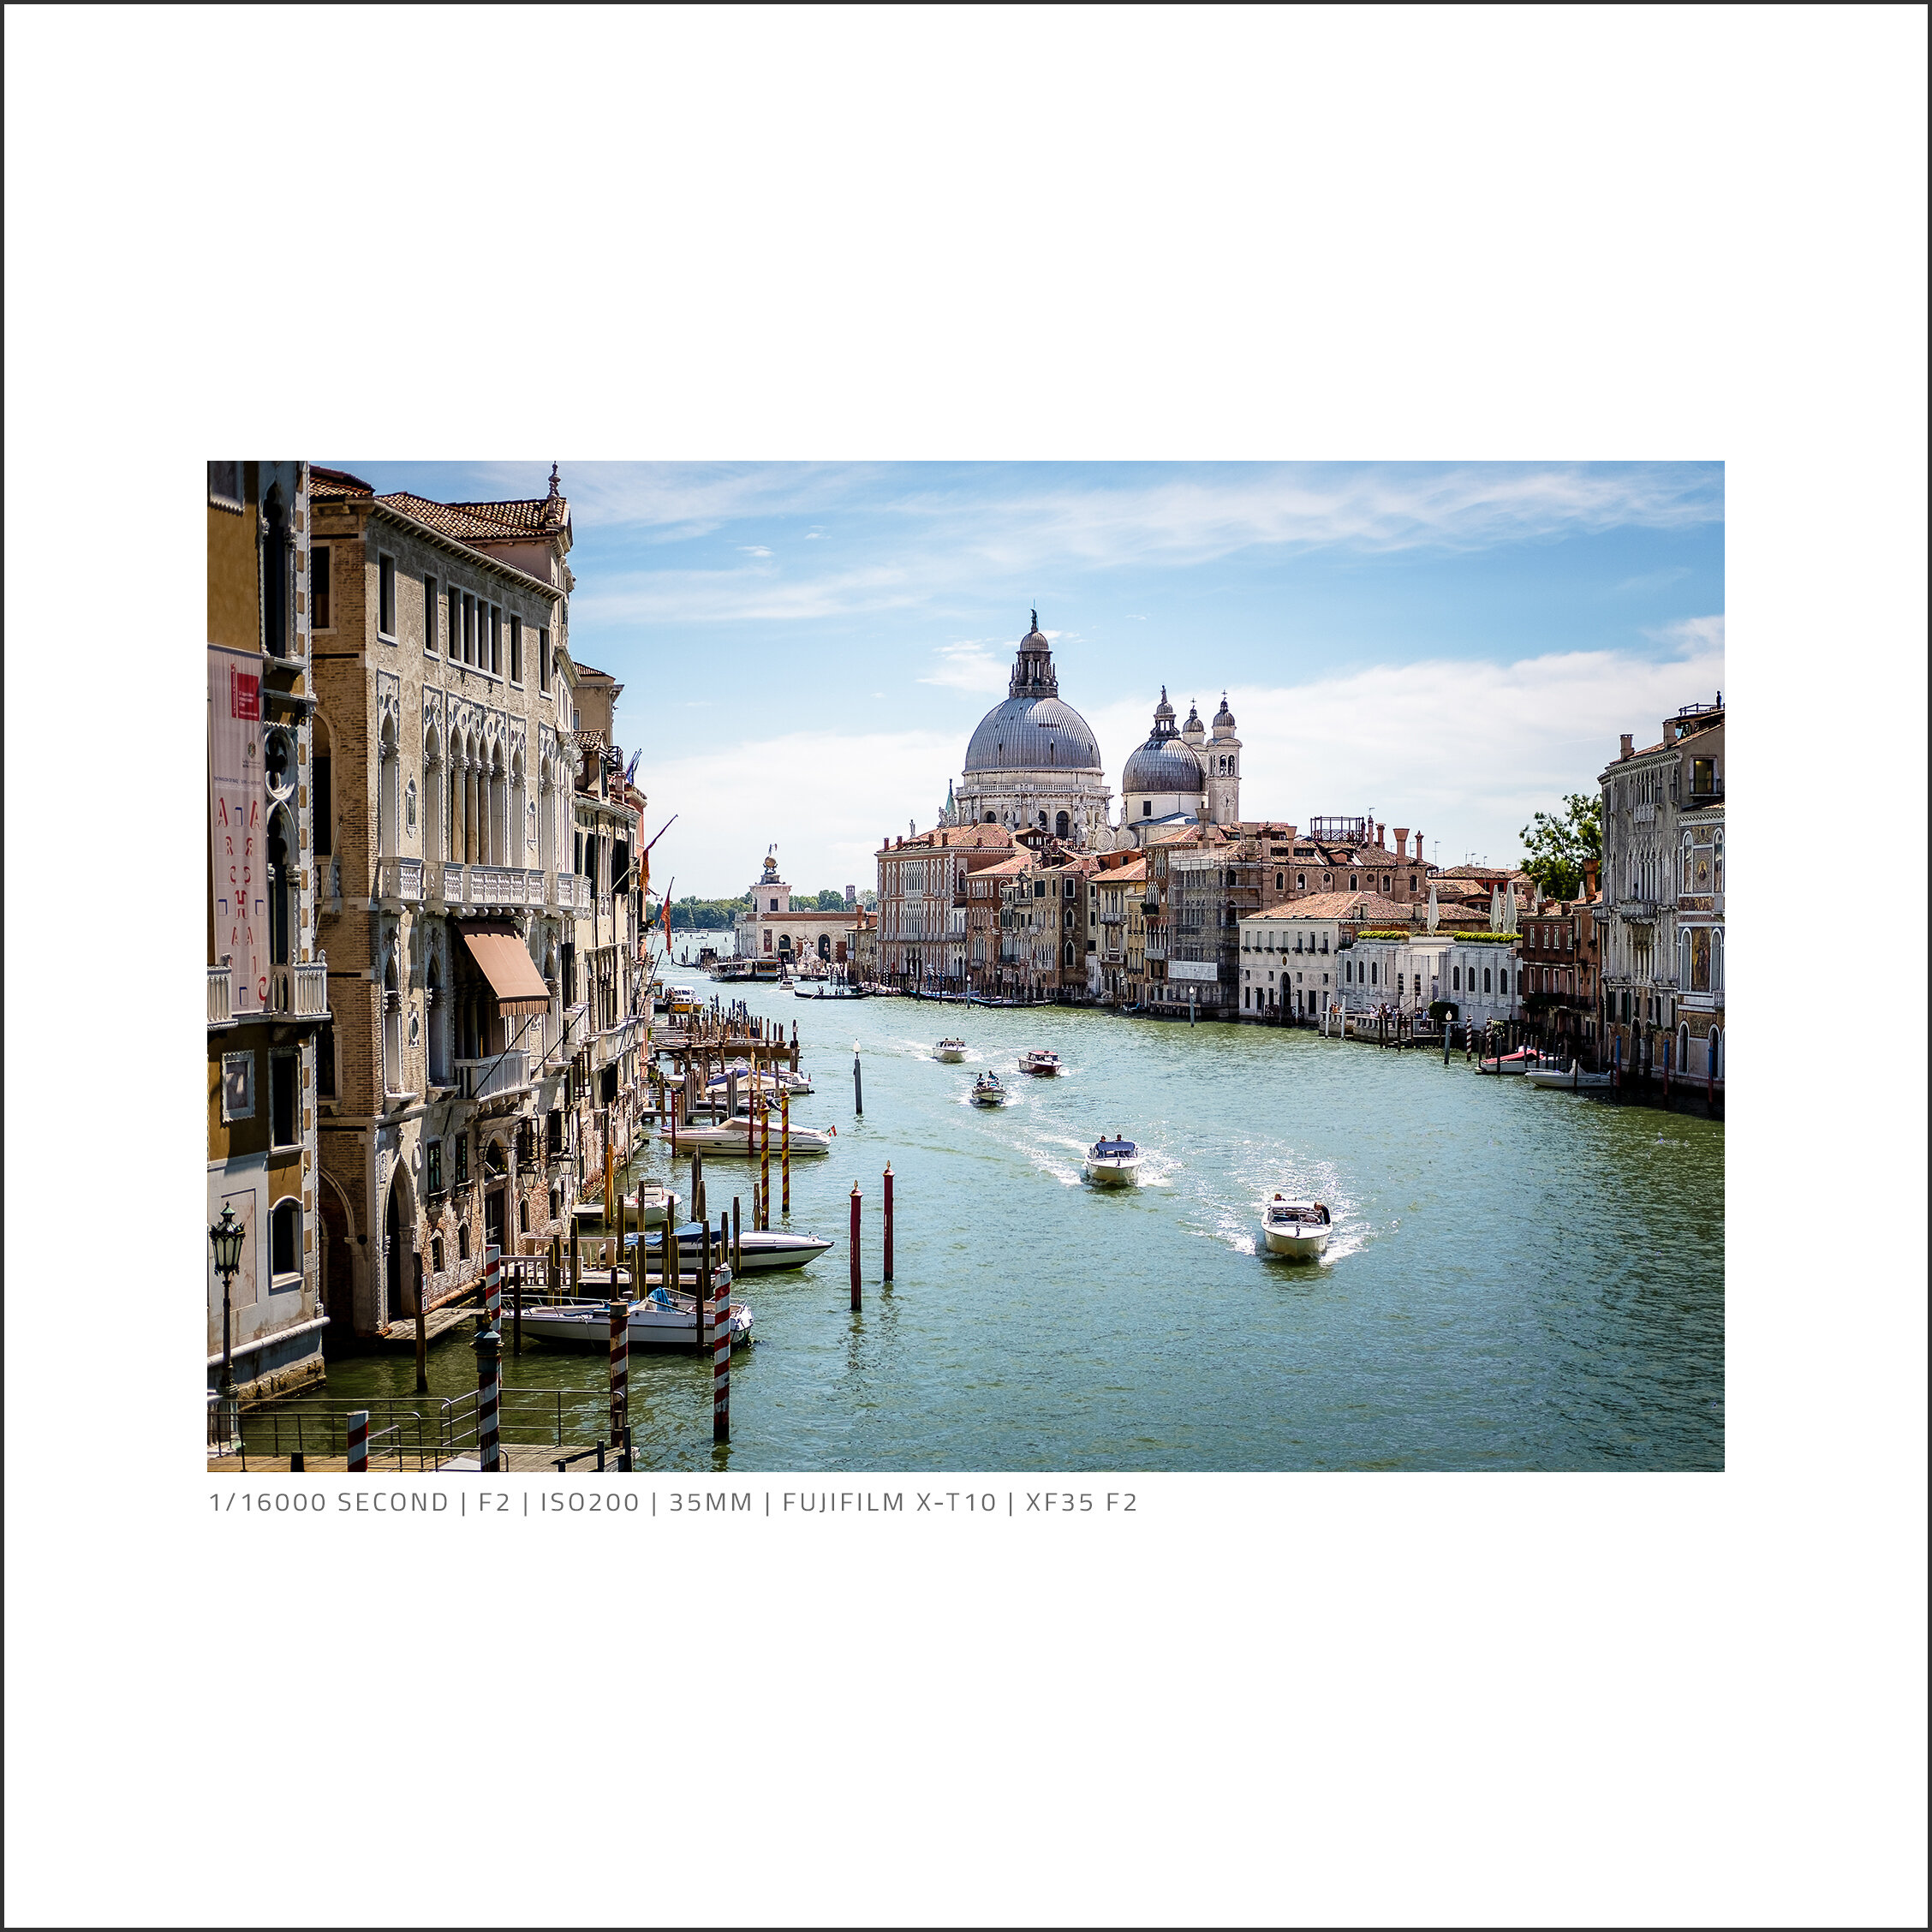
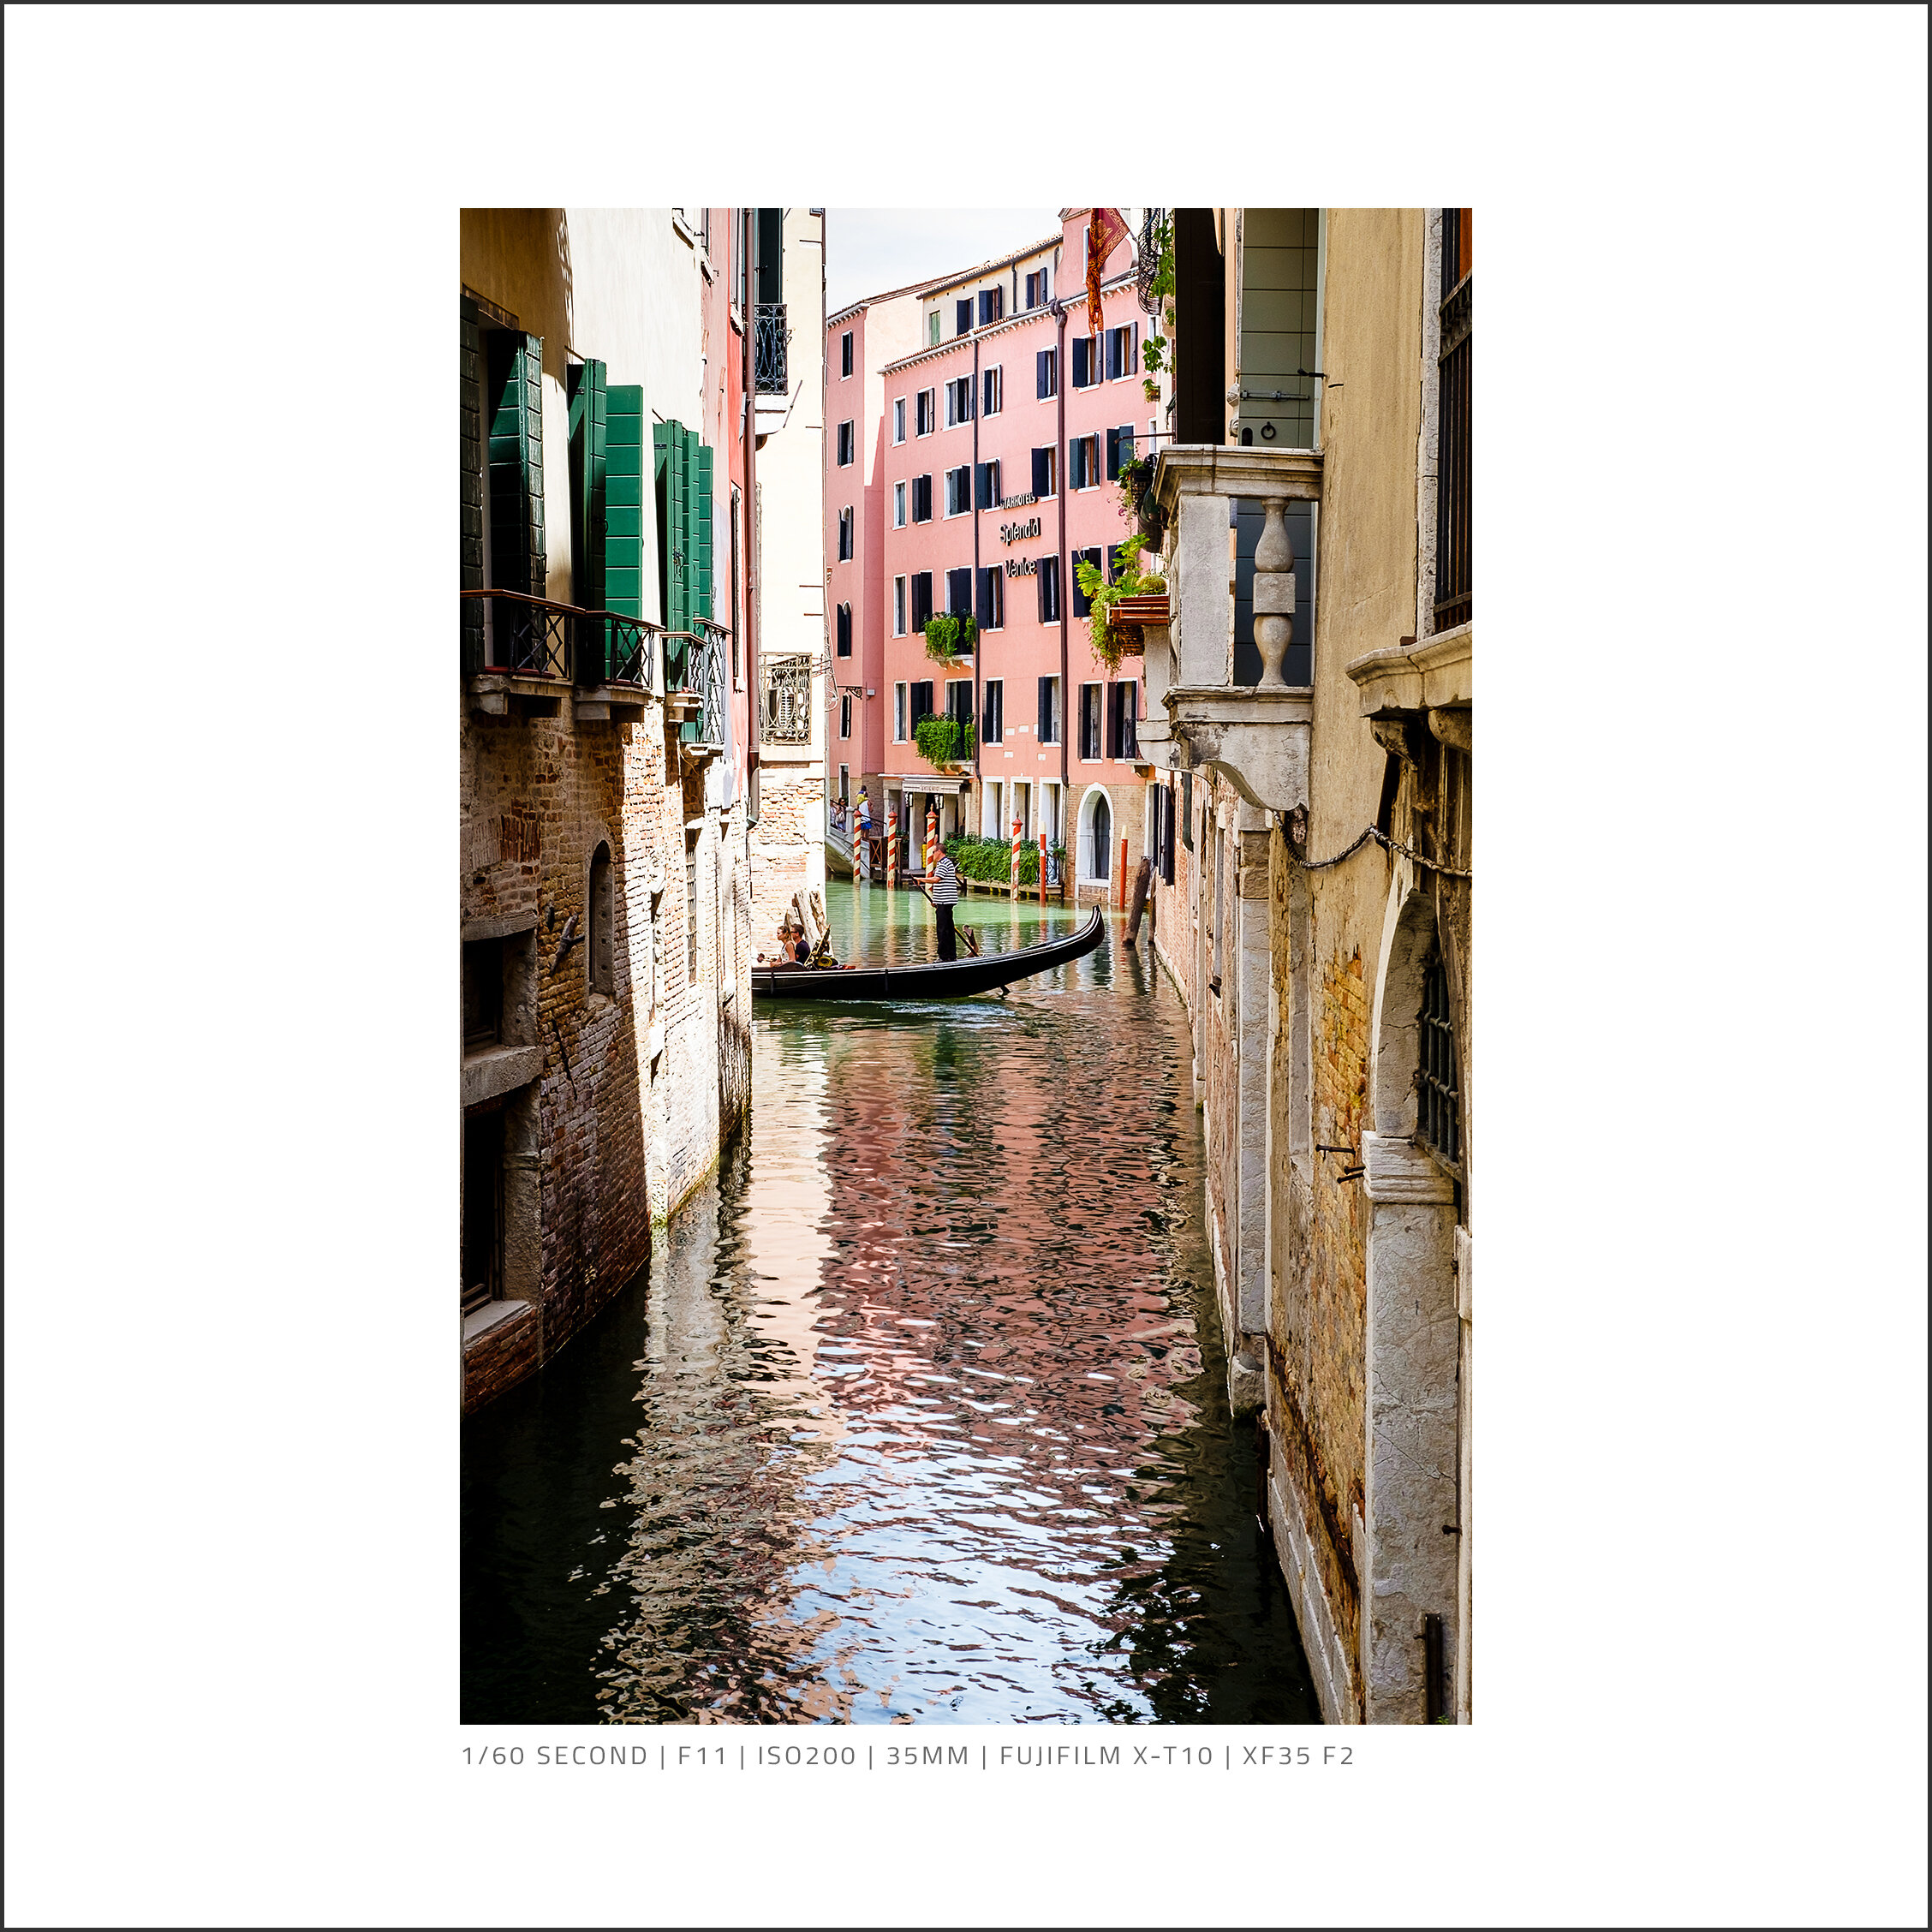
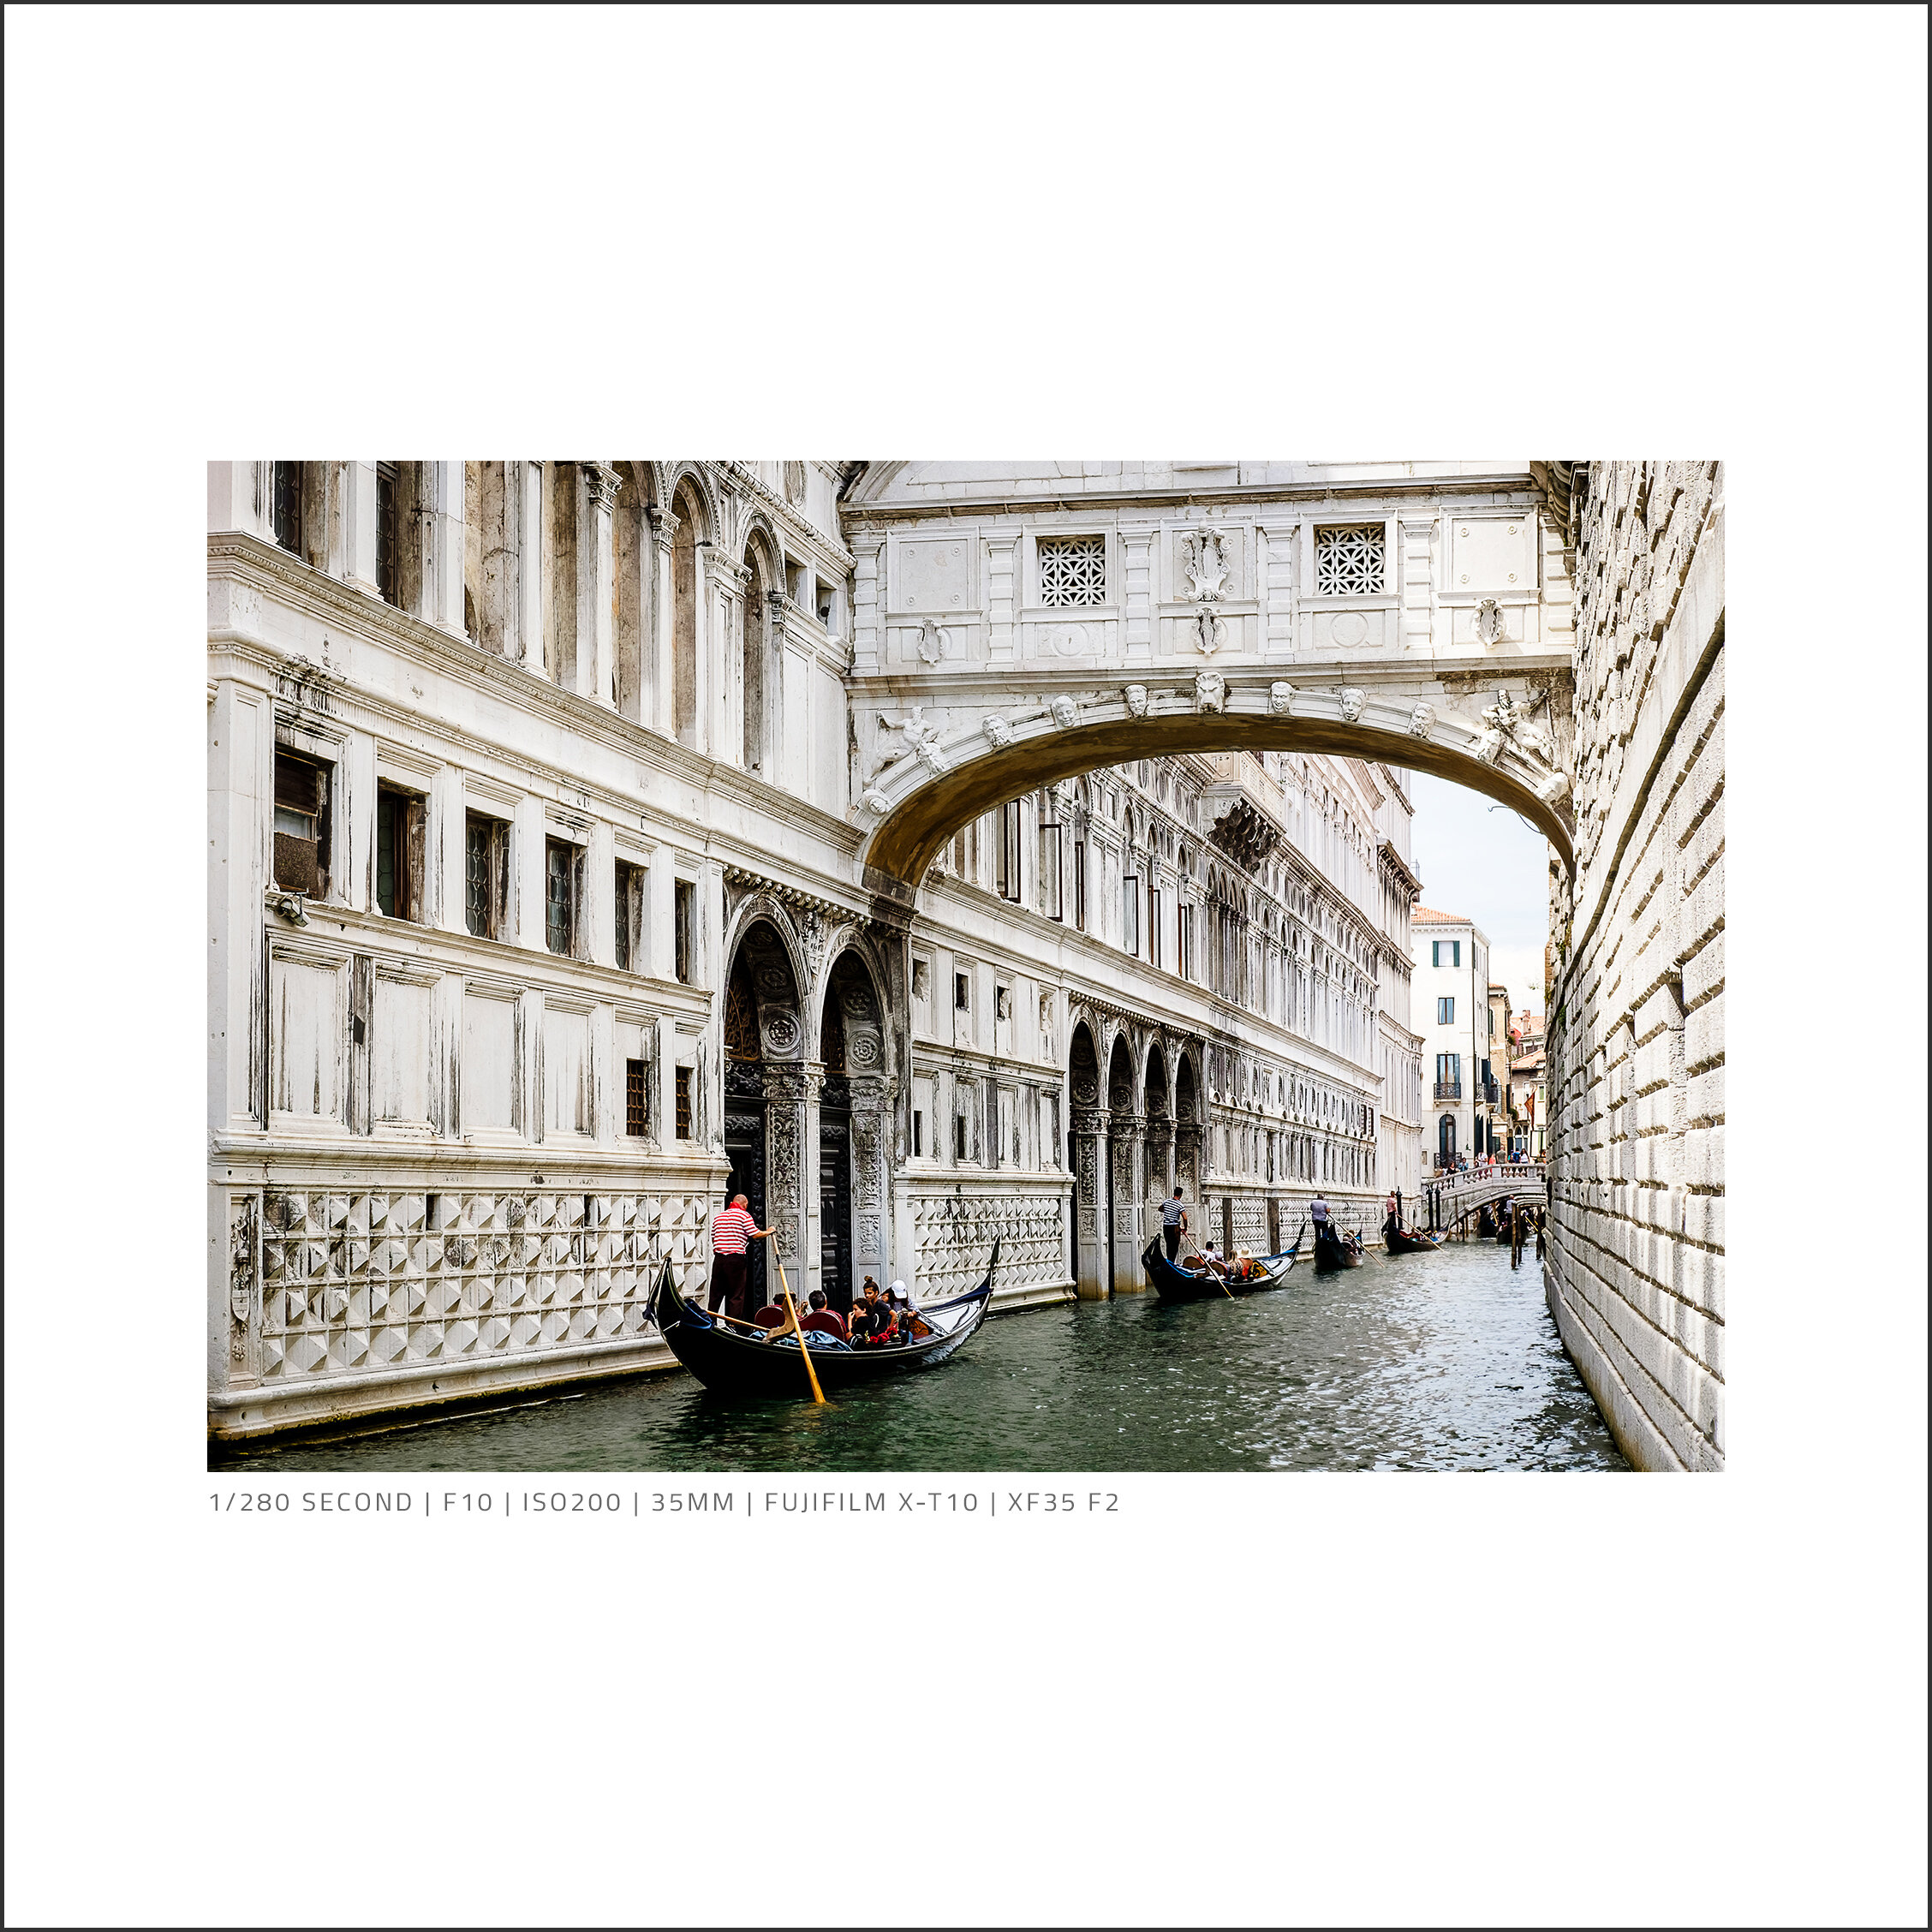
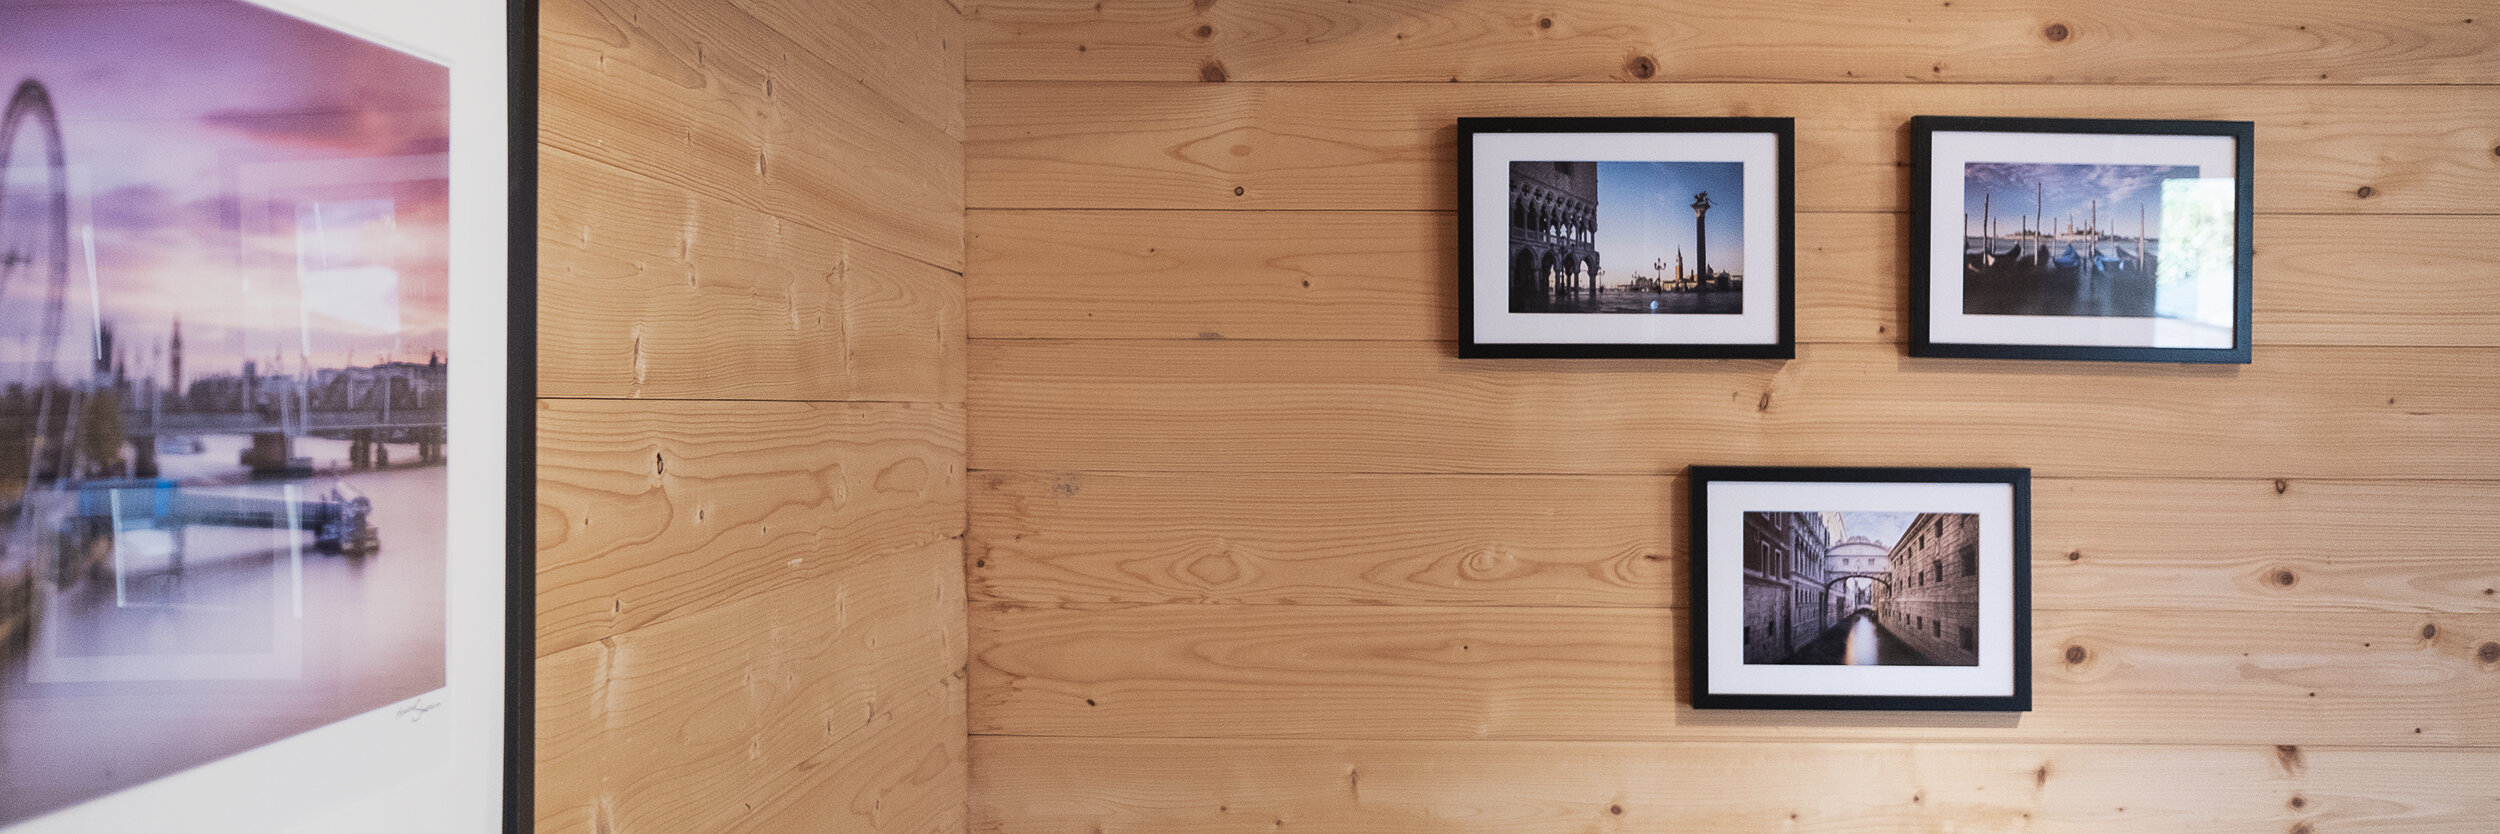
After the book, I wanted to print a few pictures a bit bigger and hang them on the wall in my studio. I chose 3 images that fit together and printed these on my Canon Pro-10s printer. I chose these three images in particular as not only are they photos of what I think shows off the beautiful city, but they also fit well together visually. All three were taken around the same time, early in the morning and each has strong blues from the sky and warm oranges from the rising sun.
While preparing the images for printing, I increased the vibrancy, added a little sharpening and brightened the images by around a stop of light. Once printed, I used frames with mounts in the same style as my other prints on the studio wall and hung them as shown in the photo below.
If you want to see more photos I took in Venice, check out my Weekend in Venice project which includes lots more photos and information about the final prints. The project page can be found here: A Weekend Photographing Venice.
Printing my Weekly Photo Series
One advantage of publishing a single photo each week is that the numbers are low enough to make printing the entire collection manageable. When I kick off a project or in this case a photo series, I immediately think about the project end game and that will include what plan I will have for the work I produce.

As with the Weekend in Venice project, I wanted to create something I could grab in a pinch and review all of the photos I produced for the series so, in keeping with the same size and style as before, I put together the Weekly Photo 2019 photo book below.
Although I share a photo on this site and social media each week, this book was for me as above all else, this is still a personal project and for all of the work that goes into producing all of the posts and choosing the photos, I wanted something I could keep and potentially recreate each year as I build up a convenient collection of my work.

I heard a quote on a podcast I was listening to recently from a photographer/teacher called Katrin Eismann and she said: “The truth is revealed when the ink hits the paper” which nicely sums up one of the reasons I also print my photos onto A3 paper.
As with the book, every photo I publish each week also gets printed. Although I love my photo books, seeing and holding your work printed in A3 or larger allows you to appreciate the photos in all of their high-resolution glory but importantly, it highlights issues with the print you may not have noticed on the computer such as compositional distractions or errors introduced when the photo was being processed. I’m no exception as I’ve previously been forced to take an image back into Lightroom or Photoshop to fix a problem found only after I had printed the photo. It’s frustrating at the time but I want these prints to represent my best work.

I print my photos on a Lustre paper which I find suits my style of photography well as the paper is not too glossy but the resulting image still has good contrast and a nice sheen to it and works well when mounted and framed behind glass.
The only problem when printing all of these photos in A3 is how I store and keep them safe. I’m keen to hear what others do to store their prints but currently, I use an A3 black presentation box which has enough room to hold around 60-70 prints all separated by a sheet of acid-free tissue paper. I don’t really know the long-term effects of the photos that sit at the bottom of the pile with all of the weight pressing down but time will tell I guess and for now, it’s the best option I can come up with.
Why every photographer should print their photos
So, I have talked a bit about my personal photo printing but if you still need help convincing to get your images off of the computer and onto paper, then here are some reasons why I think you should give it some serious thought.
#1 There are so many print options to choose from
As I mentioned earlier in this post, when I grew up, print options and finishes were incredibly limited and most photos would end up in a shoebox in a cupboard. We are so lucky to live in an age where there is literally a different print option for every photographer. If you want to create a book like I have, great, what size do you want? How many pages? What cover style? If I wanted to print a single image large and hang it on my wall, do you choose a traditional framed print or do you create a modern, vibrant acrylic or aluminium print? Don’t even get me started on how fun the Fujifilm Instax system is. With so many options, choosing the best format for your work has never been easier.
#2 Prints make a great backup
Now, I don’t strictly buy into the fact that one day all of the electricity can go off and along with it your photos will be lost if not printed as truth be told, if we all suddenly lost power, I would be much more worried about surviving than my photos of London. But that being said, if for some reason I was to lose my digital copies in some freak data loss situation, having my best work printed means they couldn’t be affected and I would still have a copy of my photos should the worst happen.
#3 Making a good print of your work means you get to learn a new skill
Ok, so technically yes, you can just grab one of your photos and upload it to the cheapest online print lab and order without giving it much of a thought and if that works for you, then happy days but, if you really want to make sure your printed work looks its absolute best then learning the steps needed to prepare your files for print is essential. This might include understanding why prints might come out darker than your screen or digging further down into colour science or print profiles. This may all seem a bit complicated to some but for those who want to spend the time to understand all of this will stand the best chance of getting a print that properly reflects the work they see on their screen.
#4 Printing your photos does not have to be expensive
Truth be told, after a very limited amount of research, I can’t find much in the way of what a print costed 20 years ago compared to today but one thing I do know is that you no longer have to print an entire roll of film just to have a few good photos. You can now walk into a high street lab with just a selection of your favourite photos on your phone and hand them over or upload just the photos you want to be printed to an online print lab, confident in the knowledge that the prints you get back will be keepers. This selective approach means you no longer have to waste money on printing photos that end up in a shoebox in the cupboard, never to see the light of day.
On the flip side, printing can be an expensive undertaking. If you choose to print on fine art paper or choose to buy a professional printer and print at home then you are going to make a more considerable investment but, the key-word here is “choose”. You can choose to spend more money but with so many options at either end of the price spectrum, you just don’t have too.
#5 Print for prosperity
Apart from the photo books I mentioned above that showcase my personal work, I have also printed many family albums in the form of photo books covering a great holiday, an event or a period of time. For example, I started creating yearbooks for my kids when they were born, converted my wedding album to a photo book and I now have close to 30 photo books and counting on my shelf which I hope one day will be on the shelves belonging to my children and maybe even their children’s shelves and so on. A photo book won’t suddenly go obsolete because the picture format is no longer supported or the social media platform they are hosted on suddenly shuts down, so, over long periods of time, the only way to ensure your photos remain accessible and if you’re lucky, passed down the generations is to get them printed.
#6 Printing your work can make you a better photographer
I mentioned earlier in this post how printing my photos bigger will emphasise compositional issues, distractions or processing errors and I think that’s a good thing. As you hold your printed work in your hands and study it, what you are doing is logging both the good and the bad within the image so if there is something you spot that works well, you know to continue doing it and on the flip side, learn from any mistakes you made while taking the photo.
When I post photos to social media sites such as Instagram, I know that most people will be viewing the images on a mobile device and this smaller form-factor is far more forgiving to issues within the photo but when I am out taking photos knowing that the photo I take could end up as a large format print, I know I have to take extra care while taking the shot, making sure the photo is as good as it can be as any flaws will be on full show once the ink hits the paper.

Should you print at home or use a professional print lab?
Before I wrap this post up, there is one last point I want to touch on and that’s the decision to print using a professional print lab or to invest in the equipment needed to make prints at home. This is a long, complicated subject but I will try to summarise why you might choose one over the over with as fewer words as possible, so, here it goes.
Printing your photos using a professional print lab
So, let's start with why you might use a professional print lab. When printing using a lab, you are effectively outsourcing the task to print your work which depending on what you are trying to achieve could be a good or bad thing. Although you are giving up the control to someone else to produce the final print, if you prepare the work properly and choose a good lab using recommendations you trust and conducting your own tests, you can end up with some quality prints easily enough. On top of this, compared to printing at home, the initial outlay is low. You don’t have to pre-purchase any equipment which is an advantage but if you have issues with the print, the turnaround time and delivery charges can add up.
Printing your photos at home
Printing at home is initially more time consuming, more technically complicated and certainly carries far higher up-front costs as you need to buy the printer, paper and inks before you can even start. Like photography itself, I regard printing my own work a craft in itself and one that needs time to explore and learn to get the very best out of it which can involve learning topics such as printer profiles, screen calibration, etc. The advantages of printing at home are that you retain full control of your final print and you can get your work printed faster, in particular, if you need to tweak and re-do.
Print your photos and bring them to life
What we do with our digital photos will continue to evolve and who knows what the next best thing will be but one thing I know for certain is that we will all continue to view most of our photos on a screen, in many cases taking only seconds to process the image before we skip to the next.
It doesn’t have to be this way for all of our photos. For those that evoke a special kind of emotion, be it fond memories, loved ones or simply a picture you are proud to have taken, bring those select few to life by making a physical print and displaying it in your home or a book on your shelf rather than being stored and forgotten on your phone or computer lost among the many thousands of other photos you probably have there.
I hope this post has gone some way to both inspire and convince more people to print their work and if you have any more tips or experiences you want to share with the community, feel free to write a comment below.

The View from St Paul's | Weekly Photo #19
St Paul’s Cathedral opens late for a few days in August so I booked my tickets and headed up to the top of the dome to capture this view of the City of London at sunset. Jump into the post to read how I got on which also includes a top tip to allow you to revisit St Paul’s for a further 12 months free of charge!
This week’s photo of the City of London was taken from atop the dome of St Paul’s Cathedral as the sun was setting on a gloriously warm summer’s evening. During the winter months, this view can be captured at sunset but it can be rather cold and windy up there which can make it a rather unpleasant way to spend an evening so when I spotted that the cathedral would be opening late each Thursday during the month of August I immediately booked my ticket!

Fujifilm X-T30 | XF18-55mm | 18mm | 1/5th Second | f/5 | ISO160
TOP TIP: Although it costs around £17 online (£20 on the door) to visit the Cathedral, UK taxpayers can gift-aid the cost of the ticket and receive 12 months free access from the time of your first visit. It’s a fantastic deal if you want to visit again within the year.
Photographing the City of London from St Paul’s Cathedral
I also featured this location to shoot from in my recent blog post titled My Top 10 Photography Spots in London. Knowing I wouldn’t be allowed a tripod and space might be a bit tight, I decided to travel light and pack a small bag with the Fujifilm X-T30 and a couple of lenses, including the XF10-24mm I used for this particular shot.
As St Paul’s Cathedral only opens late four times during August, I assumed it might be a bit busy but I could not believe how busy it might get. I arrived for 7 pm and the queue was literally down the street! I was glad I packed light so I could move quickly and climb the 500+ stairs to get to the top without being weighed down too much by my gear. After getting to the top, I made myself as small as I could so other visitors could walk past me as I was shooting.
As the sun was setting and the light levels reduced, the shutter speed started to lengthen so luckily for me, the curve of the ledge allowed me to rest my camera and keep it perfectly still so I was able to continue shooting without the need to up my ISO or open up my aperture too much.
As the city lights switching on, the scene really came alive and I was able to capture this sunset/early blue hour shot with the city lights adding interest in the scene. The last of the sun’s light reflecting off the high-rise buildings and a hint of the blue hour light finishes the photo off nicely. This is easily one of my favourite photos taken so far in 2019.
Why You Should Print your photos
I am a big fan of printing photos as I do believe a tangible print you can hold and enjoy is far and away, the best way to show off your work. It was an easy decision to print this image which I did so along with a few other photos I have taken recently and I must say, although the photo of the print below doesn’t do it justice at all, it looks fantastic in person!

So, if you don’t usually print your photos, I thoroughly recommend you start. There are so many great online photo labs and costs are normally reasonable for paper printing. Please feel free to drop me any questions that might help you kick start your own photo printing journey.
Talk to you soon.
Trevor
This post is featured in my Weekly Photo series where I post a new photo every Monday. To have this delivered directly to your inbox, you can subscribe to the mailing list here.

How I Printed This Image of The Shard London
I love to see my photos printed but for some, printing at home can be both daunting but equally rewarding. In this blog post I walk you through the simple steps I took when printing my own London cityscape photo of The Shard on Fotospeed’s Metallic Gloss paper using photoshop and my Canon PRO-10S printer.
So, last year I decided to buy my first professional printer in a bid to start printing my own images at home. I was at the UK Photography Show in Birmingham and I brought the Canon PRO-10S. This printer had a show exclusive £150 cash-back on it’s already reasonable purchase price of £500 so in end I paid £350 for it. Bargain!
Although there are cheaper and more convenient ways to get my images printed by using third party printing labs, I wanted to own the entire creation process from capture to edit and then print with the aim to experience more of my work in a tangible print form while careful selecting the paper and styles to get the print exactly how I want the finished article to look.
I’m not going to cover in this post how I originally edited the image I chose to print, nor the process around calibrating screens as this is a topic for another day. In this post I will run through how I prepared the image to print and talk about some of the settings I used along the way. If you want to read a post covering how I edited a print from RAW to finished image, see this blog post:
Editing Sunset at The South Bank
Below is the photo I decided to print. This is a long exposure photo I took of The Shard in London from across the River Thames. This is a great spot to capture an iconic view of London and what’s great about it is that although the vantage point is private property on the grounds of the Tower of London, they don’t have restrictions around the use of tripods which can be an issue elsewhere in London. That being said, the usual rules should still apply when using a tripod in busy areas such as not getting in peoples way and being polite and thoughtful of those around you.

Fujifilm X-T10 | XF10-24mm | 13mm | 100 Secs | f/13 | ISO200
Step 1: Choosing the right Paper
I learned quite quickly that it’s particularly important to ensure the photo matches the paper it is printed on. Some images just won’t look at their best when printed on a high gloss paper and likewise, other images wouldn’t be at their best with a matt finish. For that reason I chose to print this image in particular as with the reflections in the glass and highlights in the clouds and water, it was crying out for a glossy, vibrant finish and I just happened to have recently bought some of Fotospeed’s Metallic Gloss paper to test out. See here for Fotospeed’s own description of this particular paper:
Metallic Gloss 275 is a flat, stiff, middle-weight paper with a metallic effect gloss finish. The paper has a neutral white base and an instant dry, microporous coating. This paper has a wide colour gamut and a high D-MAX which delivers beautiful images, both in colour and B&W.
Step 2: Preparing the Image
Now with paper and image chosen, I went about preparing the image for print in photoshop. Since this image is already processed, I didn’t need to do a lot to it to get it ready but I do think these steps are crucial to ensure the image looks its best in print.

Start with the highest quality image you have: When I edit photos, I always export a gold master copy in TIFF format. TIFF does not compress the image and from this gold master, all copies of the image can be made from a consistent baseline. I will create lower resolution copies for web or like in this instance, edit a copy in readiness for printing.
Brightness and contrast: There is a big difference between how an image is illuminated between on screen display and print. On the screen, the image will be back-lit and appear brighter whereas on print, the image is illuminated via reflective light so it will react to the environment. If the room is dark, the print will be dark. As such, I always increase brightness and add a little contrast to my images before printing. For this image I increased brightness by 20% and contrast by 10%. As always, watch those highlights and shadows by using the histogram and make use of a layer mask to mask out the effect where needed.
Resize the image: I always resize my images at this stage to ensure the image is at the right size to print to prevent resizing taking place at the print stage. I will use the Image->Image Size option in the menu and use the appropriate recommended settings to ensure the image is the exact dimensions I want to print the image. I used the following settings (also see image above):
Width = 11 inches (to print on A4 paper with a small border)
Lock aspect ration to auto adjust the hight
300 pixels per inch for print resolution quality
Reduction option to preserve sharpness on the resample option
Sharpen the image: I always sharpen my images a little when I print. In Photoshop, I create duplicate layer of the image, and I use the High Pass filter (Filter->Other->High Pass) add a 1-2 pixels to taste being careful to not to add too much to keep the image looking at its best. In this image, I added 1.5 pixels. Next, to allow the base layer to show through, change the blending mode to Overlay on the layer with the High Pass filter applied.
Vibrance and Saturation: The last thing I do before I print is add a little more vibrance and saturation as I notice on colour prints, I can lose a little bit of the punch in the image so I like to add this back a little. With another Adjustment Layer, I added 15% Vibrance and only 5% saturation. Be very careful not to overdo these effects but they need to be adjusted based on the image being printed.
That’s it, the image has been prepared for print. See below for a before and after image. As you can see the effect is noticeable but not extreme and will ensure the image looks fantastic when printed.

Step 3: Printing the image

So, now it’s finally time to get the ink to paper!
Before I printed my image, I made sure that I downloaded and installed the correct printer/paper profile from Fotospeed’s website. This is important to ensure the print, paper and ink all match which goes a long way to ensuring the colours render correctly when the image is printed.
So, still within photoshop and once the print dialog box was open, I chose the following settings:
Selected the correct printer
Ensured Photoshop was handling the colour
Chose the correct printer profile mentioned previously.
Centred the image on the paper to make an even boarder
So off the printer went and out came my image. The image to the right was taken as soon as the printing had finished.
Tip: Leave the print at least a few hours before handling to ensure the ink fully dries. The tones may also change a little too so don’t inspect the finished print until it has had tome to dry.
So there you have it….
Below is the final print in all it’s glory. Although this photo doesn’t do it justice as it looks a little too blue/purple, it looks fantastic in person and much more alike to the image at the top of this post.

It was far from a comprehensive overview of the printing process but to some it is quite daunting to try and this post shows that it can be done well with minimal steps.
Feel free to add any of your own tips to simplifying the print process in the comments below.
Until next time.