
BLOG ARCHIVE

The Long Exposure by Gary Turner | My Photo Bookshelf
This A5 zine is dedicated to the art of long-exposure photography with 24 beautiful black and white photos by photographer Gary Turner.
I came across Gary Turner and his A5 zines when listening to him being interviewed on Euan Ross’s Biblioscapes podcast. With what seems like the rise of the Zine in recent years and with a particular fondness for long-exposure photography, I popped over to Gary’s website and grabbed a copy.
Author’s Synopsis
My (Gary Turner’s) first foray into the world of self-publishing resulted in this limited edition zine comprising 24 pages of beautifully calming black and white, long exposure imagery of water.

My thoughts about the book
What I like about the zine format is how accessible it is for both the reader and the book creator. Zines tend to be less expensive to make and subsequently buy, which means when I come across one I like, I’ll usually buy it there and then instead of adding it to my ever-growing list of more traditional, more expensive photo books.
It might be easy to assume that with a lower price point comes inferior quality and if this zine by Gary Turner is anything to go by, that’s absolutely not the case. The Long Exposure zine is a collection of 24 black and white, long-exposure photos all with one common theme. Water. The collection includes photos taken of natural streams and waterfalls to man-made piers and canals. With 200gsm silk paper pages, the book looks and feels a nice quality and the paper choice works well to ensure the pictures retain a healthy amount of contrast which, for the photos included is important.
I really like the collection of photos Gary has put together but there are a handful that really stand out to me. Rocker Pier (which is on the front cover) is fantastic. It’s an incredibly strong composition, simplified by the softening effect the long exposure technique provides but I think my favourite is the picture of Salts Mill Wier which I particularly like as the long exposure has resulted in some fantastic patterns in the water which in my opinion makes this good photo into a great one.
Being a smaller zine full of strong long exposure photos, it’s hard not to recommend this book but as it’s no longer in print, I highly recommend the eBook version which, at the time of writing is for sale. See the link below.
Book Details
Softcover
Size: A5
Pages: 24 pages of 200gsm silk paper
Availability at the time of writing: No longer in print but an eBook copy is currently available from: https://www.shutterspot.co.uk/product/the-long-exposure-zine/

Masters of Drone Photography | My Photo Bookshelf
At the time of writing, I’ve owned a drone for almost a year now and I’m always looking for ideas and inspiration to draw from. so, when I came across this book on Amazon, knowing how the “Masters” series of books is presented, I knew this would be a book I would enjoy.
At the time of writing, I’ve owned a drone for almost a year now and having other options in my camera bag to capture the landscape from a different perspective has been a lot of fun. With that, I’m always looking for new ideas and inspiration to draw from, and when I came across this book on Amazon, knowing how the “Masters” series of books are presented, I knew this would be a book I would enjoy.
The synopsis
Masters of Drone Photography orbits the world of 16 leading lights, each with a creative vision of how, where, and why drones should be used to create stunning photography. Through probing Q&A style interviews, beautifully reproduced images, captions telling the story of each picture, and detailed technical information, the reader is given an insight into the photographers’ working practices, from their career paths and inspirations, to the equipment and techniques they employ to create their breathtaking and visionary works.

My thoughts about the book
As I mentioned above, this isn’t the first book I’ve owned in the “Masters” series, I also have Masters of Landscape Photography on my bookshelf, so I know the general format of the book and particularly enjoy the questions posed to each photographer and the variety in the answers provided. This gives a useful “behind the camera” perspective and contains many hints and tips the reader can implement into their own work.
The general format is, there are 16 photographers featured in the book, each sharing 6 of their own aerial photos with a small caption alongside. On top of the pictures they share, the author of the book posed 8 different questions about their work. At the end of each section is a thumbnail of each picture and some technical details such as the done and camera settings used.
I enjoyed the variety of photographers included in the book, as with photos ranging from top-down pictures of whales in Hawaii to colourful, urban basketball courts in New Zealand, it opened my eyes up to what I could achieve when I’m out taking pictures with my drone.
Talking of the photographers, the quality of the pictures included really were top-notch. All are very different and all display their own unique take on this genre of photography. After each chapter, I would often put the book down and open the laptop to research the photographer further and in many cases subscribe to their social media pages to continue to follow their more recent work.
All in all, if you enjoy drone photography and want some creative inspiration, or just want to admire the work of other, established drone photographers, then I highly recommend picking up a copy of this book.
Book Details
Hardcover
Size: 230mm x 285mm
Pages: 176
Availability at the time of writing: Still in print and available from leading bookshops.

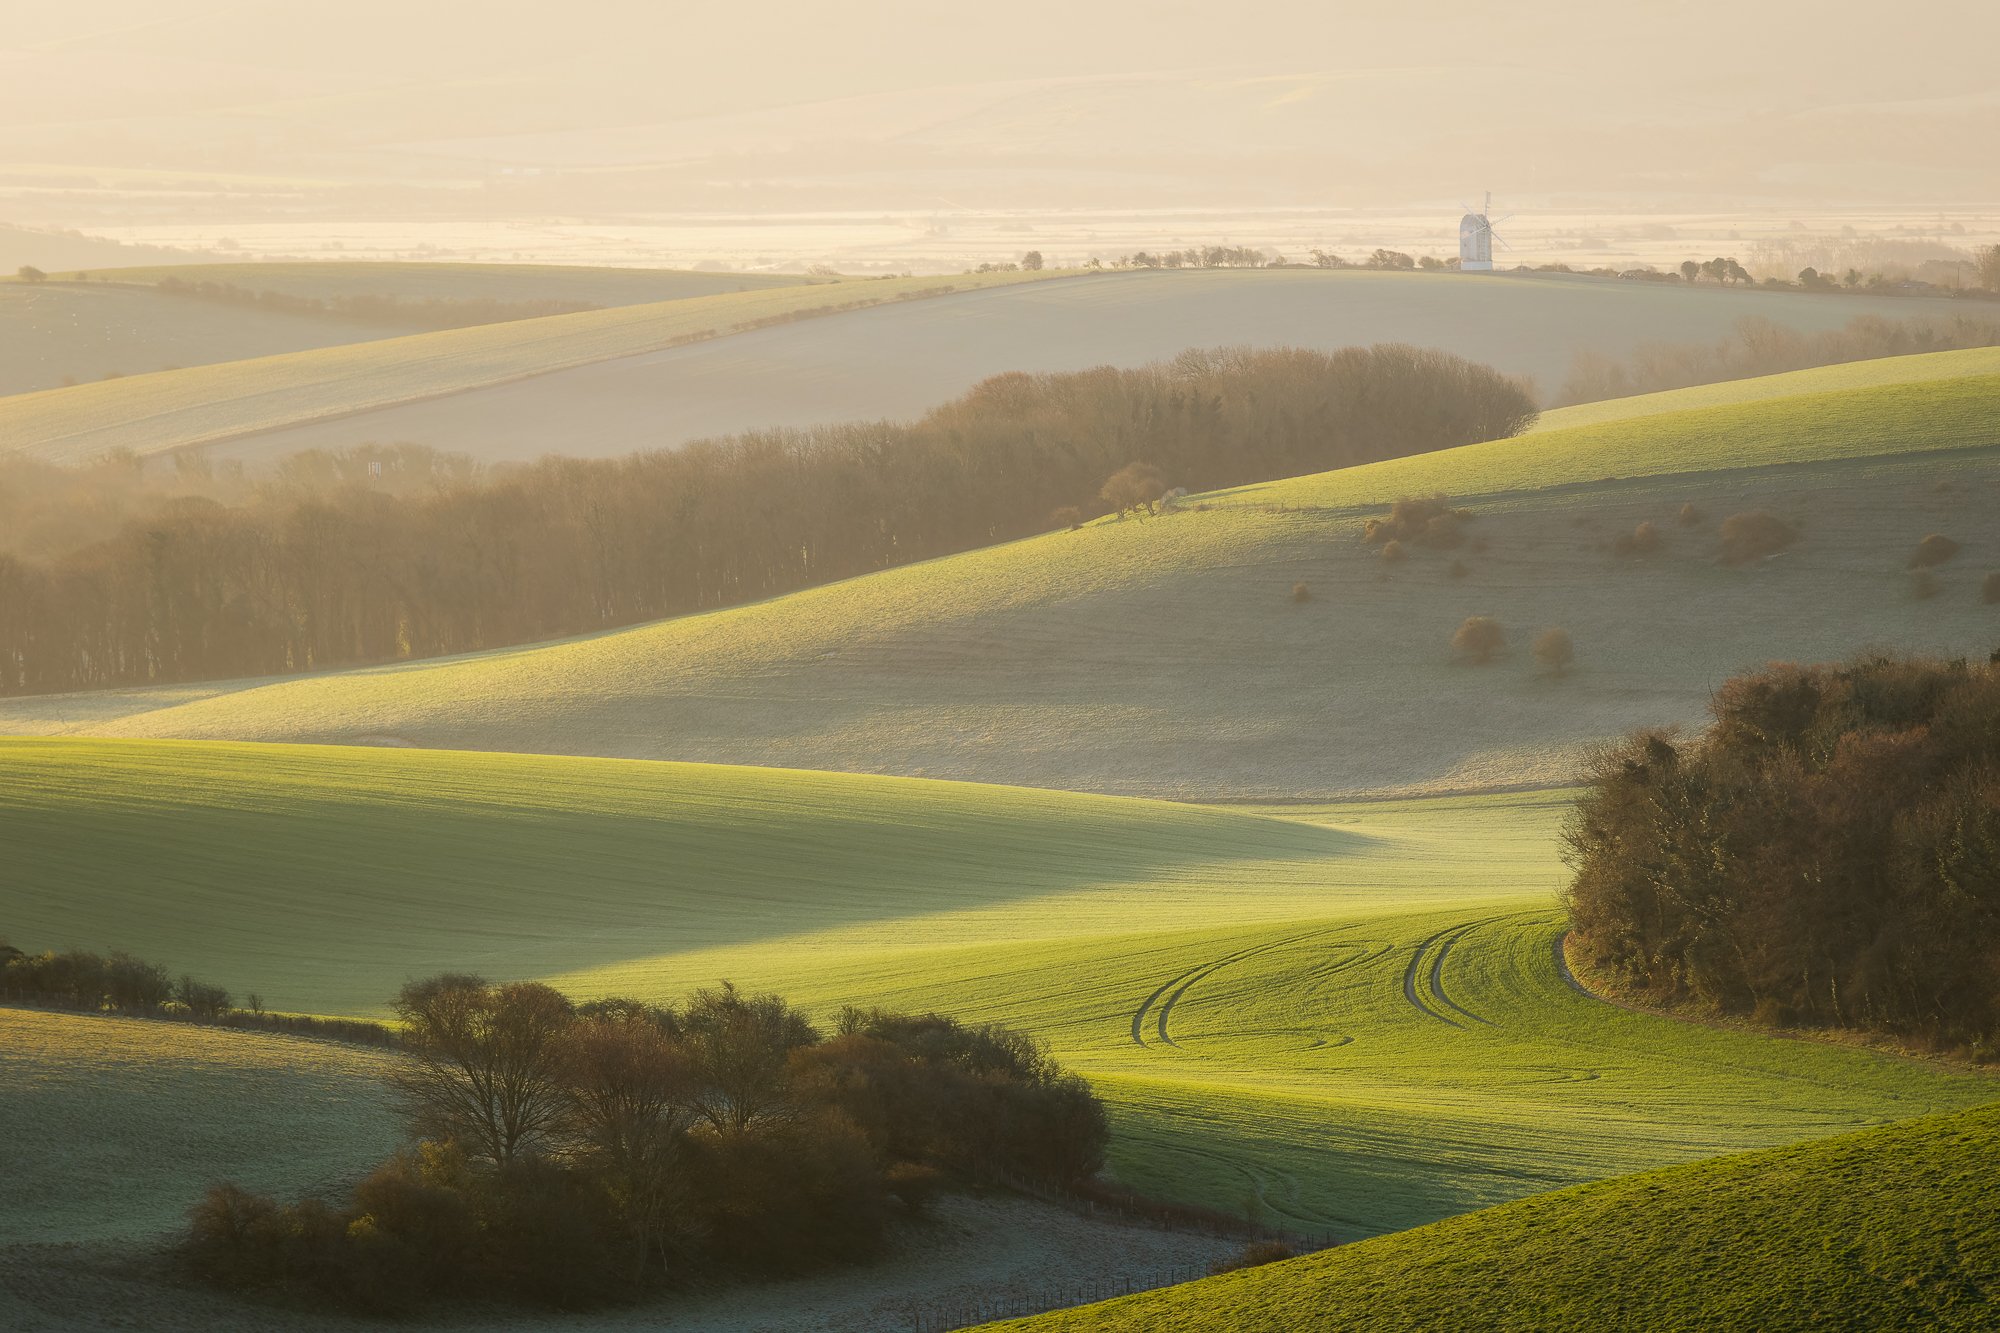
On Location Photographing a foggy winter woodland
Back in April 2023, when all my weather apps were aligned and fog was predicted for the next morning, I packed my bag and set the alarm for an early morning trip out to my local woodland.
What is the fascination many photographers have with a foggy woodland?

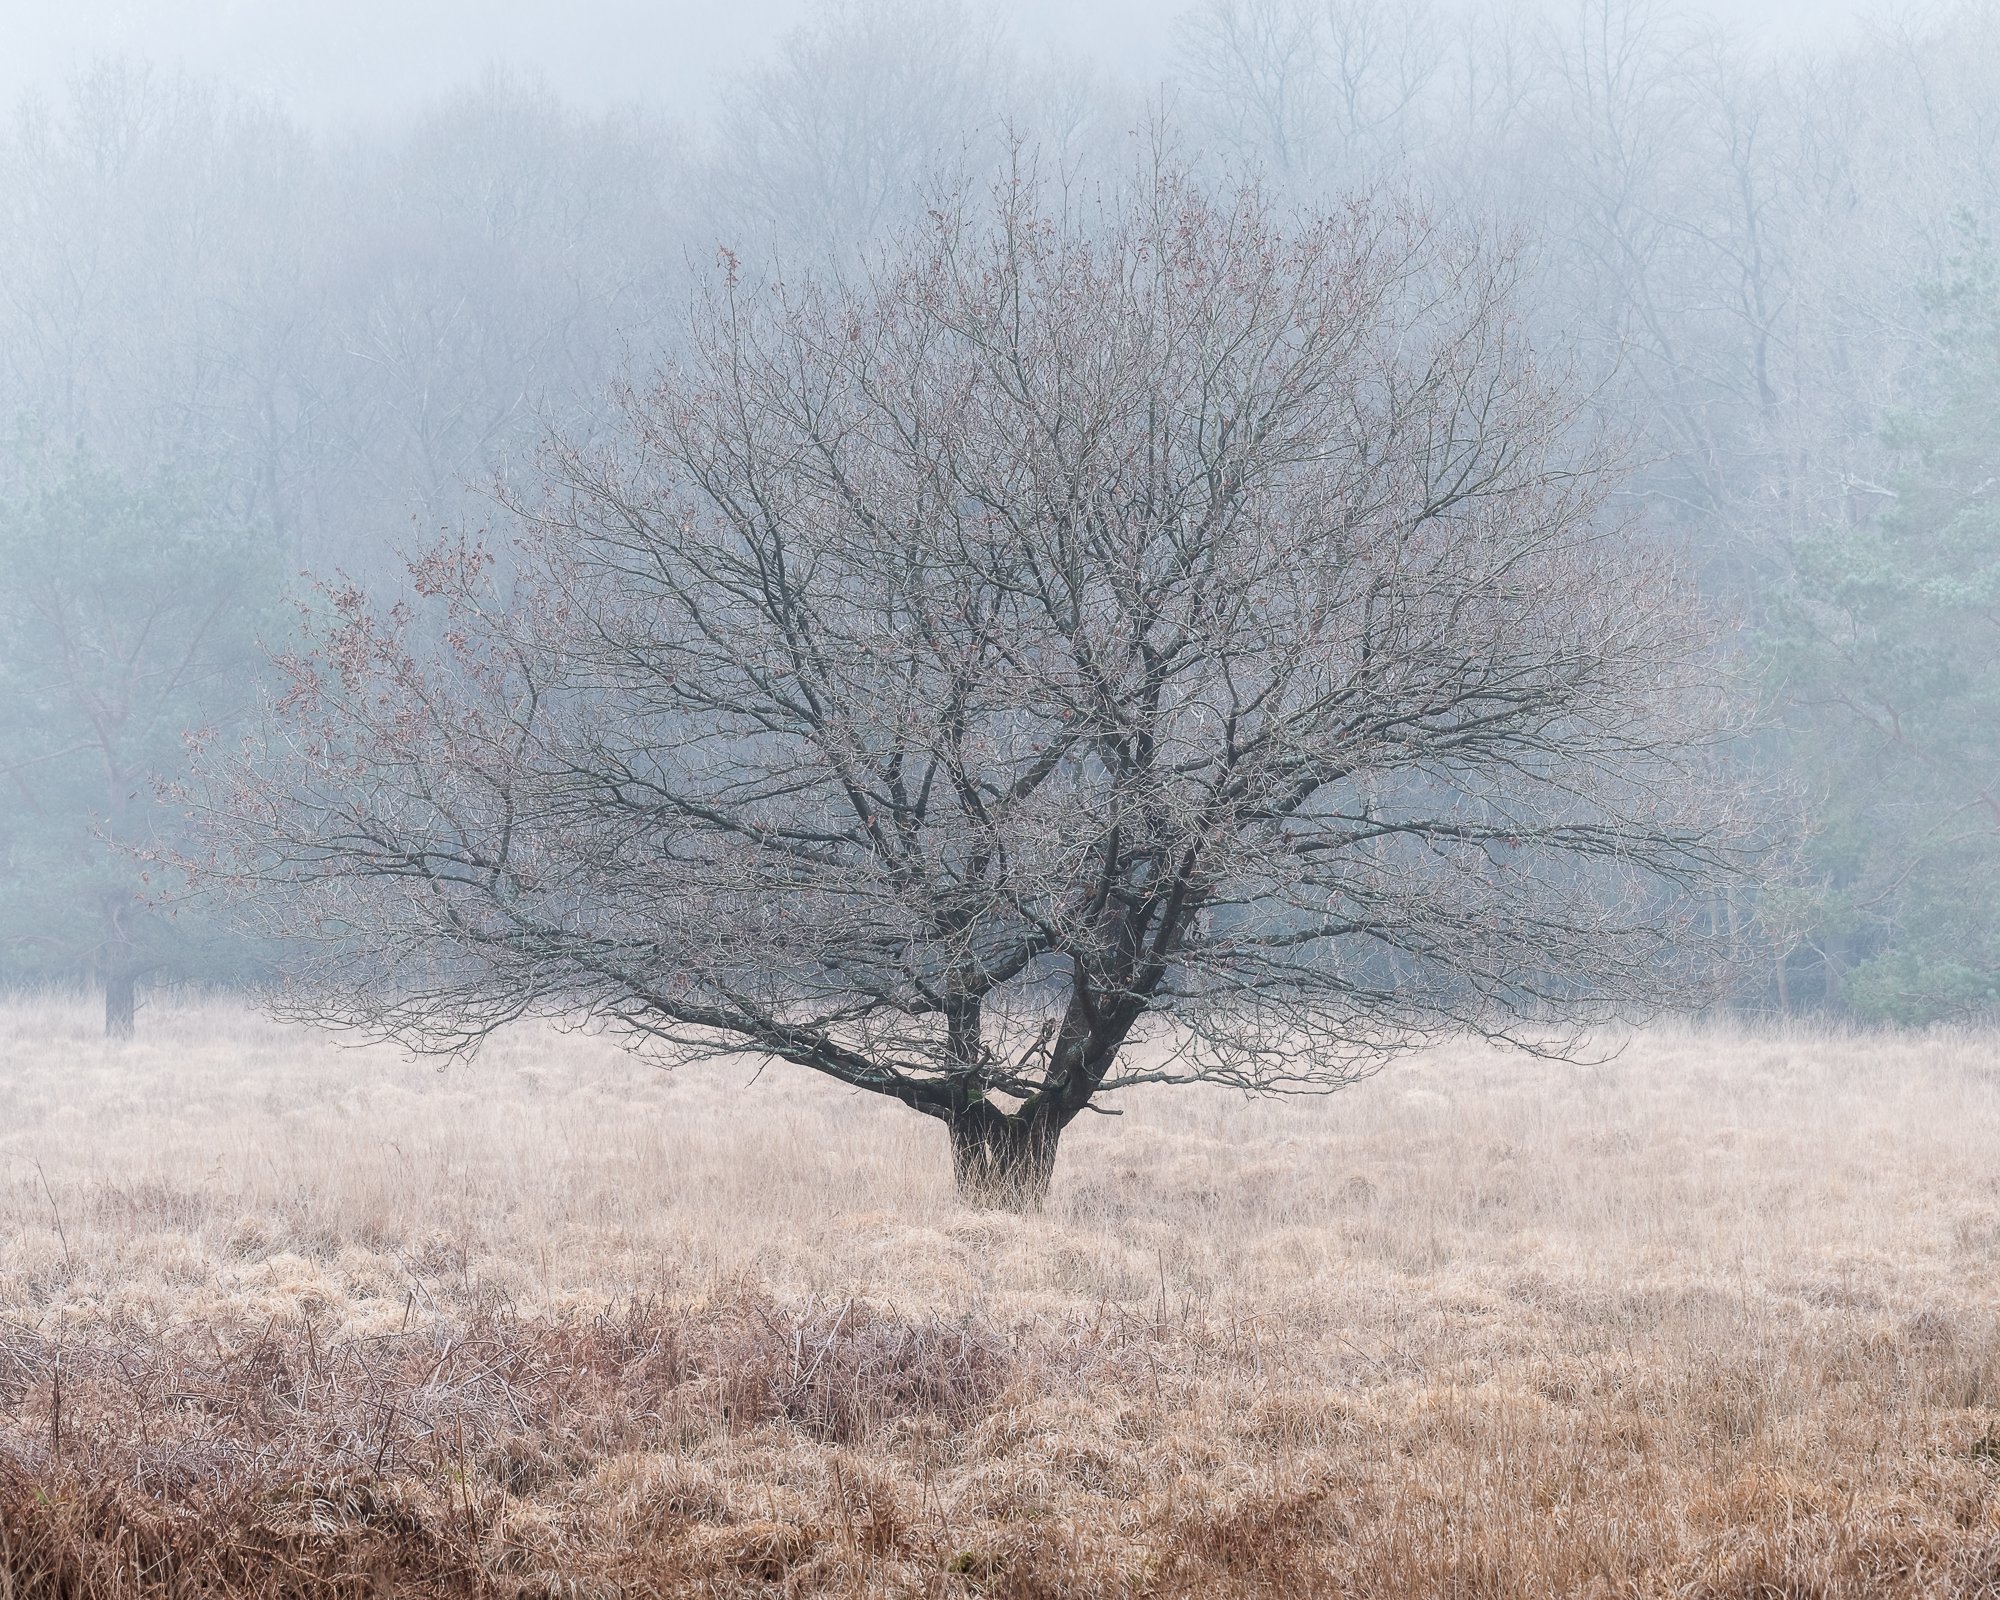
Fujifilm XT5 | XF16-55mm | 51mm | 0.4 Seconds | f/7.1 | ISO125
I’ll try to answer.
Along with simplifying and adding a sense of depth to a composition, nothing brings a sense of mood and atmosphere to a woodland like some mist or fog. Along with softer edges and textures, the diffused light falling on the trees creates an ethereal atmosphere and a sense of mystery in the photos and being drawn to lower contrast scenes in general, the resulting look and feel it can create appeals to my taste and style.
Like a lot of landscape photographers, as soon as the weather app shows even a tiny chance of fog in my local area, I’m immediately planning an early morning trip to one of the woodlands I like to photograph, keeping my fingers firmly crossed that any fog predicted comes to fruition.
So, back in April 2023, when all my weather apps were aligned and fog was predicted for the next morning, I packed my bag and set the alarm.
In my bag was my Fujifilm XT5 and both my XF16-55mm and XF50-140 lenses but during the shoot, I stuck with the standard zoom and the telephoto remained in the bag for the entire shoot.
Thankfully, on this occasion, the predictions were right and there was thick fog throughout the woodland. I decided to concentrate on just a small section of the woodland and in the two or so hours I was there, I must have only walked two or three hundred yards.

Fujifilm XT5 | XF16-55mm | 25mm | 1.3 Seconds | f/7.1 | ISO125

Fujifilm XT5 | XF16-55mm | 31mm | 1.3 Seconds | f/7.1 | ISO125

Fujifilm XT5 | XF16-55mm | 47mm | 0.5 Seconds | f/7.1 | ISO125

Fujifilm XT5 | XF16-55mm | 47mm | 0.4 Seconds | f/7.1 | ISO125

Fujifilm XT5 | XF16-55mm | 39mm | 0.4 Seconds | f/7.1 | ISO125

Fujifilm XT5 | XF16-55mm | 38mm | 1/3 Second | f/7.1 | ISO125

Fujifilm XT5 | XF16-55mm | 19mm | 0.6 Seconds | f/7.1 | ISO125
I hope you like the photos.
Until next time.
Trevor
Fujifilm XT5 | A Landscape Photographer’s Review
My review of the Fujifilm XT5 from the perspective of a landscape photographer after 6 months of owning and using it in the field. How good is the new 40MP sensor? How is the image quality? Have a read and find out what I think.
Towards the end of 2022, while out in the field on a shoot, the screen on my Fujifilm XT2 started to flicker uncontrollably and after a few minutes of strange behaviour, it turned itself off and however much I tried, I couldn’t get it to turn on again. It seemed after 5 faithful years of service, the XT2 was dead. So, I had a decision to make. Do I fix it? Or do I invest in a new camera body? When it comes to cameras and lenses, unless there is a particular problem I need to solve, I never chase the latest gear.
I much prefer familiarity over shiny and new. If my camera does the job for me and I know it’s strengths and weaknesses (they all have them), I tend to stick with it.
After 5 solid years of use, I decided it was time to say goodbye to the XT2 and hello to the newly released XT5. Before buying the XT5, I briefly considered the recently released XH2 but decided against it as I wanted to stick with the familiar dials and ergonomics of the XT range.
Having now used the camera for 6 months and along with a few of the photos I’ve taken with it, I wanted to share some of my thoughts and opinions on the Fujifilm XT5 from a landscape photographer’s point of view. As with my other gear reviews, this will be far from scientific (a simple Google search will provide you with those). I won’t talk about every new and improved feature this camera offers, these are my personal observations and opinions based on how I use the camera in the field and other people’s experiences may differ from mine.
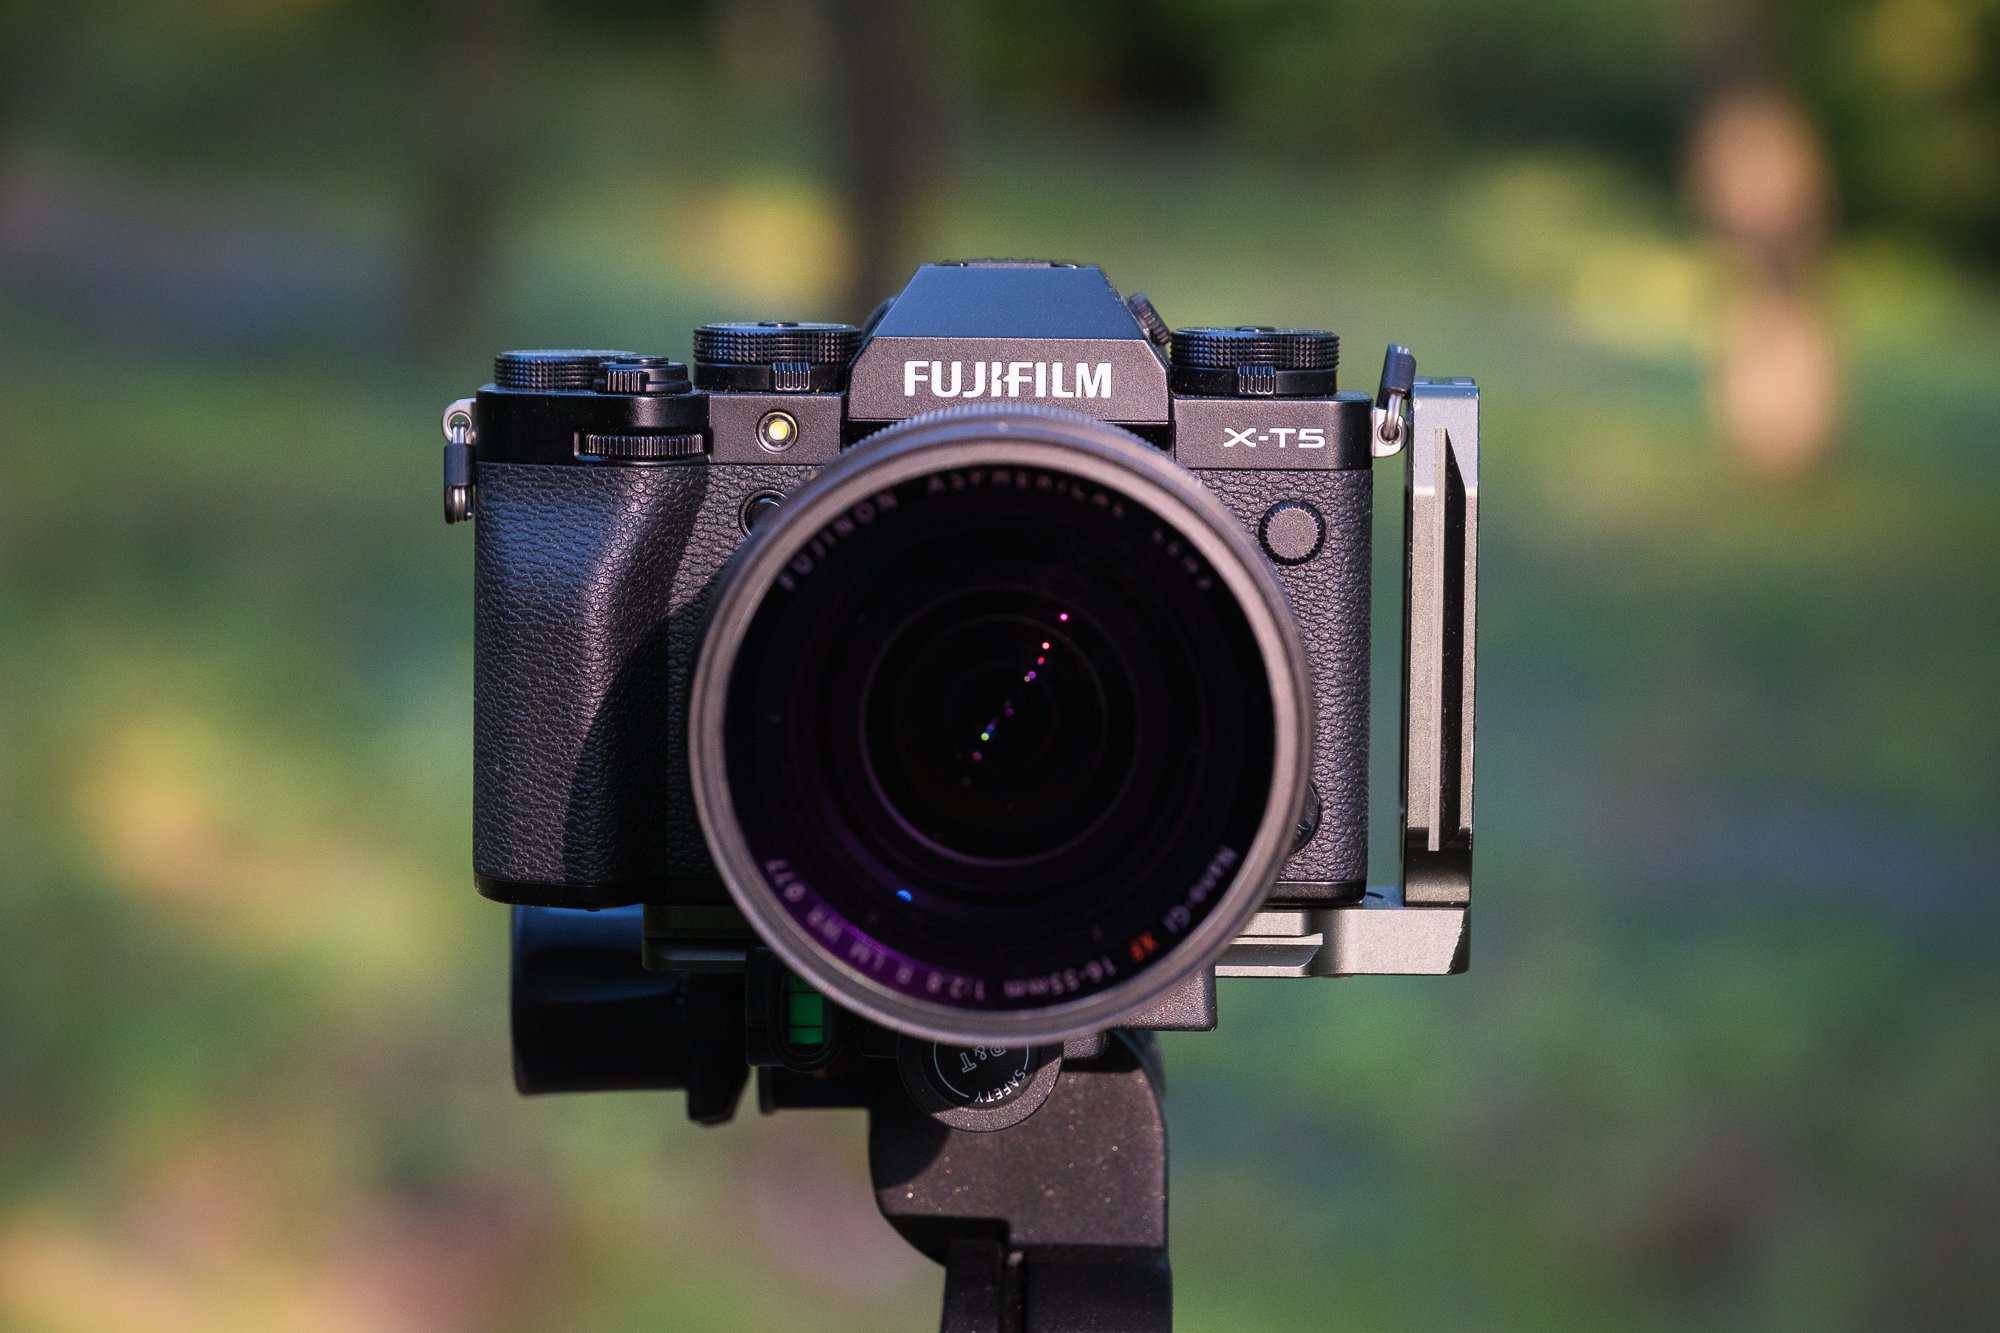
What’s in my camera bag?
Before we get into the XT5, I wanted to mention what gear I currently carry with me while taking landscape photos. More specifically, the lenses I use with my XT5 on a day-to-day basis.
At the moment, I am quite happy carrying just 2 lenses, the XF16-55 f2.8 standard zoom and the XF50-140 f2.8 telephoto. These are red badge lenses so considered the best quality in the XF lens lineup and give me an effective focal range of 16 to 140mm (24mm to 200mm in 35mm terms) which is fine for 95% of the photos I take. That being said, with constant f2.8 apertures, they may be better quality but they’re also a lot heavier than Fujifilm’s variable aperture lenses. Worth thinking about if weight is a priority.

You may have also noticed the DJI Mini 3 Pro which I also reviewed from the perspective of a Landscape Photographer. You can read about that here.
For more details about all the gear I carry in 2023, pop over to my latest “Whats in my camera bag” blog post.
Is the Fujifilm XT5 bigger and heavier than its predecessors?
Well, yes and no. It would have been fair to assume that the XT5 wouldn’t be immune to the current trend that sees mirrorless cameras getting bigger over time and yes, compared to the XT2 (133 x 92 x 49mm, 507g) the XT5 (130 x 91 x 64mm, 557g) is slightly bigger and heavier, but Fujifilm has, to their credit, shaved off a little size and weight compared to the XT4.
However, in real terms, these numbers don’t really mean a lot to me. A few mm here, a few grams there won’t make a huge difference and although its important camera manufacturers keep the size and weight of their respective systems in check, it’s probably easier to say that the XT5 is around the same size as those before it. That’s a good thing.

Fujifilm XT5 | XF16-55mm | 16mm | 1/100th Second | f/5 | ISO125
I spend a lot of time hiking up hills, exploring woodland or even as per the picture of London above, climbing the 528 steps to the top of St Paul’s Cathedral. So, what’s even more important to me is that I choose to shoot with a smaller, lighter system compared to the full frame and medium format systems. Using an APS-C system allows me to carry the XT5 along with 2 heavier, flagship lenses and still have a lighter camera bag compared to other full-frame or medium format systems.
How good is the XT5 build quality and weather sealing?
Landscape photographers need to be able to shoot in almost any condition and in all but the most extreme weather, should be able to do so without the need of additional rain covers and shower caps. The Fujifilm XT5 has a weather-sealed body and when coupled with a weather-resistant lens such as my XF16-55mm or XF55-140mm, I’m able to shoot in most conditions. In the 6 months I’ve been using this camera, I’ve shot in many a wet and rainy woodland, the wintry mountains of Snowdonia and some stormy weather by the coast and so far, so good.
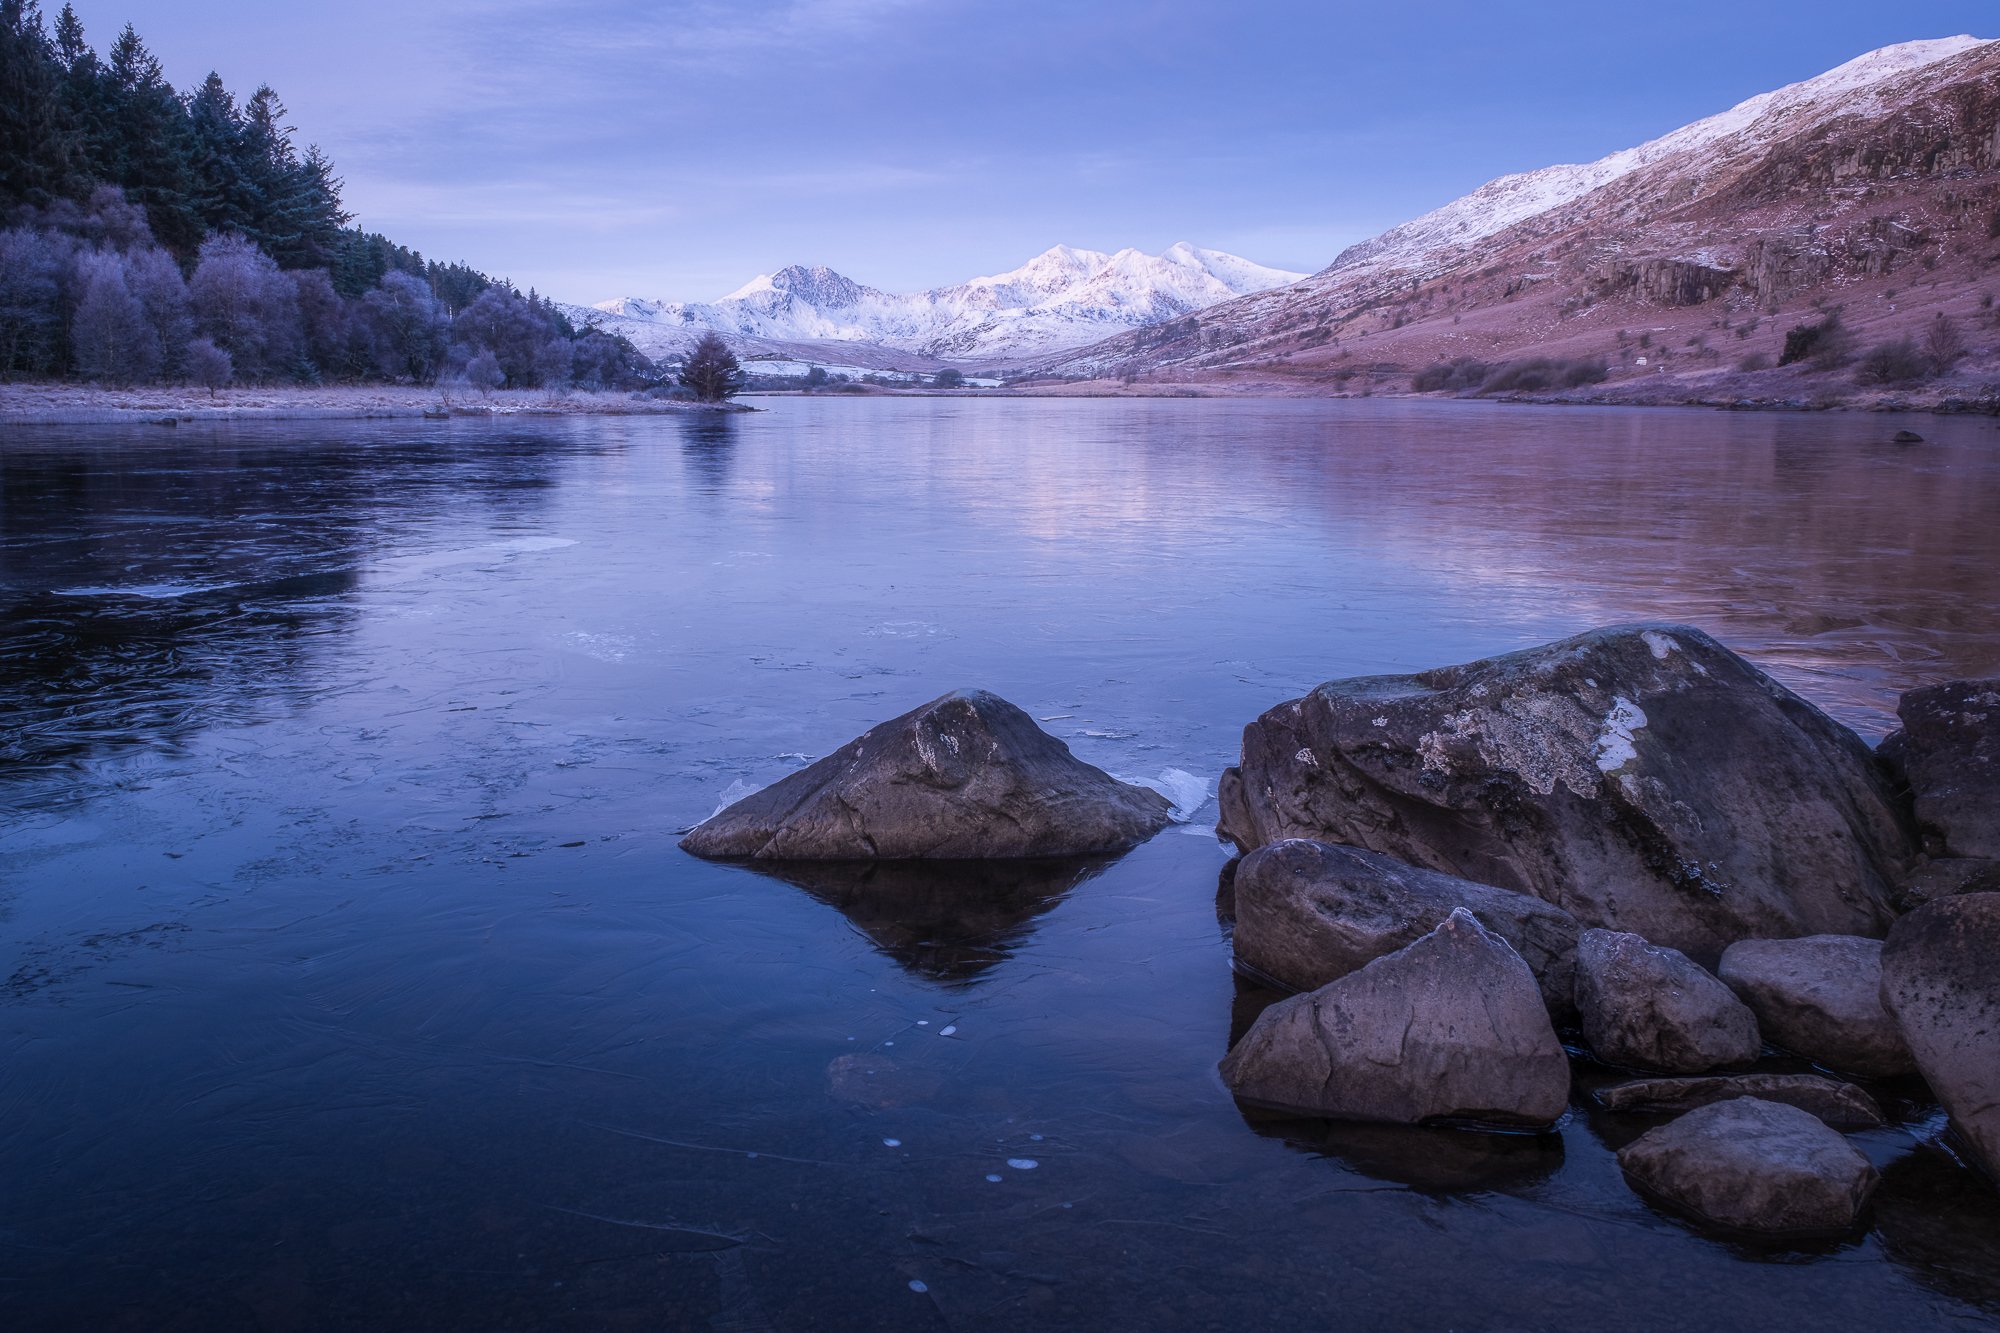
Fujifilm XT5 | XF16-55mm | 18mm | 2 Seconds | f/8 | ISO125
That’s all well and good but there have been questions raised about the amount of plastic used in the construction of the XT5 compared to previous models making it look and feel a little cheaper. I guess if being particularly pernickety, it probably does a little but in the 6 months since buying the camera, I’ve literally given it zero thought. In all fairness, Fujifilm makes no claims that the camera is fully waterproof and certainly doesn’t provide an IP rating. So, although I would happily shoot during an average rain shower, I would stop short of exposing it to a prolonged torrential downpour.
What about the XT5’s physical dials, dual memory card slots and tilting screen?
Although I already had dual memory cards, physical dials and a 3-way tilting LCD on the XT2, I now consider these a must when picking a camera to use for landscape photography.
Coming from the world of IT, I know too well how technology should not be relied upon, however robust it might seem. The last thing I want is for a whole day of shooting to be lost because my only memory card suffered a failure at the wrong time. This is why I’ve configured the XT5 to write my raw files to both cards simultaneously, creating an instant backup while out in the field.

Fujifilm XT5 | XF16-55mm | 16mm | 1 Second | f/8 | ISO125
Next up, those physical dials. For me, these were a game changer. Apart from the warm fuzzy feeling of nostalgia I get when using them, being able to fine-tune my exposure by feel, without a menu in sight makes life so much easier when out taking photos. This is especially true in the winter when using gloves or when the camera is low down to the ground like it was when photographing the Sussex coast as pictured above, which can make accessing menu buttons trickier.
Talking of having the camera low to the ground. As a landscape photographer, this will often be the case and having a tilting screen means I don’t have to be down there too. Whether I’m shooting in landscape or portrait mode, the 3-way tilting LCD means the screen will tilt in my direction whatever its position.

Fujifilm XT5 | XF16-55mm | 55mm | 1/10th Second | f/11 | ISO125
How good is the battery life on the XT5?
With the larger W235 battery used in the XT5 compared to the smaller X126s I was using in the XT2, for me at least, battery life has improved dramatically. A game changer in fact. This was my main gripe with the XT2 as I was constantly having to change out dead batteries midway through a shoot.
The extra battery life really came into its own during the 48 hours I spent in a wintry Snowdonia. The temperature during the day barely made it above freezing and being so cold will reduce the amount of charge the battery will hold, but irrespective of this, I was still able to shoot from sunrise to sunset on a single charge.
Fujifilm XT5 | XF50-140mm | 69mm | 1/2 Second | f/9 | ISO125
Even if upgrading from the XT4 which also uses the W235, Fujifilm still claims an improved battery over its predecessor due to the reduced power consumption of the X-processor 5. So, I think it safe to say that Fujifilm has made a big step forward in battery performance since introducing the larger W235 into their recent flagship cameras.
Is the XT5’s 40-megapixel sensor worth the upgrade?
Fujifilm announced their 40.2MP sensor a long time before it was released and the prospect of having the extra resolution was exciting, opening new possibilities for cropping in post or bigger prints. I was, however, slightly concerned about how cramming more pixels onto the same size sensor would affect image quality and, if it would result in noisier pictures.

Fujifilm XT5 | XF16-55mm | 55mm | 1.3 Seconds | f/6.4 | ISO125
I’m pleased to report that I’ve not found the pictures I’ve taken so far to have any more noise than I was used to with the XT2. That was a big surprise and a welcome one at that! Don’t get me wrong, Do I still see noise in some of my images? Of course. There will always be situations where the light levels are such that avoiding noise altogether is impossible, but overall and in my own unscientific way of pixel peeping, I don’t see any negative impact of those smaller pixels all bunched up together on this new X-Trans CMOS 5 HR sensor.
One thing that I was hoping for and something Fujifilm appear to have delivered is improved dynamic range performance. Again, not something one expects when increasing pixel density but given this sensor is a few generations newer than what I was using, I was very much hoping for this to be the case. I did a little research on this topic and for sure, many out there say the dynamic range has gone backwards slightly and still not as good as the XH2 which uses the same sensor but from my own real-world usage, the dynamic range has definitely improved for me. Sure, it’s still not up there with the full-frame and medium format systems (pesky laws of physics), but what I can say is that with my woodland photography, where high dynamic range scenes are commonplace, I’ve not had to bracket my images nearly as much as I used to. Saving me time during editing and saving space on my hard drive too!
Talking of hard drive space, with the increased resolution comes increased file sizes so if you’re tight on raw file storage space, consider shooting with the compressed raw enabled on the camera or prepare to invest in bigger hard drives.
Fujifilm XT5 | XF50-140mm | 140mm | 1/50th Second | f/7.1 | ISO125
Is the Pixel-Shift on the XT5 worth all the hype?
Remembering this article is about sharing my experience, I’m going to say no……for now.
Pixel Shift, which can be enabled in the menu, is where the camera will take 20 separate photos, shifting the sensor by half a pixel each time and by using a separate software on your computer, you can merge the photos together to create a huge 160MP image.
Taking landscape photos can often mean a static scene where 20 separate photos won’t capture any movement but add in some waves along the coast or some subtle breaths of wind in the woodland and suddenly things start to get a little trickier. I’ve used this feature a few times to see how well it works and if you have a static scene and need that extra resolution, then having this option available is great, but, given the extra disk space needed and the time it takes to merge them together in post-processing, it’s not something I think I will use very often personally.
Fujifilm XT5 | XF16-55mm | 53mm | 1/40th Second | f/8 | ISO125
What about the Fujifilm XT5’s improved autofocus?
This is where things went a little awry for me. Fujifilm boast that due to the higher pixel count in the XT5, the number of phase detection pixels also increases resulting in an improved AF-S focusing accuracy when taking landscape photos.
With the XT2, I preferred to use back button focus when taking landscape photos. When composing an image and selecting the autofocus area, the XT2 locked in nearly all cases without issue, and I only really needed to switch to manual focus in trickier, low-light situations. I didn’t really give it much thought as it just worked.
Fast forward to getting the XT5 out in the field and after setting the camera up to work in the same way, things were a lot different. When pressing the back-button focus, the XT5 was missing focus almost 50% of the time. It was incredibly frustrating and after a little research it seemed I wasn’t the only one to notice how poor the autofocus was on this camera.

Fujifilm XT5 | XF50-140mm | 66mm | 0.4 Seconds | f/9 | ISO125
With zero trust in the autofocus, I switched to manual focus 100% of the time which, although not the end of the world, did slow down my workflow a little.
This went on for about three or four months and although I’ve not seen anything specifically from Fujifilm on the subject, since applying the firmware updates released since, the issue has improved somewhat. I still refuse to default back to my previous workflow as my trust in the autofocus hasn’t been restored but when using features like focus bracketing, which depends on autofocus, I do have a little more confidence that the results will be sharp.
Again, this was my personal experience and there are built-in tools that can help your focusing workflow such as focus peaking, but for me, a quick zoom-in and out again to check the image sharpness works just as well.
Update: I wrote this post just before firmware v2.0 was released, which included some significant focus improvements for the XT5. Since applying this and subsequent lens updates, the camera has had far fewer issues with autofocus.
Does Adobe Lightroom play nice with the XT5 RAF files?
I’ve used Lightroom (Classic) to edit my raw files for many years, long before I swapped to Fujifilm in 2016 and I think it’s fair to say, Lightroom has not always played nice with Fuji raw files - worms anyone? If you know, you know. These days, life is a lot easier when it comes to editing Fujifilm RAF files in Lightroom, either Adobe has improved the compatibility, or I’ve just learned to avoid the pitfalls as I run through my usual workflow (step away from the sharpening slider). In truth, it’s probably a bit of both.
One approach I use is not to apply any sharpening in Lightroom and instead, when I want to prepare for print or screen, I export to Photoshop and use the High Pass filter on a separate layer (between one and two pixels radius) and the Overlay blending mode, masking in the areas I want to be sharpened. A method I still do today and works best for me.

Fujifilm XT5 | XF50-140mm | 140mm | 1/8th Second | f/9 | ISO125
There are, however, still times I feel Lightroom doesn’t render my raw file with the amount of detail I know the file contains. I’ve heard many times that other editing software is more sympathetic to the Fujifilm raw files, but I really don’t want to learn another software. Instead, for those times I need a little more detail I use a plug-in called DXO Pure Raw. I don’t run every picture I take through the software as I prefer some to be a little softer or painterly but when a bit more detail is called for, it seems to do the job nicely.
Conclusion
I’ve written a lot about the features and benefits of using the XT5 for landscape photography and there are many great features I decided not to talk about such as the 7-stops of IBIS, improved video modes, subject detection and white balance driven by AI (whatever that means) but in truth, my needs are quite basic meaning I probably only use about 10% of the camera’s features for my landscape photography and it would be wrong for me to review those I haven’t used extensively.
So, would I recommend this camera to other landscape photographers? The simple answer is yes. If size and weight is important to you, the XT5, with its fantastic image quality, intuitive ergonomics, weather sealing and much-improved battery life, packs a real punch.
I hope you found that useful and enjoyed some of the photos I shared. If you have anything to add such as any points I missed or questions about the camera, please leave a comment below or contact me directly here.
Until next time
Trevor

My Top 10 Tips for Woodland Photography
In this article, I list my 10 top tips for getting the very best woodland photos from when to shoot, how to eliminate distractions and what gear can help improve your images.
I’ve been taking photos of the landscape for a number of years now but more recently, I discovered the joy and subsequent benefits of woodland photography. Woodland photography is a beautiful and relaxing way to connect with nature while still allowing me to practice this creative craft I enjoy so much. It encourages me to explore and learn about the wildlife I see and offers a sense of peace and tranquillity, allowing me to escape life’s more hectic demands, even if it’s just for just a few hours.
During this time, I’ve made plenty of mistakes, learned lots of lessons and picked up new skills that have helped me take better woodland photos. So, this blog post is my attempt to share some of those lessons and provide a little inspiration to those who might not be quite as far along in their own woodland photography journey.
So here are my top 10 tips for woodland photography.

Fujifilm XT2 | XF10-24mm | 11mm | 1.5 Seconds | f/10 | ISO400
#1 Photograph the Seasons
There are so many reasons to pay attention to the way a woodland changes over the course of 12 months and being aware of these can open up so many creative possibilities when it comes to woodland photography. One popular example is to find a particular composition that works in all seasons and take the same picture in spring, summer, autumn and winter, creating a ‘through the seasons’ series. This might sound cliché, but some I’ve seen are simply amazing and it’s a useful little project that encourages you to go back to the same place to observe how it changes. To get the best photos, you might have to wait several years to get a portfolio image of a particular season but chasing that shot is part of the fun. I have a few on the go but haven’t quite made it to all four yet.
Alternatively, knowing how your local woodland changes through the year may also open up new photographic opportunities. There will be places that lack photographic allure in (let’s say) summer but come alive with opportunities at other times of the year. For instance, in my local woodland, there is a lot of fern growth which means parts of the forest are completely cut off in the summer months but from late autumn to late spring, those areas of woodland are easier to explore with the camera.
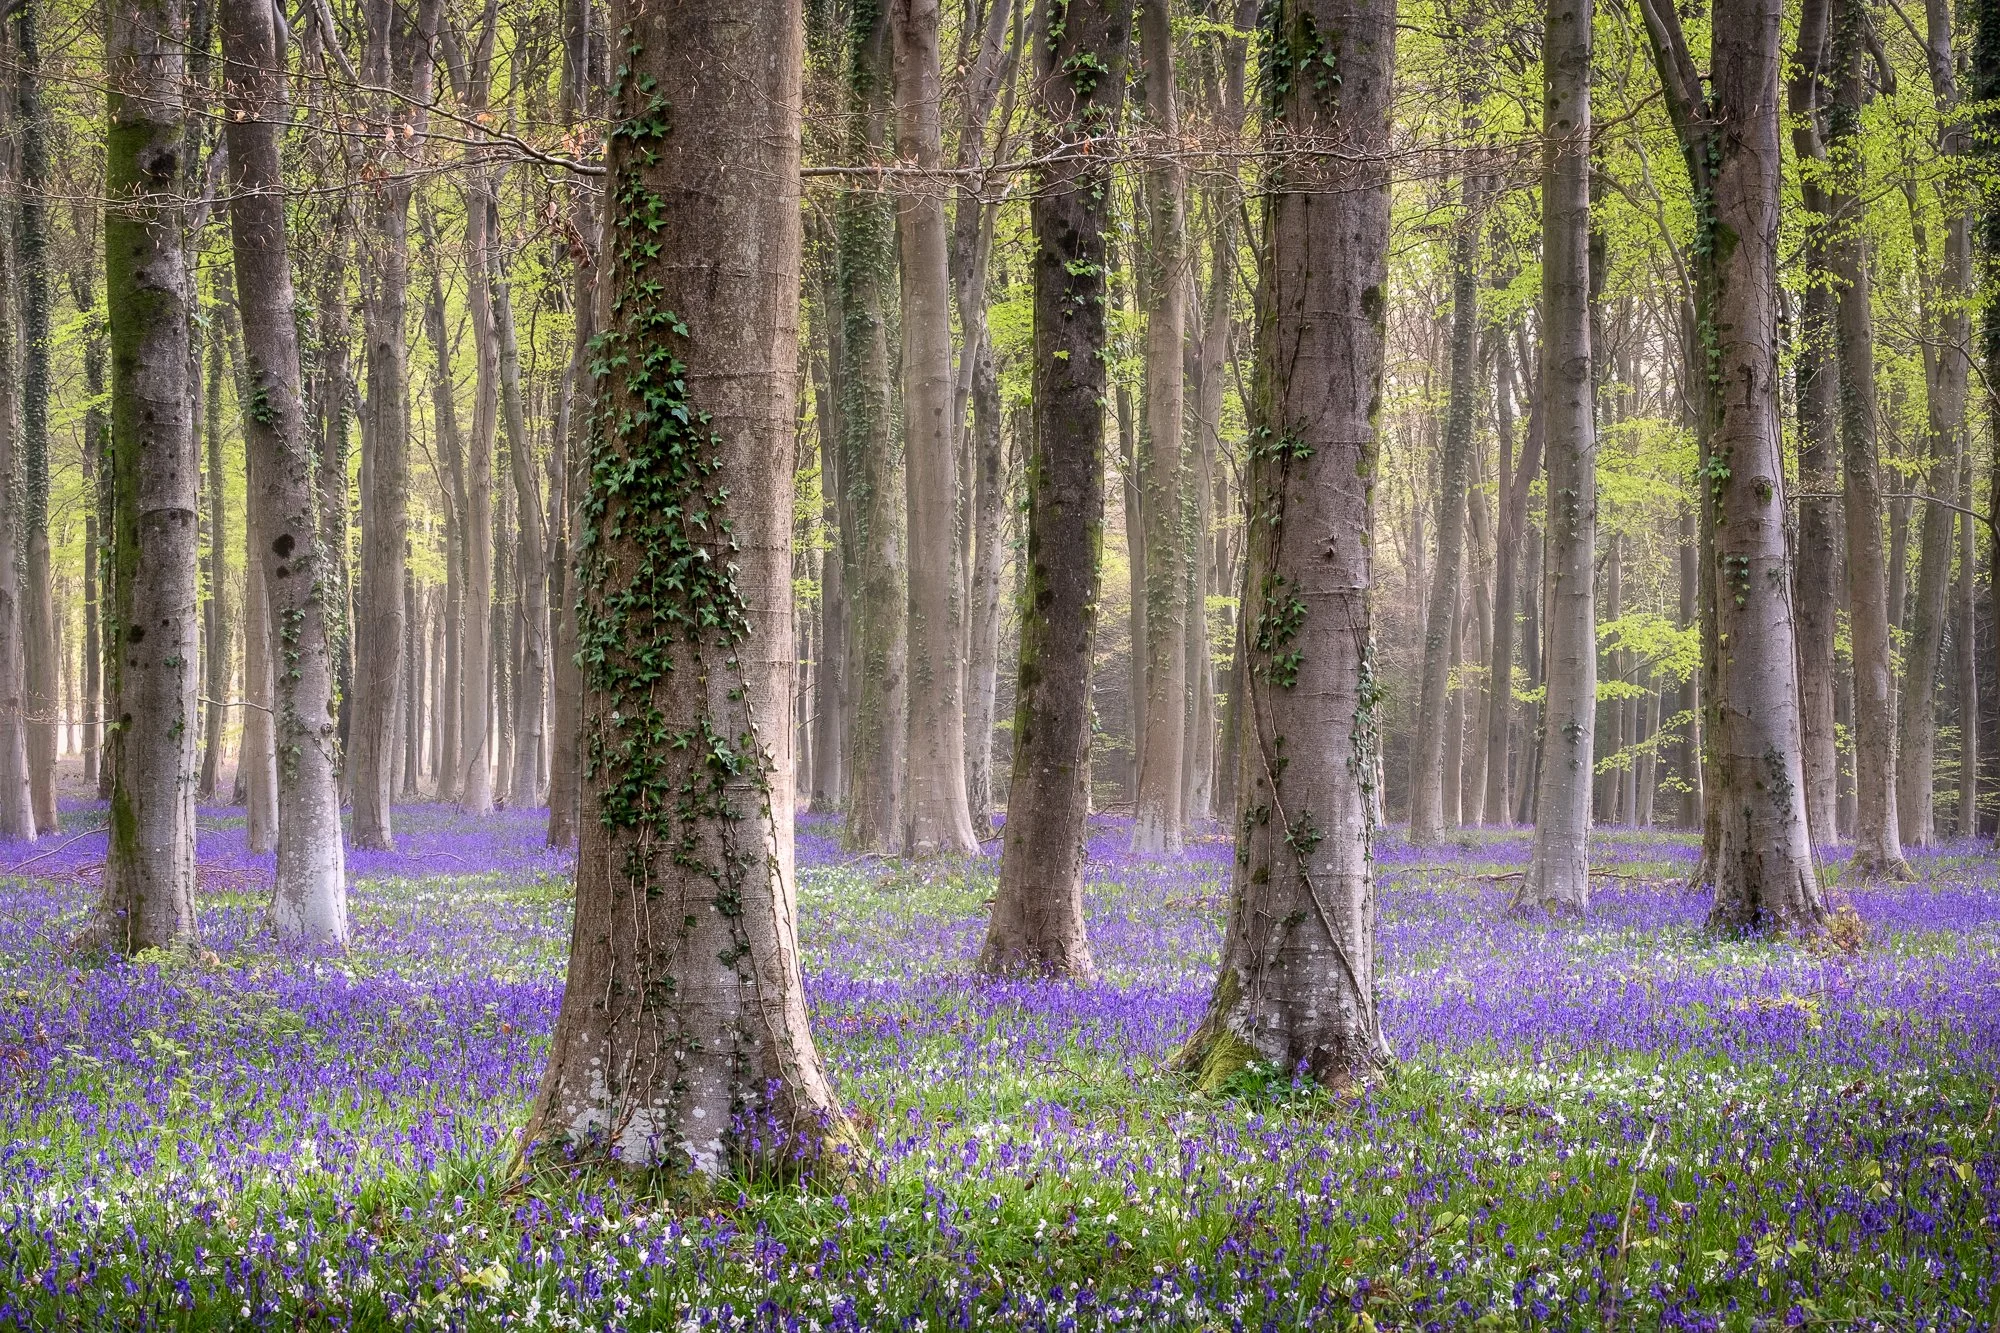
Another example is the bluebell picture below. Of course, bluebells in spring are beautiful in their own right but in this particular location, the woodland floor is typically messy with fallen branches and patchy plant life, but, for a few weeks each year, the bluebells completely cover the messy floor resulting in a much cleaner photo.


#2 Photograph the woodland whatever the weather
While perfectly defused golden hour lighting can create beautiful woodland photos, don't be put off by cloudy, or even rainy days with less inspiring light. I for one love to head out into the woodland while the sun is obscured as the softer, diffused light of an overcast day can result in quieter, lower contrast images, helping to create a moody and ethereal feel to your photos.
Even if the sky is blue and there is high contrast, midday light to contend with, don’t let that stop you. Personally, I struggle in such situations but when I do find the light too bright and distracting for my usual style of woodland photography, I will change tact and more often than not, point my camera down towards the ground and seek out small scenes with interesting patterns and details hiding in the shadows and away from those pesky specular highlights. More on that in the next tip!

Fujifilm XT2 | XF55-200mm | 55mm | 1/8th Second | f/9 | ISO250
#3 Point your camera towards the floor
Getting into the habit of taking pictures of the woodland floor is something I’m still getting to grips with. It took a while for me to move away from the traditional “landscape” style photo and start paying attention to the smaller shapes and textures hiding amongst the undergrowth, but once I did, I never looked back. A year or so into my woodland photography experience, I started heading out into the forest just to see what small scenes I can photograph, completely ignoring the wider landscape photos I usually look for.
With so much texture and pattern on offer, once you get the camera up close to these smaller scenes, you will be able to tap into a wealth of photographic opportunities and although getting down that low can often be a little tough on the back, by slowing down and taking your time to compose the image properly, you will undoubtedly capture some beautiful, intimate woodland photos.


#4 Look out for mist and fog in the woodland
Although it should never be considered the be-all and end-all of woodland photography, I think it’s safe to say that the majority of woodland photographers prefer to shoot in misty/foggy conditions, and for good reason. A scene full of branches and leaves can be a cluttered, messy affair and one of the challenges with woodland photography is simplifying the composition. This is where a foggy woodland comes into its own as not only can a fog add depth and atmosphere to a scene, but it can also help declutter the composition, providing a sense of space and room for the subject to breathe.


#5 Avoid a distracting sky
Unless you are blessed with the defused light of a foggy woodland, there’s a good chance that by including the sky in your woodland photos, you will be left with some distracting highlights around the top of the frame. With the lower light levels under the trees and the bright sky, the dynamic range will be extreme enough to push the limits of most modern cameras. So, what to do if you come across this situation yourself?
Avoiding the sky completely in your woodland photos can be tricky, but one option to avoid it is to shoot from an elevated position. Keeping the camera pointing slightly downhill can cut some or all of the brighter sky out of the frame. Alternatively, if there is space to do so, try stepping back away from the scene and then use a telephoto lens to zoom back in to better isolate your subject.
Lastly, choose a time of year when there are plenty of leaves on the trees. Like with the picture below, during the warmer months, the woodland will be much fuller and as a result, a lot less sky will be included in your compositions.

Fujifilm XT2 | XF55-200mm | 55mm | 1.4 Seconds | f/13 | ISO200
#6 Pack a circular polariser to give your photos some punch
If like me, you enjoy photographing the woodland early in the morning or in damp conditions, you will almost certainly come across wet, reflective leaves in your scene. Reflective light can be pretty distracting in your woodland photos which is why I recommend packing a circular polariser (CPL) filter in your camera bag. A CPL filter works by blocking the reflective light from entering your lens which means less glare and more punchy colours in your woodland images. This effect is practically impossible to replicate in post, so, to get the very best quality pictures in these conditions, it’s definitely worth mounting a CPL onto the end of your lens.
Just a word of caution. A common mistake many photographers make is to automatically turn the CPL all the way; removing all reflective light from the image. This can result in flat, highly saturated pictures. My advice is to rotate the filter back and forward until there is a good balance between eliminating the distracting reflections and retaining some of the life in the scene.

Fujifilm XT2 | XF18-55mm | 29mm | 2 Seconds | f/10 | ISO200
#7 Remember, the woodland is always changing
These two images below were taken in separate woodlands and are among my favourite woodland photos I’ve taken. I’m so happy I found and photographed them when I did because they now look very different as they were both devastated by stormy weather in early 2022.
So, tip number seven is to not take the apparent static nature of woodland for granted. If you find a location worth photographing and conditions are not quite right at the time, don’t wait too long to return. Through the hand of man, or mother nature herself, it can change literally overnight and like in my case, a couple of locations I planned to return to look completely different now.

Fujifilm XT2 | XF18-55mm | 31mm | 0.6 Seconds | f/9 | ISO200

Fujifilm XT2 | XF18-55mm | 29mm | 1/6th Second | f/8 | ISO200
#8 Get to know your local woodlands
This may seem similar to shooting the seasons or observing the changes in your woodland but getting to know your local woodland goes a lot deeper than that. If you speak to any experienced woodland photographer and they will tell you that knowing a location intimately is by far the best way of getting the best woodland photos.
When heading to new locations or those you can’t visit as often as you like, luck can play a huge part in taking portfolio-worthy pictures as you might not get the best light, or you might not know the best time of day/year to photograph that particular location. Having a local woodland only a short walk or drive from where you live means you remove the need for some of that luck as you can keep returning until the conditions are right. If you live close enough, you can afford to be reactive to the weather conditions and as soon as the fog comes in, you can grab the camera and head out!
Taking it one step further, having the ability to return again and again means the pressure to get a portfolio image on any given trip is removed, meaning you can relax more as you wander the woodland. This will help you slow down and get under the skin of the woodland, helping you fully engage your mind and in turn, spot compositions you might have otherwise walked straight past.
The below four pictures were all taken from the same woodland only 5 minutes’ drive from where I live.


#9 Try different focal lengths
Depending on the subject you are trying to shoot, experimenting with different focal lengths can transform the look and feel of the photos you take.
A wide-angle lens can help you include more of the scene and capture the grandeur of the woodland you’re in, enabling you to include more compositional elements such as an interesting foreground or more dramatic lead-in lines. As appose to using a wide-angle, the telephoto lends itself to seeking out more intimate details, helping you to eliminate distractions and focus on the shapes, colours and texture the woodland offers. As I mentioned in tip #5, when you have a bright distracting sky, this is where a telephoto focal length can save the day.
Play around with different lenses to see which ones work best for the photos you want to take.


#10 Leave no trace
The enthusiasm for the natural landscape is on the rise, particularly since the pandemic as so many people have re-discovered the beauty of their local woodlands. But all this footfall is having a big impact on these important natural spaces. That’s why, through effective education and following a few simple principles, these popular places can still be visited and enjoyed, but remain protected for future generations to experience.
I’ve shared the bluebells photo below as this is a good example of how our actions directly impact these natural spaces. The bluebell is actually a protected species in the UK and picking or digging them up is illegal but not many people know just how fragile they really are. Bluebells can take years to recover from the damage caused by people trampling over them just to take a selfie, and if their leaves are crushed they can be weakened (as they can no longer photosynthesis). This can all be avoided if everyone sticks to the woodland pathways.
Nature First is just one of many organisations trying to help us woodland photographers to keep these natural spaces safe and they have a few simple principles to follow. By doing so, we can all do our part to preserve our beautiful woodlands.
Prioritize the well-being of nature over photography.
Educate yourself about the places you photograph.
Reflect on the possible impact of your actions.
Use discretion if sharing locations.
Know and follow rules and regulations.
Always follow Leave No Trace principles and strive to leave places better than you found them.
Actively promote and educate others about these principles.
Fujifilm XT2 | XF55-200mm | 67mm | 1/13th Second | f/9 | ISO200
There you have it, with a few simple techniques and ideas, you can take your own woodland photography to the next level.
I hope this blog post will help anyone that might be lacking some inspiration and the motivation to get out there and take amazing photos of our beautiful, wooded areas. if you have any more tips you want to share, feel free to leave them in the comments below.
Until next time
Trevor

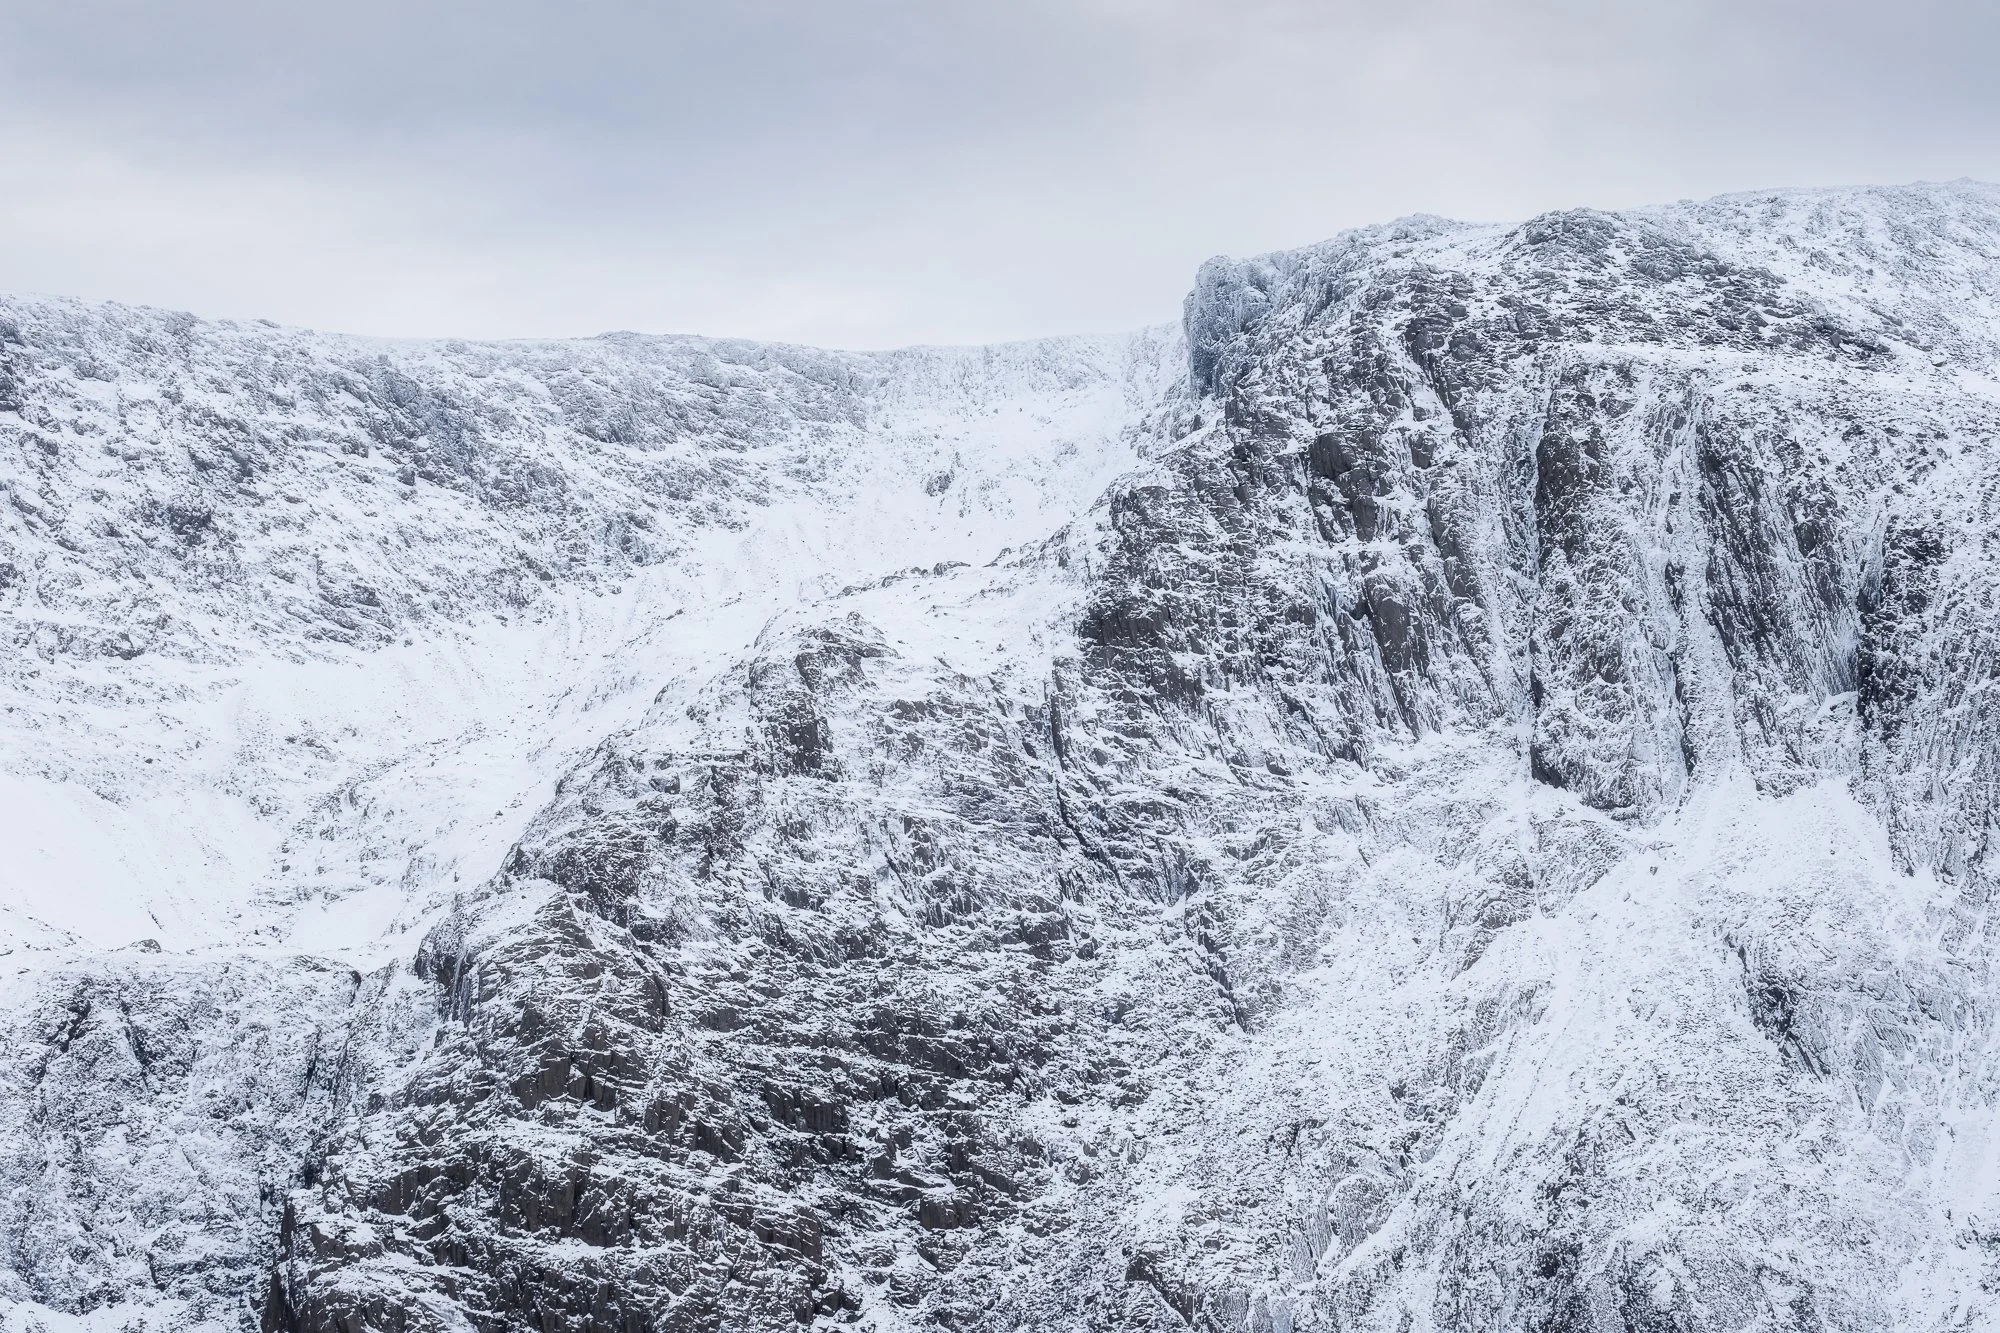
On Location | Photographing a Wintry Snowdonia
In January 2023, I took a trip to Snowdonia to spend 48 hours photographing this stunning, snow-covered landscape, from epic sunrises to aerial drone panoramas.
Ever since taking up landscape photos, I’ve been fascinated by the Welsh landscape. From the beautiful waterfall country in the south to the rugged, mountainous terrain in the north, but as I am based down in the Southeast of England, I’m a good 3 hour’s drive from the Welsh border and even further from the likes of the Brecon Beacons or Snowdonia in the north. This means heading there for a sunrise shoot or even just for an entire day is tricky as the round trip alone would take half a day. To make a trip worthwhile, it really needs to be at least 24 hours and even better, 48.
Starting off in The Brecon Beacons in 2021, I’ve since made a couple of trips to photograph the amazing waterfalls on offer but in January this year (2023), I drove further north to spend 48 hours photographing the more dramatic landscape in Snowdonia.
Although I had a few locations in mind, I wanted to focus most of my attention in and around the Ogwen Valley, so I booked an inexpensive hotel close by and set off for Wales.

With some inevitable hills to climb, I needed to strike a balance between having the right gear with me and keeping the weight manageable, I packed my Fujifilm XT5 body and two lenses, the 16-55mm standard zoom and 50-140mm telephoto.
With the scenery on offer, there was no way I would be travelling without the drone, so in the bag that went along with my Kase filters, batteries, memory cards and head torch.
Although a little on the heavy side, I took my Benro tripod and geared head as I wasn’t sure how windy it might get up on the mountains and wanted to ensure I had a good, stable tripod to work with.
For more detail about what I carry in my camera bag, check out my latest “What’s in my camera bag?” blog post.
Heading off first thing on Friday and arriving in the national park later that afternoon to a beautiful snowy landscape and clear blue skies, I spent the first few hours getting to know the area around the Ogwen Valley, scouting a few locations for when the light would hopefully improve. Typically, when in an environment I know well and the light doesn’t lend itself to photographing the wider landscape I will focus my attention on smaller scenes and take more intimate landscape photos, but when in a new landscape, especially those as beautiful and dramatic as this, I often get distracted and just end up wandering around in awe of my surroundings.
Photographing Tryfan from across the Ogwen Valley
Being the middle of winter, the sun started to dip quite quickly so I made my way up to the first location I had planned, which was this classic view of Tryfan and Llyn Ogwen. Back in June 2022, I spent a week in Snowdonia with some family and friends and while there, managed to fit in a couple of landscape photography shoots. One of the locations I went to back then was here, to photograph the same view of Tryfan from across the valley.

Fujifilm XT5 | XF16-55mm F2.8 | 16mm | 1/5th Second | f/16 | ISO125
There is a popular composition up on the edge of Pen yr Ole Wen which features a stone wall and stile. The one I’ve seen plenty of is to the right of the stream (as you’re looking back down the slope) but in that composition, the wall seems to cut a horizontal line straight through the middle of the scene which I find quite distracting. Instead, along the same wall, on the other side of Afon Lloer, there is another Stile, but this time the wall comes into the frame from the left and leads the eye a little further into the scene and at this time of year, straight towards the setting sun.
It took a bit longer than I planned to climb as the higher I went, the deeper the snow got so I had to take it slow, being careful not to lose my foot in a snow-covered gap between the rocks. When I did finally arrive, the sky hadn’t improved at all, so I positioned my camera ready to capture the sun just as it dipped behind the horizon and managed to photograph the picture above featuring a small sunburst before the sun disappeared for good, leaving a beautiful landscape but a rather uninteresting sky.

Fujifilm XT5 | XF16-55mm F2.8 | 16mm | 1/60th Second | f/9 | ISO125
Happy with the sunburst image at least and with the sun now behind Cwm Idwal across the valley, I decided to make my way down the mountain, following Afon Lloer to the same spot I photographed back in June. I like this position on the hillside as I’m able to use the small waterfall in the foreground to help build a stronger composition and although the partially snow-covered ground made for a messier landscape than I would have liked, there was still a shot to be had. Being careful not to slip into the water, I set my tripod as low as I could and framed up a composition.
By this time, some high-level clouds had drifted in and although the sun had already set, there was a lovely post-sunset glow emanating from behind Cwm Idwal, so with the light levels dropping fast and not wanting to miss the opportunity, I clicked the shutter and bagged this photo below.
This is the first of two times I found my 16-55mm lens just a bit tight and could have done with a slightly wider focal length to include a bit more foreground and a little more sky but overall, I’m pleased with the picture I took.
With the best of the light now gone, I made my way back down the hill to the car and headed for my hotel.

Fujifilm XT5 | XF16-55mm F2.8 | 16mm | 1/4 Second | f/5 | ISO125
Photographing Snowdon from Lynnau Mymbyr
Fast forward to the next morning and my only full day of the trip, I decided to drive the short distance to Lynnau Mymbyr to photograph the well-known view of Snowdon’s horseshoe from across the lake. With very little wind and the potential for nice light, my hope was for a calm lake with plenty of reflections to play with but as it got lighter, it became clear that the lake was completely frozen over. This may not have been what I had hoped for but at least the surface was still, meaning there were at least some reflections to play with.
As the blue hour started to creep in, the cool tones that draped across the landscape were simply stunning and the snow-covered peaks were illuminated by the early light, helping them to stand out in the distance. Taking a few minutes to find a composition, I found this spot here behind some rocks which I could use to provide some interest in the foreground and with the tripod resting on top of the lake’s frozen surface, it was time to take my first picture of the day.

Fujifilm XT5 | XF16-55mm F2.8 | 18mm | 2 Seconds | f/8 | ISO125
Starting with the wider composition above and using the rocks to build a stronger composition, I tried to create as much symmetry as I could using the banks on either side and adjusting the height of the tripod to allow plenty of space between the layers of rocks, reflections and background but still staying as close to those rocks as I could, I managed to take one of my favourite photos from the trip.
To make a real feature of Snowdon’s horseshoe, still using the 16-55mm lens, I zoomed in to around 42mm and with a 2:1 crop, I took this blue hour pano of the frozen lake and snowy mountains. The great thing about my new Fujifilm XT5 camera is that I now have 40MP to play with and even after cropping this image to a 2:1 ratio, the resulting image is still 28MP. That’s plenty of resolution for creating reasonably large prints and still more than my old 24MP XT2.
Fujifilm XT5 | XF16-55mm F2.8 | 43mm | 1.3 Seconds | f/8 | ISO125
As the blue hour faded and the pre-sunrise light started to get more intense, the sky became awash with these wonderful pastel pink colours. Being from the Southeast of England, our landscapes are nowhere near as impressive as those in Snowdonia, so for me, I was simply in awe of the scene and the conditions I was witnessing.
Like with my first blue hour picture above, I switched back to a wider focal length and captured the image below and all its wonderful pastel pink colours reflecting from the lake’s frozen surface.

Fujifilm XT5 | XF16-55mm F2.8 | 17mm | 1/3rd Second | f/8 | ISO125
For the picture below, I decided to make it a multi-image panoramic. As the vivid pinks started to fade, I switched to the 50-140mm telephoto lens and zoomed in to around 70mm. With my tripod and camera completely level, I swept the camera from left to right taking pictures along the way which I stitched together later in Lightroom to produce this close-up 3:1 panoramic of the Snowdon peaks basking in the warm sunrise light.

Fujifilm XT5 | XF50-140mm F2.8 | 72mm | 1/15th Second | f/8 | ISO125
With the 50-140mm lens still attached, for my final picture of the morning, I zoomed in to 106mm to pick out a much tighter wintry composition of Snowdon’s snow-covered peak (the one on the left). with the beautiful pink clouds above. What I like about this image (apart from the light and colour), is the repeating horizontal and diagonal lines you can see through the scene which provide some interesting repeating patterns while adding a sense of depth at the same time.
After the best of the light was gone, off I went to my next location.

Fujifilm XT5 | XF50-140mm F2.8 | 106mm | 1/13th Second | f/8 | ISO125
Photographing the Ogwen Valley with my drone
After a fantastic and successful morning photographing Snowdon, I headed back to the Ogwen Valley. By the time I had found somewhere to park and refuelled with some food and a coffee, it was getting close to midday. Although I had flown my drone a little that morning, I didn’t manage to take any good photos with it, so I sent it up again to see what I could see.
I parked just west of Llyn Ogwen, along a small country road and flew the drone up and around this area of the valley.
With Tryfan over in the background, I focused my attention on the contrasting landscape with snow-covered hills to the right and a greener, exposed landscape to the left. On top of this, there were sunlit areas with dappled light across the landscape adding more interest to the scene.
I admit, the sky wasn’t great, but given the time of day, I’m still pretty happy with how they look.

DJI Mavic Mini 3 | 24mm (effective) | 1/4,000th Second | f/1.7 | ISO100
I spent 30 minutes to an hour flying around the valley and from this flight, the picture below is probably my favourite. I like that there is more of the snowy landscape in the frame and the transition in the foreground where the snow stops, giving way to the ground underneath. This transition creates a subtle lead-in line towards Llyn Ogwen and further through the valley to Tryfan.
On the right-hand side of the picture, you can see the reflective surface of Llyn Idwal and that’s where I’m heading next.

DJI Mavic Mini 3 | 24mm (effective) | 1/6,400th Second | f/1.7 | ISO100

DJI Mavic Mini 3 | 24mm (effective) | 1/1,000th Second | f/1.7 | ISO100

DJI Mavic Mini 3 | 24mm (effective) | 1/6,400th Second | f/1.7 | ISO100
By this point, it was mid-afternoon and with sunset around 4:30-5pm, I started to slowly make my way to my final spot of the day which was part way up Y Garn. To get there, I first needed to get to Llyn Idwal. Once there, I spent a while looking for some interesting compositions of the lake but there was a small problem. Although the scenery was absolutely stunning, the frozen lake had lots of broken ice spread across its surface. I assume from people throwing it on to see if they could break the surface. This meant any attempt to capture the clean reflections in the ice from the edge of the lake would be thwarted by the inclusion of lots of broken pieces of ice. So, after trying and failing to take a picture from ground level, up went the Mini 3 Pro once again to see what I could see from the air.

DJI Mavic Mini 3 | 24mm (effective) | 1/6,400th Second | f/1.7 | ISO100
While flying above Llyn Idwal, I took a few pictures, including these two panoramas. The first (above) was taken from just a few feet above the lake, away from the banks and the messy ice, and by keeping the drone low, I could make the most of those fantastic reflections across the lake’s icy surface. Without the drone, this shot would have been impossible, so this alone made the inclusion of it in my bag 100% worthwhile.
The second pano (below) was taken from much higher and further back from Llyn Idwal to get more of the scene in the frame. I wanted to capture the contrast between the dark water and the brighter, snow-covered scenery. While processing the image, I did consider cropping out the green valley floor on the right, but I like the added interest and with the mountain range falling away towards the right-hand side, the colour contrast adds a touch of visual weight and balance.
For both drone panoramic photos, I rotated the DJI’s camera to a vertical orientation to get more foreground and sky in the frame. I then swept the camera from left to right, turning the drone on its axis and taking overlapping images as I went. I simply stitched the images together later in Lightroom.

DJI Mavic Mini 3 | 24mm (effective) | 1/8,00th Second | f/1.7 | ISO100
Photographing the view from Y Garn
Finishing up with the drone, I carried on past Llyn Idwal and part way up Y Garn. Although I had appropriate clothing on to photograph in the snowy mountains, I didn’t have hiking sticks or shoe grips and due to the conditions, such as hardened snow and Ice, I decided not to push my luck too much and climbed only part way up, stopping just before the incline became too slippery for spikeless walking boots. I wasn’t overly concerned about not climbing higher because my main intention was to capture this panoramic view of Llyn Idwal and Llyn Ogwen down in the valley.
Once high enough, I found a useful plateau to shoot from. With it getting late on this midwinter’s day, I knew this would be my last opportunity to take photos so with plenty of layers on I settled in for the hour or so I would be up there.

Fujifilm XT5 | XF16-55mm F2.8 | 22mm | 1/125th Second | f/8 | ISO125
The picture above was the first of two panoramic images I took of this wide, wintry vista which features both Llyn Idwal on the right and Llyn Ogwen further down the valley. The mountains in view start from the base of Pen yr Ole Wen on the far left, the mighty Tryfan across the valley nearer the middle of the frame and moving right you have Glyder Fach, Castell y Gwynt and Glyder Fawr and the Devil’s Kitchen just out of view.
With a perfectly level tripod, I took this pano by mounting my camera vertically and sweeping it from right to left, overlapping each image by around 30-40% to make sure I had enough overlap to stitch easily later in Lightroom. This final image is around 140MP and although you can’t appreciate this fully when viewing the image on the screen, the amount of detail as you zoom in is quite astonishing.

Fujifilm XT5 | XF50-140mm F2.8 | 91mm | 1/30th Second | f/11 | ISO125

Fujifilm XT5 | XF50-140mm F2.8 | 115mm | 1/30th Second | f/11 | ISO125
Over the previous 24 hours, I hadn’t used my 50-140mm lens too much and I could see over in the distance how the snow-filled crevices against the darker rockface were creating all sorts of interesting textures and by zooming in on the mountains on the other side of the lake, I was able to fill the frame, creating the above abstract pictures of the mountain range. If you scroll back to the panoramic image above and look closely, you can see what part of the mountain these two are from.
Still using the telephoto lens, I decided to pick out a few more features in the landscape like this here of Llyn Ogwen and the mountain top further down. I just love the soft, cool tones in the closeup photo of Llyn Ogwen below, particularly that vivid blue water. The two different tones across the surface of the lake are created by the partially frozen water. A very cool effect but signs that the temperature was rising.

Fujifilm XT5 | XF50-140mm F2.8 | 50mm | 1/40th Second | f/11 | ISO125
Fujifilm XT5 | XF50-140mm F2.8 | 56mm | 1/50th Second | f/11 | ISO125
With the wind increasing fast, I decided to throw the drone up one last time before it became too windy to fly. I few around capturing different compositions and the below images are two of my favourites. No panoramic images this time but I did manage to capture some different compositions of the two lakes.

DJI Mavic Mini 3 | 24mm (effective) | 1/1,600th Second | f/1.7 | ISO100

DJI Mavic Mini 3 | 24mm (effective) | 1/1,600th Second | f/1.7 | ISO100
Just before the light dipped too much, I took my final panoramic picture of this epic Snowdonia vista. Although it’s a similar composition to my first pano from this spot, I decided to go even wider and included all of Pen yr Ole Wen on the left-hand side. I think this addition adds more weight to the left-hand side and emphasises the distant view down, through the valley.
By this time, it was getting very cold out there and with the light levels dropping the resulting cooler tones work well to portray the freezing temperatures I was experiencing up on the side of the mountain. Just looking at this picture makes my toes feel cold again!! The resulting panoramic is made from 11 vertical pictures and even after some cropping, the resulting image is nearly 200 megapixels. I plan to print this image nice and big and can’t wait to see all that glorious detail!

Fujifilm XT5 | XF16-55mm F2.8 | 23mm | 0.4 Seconds | f/8 | ISO125
Photographing the Nant Gwynant Valley
Originally heading out at sunrise on my final morning to photograph Llyn Gwynant, I arrived in the dark and with my head torch on to guide the way, I climbed up the south-eastern side of the valley to get to a higher, less visited vantage point, offering a fantastic view down the valley towards the lake. Well, today, the views of Llyn Gwynant were far from fantastic. The air was hazy with light rain and there was very little clarity or contrast in the scene so as much as I tried, there was no image to take pointing down the valley.
I did, however, point my camera across the valley towards Gallt y Wenallt. Although at 619m it would be considered small compared to some of the 900-1000m peaks, from where I stood, the contrast provided by the snow on top gave it all the drama I needed to attach my telephoto lens and take the picture below.

Fujifilm XT5 | XF50-140mm F2.8 | 50mm | 1/125th Second | f/3.6 | ISO400
From where I stood, I had a pretty good view of Snowdon so, before heading back to the Ogwen Valley for the last time of the trip, I pointed my lens over at its partially obscured peaks and took the photo below. With the light so bad that morning, I’m pretty pleased to have come away with a couple of images I like.

Fujifilm XT5 | XF50-140mm F2.8 | 80mm | 1/200th Second | f/3.6 | ISO400
After climbing down and driving back in the Ogwen Valley, I did climb up to get another view of Tryfan once more but with the melting snow creating a very messy foreground, I decided against climbing all the way up and instead, used the 50-140mm telephoto lens once more to take a few closeup pictures of Tryfan’s peak and (I think) Glyder Fawr off to the right. It was the stark contrast and textures created by the dark, menacing rock and the bright, partially melted snow that I like about the photos I took. With poor shooting conditions, getting in close and seeking out alternative ways to photograph these epic landscapes was a great way to avoid coming away from this morning’s shoot empty-handed.

Fujifilm XT5 | XF50-140mm F2.8 | 54mm | 1/200th Second | f/9 | ISO200

Fujifilm XT5 | XF50-140mm F2.8 | 140mm | 1/100th Second | f/9 | ISO200
Photographing Llyn Idwal and the Devil’s kitchen
My very last stop before heading home was back up at Llyn Idwal. I had passed the waterfall at the foot of the trail a few times during the trip, each time hoping to stop and get a good photo of this view looking up at the falls with Y Garn’s peak in the background. Frustratingly, each previous time, the conditions weren’t right for the picture I wanted to take. Either the sky was bright blue with too much contrast or, the sun was directly in line with the view meaning the sky was too bright for my taste.
Thankfully, as I crossed the bridge on this very last visit, the shot was on! The low, dark clouds kissing the peaks in the background added the right amount of drama and the dark rocks flanking the falls helped to emphasise the water making its way down the hill.
With the tripod up and the 16-55mm lens attached, I opted for a longer exposure to smooth out the water as it cascaded down, between the rocks. With the ND filter on the lens and with everything in the frame lined up, I took what ended up being one of my favourite shots of the trip.

Fujifilm XT5 | XF16-55mm F2.8 | 18mm | 1/5th Second | f/10 | ISO200
Happy I had the waterfall shot I was after and having arrived up at Llyn Idwal, I wanted to take a picture of this classic view of The Devil’s Kitchen. The wind was getting up by now and it was creating ripples across the lake’s surface, giving it a messy, cluttered look, so before taking the shot, I mounted my ND filter (6-stop I think) to smooth out those ripples and help simplify the composition.
I just love the texture in those foreground rocks, for me they are the main subject of the composition, so I got the camera as low down as I could to make the most of them. Along with the ND filter I was using, I also attached my circular polariser which worked a treat to remove any glare from the rocks and eliminate any reflections in the water and bringing out some of the details from underneath the surface closer to the camera.
In an ideal world, I would have liked just a bit more sky but if I lifted the camera, I would have lost some of the foreground elements, so this would be the second time in the trip that the 16-55mm lens was a little tight. Next time I visit, a wider lens will be in my bag for sure.

Fujifilm XT5 | XF16-55mm F2.8 | 16mm | 13 Seconds | f/8 | ISO200

Fujifilm XT5 | XF16-55mm F2.8 | 22mm | 10 Seconds | f/8 | ISO200
With a long drive home ahead of me and with the rain now falling hard, it was time to call it a day and head to the car.
As a photographer, when you visit an area for the first time and don’t get the opportunity to return often, luck plays a huge part in whether you walk away with any keepers and it would be unrealistic to expect to come away from every location with a banging shot, so I am incredibly grateful for those I did manage to get on this trip and with some lessons learned and experience gained, I feel a little more prepared for my inevitable return with the camera.
Thanks for sticking with this incredibly long post1
Until next time,
Trevor.

Shoreline by David Southern | My Photo Bookshelf
Shoreline by David Southern. An abstract view of natural shapes, patterns and textures created by mother nature along a 40-mile stretch of England’s northeast coastline.
I’m unsure how I originally came across David Southern and his close-up, abstract work. It could have been a podcast or maybe on Instagram via another member of their Parhelion creative. Still, either way, the timing could not have been more perfect, as around the same time I started to become more interested in this genre of photography, I also came across David and his Shoreline book.
The synopsis
All the images within the book were captured within a 40-mile stretch of coastline. With his imagination let off the leash David did not limit himself to seeing an attractive pattern or shape etched in rock but rather enjoyed the liberation of finding subtleties of light, shade and water flow that created compelling images.

My thoughts about the book
When this book first arrived, not only was I blown away by the imagery on show, the lines, the patterns and details but the imagination to see familiar-looking shapes and objects and communicate these through clever titles. The below page spread is a perfect example of David doing this. It’s easy to see that so much work went into each and every individual photo to make the very most of the compositions on offer.
On the day I received the book, I had a quick flick through a few of the pages and noticed the creative image titles, so when the time came to spend a bit more time with the book, I had a lot of fun studying each image and trying to guess what the title might be after. I was wrong almost every time.
The book itself is well presented, with minimal text except for David’s introduction and a forward written by Rachael Talibard (which is a nice touch.) The sequencing works really well with some fantastic image pairings but as mentioned in other photo bookshelf posts, I’m not a huge fan of pictures that span multiple pages as it partly obscures the image and can often interrupt the flow and this book has a few of them.
This fantastic project and beautiful imagery deserve to be shared in printed form and this book does the job perfectly. I’m thrilled to have it on my bookshelf.
Book Details
Hardcover
Size: 240mm x 280mm
Pages: 116
Availability at the time of writing: Still in print and available from the author’s website at https://www.southernphotography.co.uk/

Landscape Within by David Ward | My Photo Bookshelf
Written by one of the British landscape photography masters, David Ward takes a creative deep dive into the world of landscape photography.
I have followed David Ward’s work for a number of years and consider him up there with some of the British landscape photography masters such as Joe Cornish or Charlie Waite, so, as I started to grow my own photography book collection, I was please to find David’s 2004 book Landscape Within and quickly added it to my bookshelf.
The synopsis
While no photographer would deny the importance of mastering the technicalities of the craft, most would agree that true satisfaction comes from using technique to realize more profound, creative goals. In this book, distinguished landscape photographer David Ward investigates the goals of photography and how they can best be achieved. He is concerned, primarily, with the nature of creativity as it is experienced and practiced by photographers, and with the thought processes that go into making an image that aspires to be a work of art. In exploring these issues, and in drawing on his own superb work, he has produced a book that goes far beyond the "how to" manual, addressing questions that, though rarely asked, go to the heart of every photographer’s ambitions. David Ward has been a fine-art landscape photographer for more than 20 years; his work has appeared in many publications, including Outdoor Photographer and Amateur Photographer.

My thoughts about the book
With so many books covering technique, technical know-how and gear, this soft-cover book from David Ward is more about art, creativity and “the why”. David covers so many topics, too many to list here. Still, some of the more notable for me was his views on photo manipulation, the art of seeing, what defines an intimate landscape, historic references and much, much more.
I particularly liked chapter 4, The Art of Seeing. Here David talked about having creative concentration and although he didn’t directly reference Mindfulness, he talked about it in all but name itself including how the mind needs to be clear and focused on the task at hand and not distracted by everyday life. He referred to it as peaceful daydreaming, which I kind of like too. With a focus on the intimate landscape, I also enjoyed how David describes the differences between what makes a scene intimate vs a wide vista and then proceeds to dissect the building blocks of the intimate landscape photograph, talking about the form, texture, perspective and rhythm.
This book was published in 2004 so, at the time of writing, nearly 20 years ago. Although there are some references that give this away, the fundamental message is as true today as it was then. To put it bluntly, I think this book has aged very well as it focuses on the creative, rather than the technical side of our craft.
Along with the excellent writing, David has included lots of his beautiful intimate landscape photos throughout the book. Not only do these photos illustrate the book nicely, but they also provide a timely rest for your eyes and mind to gaze at before taking on the next page as for me at least, some of the writing is a bit full on and takes a couple of reads to click.
For anyone who likes to study landscape photography a little further, to gain a deeper understanding of the craft as well as learn a little of the history along the way, then this is well worth a read.
Book Details
Softcover
Size: 223mm x 228mm
Pages: 128
Availability at the time of writing: Unavailable from the usual UK booksellers. Consider buying a used copy.
What's in my Camera Bag for Landscape Photography (2023 Edition)
Want to know what gear I take on a landscape photography shoot? This post provides a look inside my camera bag and lists the equipment I use in 2023.
With my last update now 2 years ago and with so much of my landscape photography gear changing in 2022, I thought it about time I posted an updated “What’s in my camera bag?” blog post. Here you will find a list of the camera equipment I use and a little bit of information about why it’s in my camera bag.
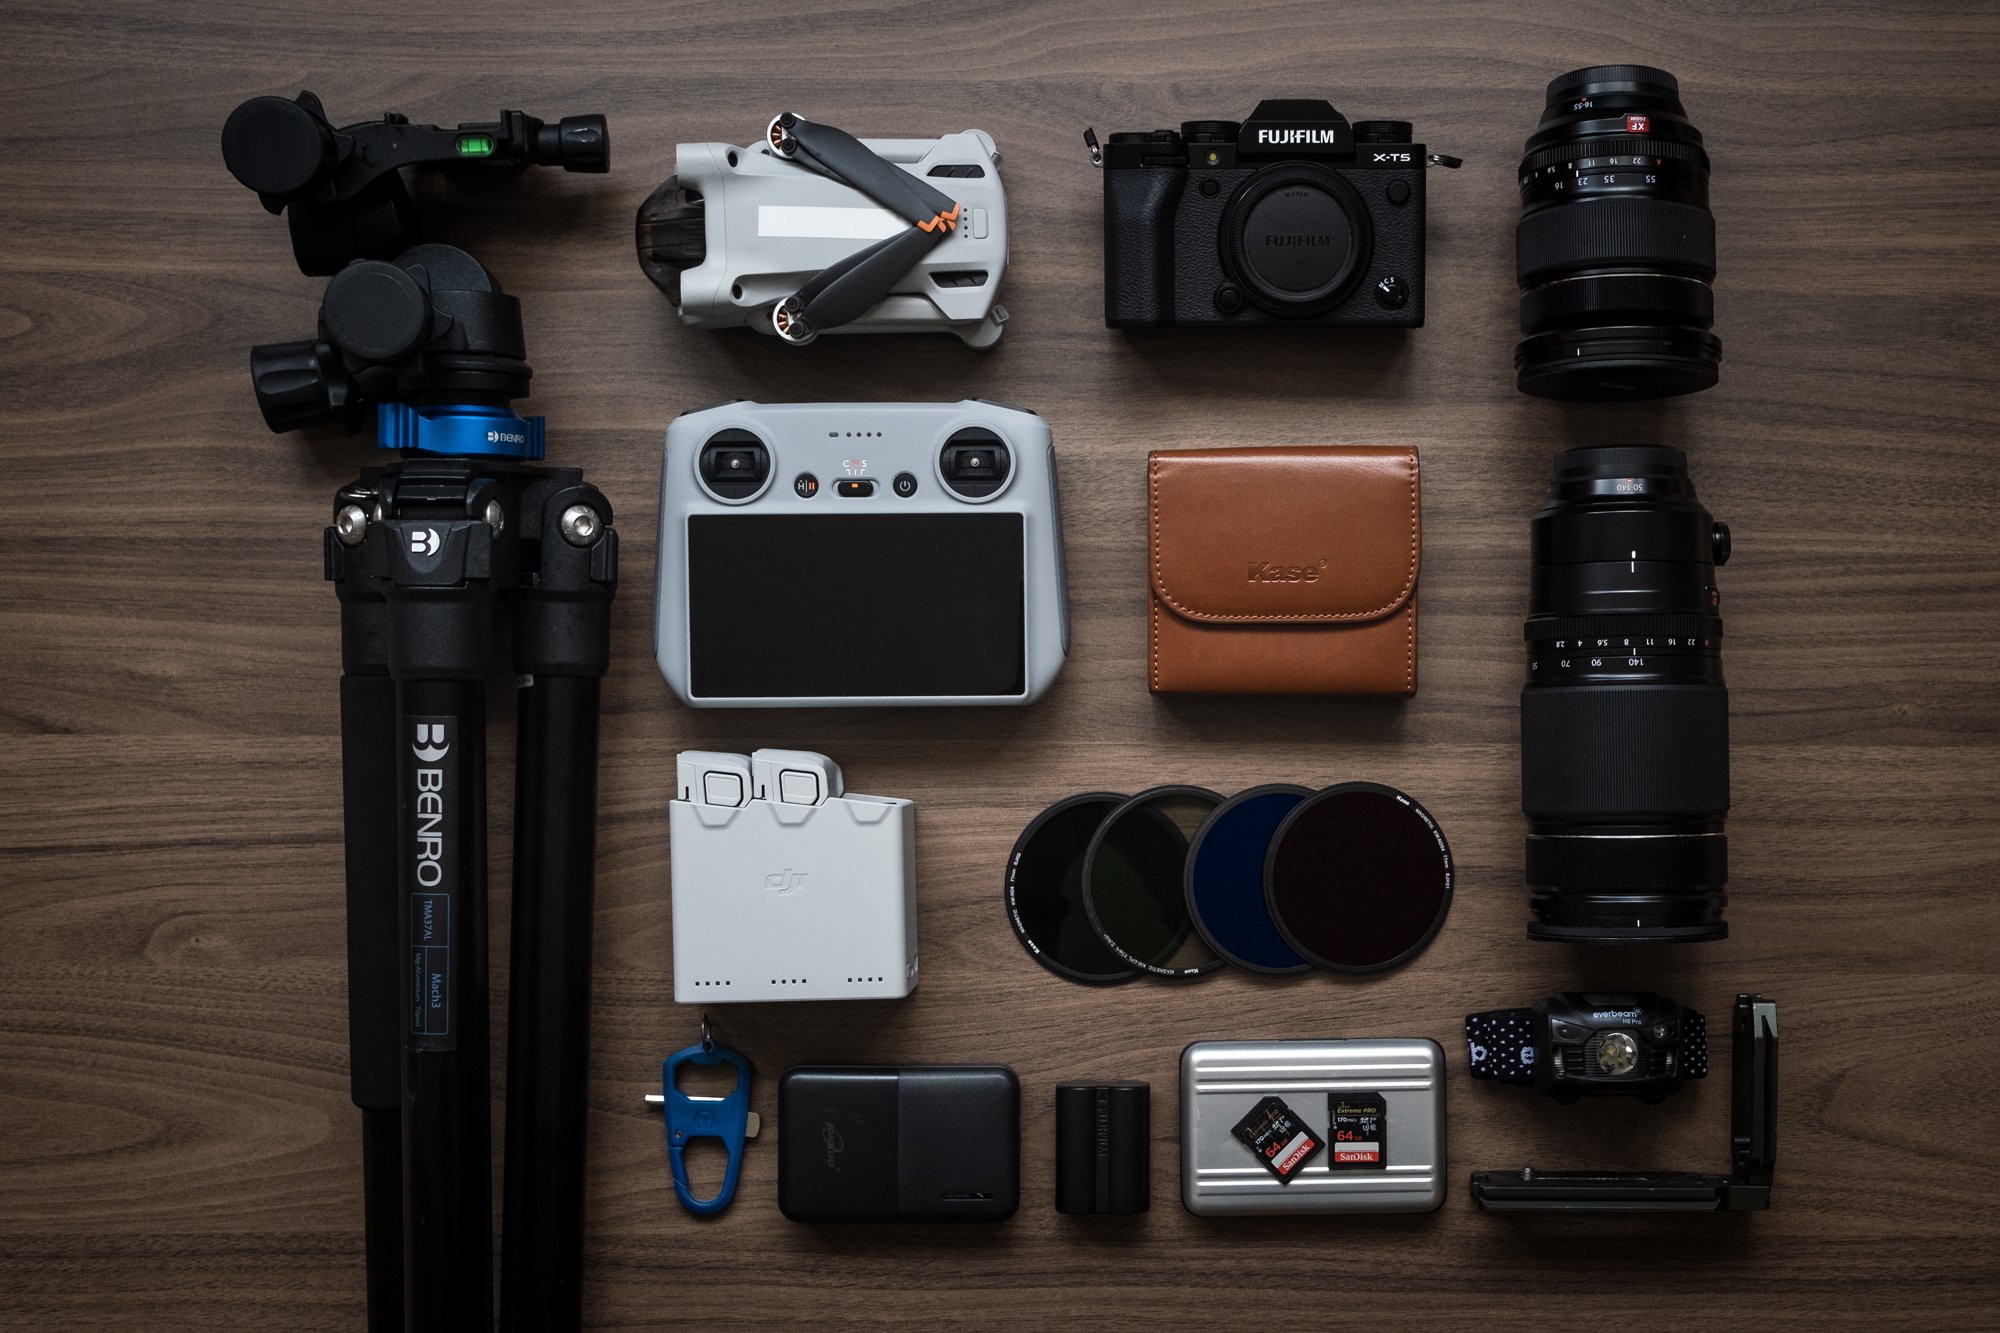
My primary landscape photography gear
Fujifilm Camera and Lenses
XT5 camera: Having used the excellent XT2 since 2017 and it decided to fail on me while out on a shoot, I held out repairing it or buying a new main camera body as based on the rumours I’d heard, it wasn’t going to be long before Fujifilm released the XT5. Sure enough, a few weeks later they did and the day they announced it, I placed the order.
XF16-55 F2.8 standard zoom lens: Although I still have the very capable XF18-55mm, in 2022, I decided to upgrade to the XF16-55 F2.8 as I wanted all of my main landscape gear to be weather sealed. The improved optics is a nice bonus, but the extra weight most certainly isn’t.
XF50-140mm F2.8 telephoto lens: For the same reasons I upgraded my standard zoom, I also traded in my XF55-200mm lens for the weather sealed XF50-140 F2.8. I do miss that extra reach now and again but my plan is to buy the 1.4x teleconverter to get that 200mm (300mm FF) reach for the odd occasion I need it.
DJI Mini 3 Pro drone
Last year, after what seemed like an eternity of indecision, I finally took the plunge and purchased my first drone. For a number of reasons, I opted for the DJI Mini 3 Pro. Having already posted about why I chose this drone and what I think about it 6 months on, there is a dedicated blog post you can read here: DJI Mini 3 Pro | A Landscape Photographer’s Review.
Filters and accessories
Kase Wolverine magnetic filters: I used to carry larger, square slide-in filters and would spend time fiddling with step-up rings for the different lenses and the holder before being able to slide in the filter I intended to use. That all changed when I got the Kase Wolverine filters. No more fuss! Snap the filter onto the lens and get shooting. I wrote more about my experiences with these filters in a previous blog post here: Kase Magnetic Filters | A Landscape Photographers Review.
Benro Mach3 TMA37AL tripod: After using my previous tripod for a number of years, I was after something a little sturdier and a little taller without relying on a less stable centre column. After a bit of research and getting a few recommendations, I eventually opted for the Benro Mach3TMA37AL.
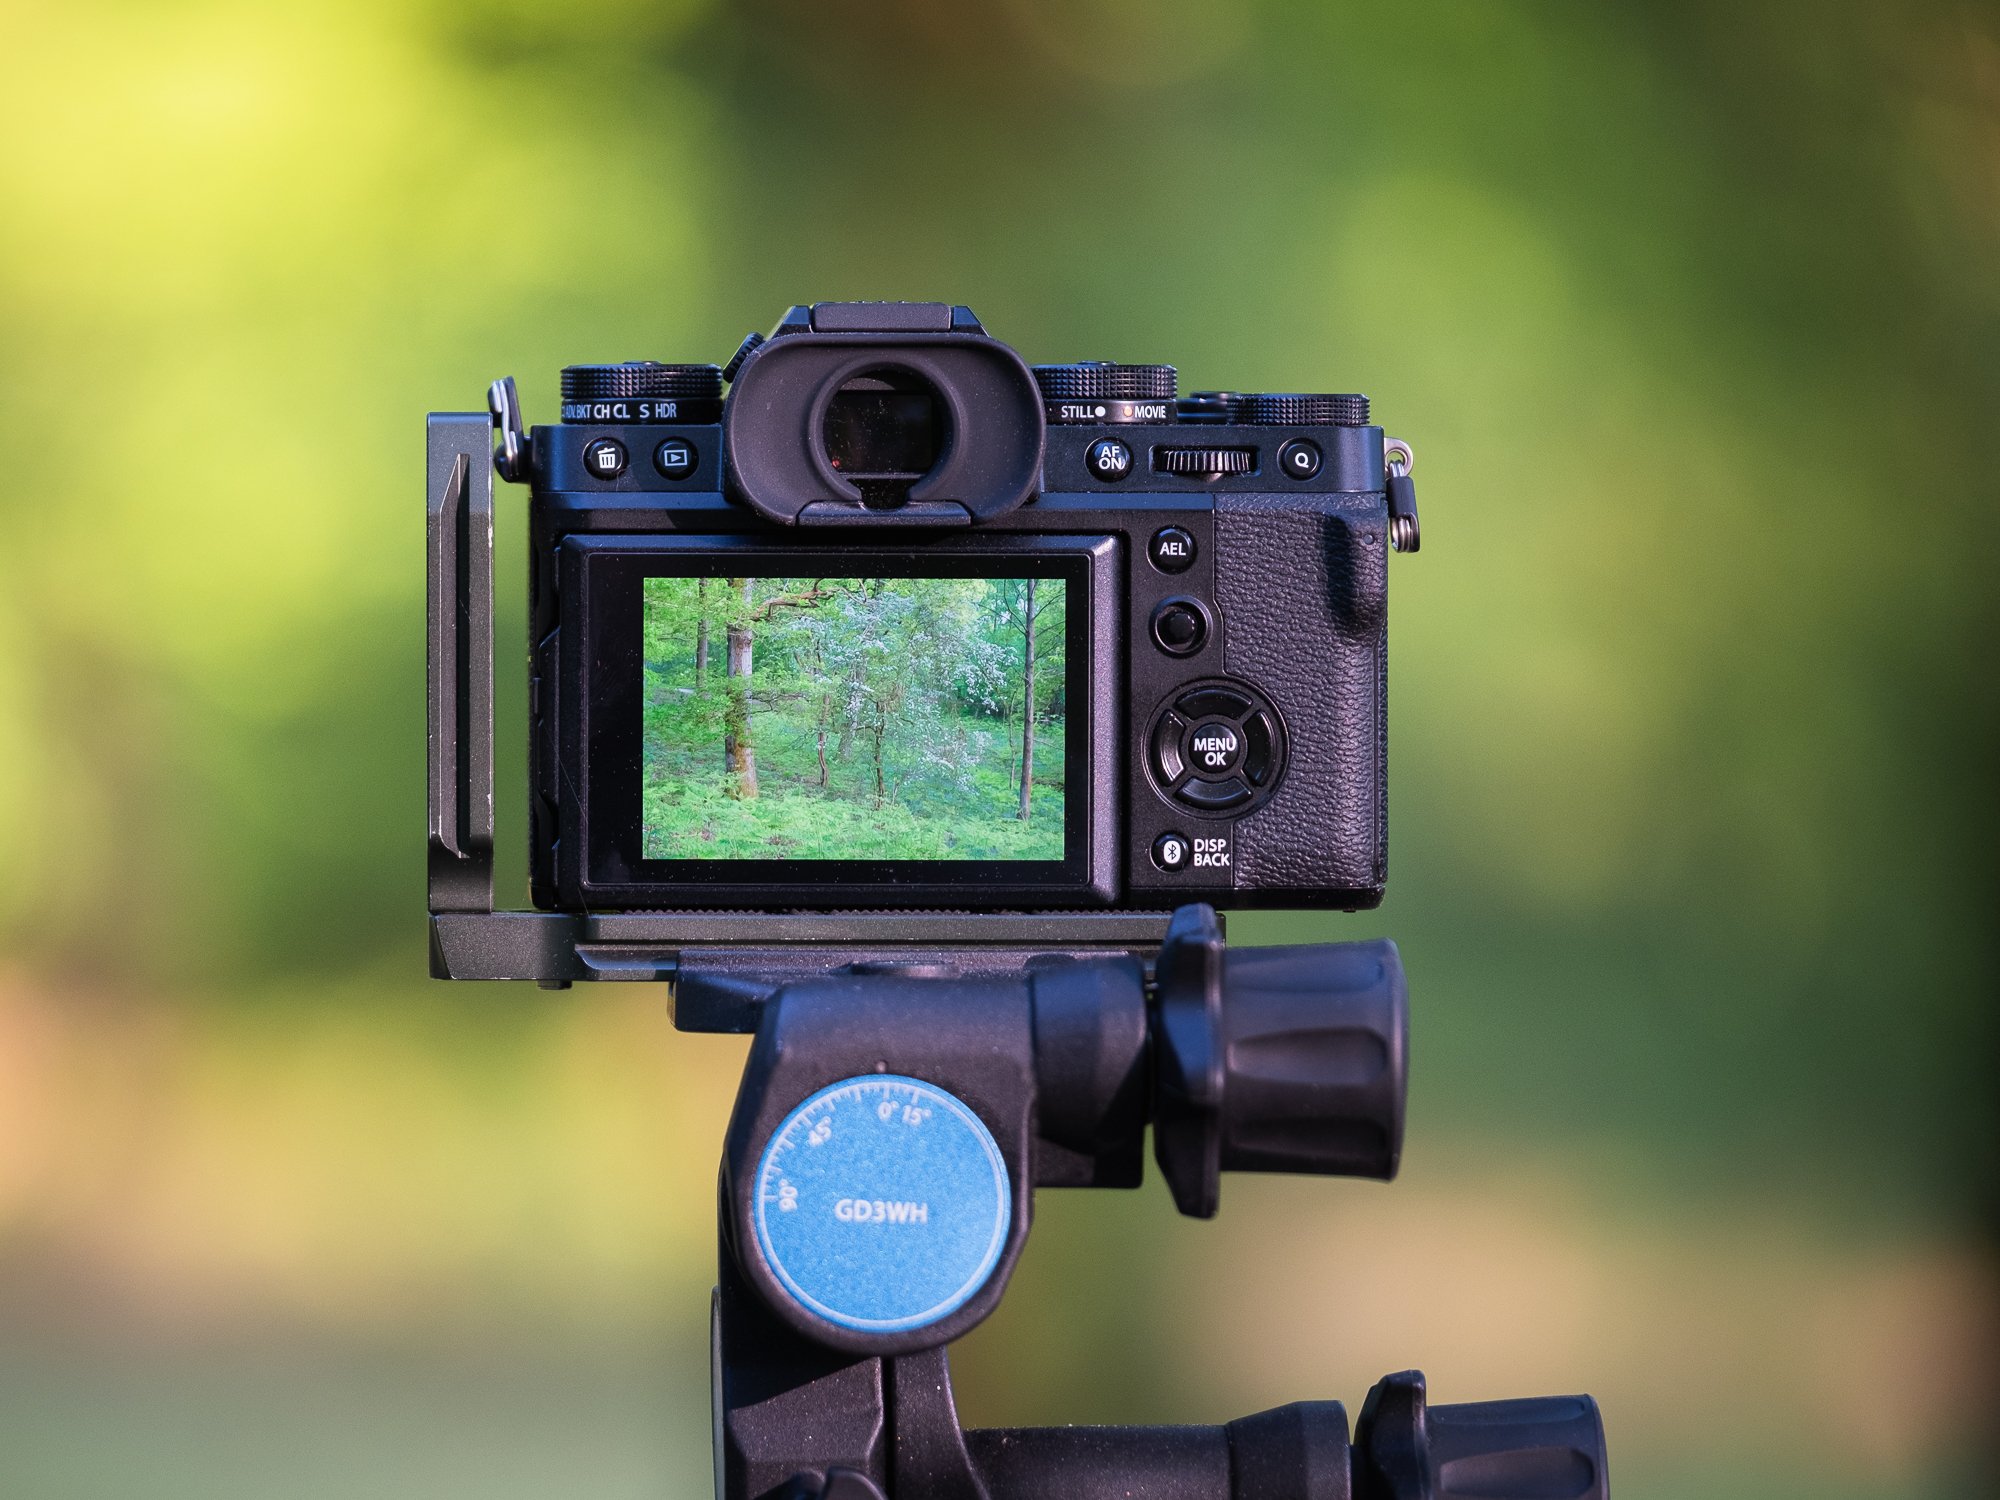
Benro Gd3Wh geared tripod head: For years I’d been happy to use a ball head on my tripod but when I started taking woodland photos, the lack of precision and having to compensate for further movement while making small adjustments with the tripod head began to frustrate me a lot. I invested in this Benro geared head and although it has a bit more bulk, it has solved this problem for me completely.
Spare batteries: The Fujifilm NP-W235 used in the XT4 and XT5 is so much better than the last generation of batteries and I can shoot for much longer on a single charge. So far, I have one spare battery but I intend to add a couple more soon enough.
Memory cards: Can’t have too many memory cards. I still prefer to use Sandisk as they have been bulletproof for me so far but I know there are other brands just as good on the market.
3 Legged Thing L-bracket: Used to quickly switch from landscape to portrait orientation when using my tripod.
3 Legged Thing Toolz: A handy tool to tighten tripod legs, remove L-brackets, etc.
Headtorch: Not much to say about this one, other than it is bright, light, waterproof and rechargeable. It cost about £15 and lights my path on those dark treks before or after a shoot.
Power bank: Now that I carry the DJI Drone with me, the spare battery case can also charge my other devices if I start to run low so technically, I could do without this little guy, but being small and light, it doesn’t hurt to keep a bit more juice with me while out and about.
Camera Bag
Although I still have the bags I mentioned in my last “What’s in my camera bag” post, I now use the Vanguard VEO Active 46 as my primary means to carry my landscape photography gear around. Although I was on the lookout for a new bag when I went to the Photography Show back in September 2022, I hadn’t really considered Vanguard until I had a look around their stand and saw the VEO Active range. For the features I wanted, the size, weight and price, it ticked all of the boxes for me.


My lightweight/walk-about camera and lenses
In addition to my main landscape photography kit, the list below includes another Fujifilm camera body and a few smaller lenses I use when I want to travel a little lighter. Typically, I might swap my heavier camera gear with these smaller alternatives when I head out on a photo walk in London or I might pack lighter when taking a city break abroad. Also, on days out with my family, I will often take with me just the single X-T30 camera and prime lens so I can snap a few nice family photos without lugging around lots of gear with me.
Fujifilm Camera and Lenses
X-T30 camera: Apart from a few “Pro’ features such as weather sealing and dual card slots, etc, this is a very good camera. When my XT2 camera failed, this smaller, but very capable camera became my primary shooter for a few weeks and didn’t miss a beat.
XF18-55mm standard zoom lens: This is the very first Fujifilm lens I bought back in 2016 as it came in the kit with my since-retired X-T10. Although it looks a little beat up now, nearly 7 years on and it is still going strong and I will often grab it when I want to travel light with the versatility of a zoom lens.
XF16mm F2.8 prime lens: I love this range of small primes from Fujifilm. They are compact, light, weather sealed and most importantly, excellent quality. I will often head out onto the streets of London with a single camera and prime lens combo. The simplicity and lack of bulk can be quite liberating compared to when carrying a full bag of landscape photography gear.
XF23mm F2 prime lens: When it comes to primes, this is probably my favourite focal length. Equivalent on a full frame to 35mm, it’s a familiar focal length which is wide enough to include some background but not so wide that it can’t be used for more intimate subjects. It’s incredibly versatile.
Tripod and accessories
3 Legged Thing Corey tripod: I wanted a smaller, lighter tripod to use while in the city or when travelling and this was my choice. Nearly three years on and it works as well as the first day I used it.
Manfrotto Pixi Mini tripod: A pocketable tabletop tripod which can support a surprising amount of weight. I’ll carry this with me when I want to keep my kit as light as possible.
Peak Design Slide Lite neck strap: A comfortable, strong neck strap which comes with a handy quick-release function for when I want to quickly remove the strap.
Spare batteries: Can’t have too many of these, especially when these smaller NP-W126S barely last a few hours when the temperature drops!

Something I’ve mentioned previously and worth reiterating is that I don’t get that excited by new camera equipment and if there is no good reason to upgrade, I’ll happily stick with what I have. After all, I used my previous Fujifilm XT2 camera body for around 6 years and had some of my lenses even longer. Don’t get me wrong, I enjoy new gadgets like everyone else, but when it comes to my photography gear, it’s different. I actually don’t look forward to using a new camera and I prefer familiarity over novelty. Even when upgrading to the newer version of a camera I already own (like I did last year), there is still a period of adjustment to get to grips with new features or changes to the menu system.
My advice to anyone buying new camera equipment is to invest in the gear you feel most comfortable using. If you can, visit your local camera store and hold it in your hands to get a feel for the size and weight. When you get it home, get to know it well and customise the menu and physical buttons so your most important settings are at your fingertips. This ensures the physical act of taking photos is as seamless as possible, allowing you, the photographer, to “focus” on being creative and working the light or composition in front of you.
Until next time.
Trevor

Woodlands by Nigel Danson | My Photo Bookshelf
Woodlands by Nigel Danson is the second book in the series and having already purchased the first, I had no hesitation adding another of his to my collection.
I’ve been photographing the woodland for a couple of years now and throughout this time, Nigel has been such an inspiration to me while honing my own woodland photography craft. So, when Nigel released his Woodlands Book, I bagged myself a copy straight away.
Nigel’s synopsis
I feel that woodland photography offers something more than just the fun of the pursuit of a beautiful image. It is the exact opposite of the adrenaline driven climb up a mountain for first light to get that magnificent shot as I showed in Vistas.
I take a trip through the seasons and share my favourite images of oaks, beeches, silver birch and many more woodland scenes from the UK and further afield.

My thoughts about the book
Following on from Vistas, Woodlands is the second in a trilogy of landscape photography books and features a large collection of Nigel’s stunning woodland photography.
There is a familiar look and feel to Woodlands and that’s because this hardcovered book has the same cloth finish and foil lettering as Vistas and that consistent design runs throughout the inside pages with the same layout and lettering. It’s a sturdy, well-crafted book which feels solid and durable.
The images, as you might expect if you follow Nigel’s work are top-notch. I particularly like the photos that have his trademark painterly look, as I think this approach to editing works really well for woodland scenes and with just a small amount of text here and there, the photos taking centre stage on the page. The images are grouped together in chapters based on the season they were taken and personally, I think that’s the right way to present a book like this as it allows for the most natural flow from cover to cover. That being said, sequencing the images within the chapters may still prove tricky but Nigel’s done a good job here too.
The book finishes off with a little information about the gear Nigel used and I like this approach. Gear is not the be-all and end-all and should not detract from the photo itself, but dedicating a page or two at the end is a good, subtle way to address any questions readers might have about the gear used to capture these photos.
This is a fantastic woodland photography book and I certainly recommend it, especially for those who love to spend time amongst the trees like me.
Book Details
Hardcover
Size: 300mm x 240mm
Pages: 128
Availability at the time of writing: The book is now sold out, but you can sign up to be notified of future print runs on Nigel’s website here https://www.nigeldanson.com/products/woodlands
My Favourite Landscape Photos from 2022
Join me for my usual yearly retrospective where I share some of me favourite photos I took in 2022 and what my plans are for 2023.
What I like about these yearly retrospective blog posts is how they encourage me to look back at the photos I took in the last 12 months, assessing how successful the year was (photographically) and whether I feel my craft has taken a step forward or not. It gives me a chance to reflect on the many photo outings I made and reminds me of those special moments like the whisper-quiet mornings in the woodland where all you can hear is the sound of your own breath or the explosion of light appearing over London as the sun sets and the controlled panic trying to capture it before it fizzles away.
Along with cityscape and landscape photography, last year (2021) was my first full year taking woodland photos and you might think that’s probably enough but for some reason in 2022 I also started to dabble in both intimate landscapes and drone photography too. I know that specialising in a particular genre may be a better route to take for some, but personally, I just want to photograph whatever appeals to me and have as much fun being as creative as I can along the way. After all, hobbies are supposed to be just that….fun!
If you were expecting the usual top 9-10 photos other photographers tend to share at the end of the year, I’ve got bad news. I just couldn’t whittle down all of the photos I wanted to share to that fewer number. Instead, I’ve organised my photos into 7 groups and selected 4 for each, that’s 28 photos I’ve shared with you from those I took in 2022.
The Wider Landscape
I’m not quite sure why but I have to admit, I struggled more often than not to be inspired to get out and take photos of the wider vistas in 2022. I think it was a combination of spending more time photographing the woodland and feeling the need to step back from some of the default landscapes, which most people (including myself) photograph here in Surrey and Sussex. Nevertheless, I still managed to add a few vistas to my landscape collection. Below is a small selection of those I took in Sussex and the Surrey Hills.

Fujifilm X-T30 | XF50-140mm F2.8 | 140mm | 1/60th Second | f/8 | ISO160


The Cityscape
For obvious reasons, the last couple of years have been a bit stop-start in terms of getting into London to take photos of its fantastic cityscape, but as I work in the city and started to go back to the office more often, in 2021, I had more opportunities, both at the beginning and end of the day to get out and about with my camera. Along with some cracking sunsets like the one I managed to take below of Tower Bridge and the Shard, I also focused on getting up high and taking photos of the city from above and have included a couple of those I took below. If you want some tips as to where to take photos of London from a high vantage point, check out one of my previous posts here: My Top 5 Free Rooftop Locations to Photograph London
One consistent theme I’ve noticed in my cityscape photos in 2022 has been capturing more drama in the sky. Be it epic light, moody clouds or a rain shower passing in the distance, I’ve managed to add quite a few of these to my portfolio which I’m particularly pleased about.

Fujifilm X-T30 | XF18-55mm | 19mm | 1/100th Second | f/9 | ISO160


The Woodland
As I mentioned before, to the detriment of spending time taking photos of the wider landscape, I focused a lot of my time in 2022 taking photos of the woodland, particularly in a forest close to where I live. Looking back between the photos I took in 2021 and 2022, it’s my woodland photography where I feel I’ve made the most progress. Seeking compositions in the woodland not only takes practice, it also requires me to be in a particular mindset, open to ideas of what will work compositionally and for me, this requires a clear, focused approach whilst among the trees. I think that’s why I enjoy the process so much, as being in the zone means a clear, distraction-free mind which I find quite relaxing and meditative.
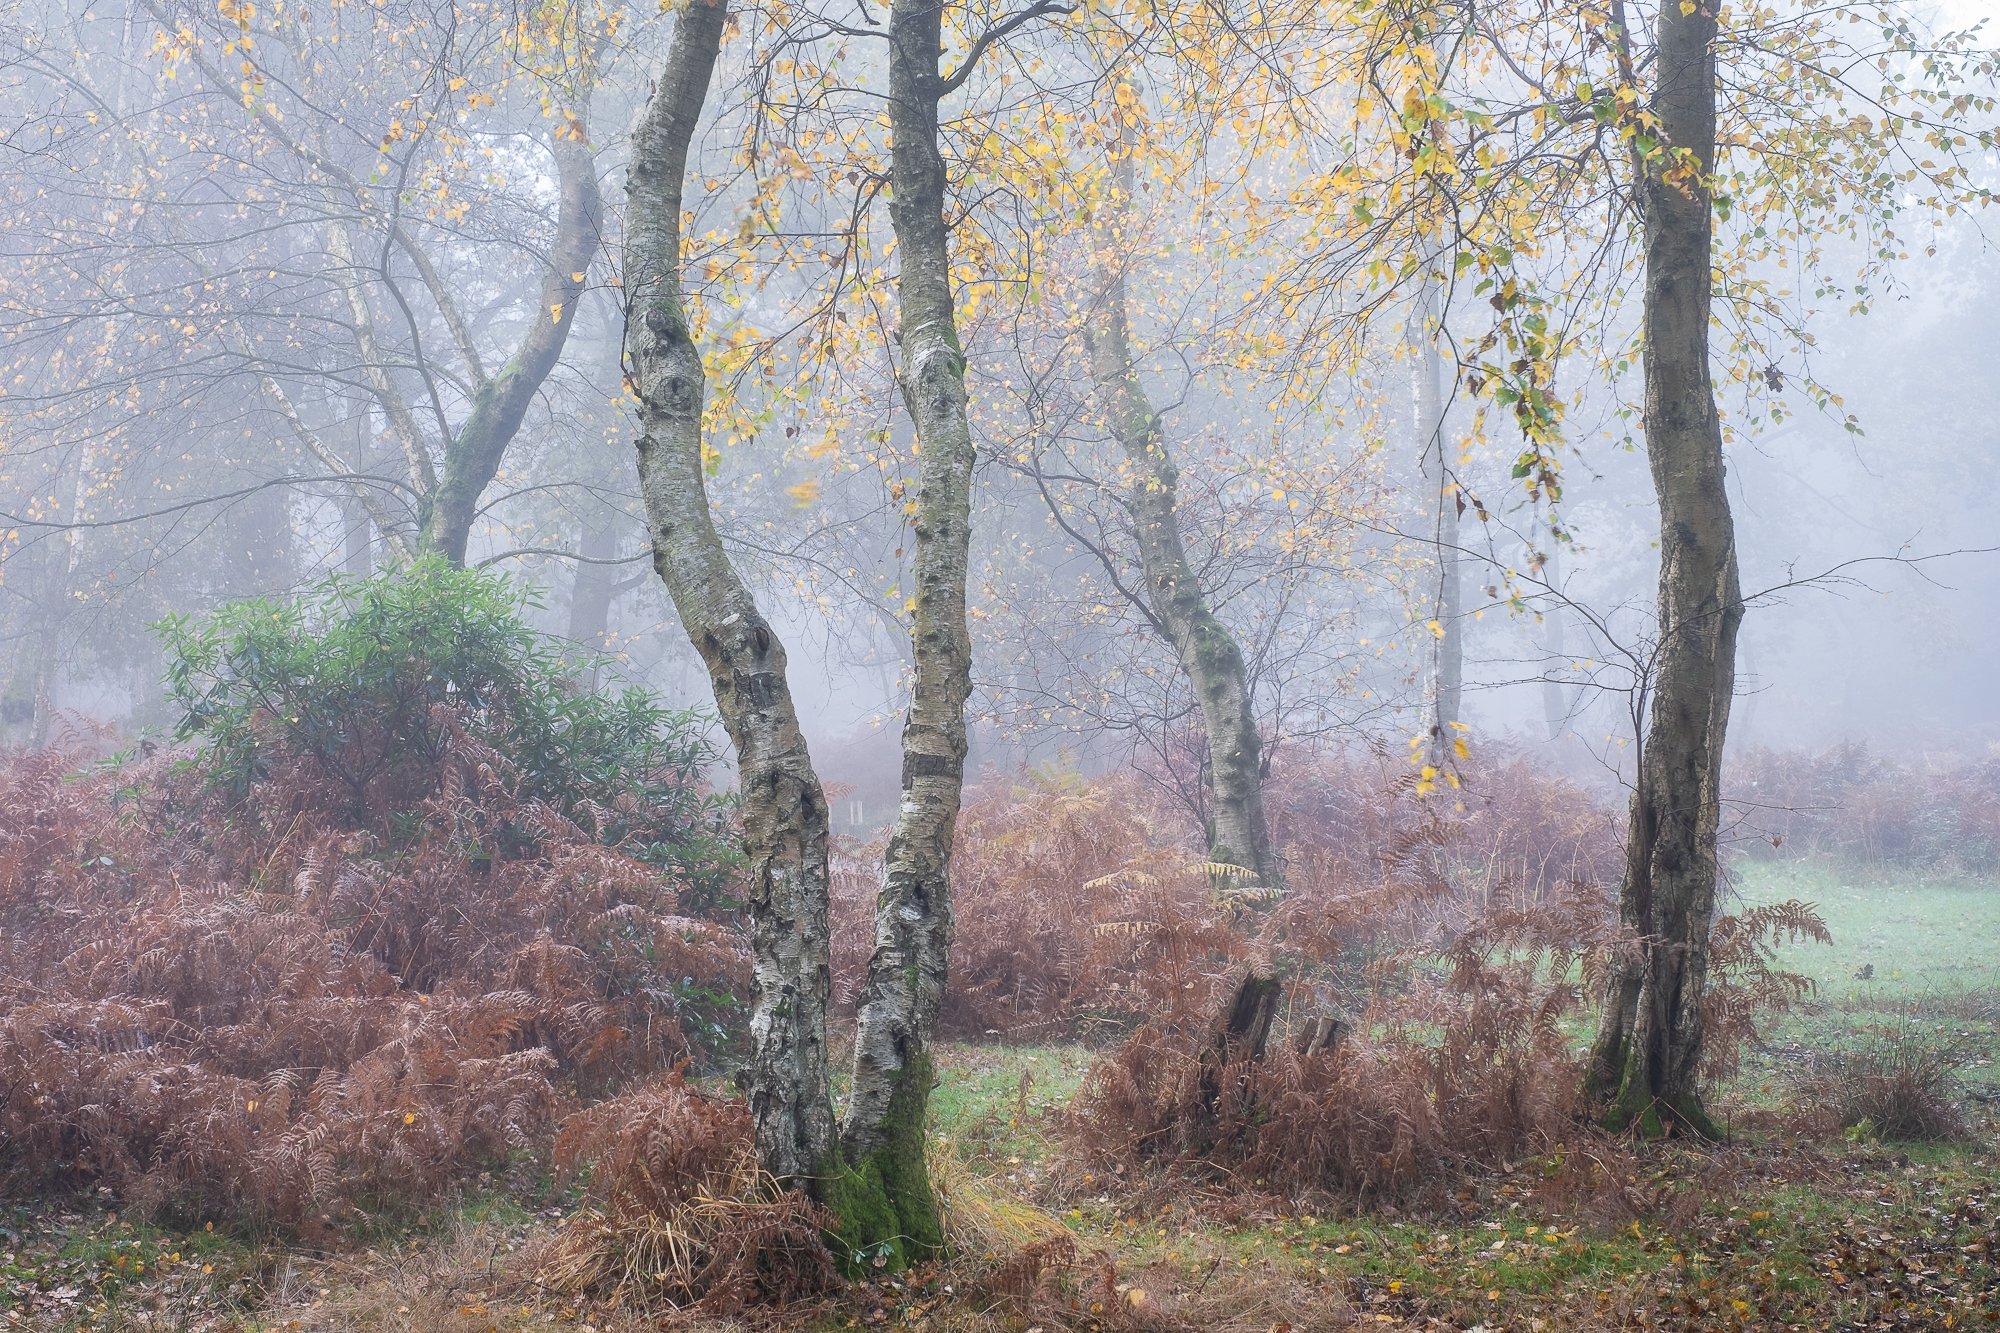
Fujifilm X-T30 | XF16-55mm F2.8 | 35mm | 1.3 Seconds | f/9 | ISO160


The South Coast
Although I spent a fair amount of time taking photos along the Sussex coast in 2022, I would have loved to have spent more time down there. The large picture below was taken along the modest dunes at Camber Sands, a stunning stretch of sandy coastline in East Sussex but due to the variety of cliffs, lighthouses and undulating landscape, the stretch of coastline between Beachy Head and Cuckmere is where I spend most of my time. That’s where I took the other three photos below. In 2023, I want to spend more of my time down along the coast, not only capturing the wide vistas on offer but also taking more intimate photos, capturing the shapes and patterns created by the movement in the water.

Fujifilm XT2 | XF10-24mm | 10mm | 1/80th Second | f/10 | ISO800


Photographing Wales
Yes, I’m kind of late to the party but I’ve fallen in love with Wales. After my autumn visit to the Brecon Beacons in 2021, I made two further trips to Wales in 2022. First up, I returned to photograph the falls in the Brecon Beacons, this time to see how it looked in late spring with the fresh vibrant leaves on the trees. Then in June, during a family trip to Snowdonia, I managed to get away with my camera a few times and came away with my own take on this classic view of the mighty Tryfan. I just wish I lived a little closer so I can visit more often.

Fujifilm XT2 | XF10-24mm | 14mm | 1/6th Second | f/9 | ISO200
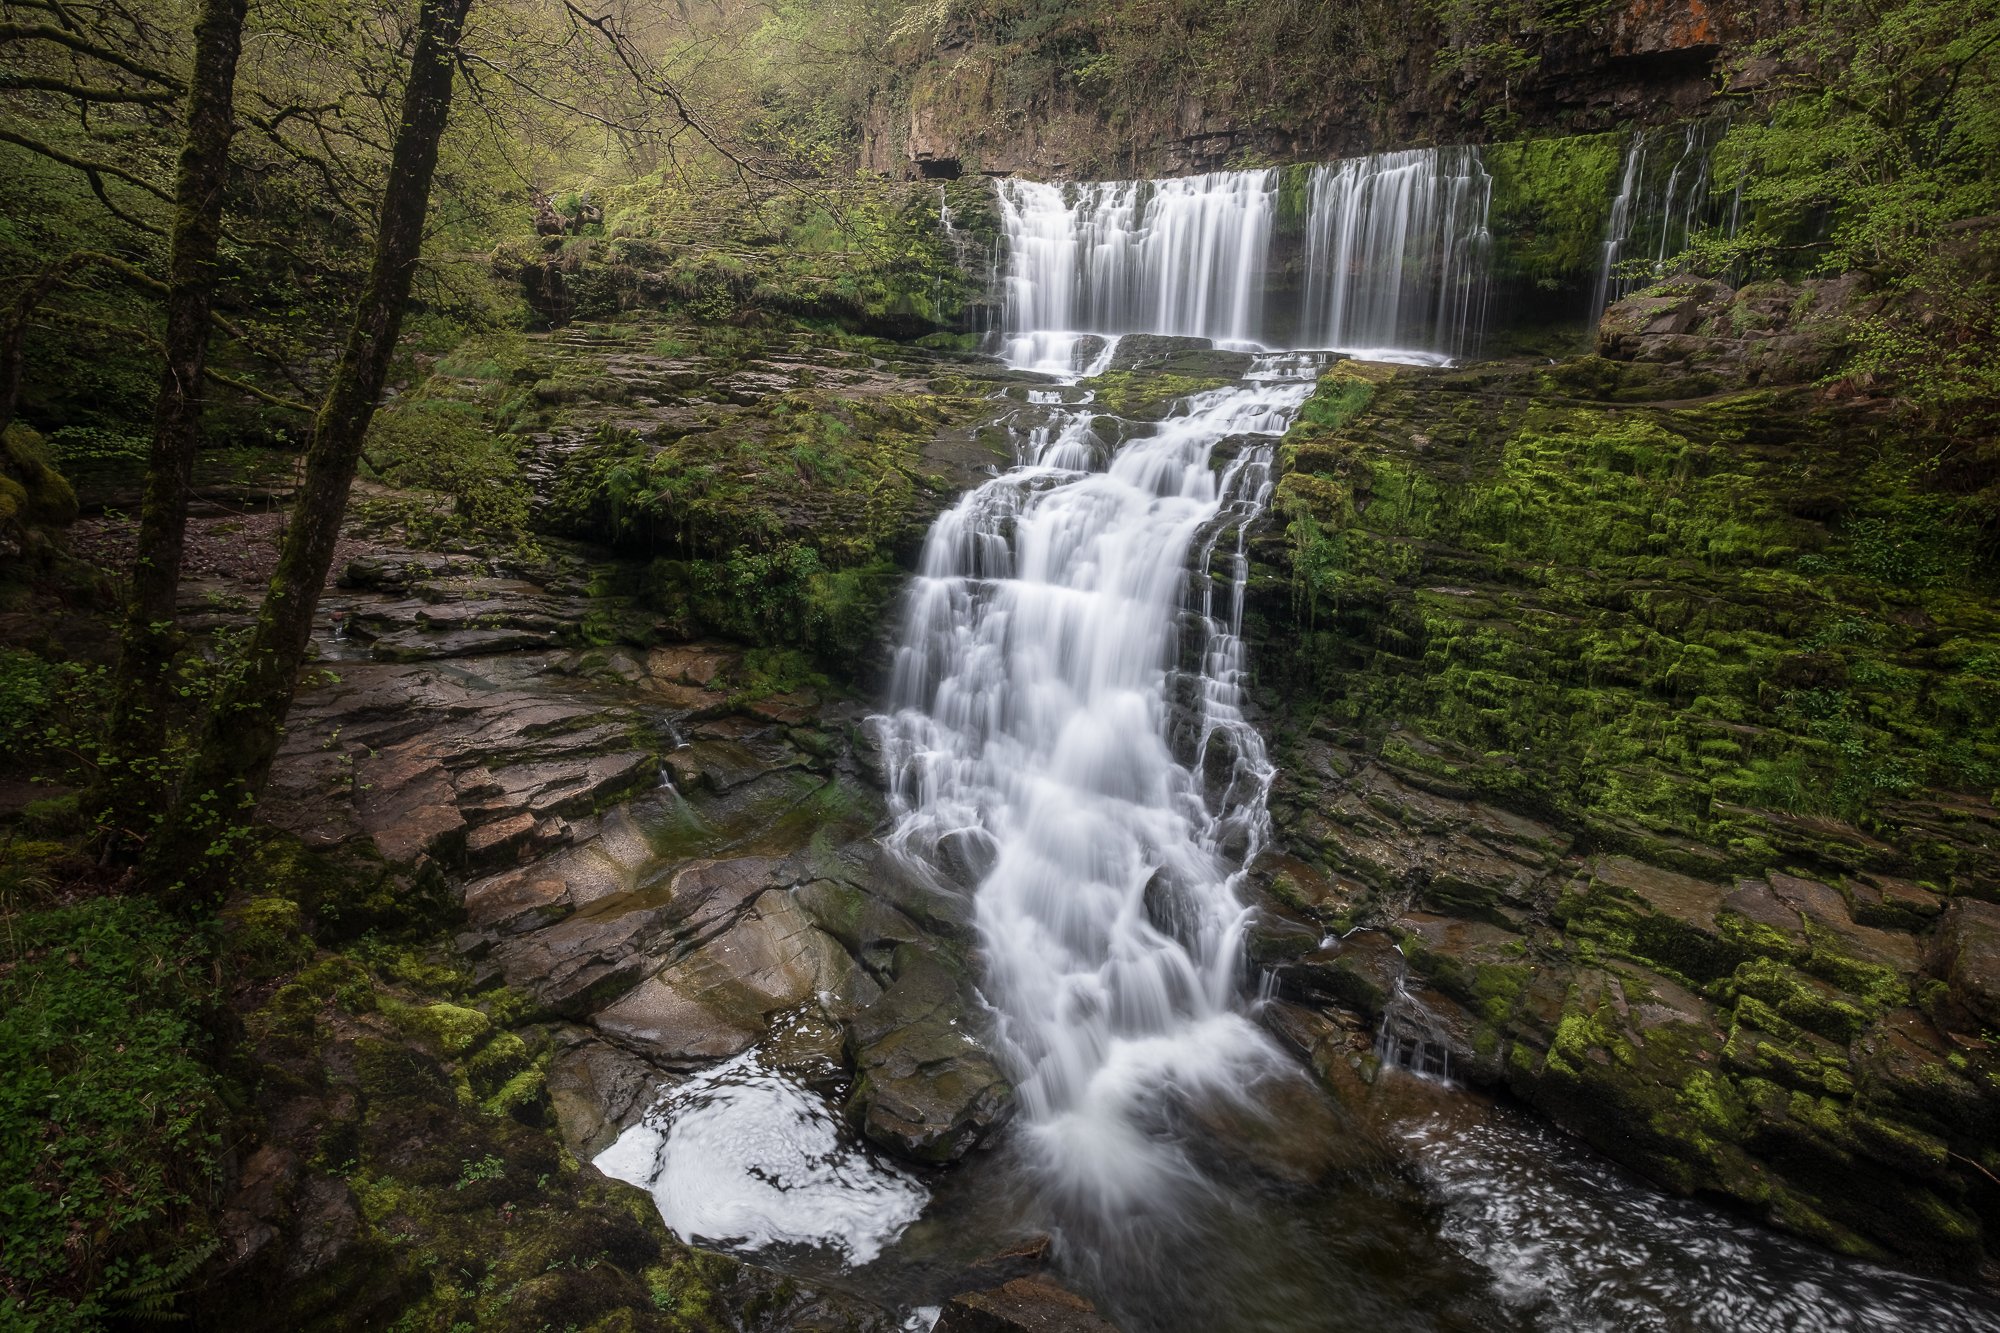
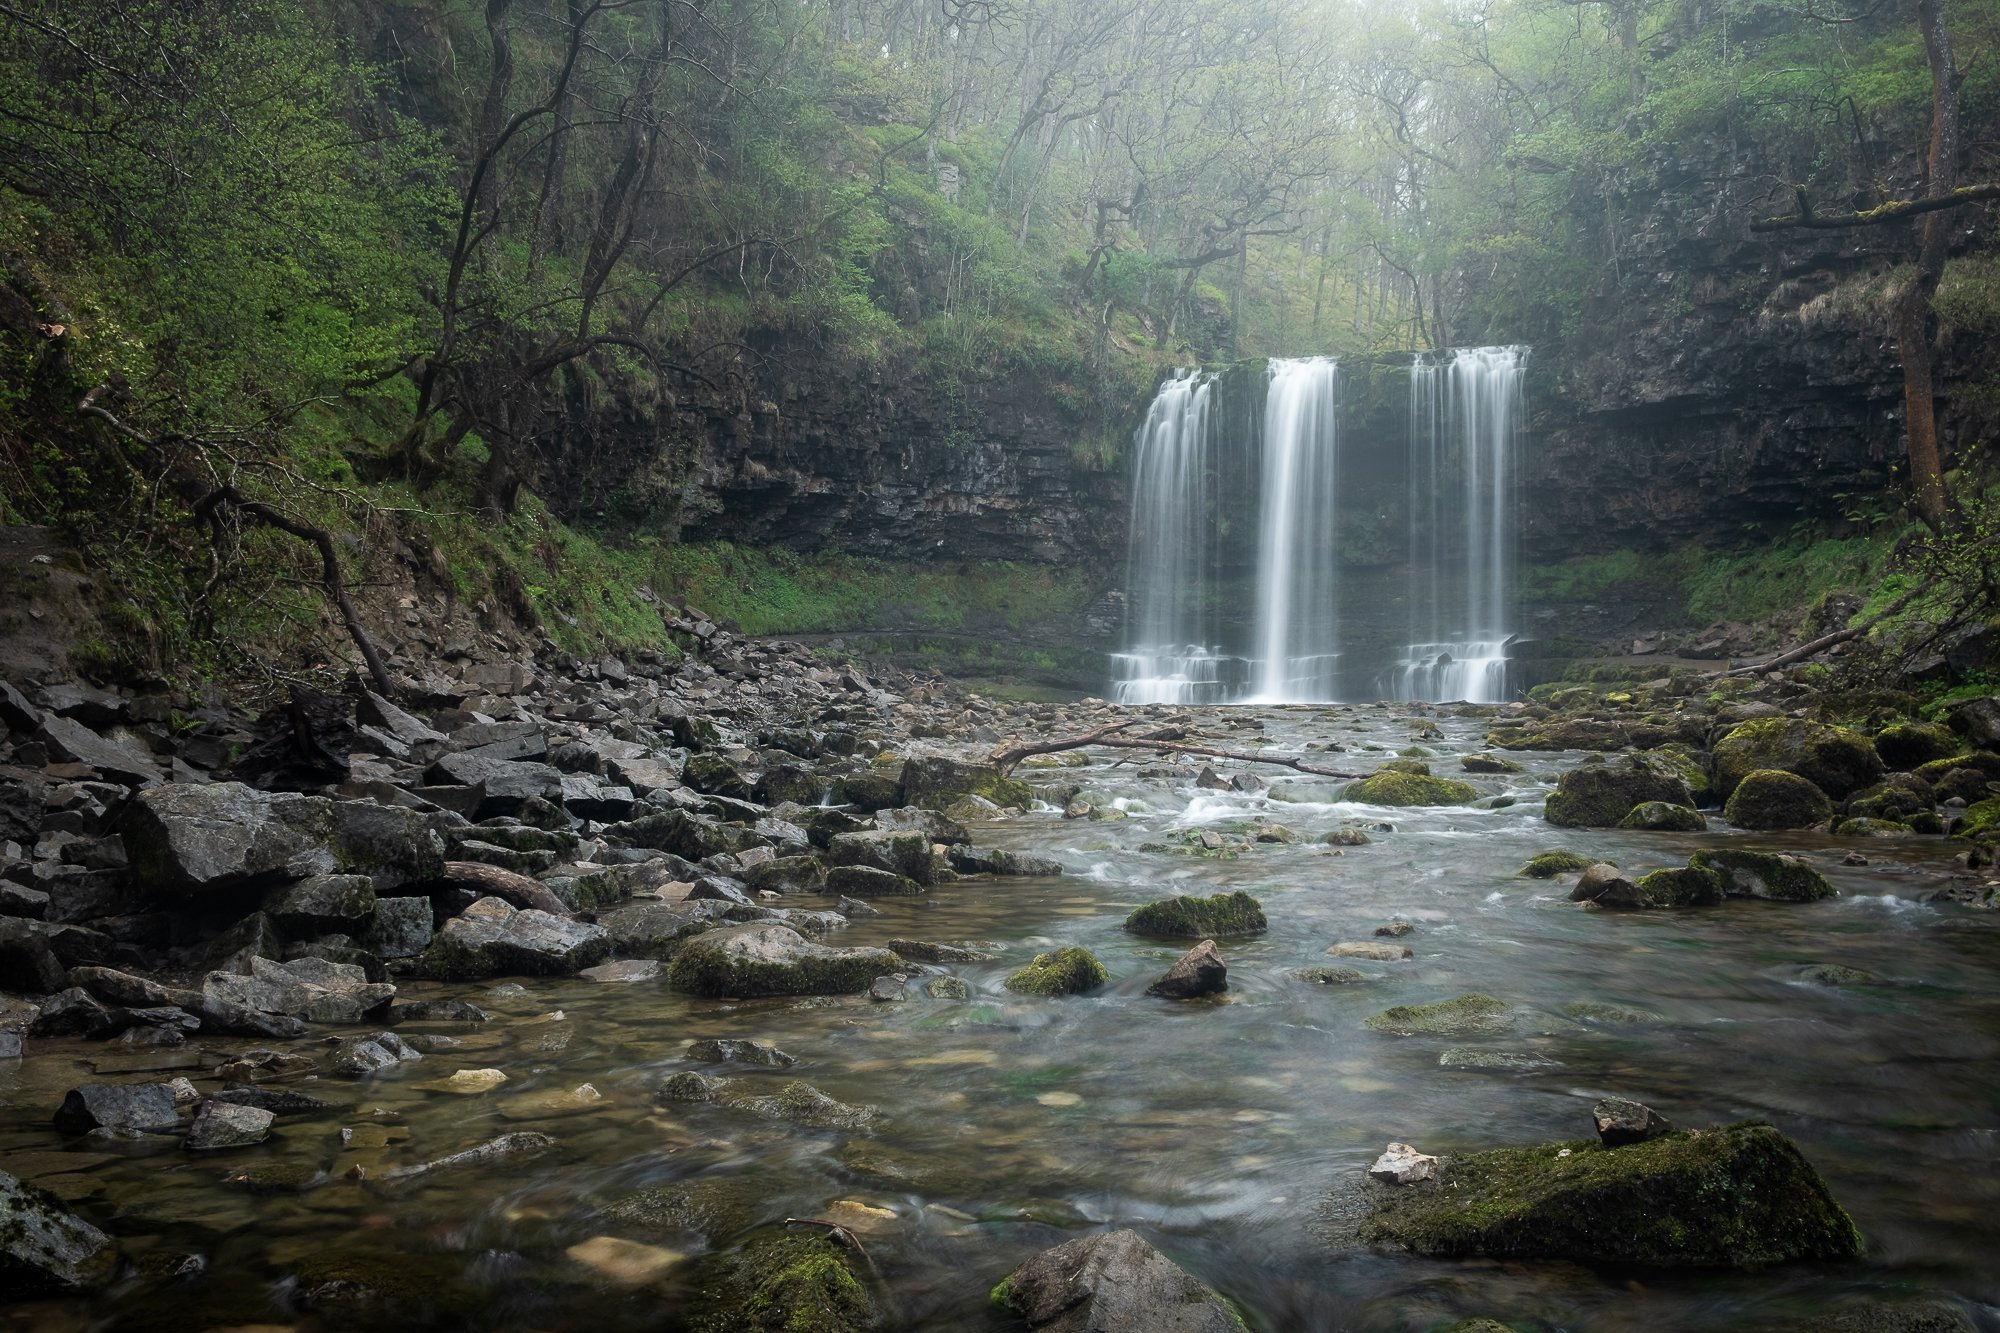
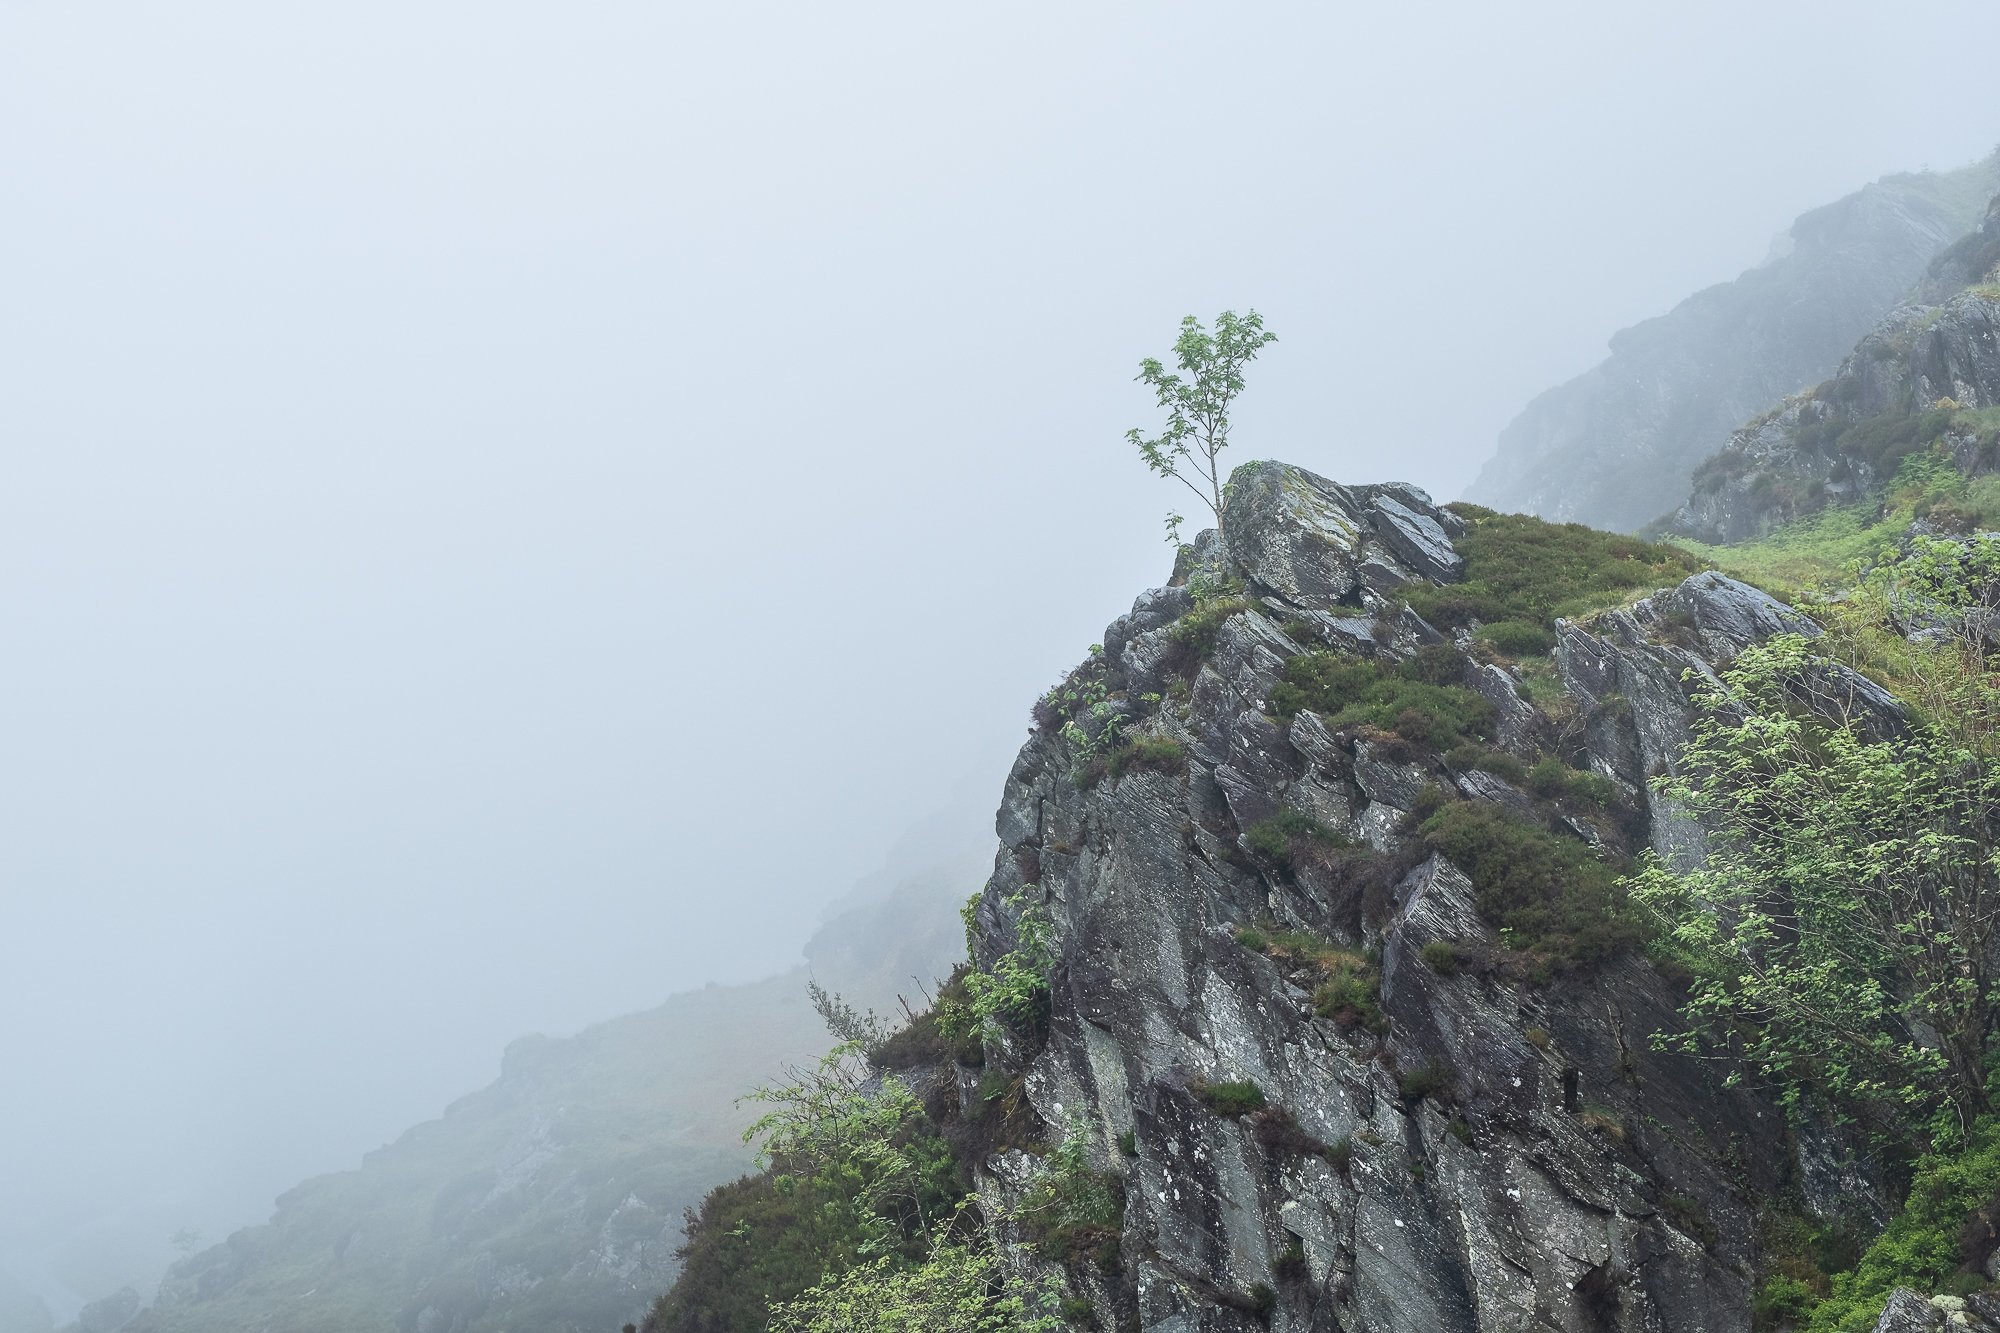
Drone Photography
In 2022 I finally brought my first drone. I’d wanted to get one for some time but was worried it would see little use but that all changed when DJI released the Mini 3 Pro. Finally, a small drone with a useful camera. It’s a great bit of kit which I carry with me most the time and if you want to know more about what I think about the Mini 3 Pro when it comes to landscape photography, head over to another blog post I wrote on that very subject DJI Mini 3 Pro | A Landscape Photographer’s Review

DJI Mavic Mini 3 | 24mm (effective) | 1/2000th Second | f/1.7 | ISO100


The Intimate Landscape
In 2022 I also started to take photos of smaller scenes in the landscape such as those I’ve shared below. Although I still find it tricky to find interesting compositions, I really enjoy the process. It’s a great way to continue taking photos when conditions aren’t great as I find flat, uninspiring light is perfect to achieve evenly exposed scenes like this, as I can focus on the shape, colour and composition and not worry about changing light and deep shadows. It’s an area of landscape photography I plan to work on in 2023.

Fujifilm XT2 | XF55-200mm | 78mm | 1/20th Second | f/9 | ISO200


Hopefully, that wasn’t too many photos to look through but having taken so many photos across the different genres in 2022, I wanted to give you a good taste of the kind of photos I took.
What’s in store for 2023?
As usual, I now need to give some thought to 2023 and what I want to achieve with my photography.
First up, I want to develop in three key areas, woodland, intimate landscapes and drone photography. Although I love shooting the wide vistas and will continue to do so, those three areas are where I feel I have more scope for development. On top of that, spending time in the woodland and seeking out interesting subjects to photograph is good for me. It relaxes me and enables me to take time out for just a short while so, I’ll certainly be doing more of that.
I plan to head back to Wales, hopefully, a couple of times to photograph the epic landscape and beautiful scenery on offer. My first trip is booked for late January so fingers crossed that works out.
I have a couple of personal projects on the go which are all still cooking and although I don’t have much to say on this right now, in time I’ll certainly share more info on these.
Lastly, I want to spend more time experiencing photos in the physical form, which includes printing more of my work or maybe creating my first zine based on the projects I’m working on. At the very least I want to spend less time in front of the screen and more time reading the many photo books I’ve been collecting from fellow photographers and artists. Some of which I’ve shared with you on this blog in my Photo Bookshelf series.
My plans for 2023 are not particularly ambitious but that’s intentional. I have a day job and photography is a hobby and although I like to get out with my camera as much as I can, it’s still something I must balance between my other priorities such as family and work. I also have some exciting (for me at least) updates to my gear which I will share in the usual “what’s in my camera bag” kind of way in the coming weeks so look out for that too.
That’s it from me for 2022, so I wish you a very happy and healthy new year and speak to you again in 2023.
Until then.
Trevor
DJI Mini 3 Pro | A Landscape Photographer’s Review
My review of the DJI Mini 3 pro from the perspective of a landscape photographer after 6 months of owning his very first drone. Was it easy to fly? Is the camera any good? Have a read and find out what I think.
Those who know me are aware that I’ve been talking about getting a drone for ages! Years in fact. Put off by the many restrictions and rules that went hand in hand with owning and flying a drone, my biggest concern was that I just wouldn’t use it enough. I thought that it would be mostly unused, sitting on a shelf gathering dust, but when DJI announced the Mini 3 Pro, the time was finally right to jump in and place the order. Having now owned the Mini 3 Pro for around 5 or 6 months, I thought I would share my thoughts from the point of view of a landscape photographer owning his very first drone.
Why did I choose the DJI Mini 3 Pro?
To answer that question, I guess I need to answer another question first. What had previously stopped me from buying a drone and why did I believe it wouldn’t get much use?
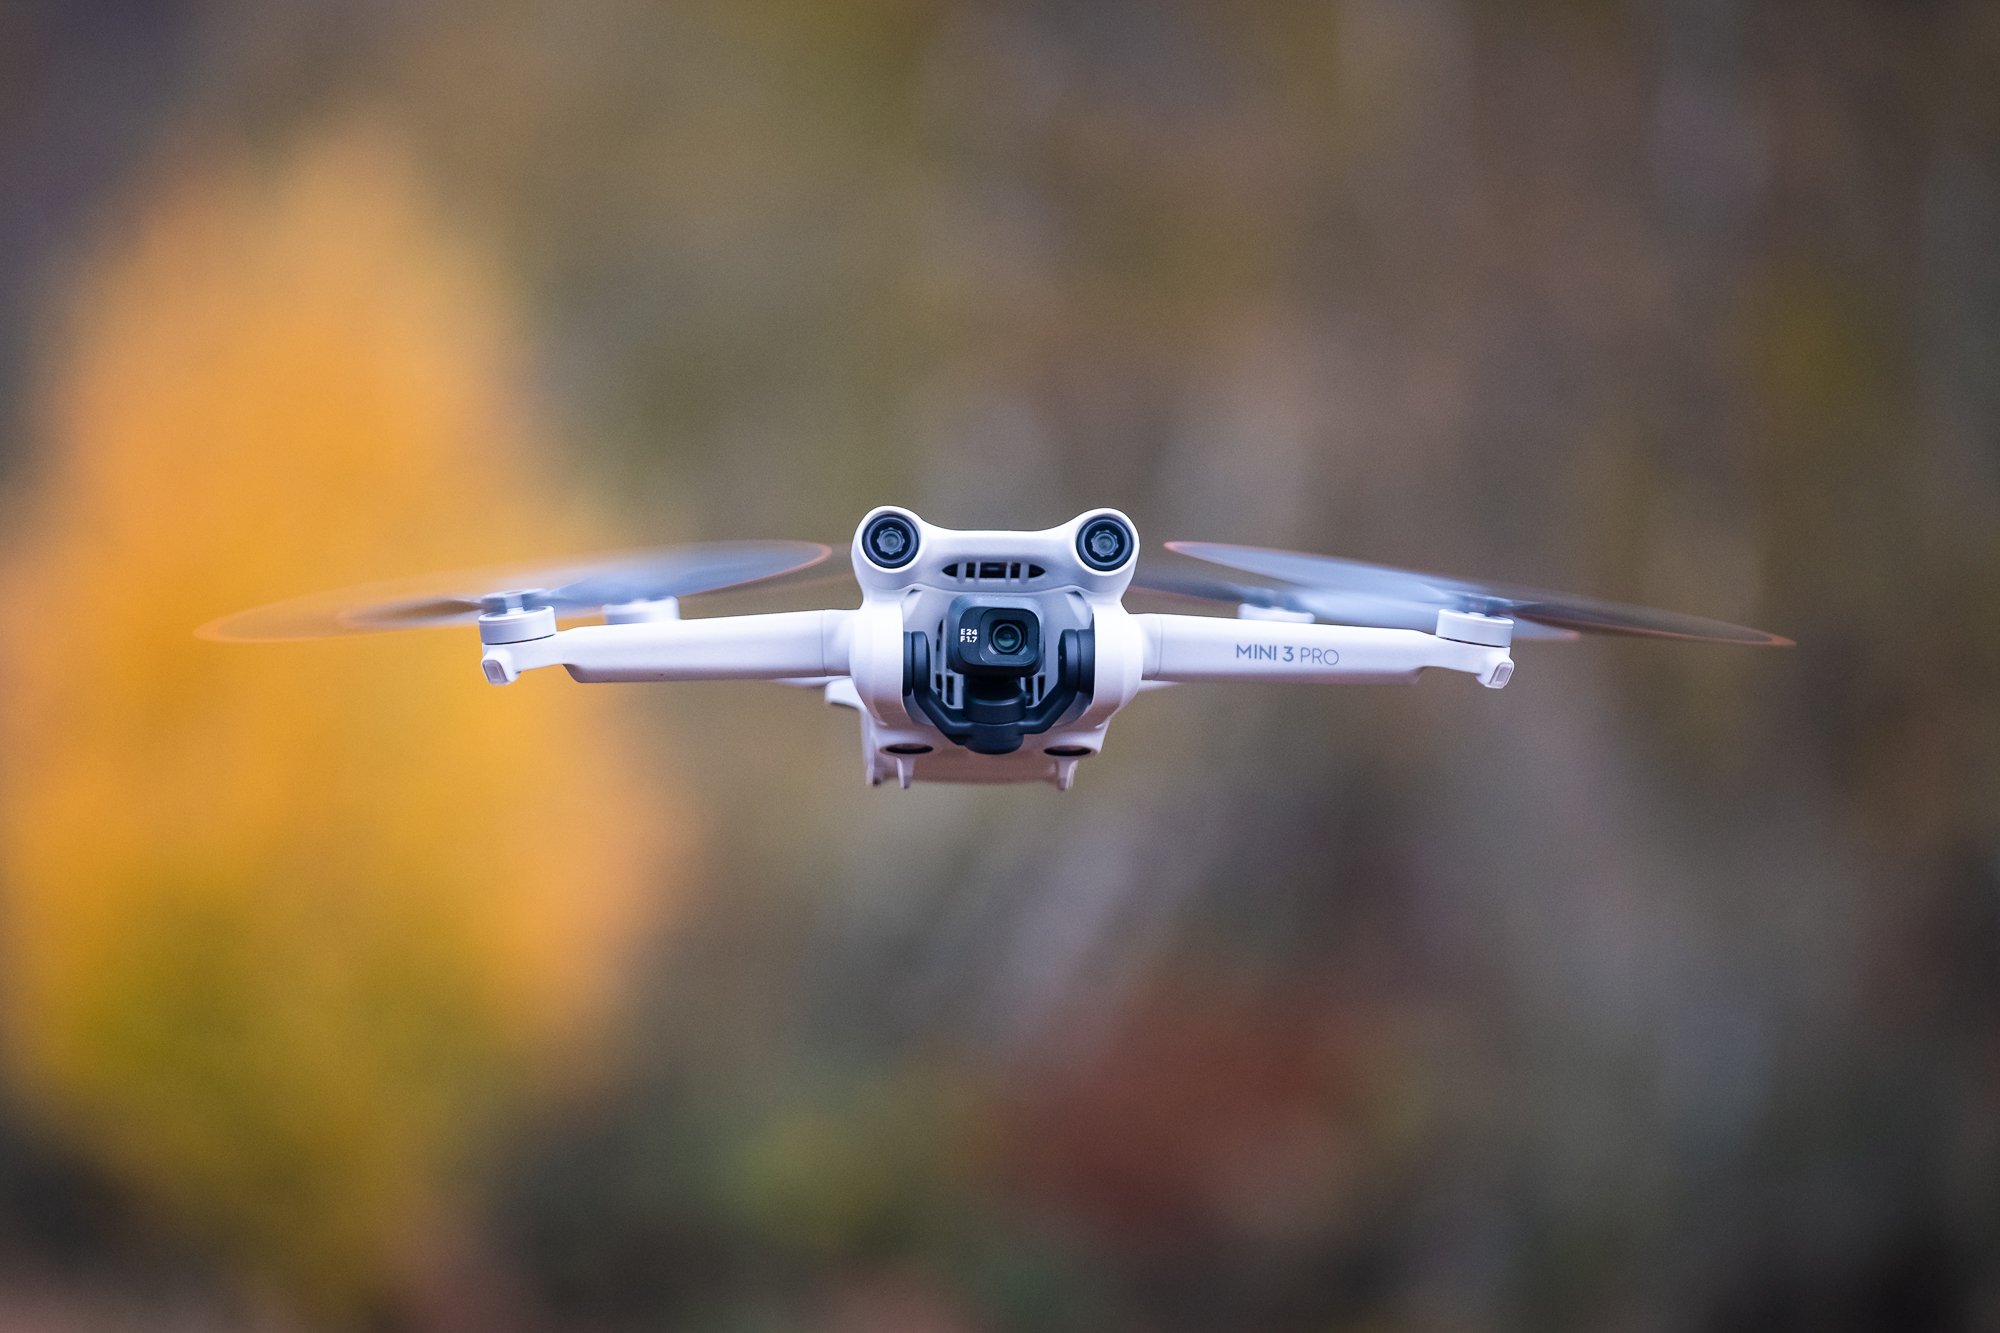
In short, the drones with the most freedom to fly and the least restrictions were not good enough when it came to photography (in my opinion). If I wanted DJI’s crème de la crème in terms of consumer drone photography, I could have opted for the Mavic Pro, but living here in the Southeast of England, there are so many restrictions and built-up areas, I felt I would be constantly frustrated by the lack of opportunities to fly and would have to travel far and wide to get the most use out of a drone like that.
The DJI Mini line of drones are perfect in terms of form factor as with a sub 250g take-off weight, I could fly almost anywhere as long as I wasn’t in restricted airspace but the original Mini and Mini 2 fell short with regards to the camera. Either because of a lack of RAW format support in the first iteration, or just sensor size and what I had read about the general image quality. If video was my priority, I would have jumped in far earlier, but to get high quality photos that I could edit and print at a reasonable size, the Mini and Mini 2 were not quite good enough.
So, when the Mini 3 and it’s improved, larger image sensor was announced, the time was right to make the jump.
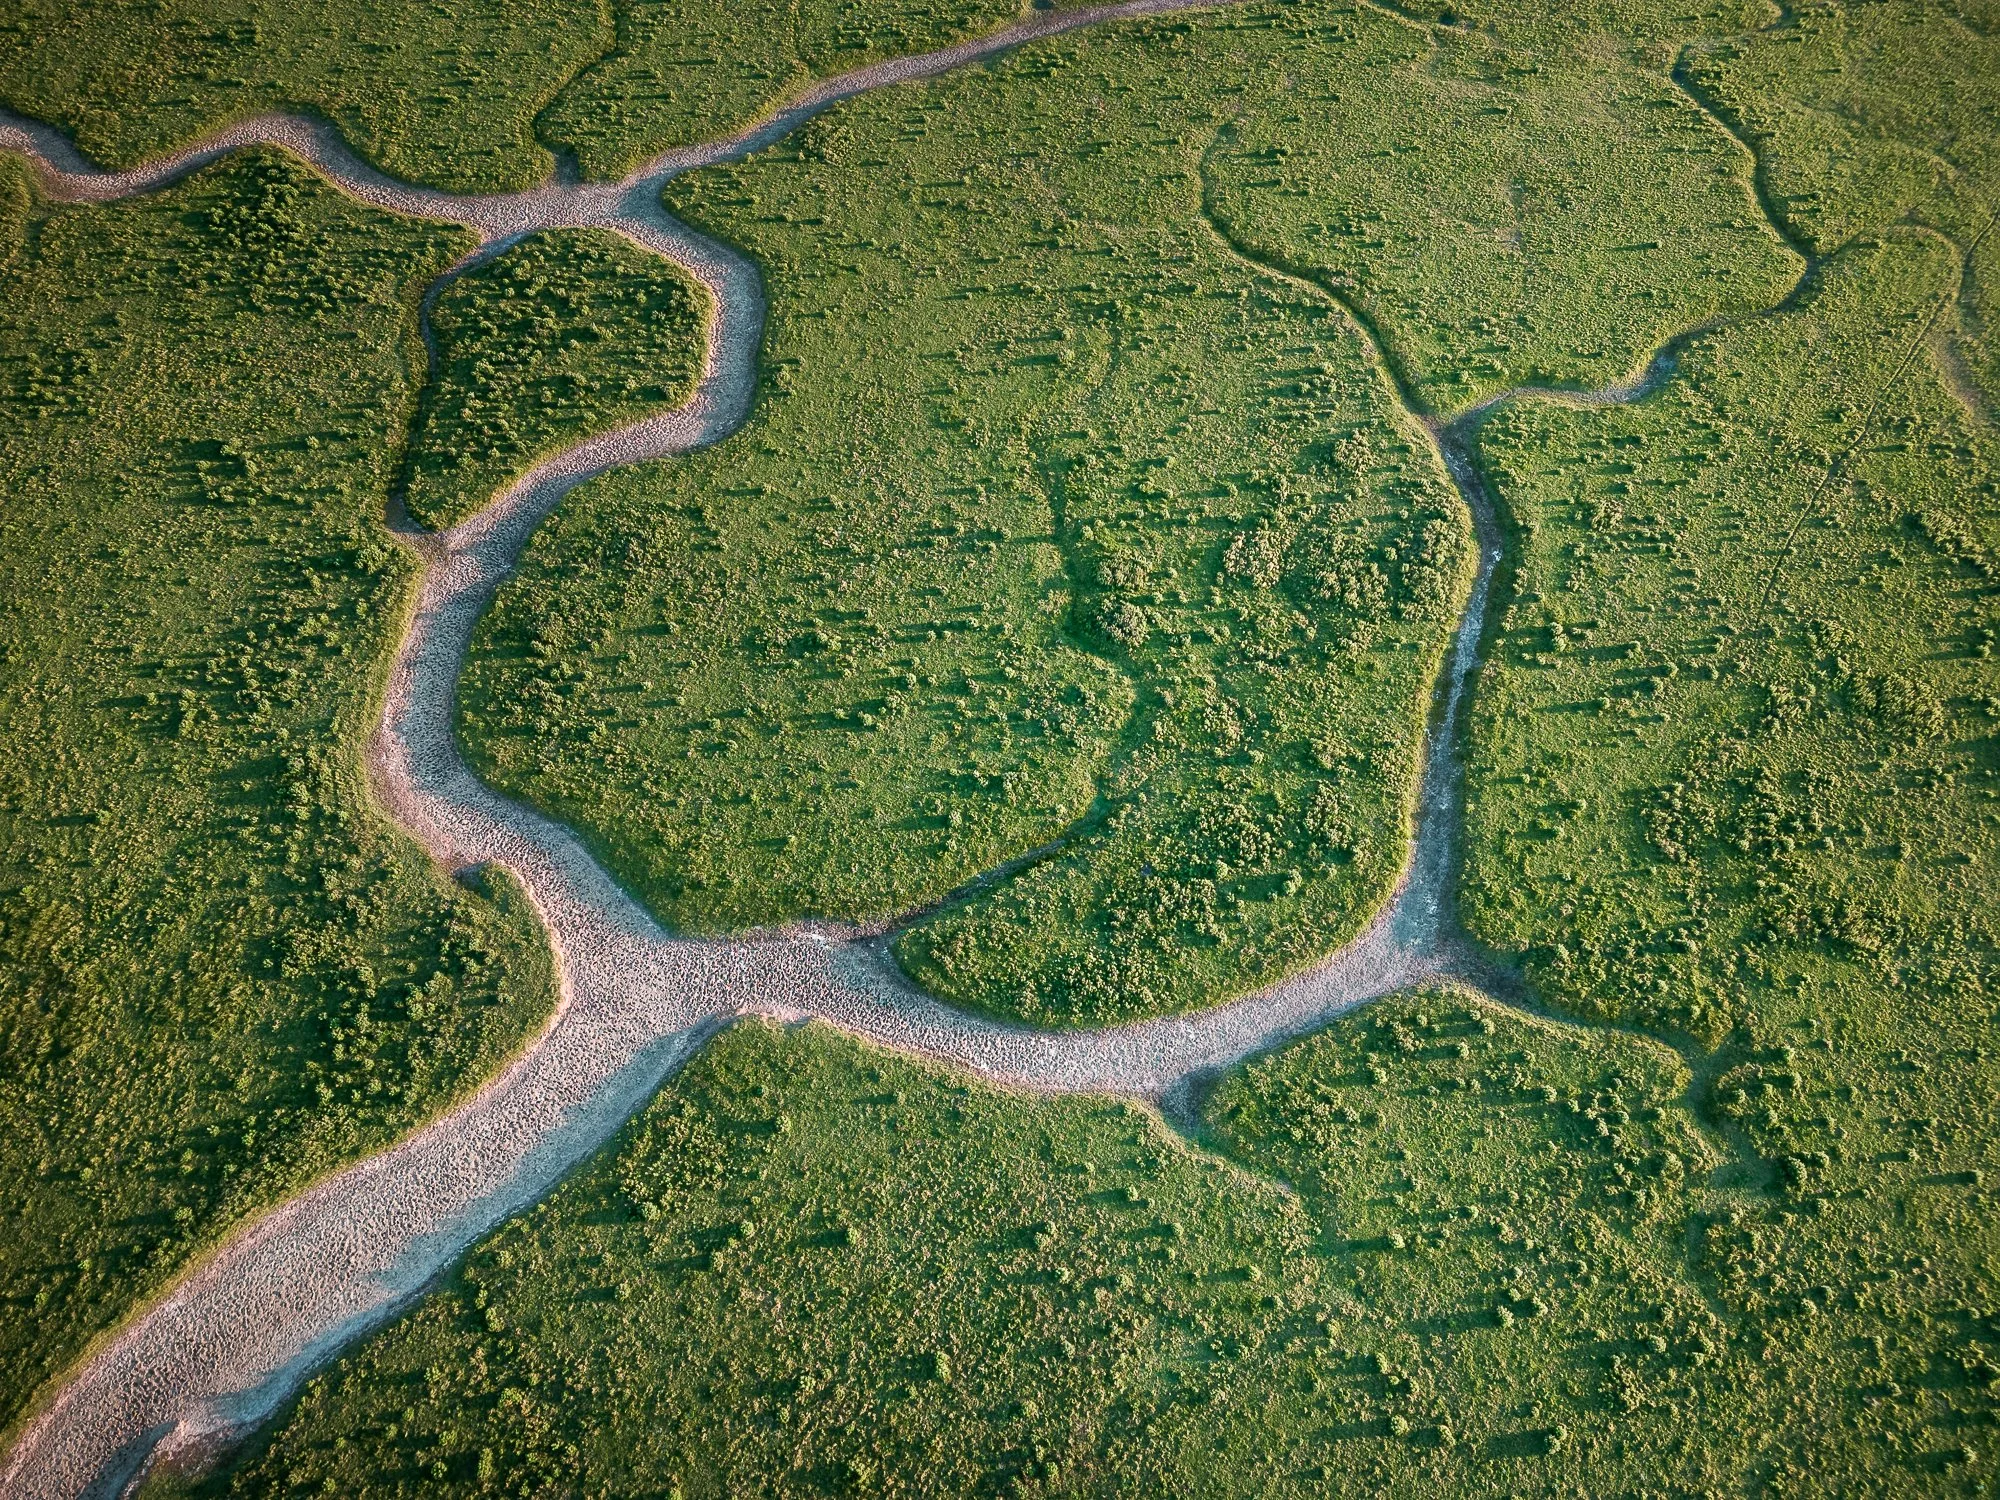
DJI Mavic Mini 3 | 24mm (effective) | 1/500th Second | f/1.7 | ISO100
The image above was taken along the East Sussex coast shortly after the Mini 3 Pro was delivered. It’s not an original composition but allowed me to practice flying and composing photos. Along with traditional landscape and cityscape photos, I also hope to use the drone to build a body of work which features more abstract shapes and textures.
The two photos below were taken above a forest in East Sussex. It’s a place I’ve been photographing for a few years, and it was nice to add some alternative viewpoints to the body of work I’ve been building over that time. By-laws prevent me from taking off from within the forest boundary due to livestock grazing, so I had to take off from the side of a public road and stay high to avoid breaking any rules and scaring the animals in the forest. Thankfully the Mini 3 is much quieter than its predecessors which helps avoid scaring any animals below.
DJI Mavic Mini 3 | 24mm (effective) | 1/200th Second | f/1.7 | ISO100
DJI Mavic Mini 3 | 24mm (effective) | 1/30th Second | f/1.7 | ISO100
I just want to confirm at this point that this blog post is in no way a technical review, I won’t be deep diving into the drone specs, nor will I be comparing the drone to any others as being the first and only drone I have ever owned (or even flown), that would be a little difficult. This is just me sharing my opinion and showing some of the photos I’ve taken along the way.
What DJI Mini 3 Pro package did I buy and how much did it cost?
With the plethora of new features added since the Mini 2, DJI added the Pro label to the Mini 3’s name. With Tri-Directional Obstacle Sensing, 4K HDR Video, true vertical shooting, real-time obstacle avoidance and much more, they were probably justified in doing so. However, with the word “Pro” added to the name came an inevitable price hike from £419 for the Mini 2 to £709 for the Mini 3 Pro (without the RC remote). Personally, I feel these extra features more than justifies the bump in cost, but opinions may vary on that point.
With the desire to fly longer than circa 30 minutes (I did say this wouldn’t be a technical review), I opted for the Mini 3 Pro with the DJI RC Remote along with the extra fly more kit giving me some extra batteries, tripling my flight time. Although around £150 more, the DJI RC Remote with its built-in screen appealed to me as it meant I didn’t need to use my phone in order to fly.
Altogether, (Mini 3 Pro with RC remote £859, the Fly more kit £159 and 1 Yr. Care Refresh £75) I spent a total of £1,093. Far from an inexpensive purchase, especially as I had never even used a drone before, but when compared to the other options and features I wanted, I was certain this was the right choice for me.

DJI Mavic Mini 3 | 24mm (effective) | 1/500th Second | f/1.7 | ISO100
These photos were taken on an early morning flight in London. Conditions were perfect for taking some atmospheric photos and although the City of London restrictions prevented me from flying any further west, I still managed to get the drone in the air and take a few photos from the eastern side of Tower Bridge.
DJI Mavic Mini 3 | 24mm (effective) | 1/2000th Second | f/1.7 | ISO100
DJI Mavic Mini 3 | 24mm (effective) | 1/1600th Second | f/1.7 | ISO100
Is the DJI Mini 3 Pro easy to fly?
I’m writing this post from the viewpoint of a landscape photographer who has never used a drone, so, I guess that’s also my target audience. Maybe you’re also a photographer, tempted by drone photography and concerned flying a drone might be too difficult to master. Let’s be honest, the drone alone is around £709 new, so even with the DJI Care Refresh, it’s not the sort of thing you want to crash too often.
I have to say, flying the Mini 3 Pro was surprisingly straightforward. There are some great tools onboard to keep things simple such as the fantastic return to home feature, single button take-off and landing and the three-way obstacle sensors. The sensors are on the front, back and underneath and help you keep out of trouble for the most part, although you need to remember that the Mini 3 Pro lacks sensors on the side so care should be taken when flying sideways.
5 tips for anyone buying their first drone
I’ll keep this relatively high level as the specifics will differ country by country, depending on where you intend to fly.
Research the local Drone rules applicable for the class of drone you own and complete any registrations and certifications needed.
Research any useful apps that provide aviation information such as real time flight restrictions in your area as the DJI Drone app isn’t always up to date. There are also apps that show flight conditions specific to flying a drone and warn you if the wind is too strong or provides such things as the Geomagnetic storm index which apparently is a thing and can be a problem as it can interfere with the signal.
Make sure you set your new drone up in advance, applying any firmware updates and fully charging the batteries before you head out. It can be a real pain when you are prompted to update the firmware while out in the field with no internet access.
Like the point above, do some research into the best settings before you head out. This might include altitude limits, return to home, camera setup and movement settings. There are so many videos on YouTube and doing a bit of research, really helped me to understand the options and settings before I went for my first flight.
Just because you can, doesn’t mean you should. The Mavic Mini 3 gives me the freedom to fly almost anywhere but I still need to be sensible around people and fly safely. I hate the stigma that comes with flying a drone as so many people feel threatened by them, thinking they are being spied on or maybe even worried it might drop on their heads. Personally, I want to keep drone flyers away from being public enemy number one so as much as possible, I try to stay inconspicuous, avoiding people, and if they are around, I fly a lot higher to the point they probably won’t notice I’m there.

DJI Mavic Mini 3 | 24mm (effective) | 1/2000th Second | f/1.7 | ISO100
With such a compact package, there was no way I was going to travel to Ibiza without the new drone. During my 2-week trip, I managed to get a few early morning and sunset flights around the island. I used the 9-shot automatic panoramic picture mode to take the photo of Ibiza Town above. I stitched and edited the photo in Adobe Lightroom and I’m incredibly pleased with the picture quality.

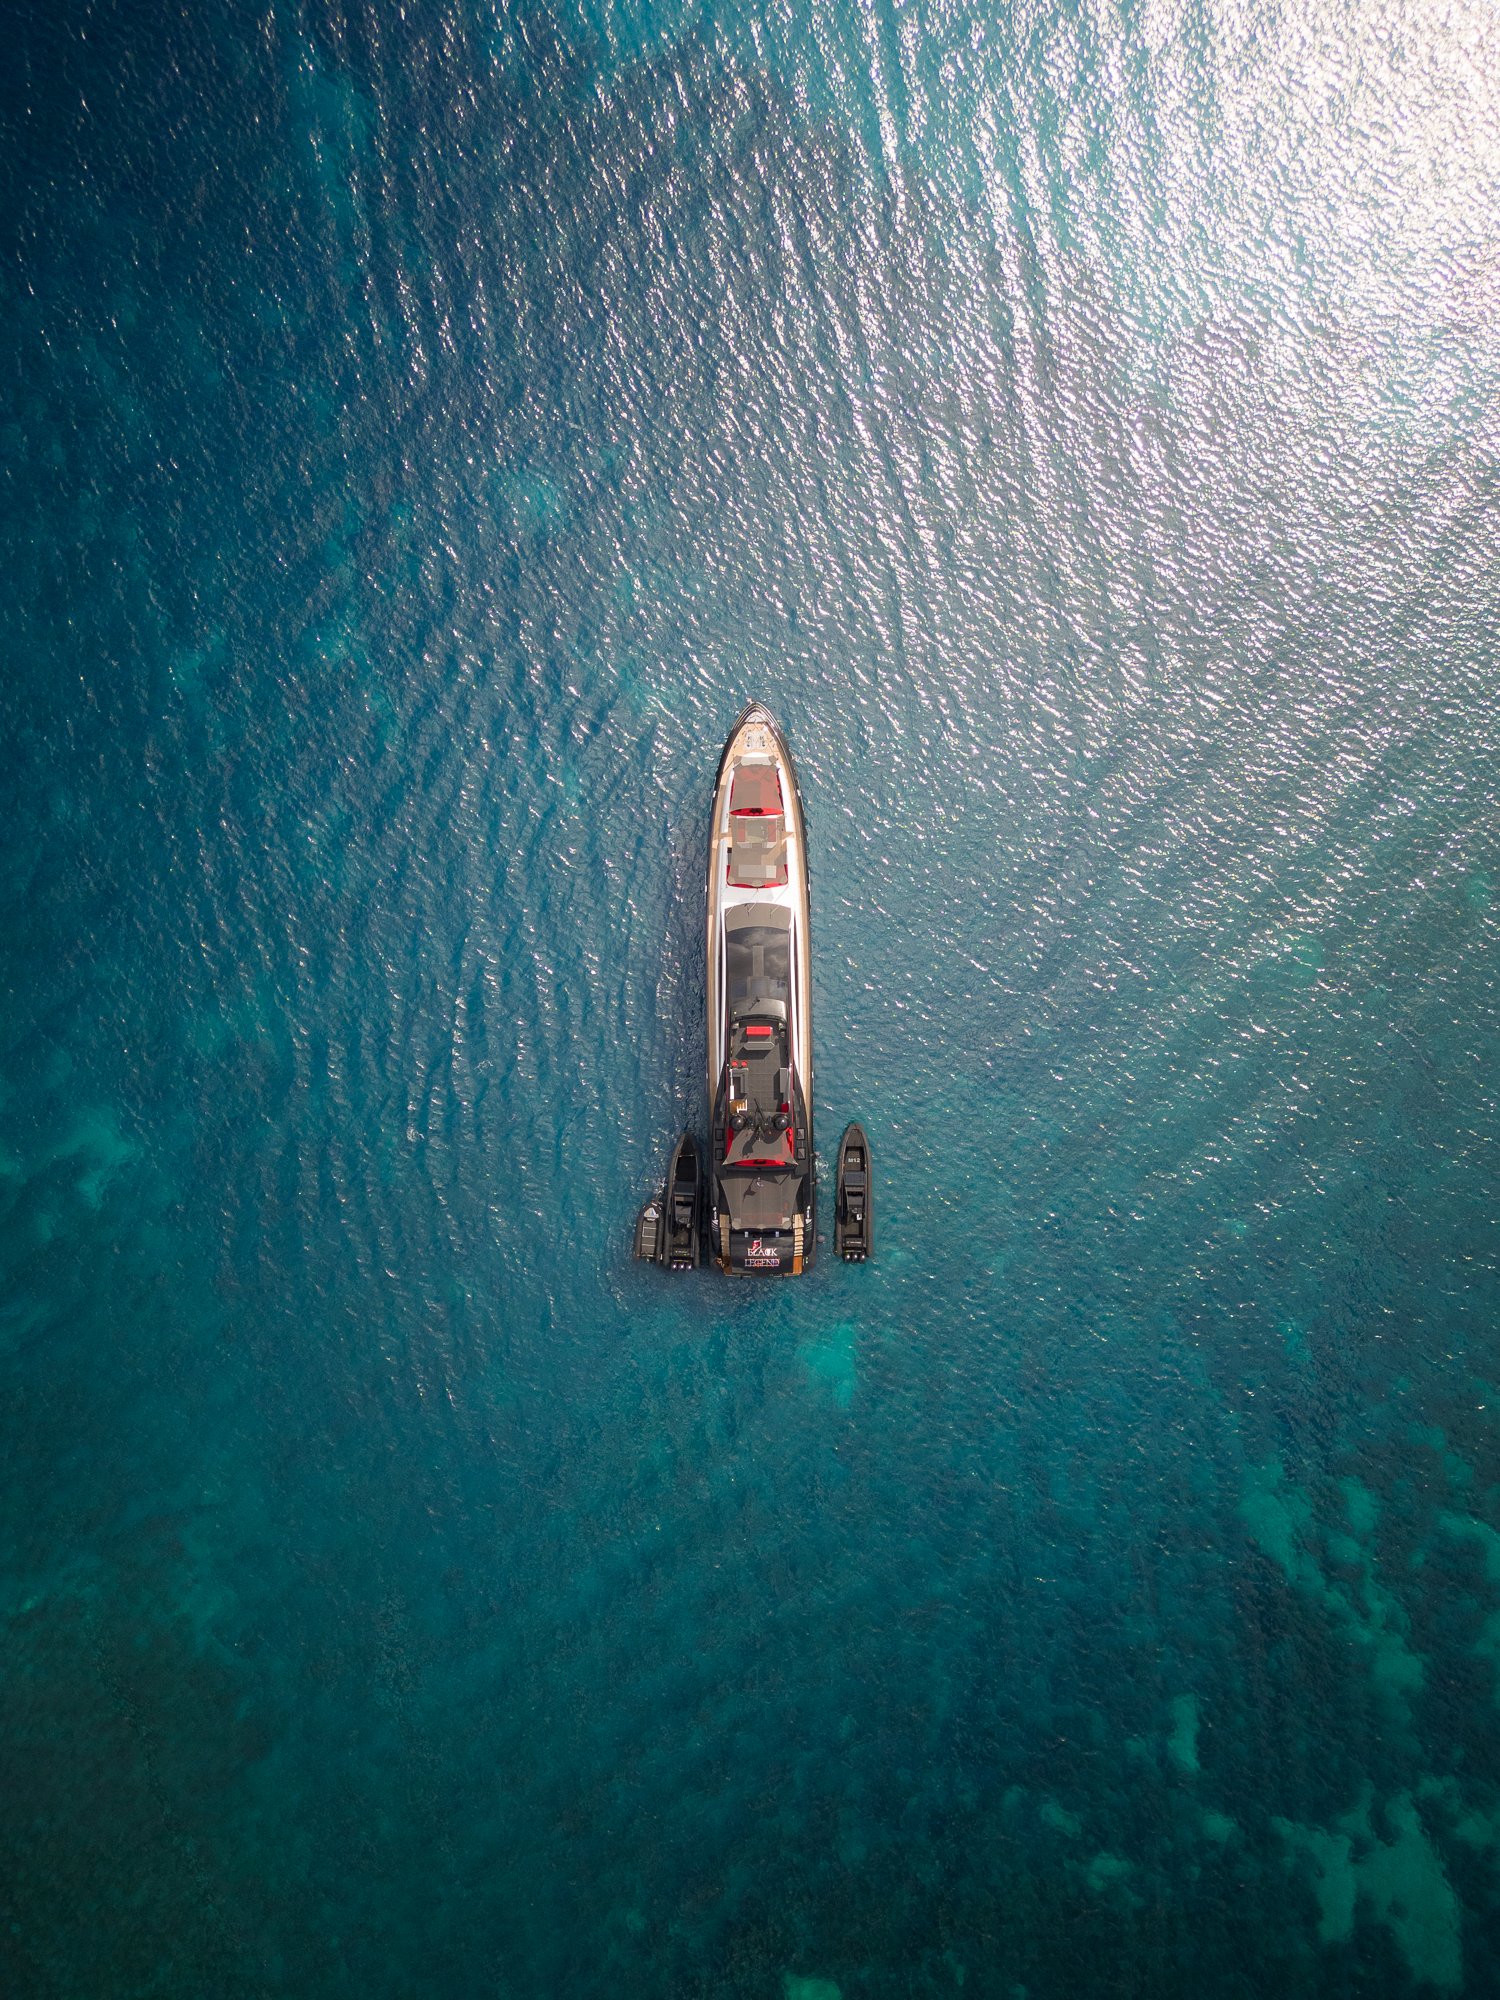
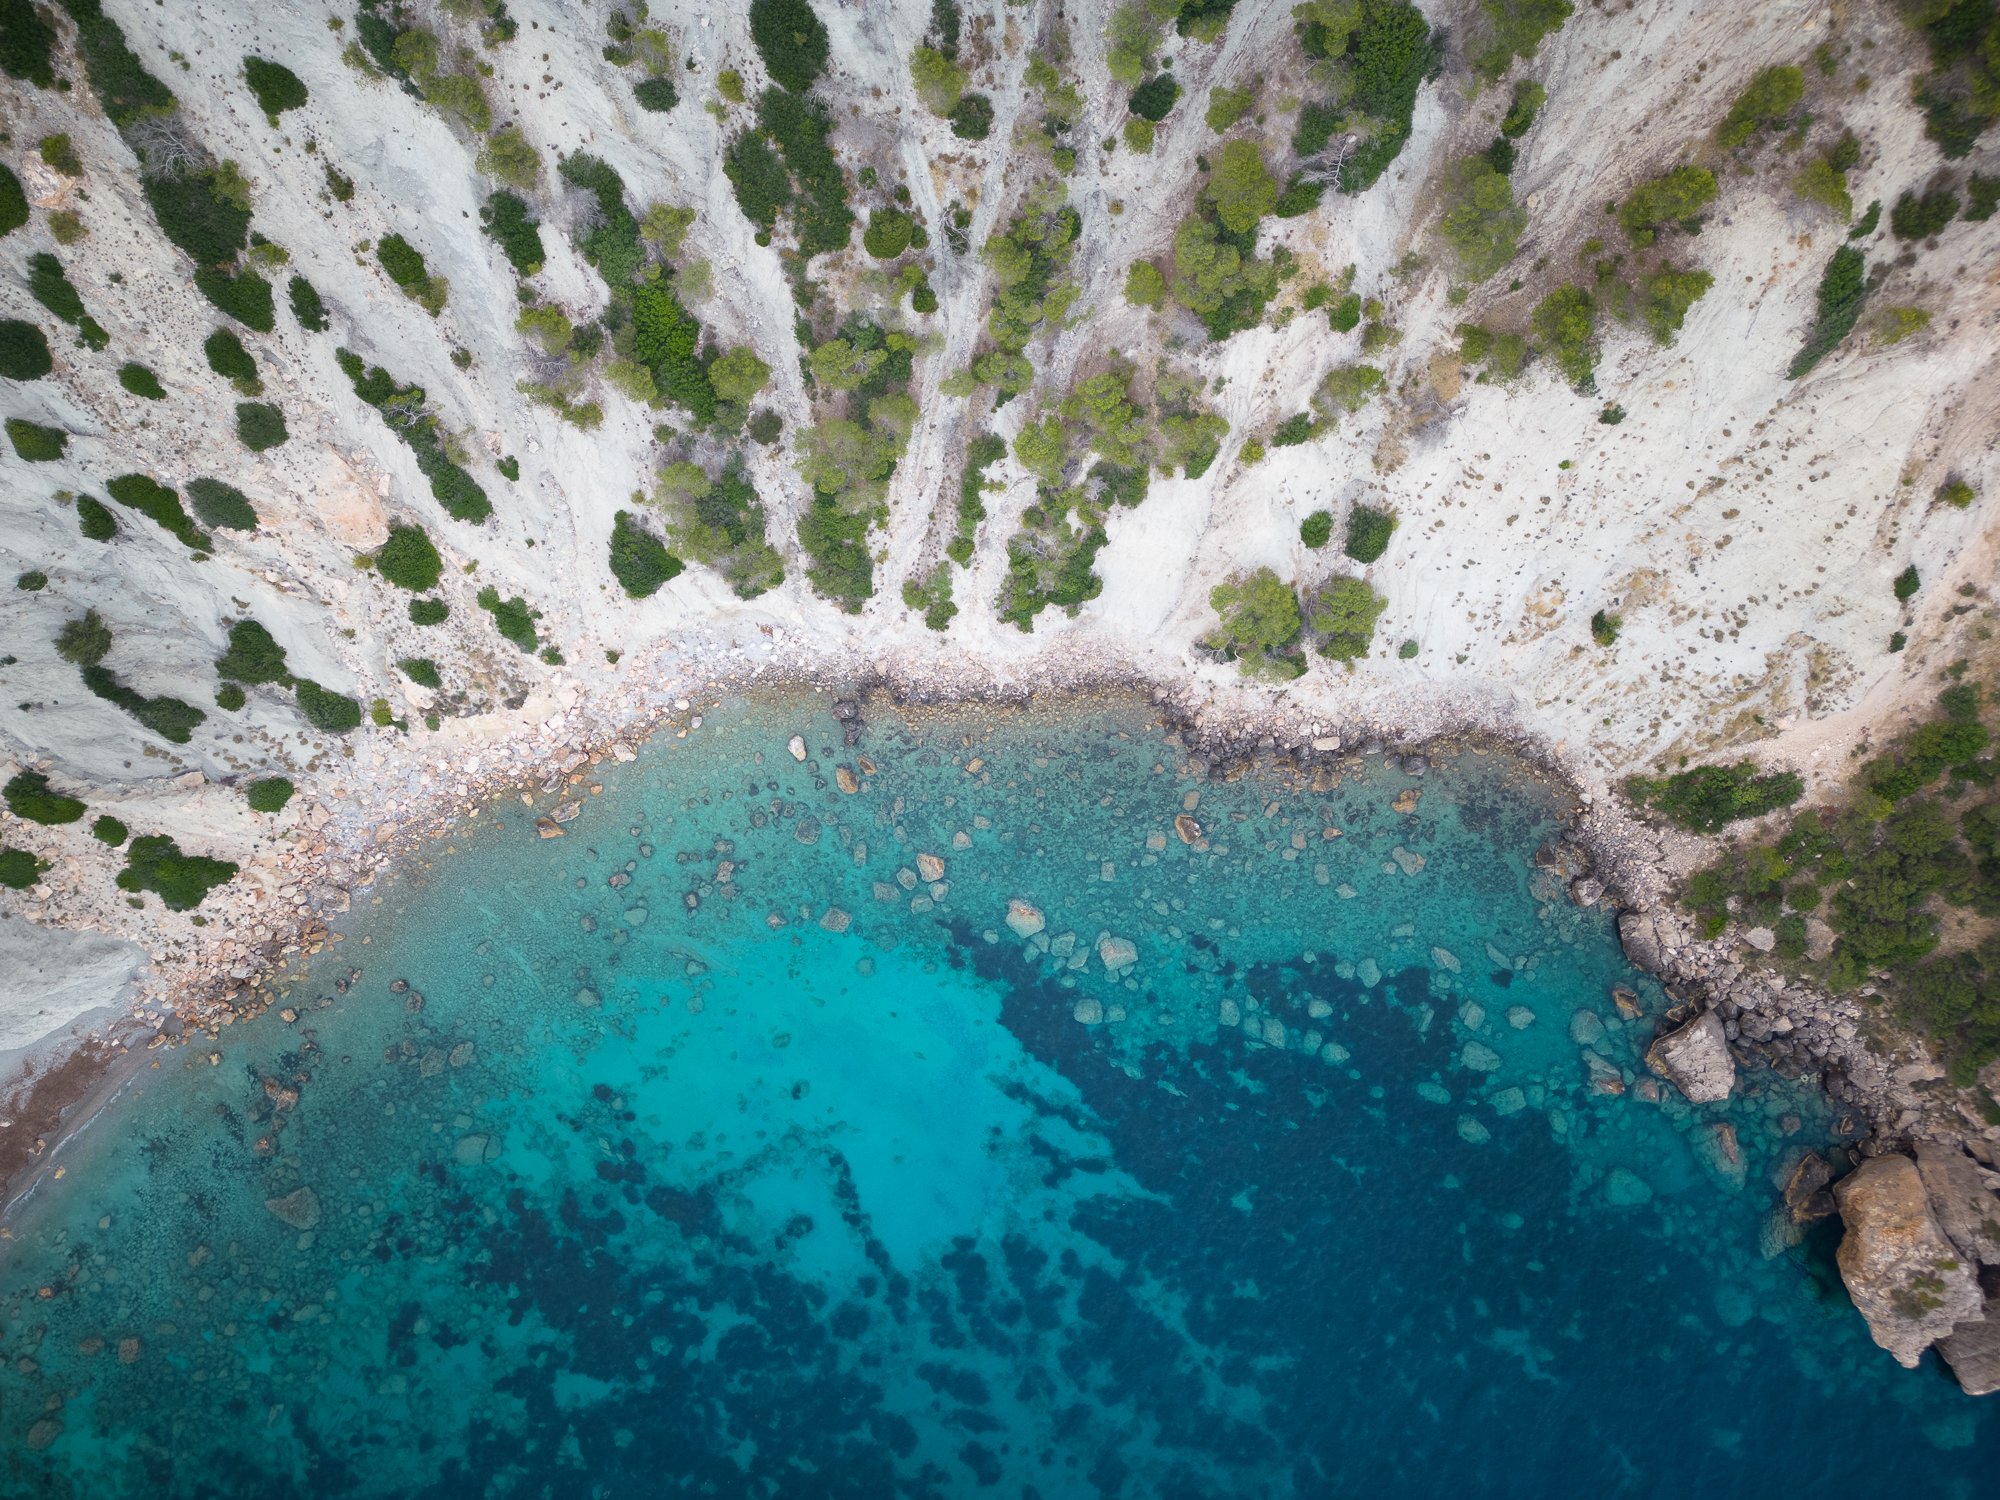

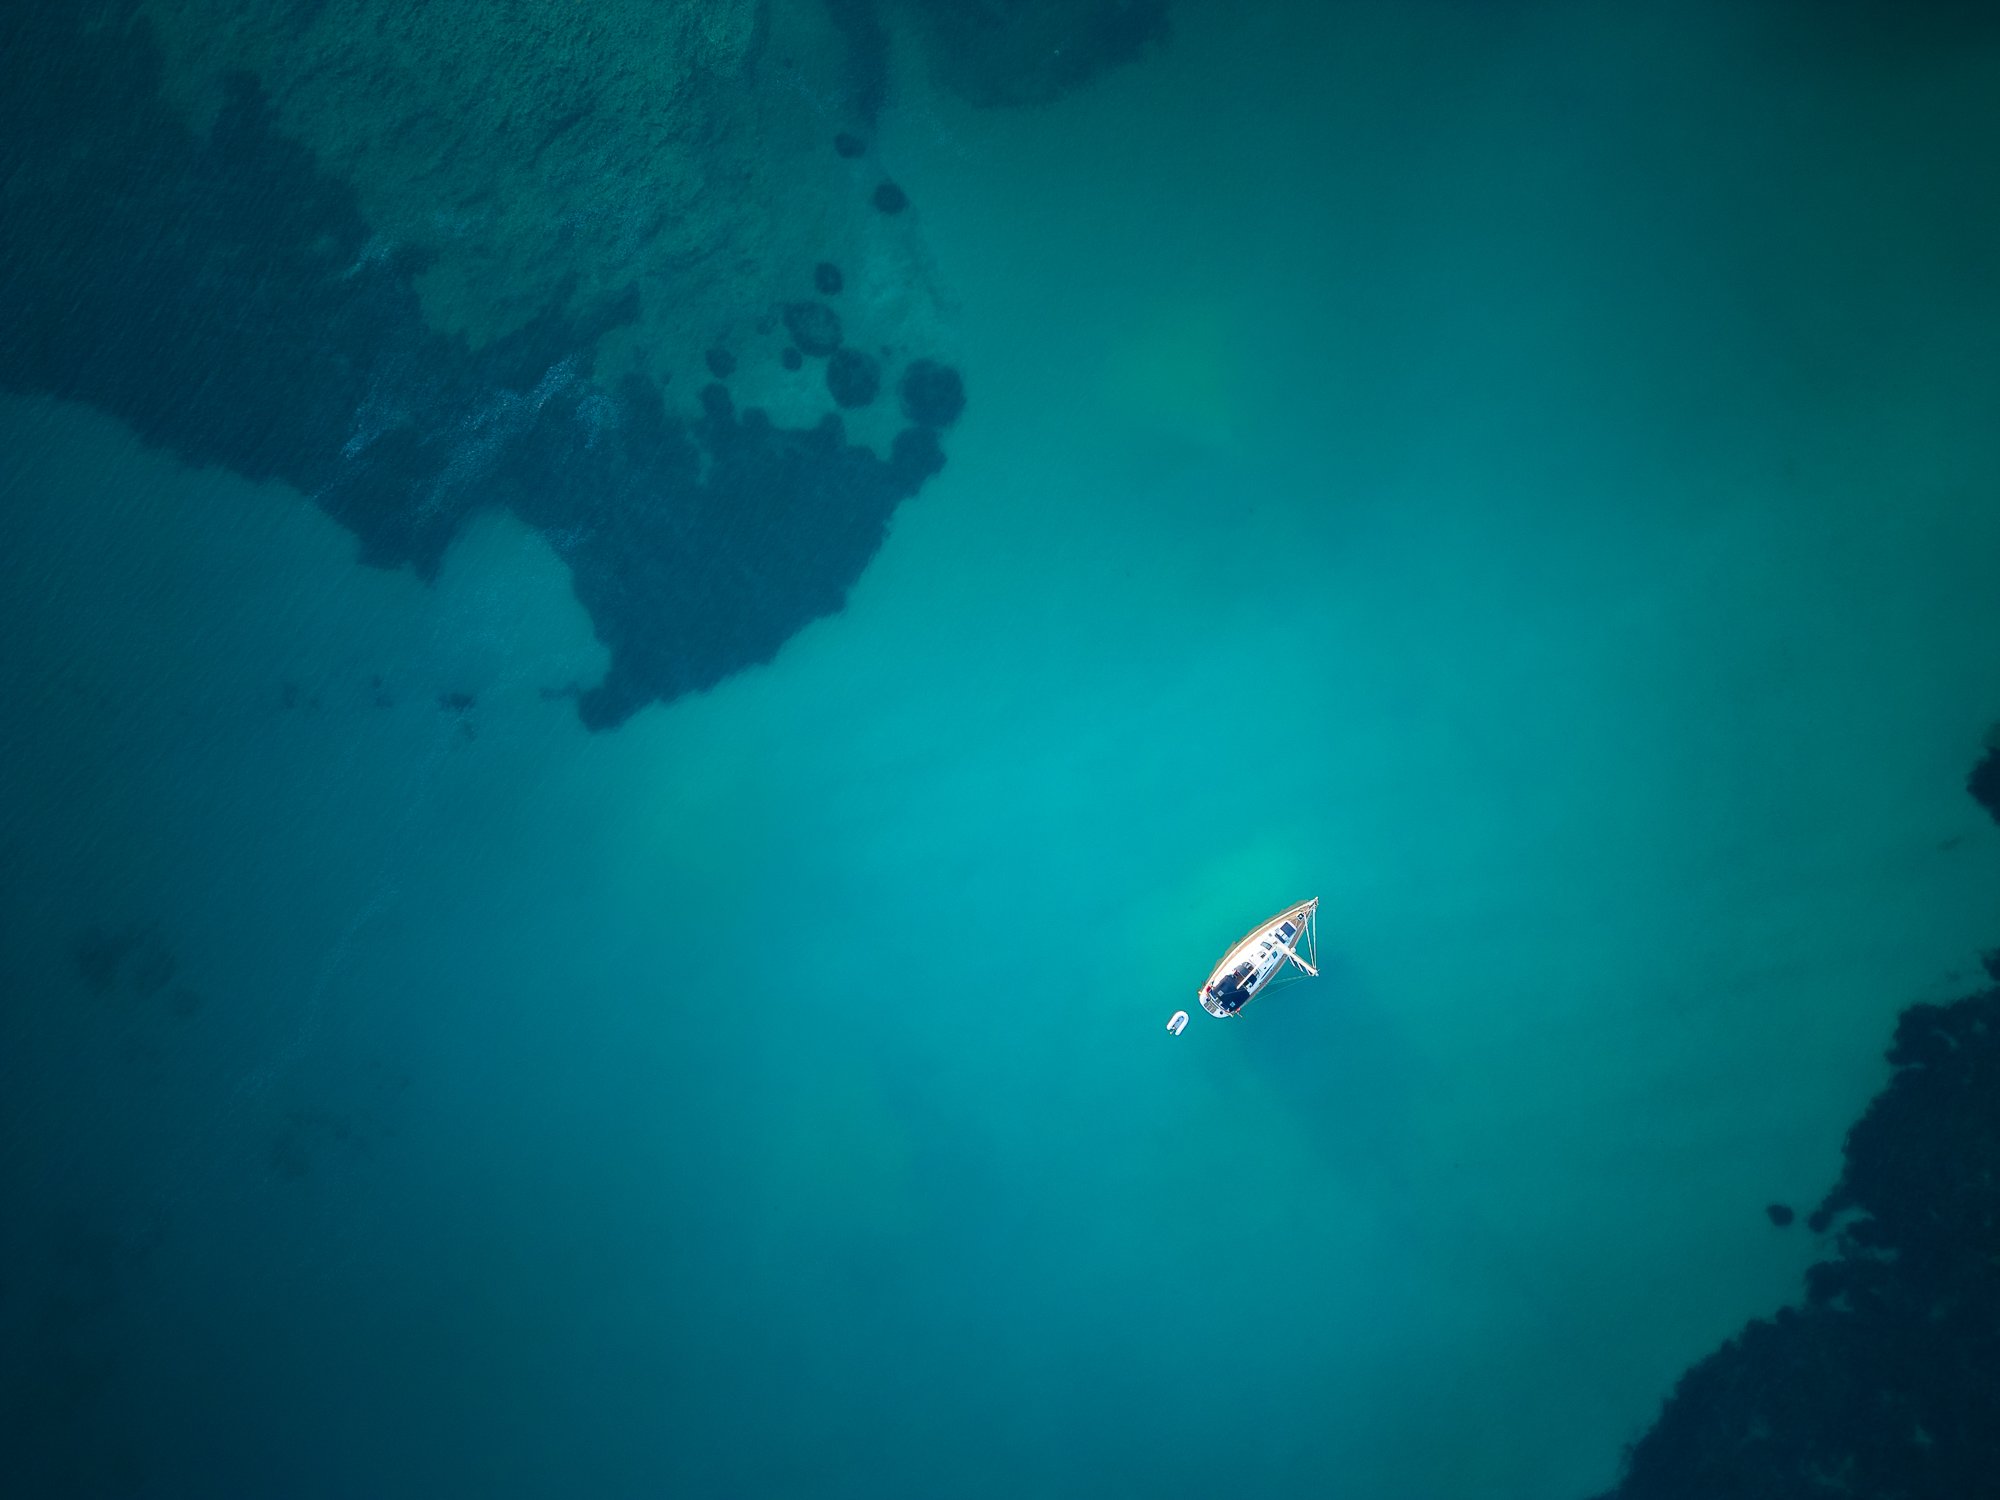
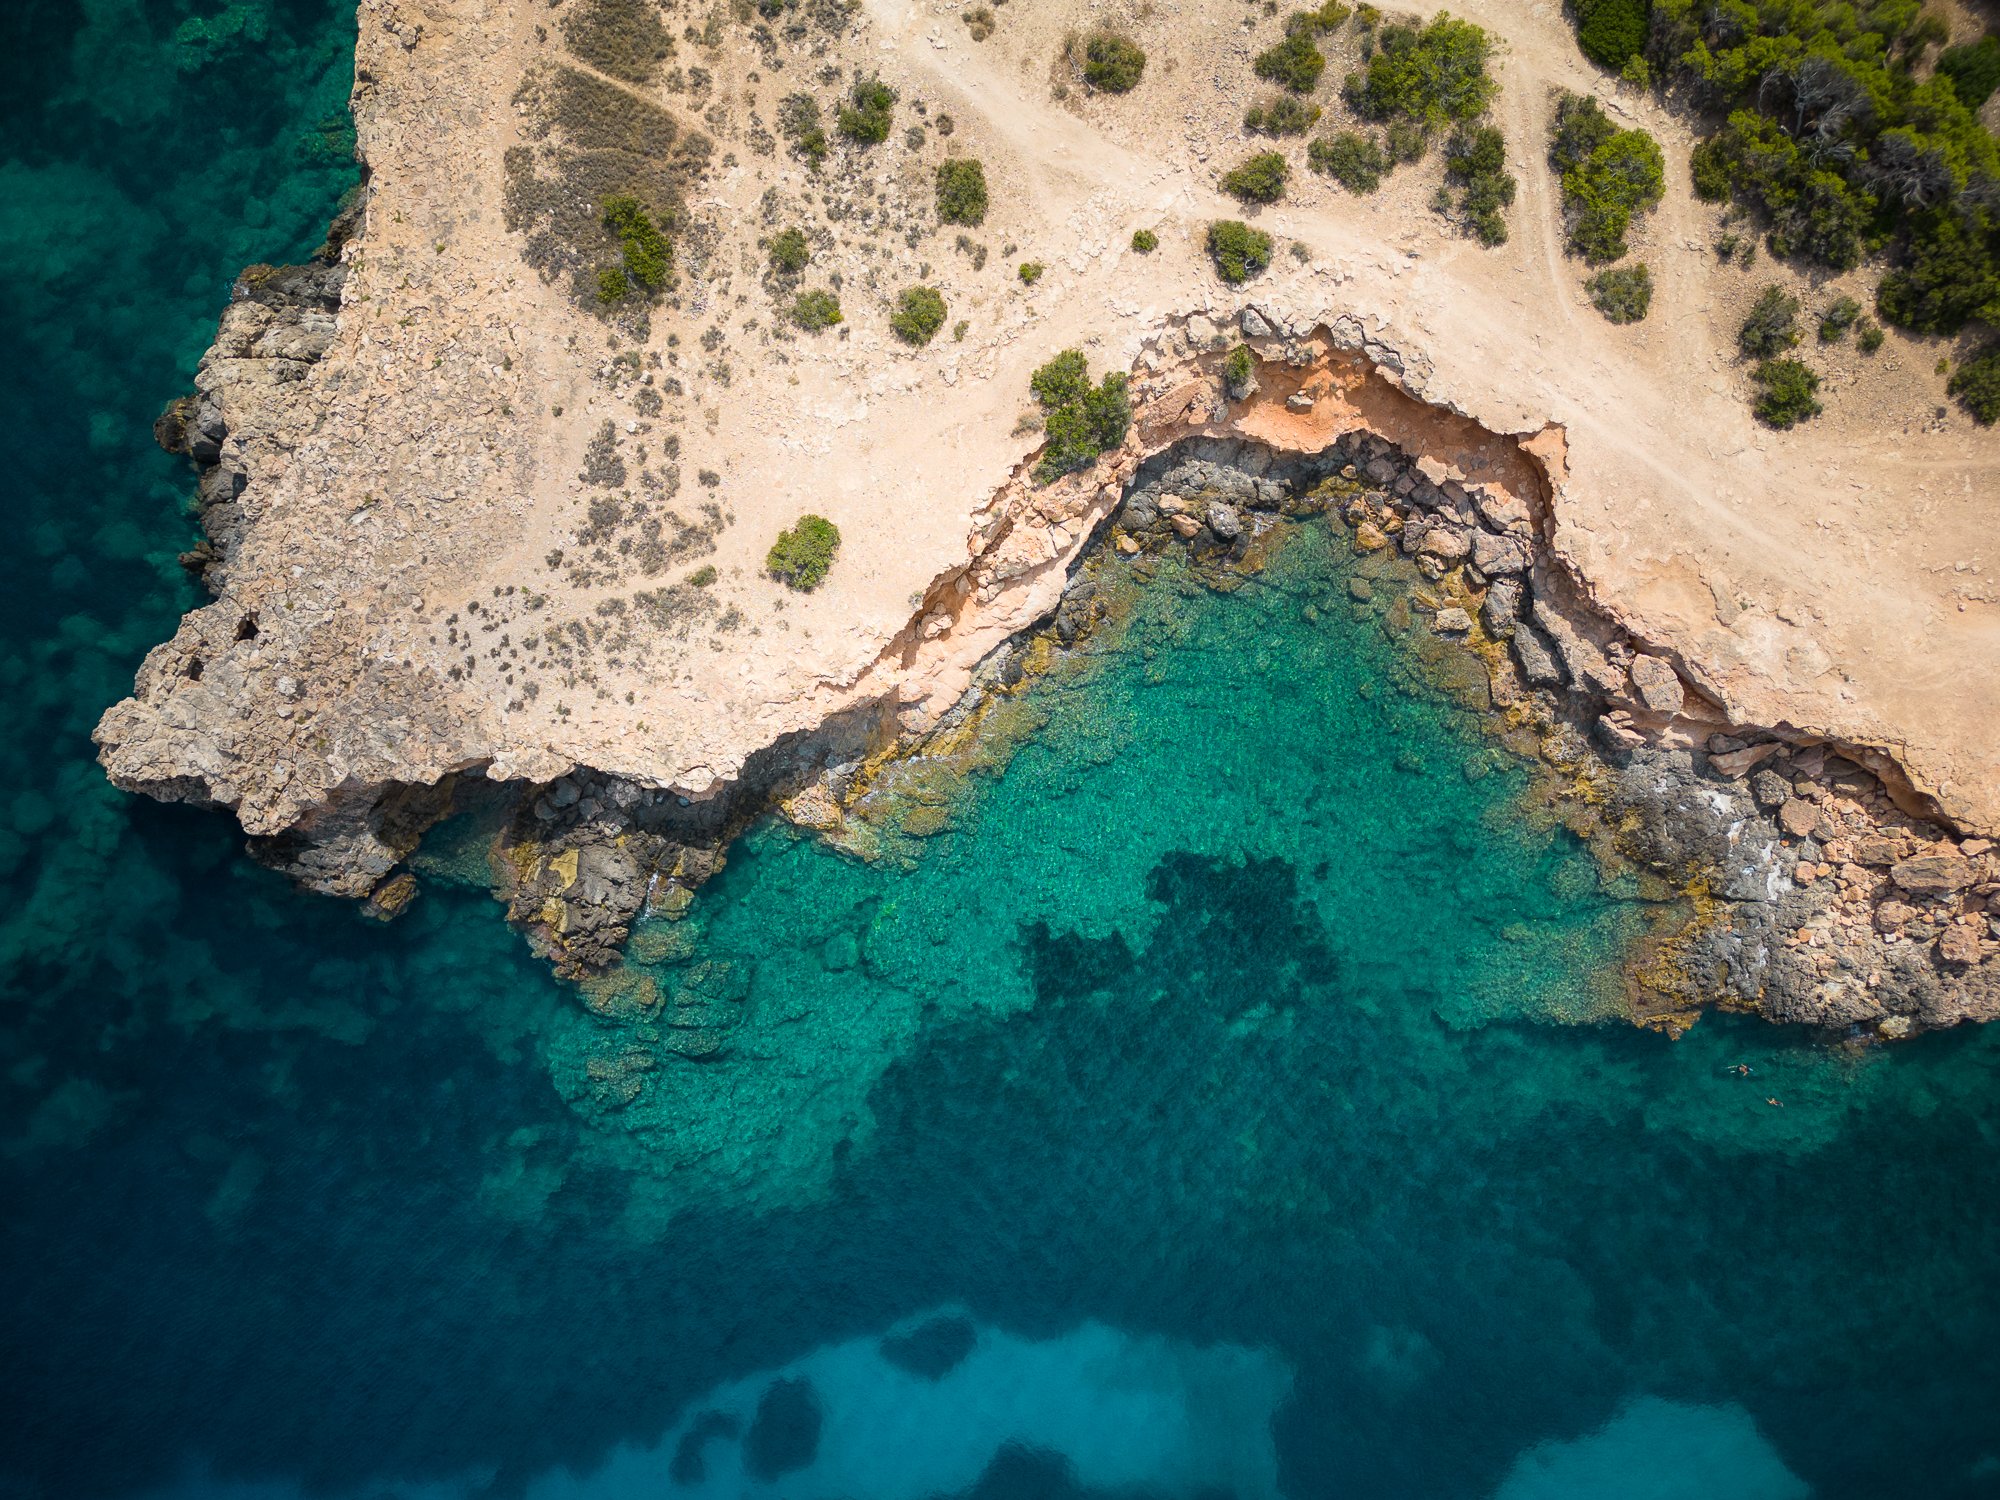
How good is the DJI Mini 3 Pro camera?
Finally, we can now start talking about taking photos with the Mini 3 Pro, its why I bought it after all. I have to say, I’m not exactly a pixel peeper but I do strive for the best image quality possible, and so far, I have been really impressed with the camera in this drone. In terms of resolution, at 12MP it won’t set the world alight but it’s good enough for most use cases. As I understand it, it’s the same sensor as the 20MP Air 2S model, with the same size pixel size but less of them on a smaller sensor. So, less resolution but equal in terms of image quality.
There is also a 48MP mode where the Quad Bayer Filter tiles the RGB filters to boost the pixel count from 12 to 48 megapixels. I have no idea what that really means, but it can be a great way to boost your resolution. In most situations, the 48MP mode works well, but based on my own experience, in darker scenes, the images can appear noisier in the shadows and completely fall away as the ISO increases. If I’m not too sure what the best option is while out in the field, what I often do is take the image at both 12 and 48MP, just to make sure I have the best version possible.
With the smaller sensor, the dynamic range is going to be limited somewhat and may affect the overall quality in certain situations where you have significantly brighter and darker areas in the frame. I knew this might be a problem before I brought the drone, so, for scenes where I feel the dynamic range is on the high side, I will use the Auto Exposure Bracketing mode which takes 5 separate photos at different exposures. That way I can combine all of them together in Lightroom with the Merge to HDR option and have a DNG file containing all the dynamic range from the 5 bracketed raw files.
Lastly, two other notable features I really like are both the vertical, portrait mode, which rotates the camera 90 degrees and the various panoramic modes to choose from. All are incredibly useful to maximise the photo opportunity or resolution while up in the air taking photos.
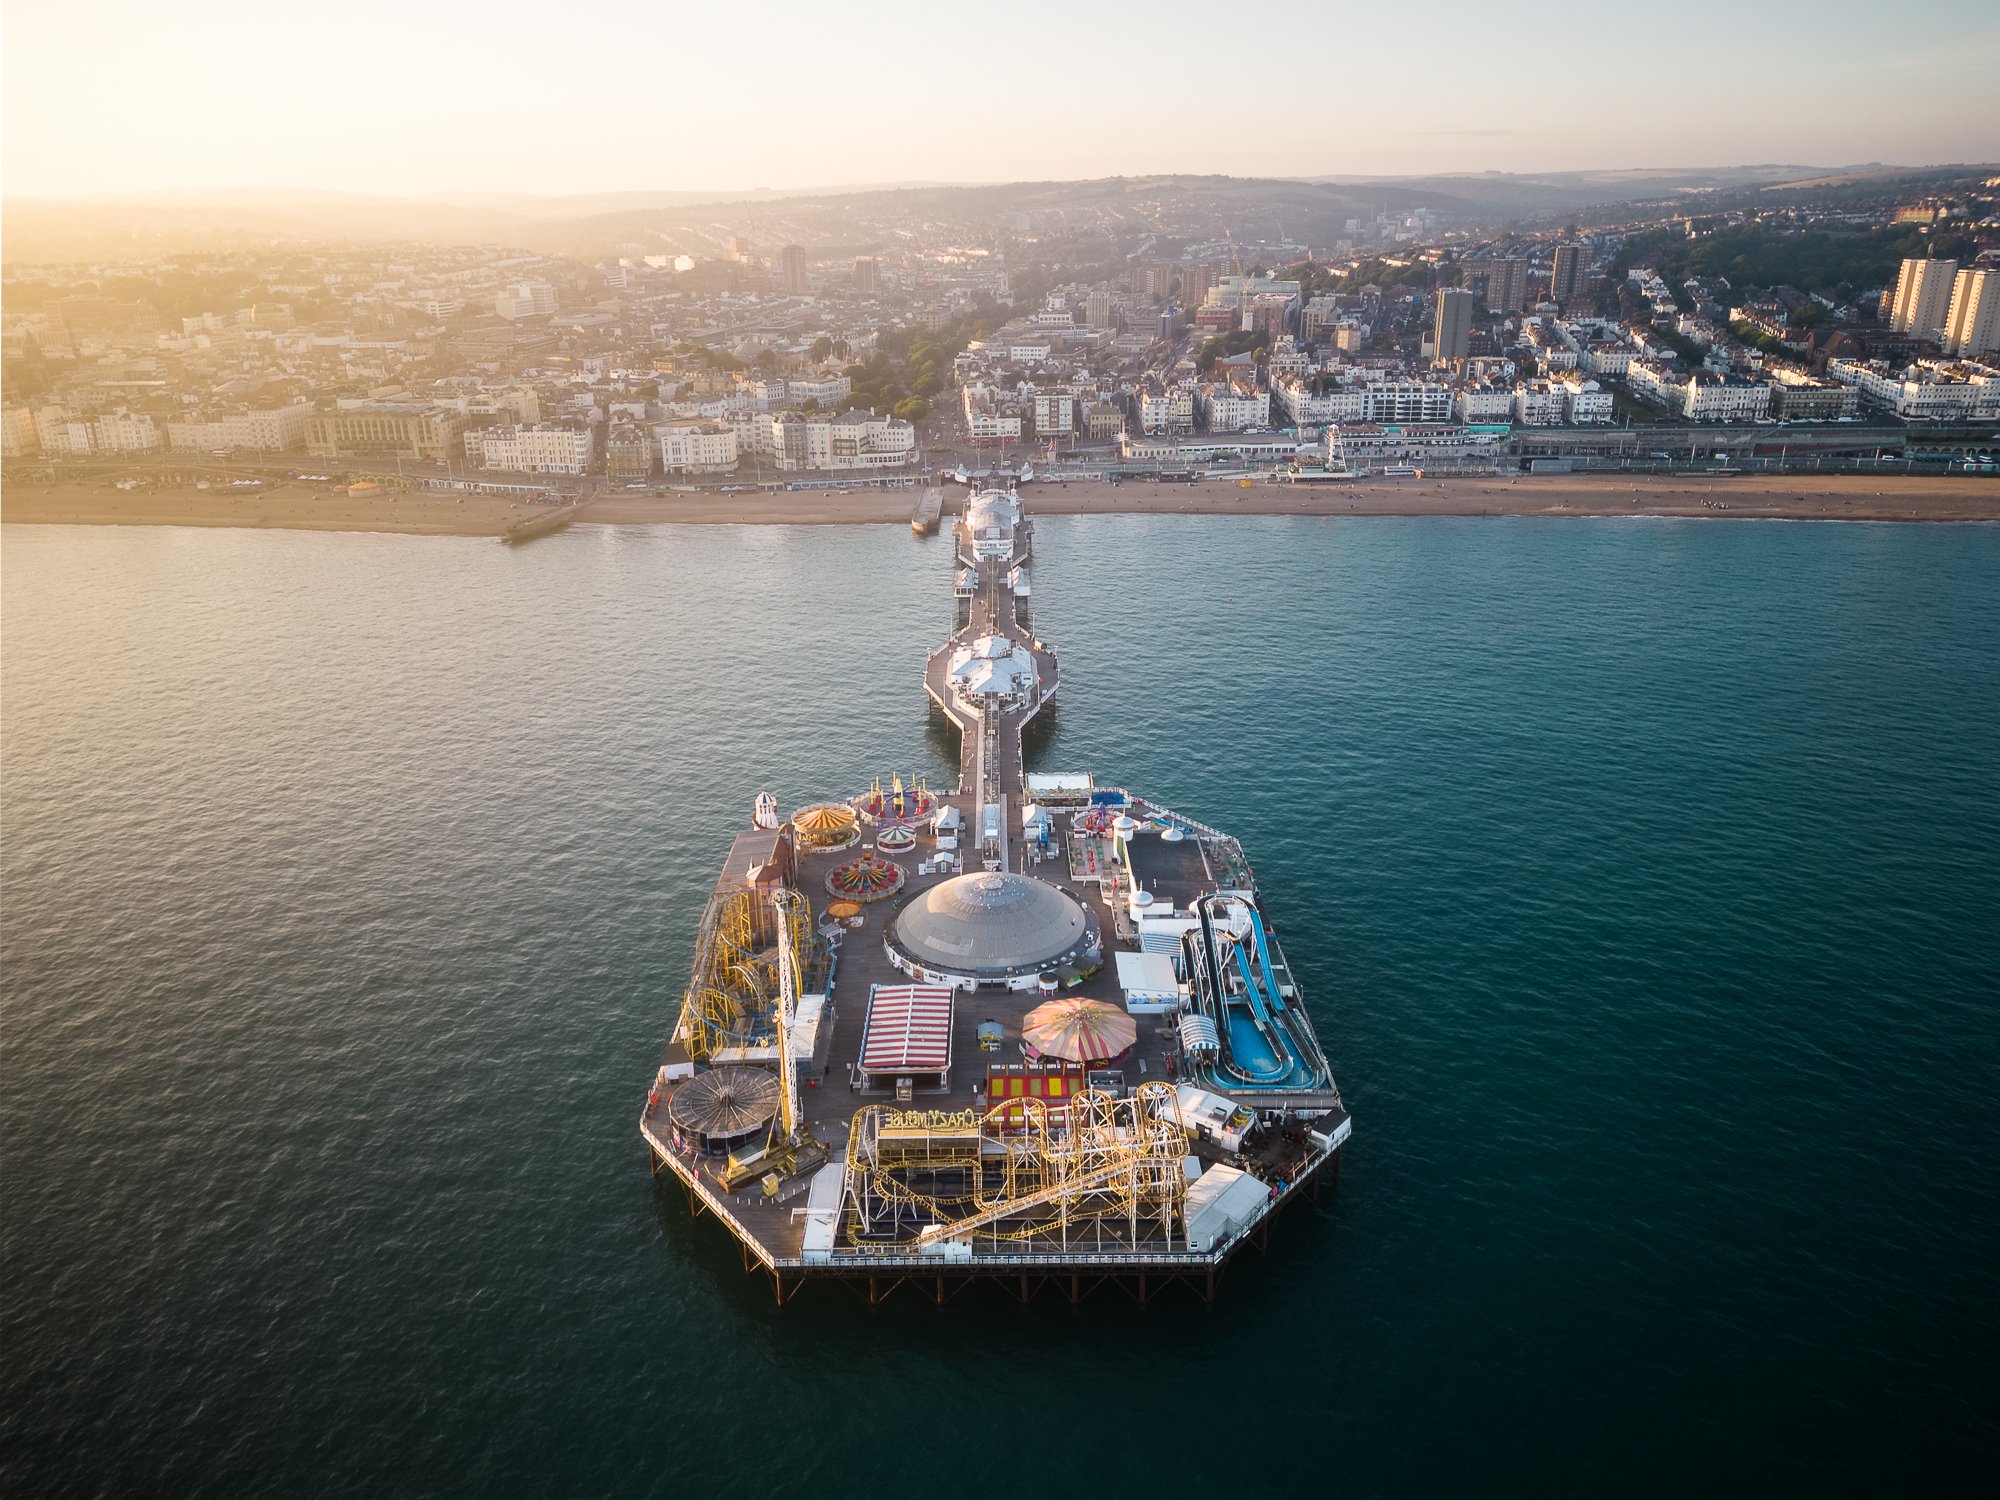
DJI Mavic Mini 3 | 24mm (effective) | 1/2500th Second | f/1.7 | ISO100
On a beautifully sunny day back in June, I took a trip down to Brighton in East Sussex to play with the drone and take some photos along the beach. Timing the flight just as the sun was low in the sky, the conditions were perfect, and I managed to take these three photos of both the fairground rides at the end of Palace Pier and a top-down photo of the skeletal remains of the old West Pier.
DJI Mavic Mini 3 | 24mm (effective) | 1/500th Second | f/1.7 | ISO100
DJI Mavic Mini 3 | 24mm (effective) | 1/640th Second | f/1.7 | ISO100
What could be improved on the DJI Mini 3 Pro
Even though I’ve already mentioned that I’m happy with this drone and the camera it has, the device is by no means perfect so here are a few examples of what I think could be improved.
Picture edge sharpness
With an aperture of 1.7, it wasn’t a surprise that the image sharpness would fall away around the edges, but it can be a little too much at times. It’s not a huge problem and can be improved a little in post processing, but it would be fantastic if the boffins at DJI could design a camera with a wide aperture that didn’t suffer this issue as much and provided better edge to edge sharpness.
Signal transmission range
I knew from researching DJI drones that it’s rare or even impossible to get the full advertised transmission range when flying the drone, but so far, the distance between drone and controller I’ve been able to achieve has come nowhere near what DJI advertises. According to DJI, in urban areas with high interference, providing I have line of sight, I should expect to get 1000-15000m and much further in areas without interference but so far, that’s not been the case at all. Even when stood on the edge of a cliff in Ibiza, flying the drone out at sea, the actual distances I’ve been able to achieve have come nowhere near what they advertise before I start to lose signal. I know mileage will vary and one must remember that keeping visual line of sight is usually required, but not even being able to achieve the low-end distances is a little disappointing.
Auto exposure bracketing in the panoramic modes
I mentioned above that with the smaller sensor and high dynamic range scenes, I will often bracket my images to get as much data into the final image as I can. But AE bracketing is not an option when shooting panoramic images. Why? I can’t think it would be a difficult feature to add in a firmware update (hopefully it’s on the roadmap) and if made available, would mean higher quality, well-exposed panoramic images can be achieved in high dynamic range situations.
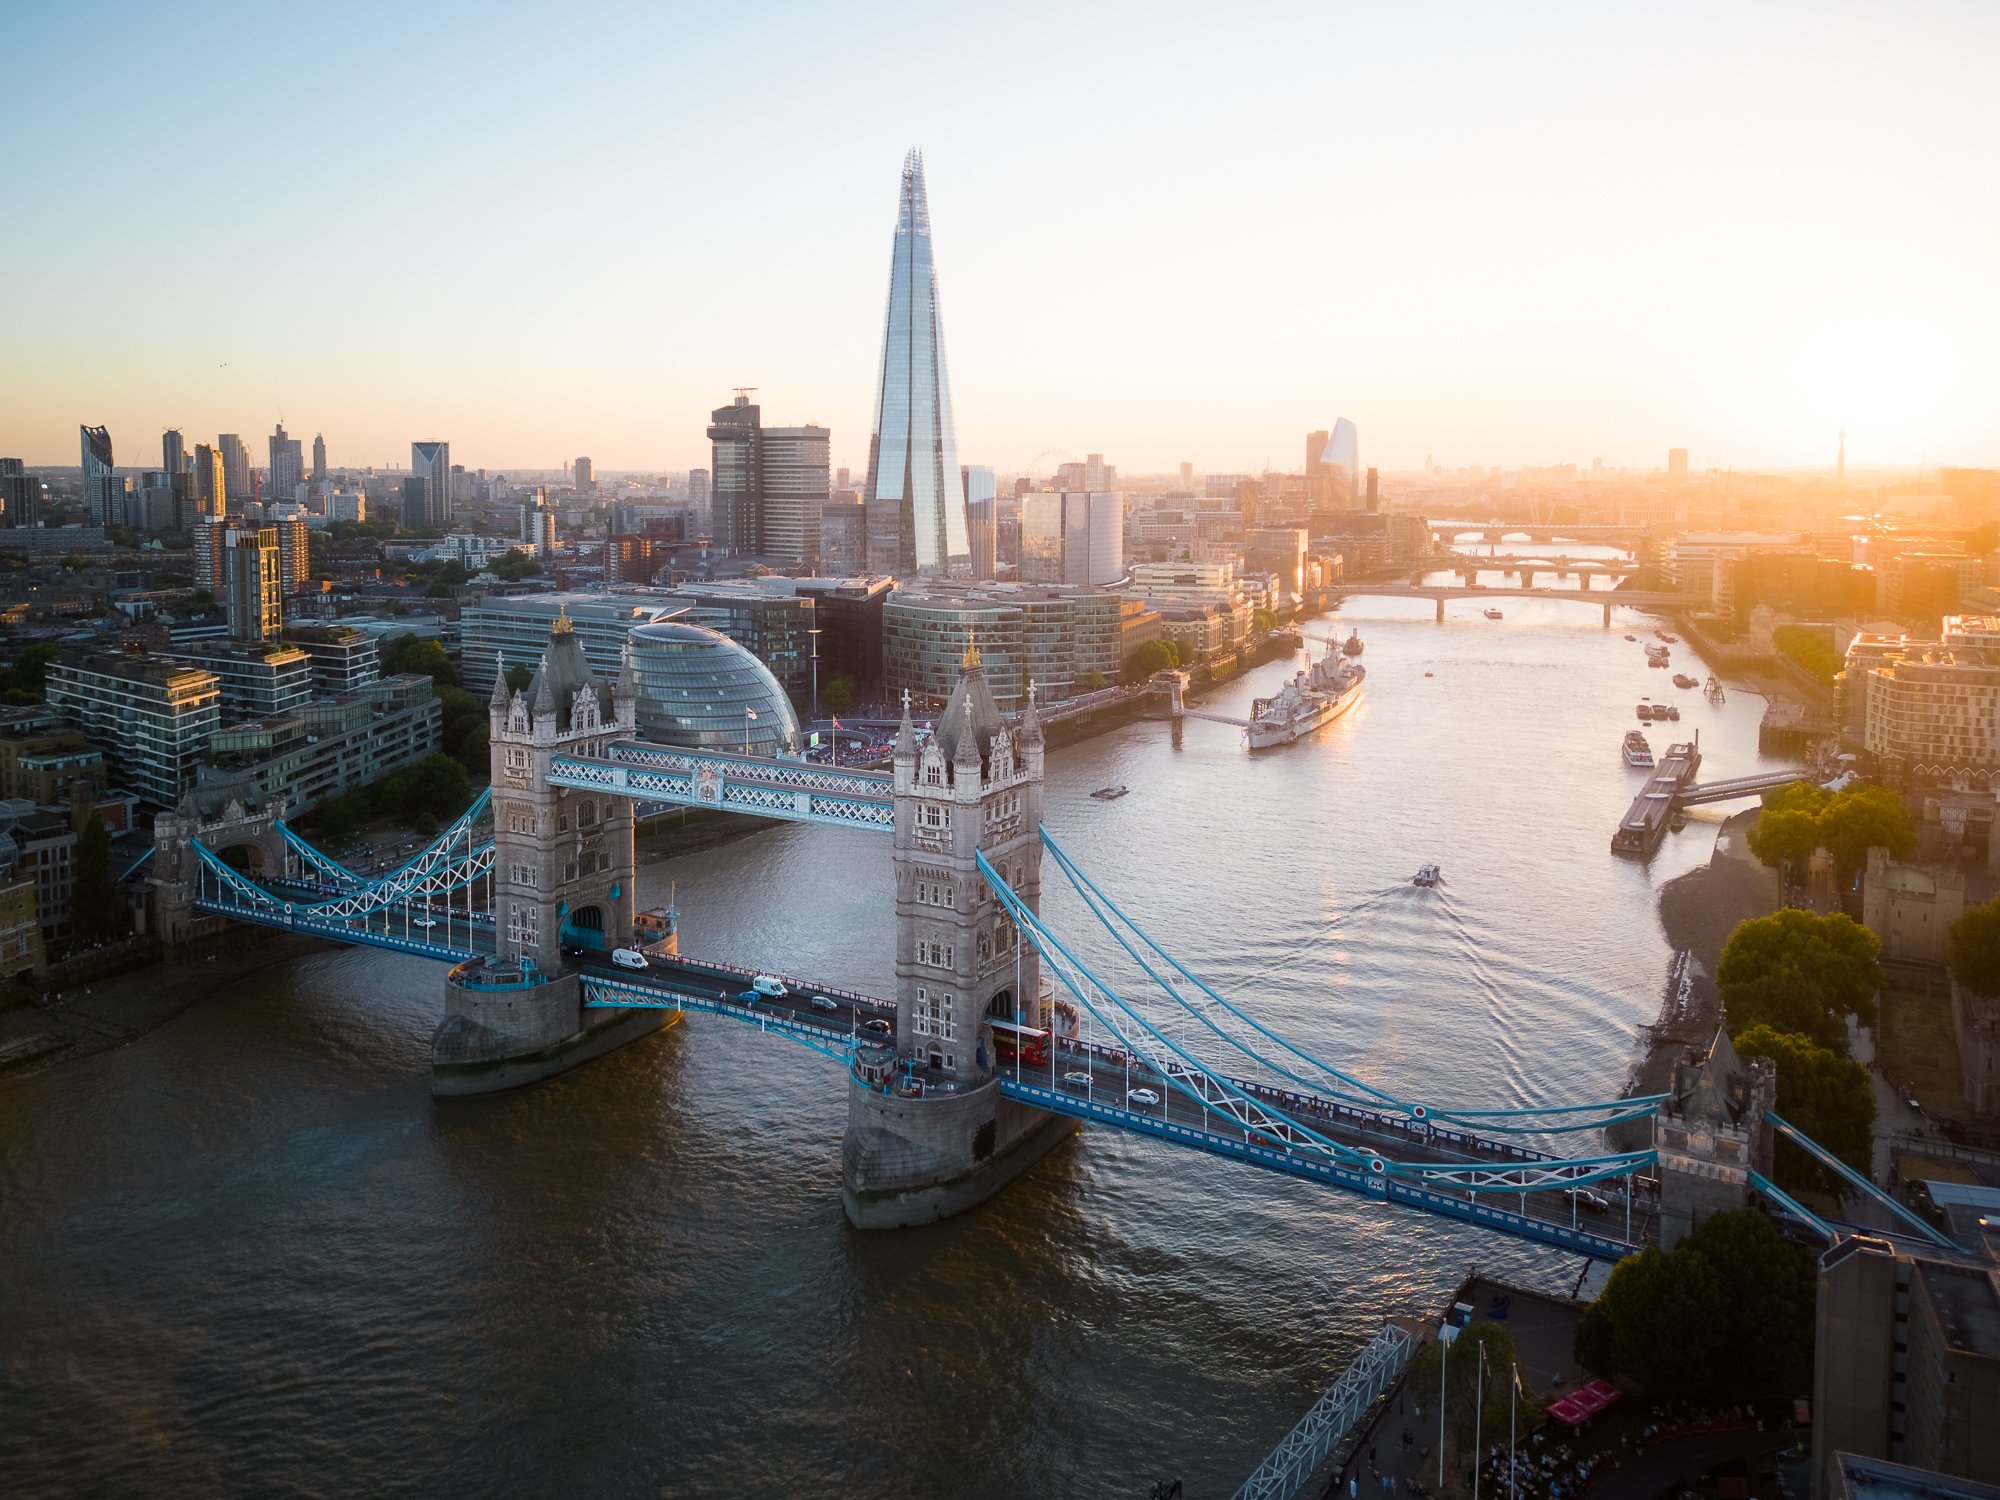
DJI Mavic Mini 3 | 24mm (effective) | 1/2000th Second | f/1.7 | ISO100
Final thoughts on the DJI Mini 3 Pro…
I must admit, when I first considered buying the mini 3 Pro, I did wonder if I would quickly become frustrated by the smaller sensor and lack of resolution compared to the mini’s bigger brothers, but so far, so good. I’m still very happy with the drone I chose. I can still fly almost anywhere, with fewer restrictions compared to the heavier drones and using the panoramic or even the 48MP modes means I can still work around the smaller resolution in most situations.
The DJI Mini 3 Pro’s smaller, lighter form factor means it fits nicely in my camera bag, so I have it with me on all my landscape photography outings. So, not only are my fears of the drone remaining unused, and gathering dust on a shelf at home unfounded, but it also means I always have it to hand for when an opportunity to bag a good drone photo arises.
Would I recommend this drone?
This drone is a fantastic, capable bit of kit and I’m very happy I went with the Mini 3 Pro as it suits my needs to fly in more locations and be subject to fewer restrictions near where I live. If this is the situation you find yourself in and you’re not looking for the best possible image resolution you can get in a drone, then I certainly recommend the Mini 3 Pro. If, however, image quality/resolution is your top priority and you visit places with more open spaces and fewer flight restrictions, then for not a lot more money, you might opt for the DJJ Air 2S, or for a little more still, the newly announced (at time of writing) DJI Mavic 3 Classic.
Personally, this drone is a perfect fit for my current needs.

Between The Wind by Ben Horne | My Photo Bookshelf
I’ve been watching Ben Horne' on YouTube for a couple of years now and admire his large format work. So, when his previously sold-out book became available, it went straight into the basket and this is my brief review.
I’ve been watching Ben Horne on YouTube for a couple of years now. Being into my wide, dramatic vistas at the time, his work was interesting to me but I wouldn’t say I was in awe of his work, but as my photography tastes matured and my interest in small scene photography increased, I started to pay closer attention to his work, appreciating his artistic and technical abilities that much more. As my fondness for Ben’s photography increased and knowing he had released his first book some time before, I added it to my photobook wish list and by the time I eventually got around to wanting to buy his book, it was unsurprisingly sold out. I was kicking myself at the time as I genuinely thought that ship had sailed. Fast forward to just a few months ago and while browsing the Kozu Books website, I noticed there were a few back on sale so without delay and feeling incredibly fortunate, I made the order.
The synopsis
There is something to be said about limitation. It sparks within me a sense of creativity, and allows me to produce work I’m truly satisfied with.
For the past decade, I’ve worked exclusively with large format film. The limitation of this medium can be overwhelming at times, but I’ve learned to be patient, to think through my composition, and to wait for the best light.
I treasure those moments when I stand next to my camera, a stopwatch in one hand, a cable release in the other — patiently waiting for the wind to settle before opening the shutter.
Each photo in this book represents a moment of calm — a moment between the wind.
This collection of work spans from 2009 through present day, and was photographed entirely on 8x10 and 4x5 color film.

My thoughts about the book
First up, I love the title of this book. Ben goes into a bit more detail in his introduction but to summarise, using a large format film camera and the inevitable longer shutter speeds needed to soak in all that light, Ben often finds himself waiting for the wind to drop before taking his images, thus achieving sharp, blur-free results. Very clever indeed.
As you would expect from Kozu Books, it’s solidly built and of high quality. The cover is natural cloth with foil text which works well considering the type of imagery the book contains. The book starts with a foreword by Charles Cramer followed by Ben’s introduction, getting straight into the imagery from there.
If you are already aware of Ben Horne’s work, you will know the style and subjects contained within his photos but for those less familiar, Ben is a large format film photographer who has been taking multiple trips a year to national parks such as Zion and Death Valley since 2012 and has been documenting these trips by using his large format film camera. So not only does Ben have to seek out interesting subjects and strong compositions like the rest of us, he also has to take well-exposed, sharp photos with a large, bulky film camera at the same time. That’s dedication for you. This book is a collection of photos Ben has taken from the salt flats in Death Valley to intimate scenes containing lone leaves and abstract details in Zion.
No good photobook is complete without the right flow of images and between Kozu Books and Ben, they have done a great job on the sequencing. Throughout the book you will find a perfect pairing of photos, be it from the same location, similar or complimentary colours or subjects that share a common theme such as the same type of tree of both containing flowing water.
If you like beautiful portraits of trees, abstract shapes and textures and intimate scenes found on the valley floor then this book is a must have for your bookshelf. Thats if you can find a copy of course.
Book Details
Hardcover
Size: 300mm x 240mm
Pages: 96
Photos: 68
Availability at the time of writing: Unavailable from the publisher (Kozu Books). Consider buying a used copy if available.

Beach Pebbles Rock by Rob Whitworth | My Photo Bookshelf
I’ve never really given the humble beach pebble much thought. We have many pebble beaches down here on the UK’s south coast so being so used to them, I tend to take their existence for granted. That all changed when I came across Rob Whitworth’s Beach Pebbles Rock project
I’ve never really given the humble beach pebble much thought. We have many pebble beach’s down here on the UK’s south coast so being so used to them, I tend to take their existence for granted. That all changed when I came across Rob Whitworth’s Beach Pebbles Rock project. You could say this book was the result of an impulse buy as within about 30 minutes, I had come across Rob’s @beachpebblesrock Instagram page, checked his website, found the book and checked out.
The synopsis
Rob Whitworth is a graphic designer and professional photographer with a love of the natural world. His fascination with beach pebbles started at an early age, when a friend gave him a paper bag full of them for his tenth birthday. Every pebble on the beach is unique and endlessly fascinating. The subtleties of colour and tone; the infinite variations of form; their tactile nature, rough and smooth and cold; the density and weights that differ for similar sizes; their intricate surface patterns. All works of art in their own right.
Initially posted on Instagram @beachpebblesrock, these photographs have received so much positive feedback and encouragement from artists, ceramicists, designers and others who draw inspiration from the natural world, that the idea has continued to grow, and this exhibition at Inspire Makers is a progression of the project.

My thoughts about the book
Rob has collected beach pebbles for many years and looking for something creative to do during the initial Covid lockdown back in 2020, he began to take photographs of his collection. After posting them on Instagram, and with some positive feedback, he decided to create this beautiful small book.
Apart from a brief introduction, this book is less about the written and all about the visual narrative. Rob's background in graphic design really shows in this book as the minimal design means the pebbles take centre stage allowing their unique textures, patterns and shapes to stand out which to me, is the entire point of the book. Rob’s eye for a pleasing arrangement is also clear to see and I appreciate the time and patience needed to organise the pebbles by size, colour, shape and texture into some well-balanced, harmonious compositions.
Apart from the pleasing aesthetics, a lesson I learned from this book was how I take so much of the natural world around me for granted and rarely do I look properly at the things we see every day. Seeing how different the colours were and their unique patterns absolutely opened my eyes and reminded me to look around more often, paying closer attention to nature’s smaller details, whether I’m out with my camera or not.
Reading this book is an incredibly satisfying experience and if you’re into your small, intimate photography then getting your hands on a copy of Beach Pebbles Rock is a no brainer.
Book Details
Hardcover
Size: 155mm x 216mm
Pages: 72
Photos: 120
Availability at the time of writing: Still in print and available from the author’s website at https://www.robwhitworth.com/books

Joe Cornish. A Photographer at Work | My Photo Bookshelf
Joe Cornish is widely regarded as one of the UK’s top landscape photographers and this book, written from the perspective of fellow photographer Eddie Ephraums, is a unique insight into the way Joe took landscape photographs.
Joe Cornish is widely regarded as one of the UK’s top landscape photographers and this book, written from the point of view of fellow photographer Eddie Ephraums, is a unique insight into the way Joe went about his craft back in the early 2000’s. With an opportunity to observe one of the country’s leading landscape photographers out in the field, this was a must-have addition to my bookshelf.
The synopsis
This highly original book explores the philosophy and working methods of one of the UK’s greatest landscape photographers. Over a four-year period, Joe Cornish and Eddie Ephraums - friend, collaborator and fellow landscape photographer - have created a unique record of Joe’s working approach in a variety of locations.
Each of these locations reflects a different aspect of the creative photographic process. Through conversations between the two, and Eddie’s revealing images of Joe at work, plus Joe’s own pictures from each location, we learn about the exploration of photographic ideas. The book also offers insights into the motivation and decision-making involved in landscape photography.

The genesis of A Photographer at Work coincided with the transition for both photographers from a traditional, exclusively film-based way of working to one that now embraces the use of digital compact cameras, digital SLRs and, most recently for Joe, a large format digital camera. The two authors explore the opportunities that each of these new tools has opened up. For example, Joe now uses a digital compact as a sketchbook and for exhibition-quality prints, while Eddie has employed one to make many of the photographs in the book.
With inspiring images and an absorbing conversational narrative, this book will appeal to everyone with an interest in photography and in the artist’s creative journey.
My thoughts about the book
When I became more interested in owning photography books and studying the craft of other photographers, it didn’t take me long to buy a book or two which featured the work of Joe Cornish. I’ve been an admirer of his work and overall photographic philosophy for many years now so when I discovered the now out of print A Photographer at Work, and after hunting down a used copy, into the basket it went.
This book is written by Eddie Ephraums who, over a period of a 4-year period, accompanied Joe to many locations and through his own pictures and words, documented him as he worked. Eddie has created a fascinating insight into the way Joe approaches and takes his photos. Each chapter features a new location, behind the scenes photos and written observations as Joe takes a photo and although this book has Joe Cornish In the title, it’s as much the fantastic work and craft of Eddie as a documentarian as it is about Joe the landscape photographer. In my opinion, it works well.
One of the reasons I watch landscape photographers out taking photos on YouTube is that I like to understand what the photographer was thinking, even visualising when taking the photo. It helps me understand what they are trying to achieve and importantly what they are trying to say with their image. That’s why I like books like this as not one for creating YouTube videos himself, it’s the closest I will get to observing one of the landscape photography greats at work.
Book Details
Softcover
Size: 216mm x 254mm
Pages: 144
Availability at the time of writing: Unavailable from the usual UK booksellers. Consider buying a used copy.
On Location | Photographing Waterfalls in the Brecon Beacons
In April 2022, I visited the Brecon Beacons to spend a couple of days exploring and photographing some of the wonderful waterfalls this beautiful national park has to offer.
In April 2022, I visited the Brecon Beacons to spend a couple of days exploring some of the various waterfalls this beautiful national park has to offer. This was my second visit to the waterfalls, the first being October 2021 when they were surrounded by autumnal colours. During that previous visit, I managed to take a couple of photos I really liked but at the same time, I couldn’t help wonder what it would be like to photograph the falls surrounded by the fresh green leaves of spring. So, thinking that April would be the best time to ensure the trees had new leaves and the greens would still be lush and vibrant, I booked a hotel for a couple of nights and with a full tank of eye-wateringly expensive fuel and my camera bag packed, I headed out to the Brecon Beacons National Park once again.
Just a couple of housekeeping notes on the photos below. I decided not to post them chronologically, but to group the photos I took across both days based on the falls they were taken at. So, although you might see some similar compositions, you should see a difference in time of day, light and weather to see how the falls look in the different conditions.
Additionally, it will be obvious to some that there is a 4th waterfall, Sgwd Clun-Gwyn missing from this post. The truth is I just couldn’t find a workable composition during my visit. I’m not sure if it was the lack of flow from the river, the light at the time or my ability in finding a good composition (probably all three), so, I came away with no photos of this particular fall.
What was in my camera bag for this trip?
Talking about having my bag packed, here’s a quick overview of the gear I took to photograph the waterfalls in the Brecon Beacons. Along with the usual camera and tripod, I had with me the three lenses I take on all landscape photography trips, the wide 10-24mm, the standard 18-55mm zoom and telephoto 55-200mm. The XT2 camera is an APS-C sensor so feel free to convert the lenses to the 35mm equivalent.
Along with the camera, lenses and usual accessories, I had my set of Kase filters with me which I used consistently throughout the shoot to achieve two very important jobs. Firstly, the circular polarizing filter was used to reduce the reflected light and glare from bouncing off the water and wet rocks, control the highlights and boosting the colours. Secondly, I used the neutral density filters to reduce the light hitting the sensor, allowing me to use longer shutter speeds, helping to smooth the water, giving it that silky look as it flows and falls.
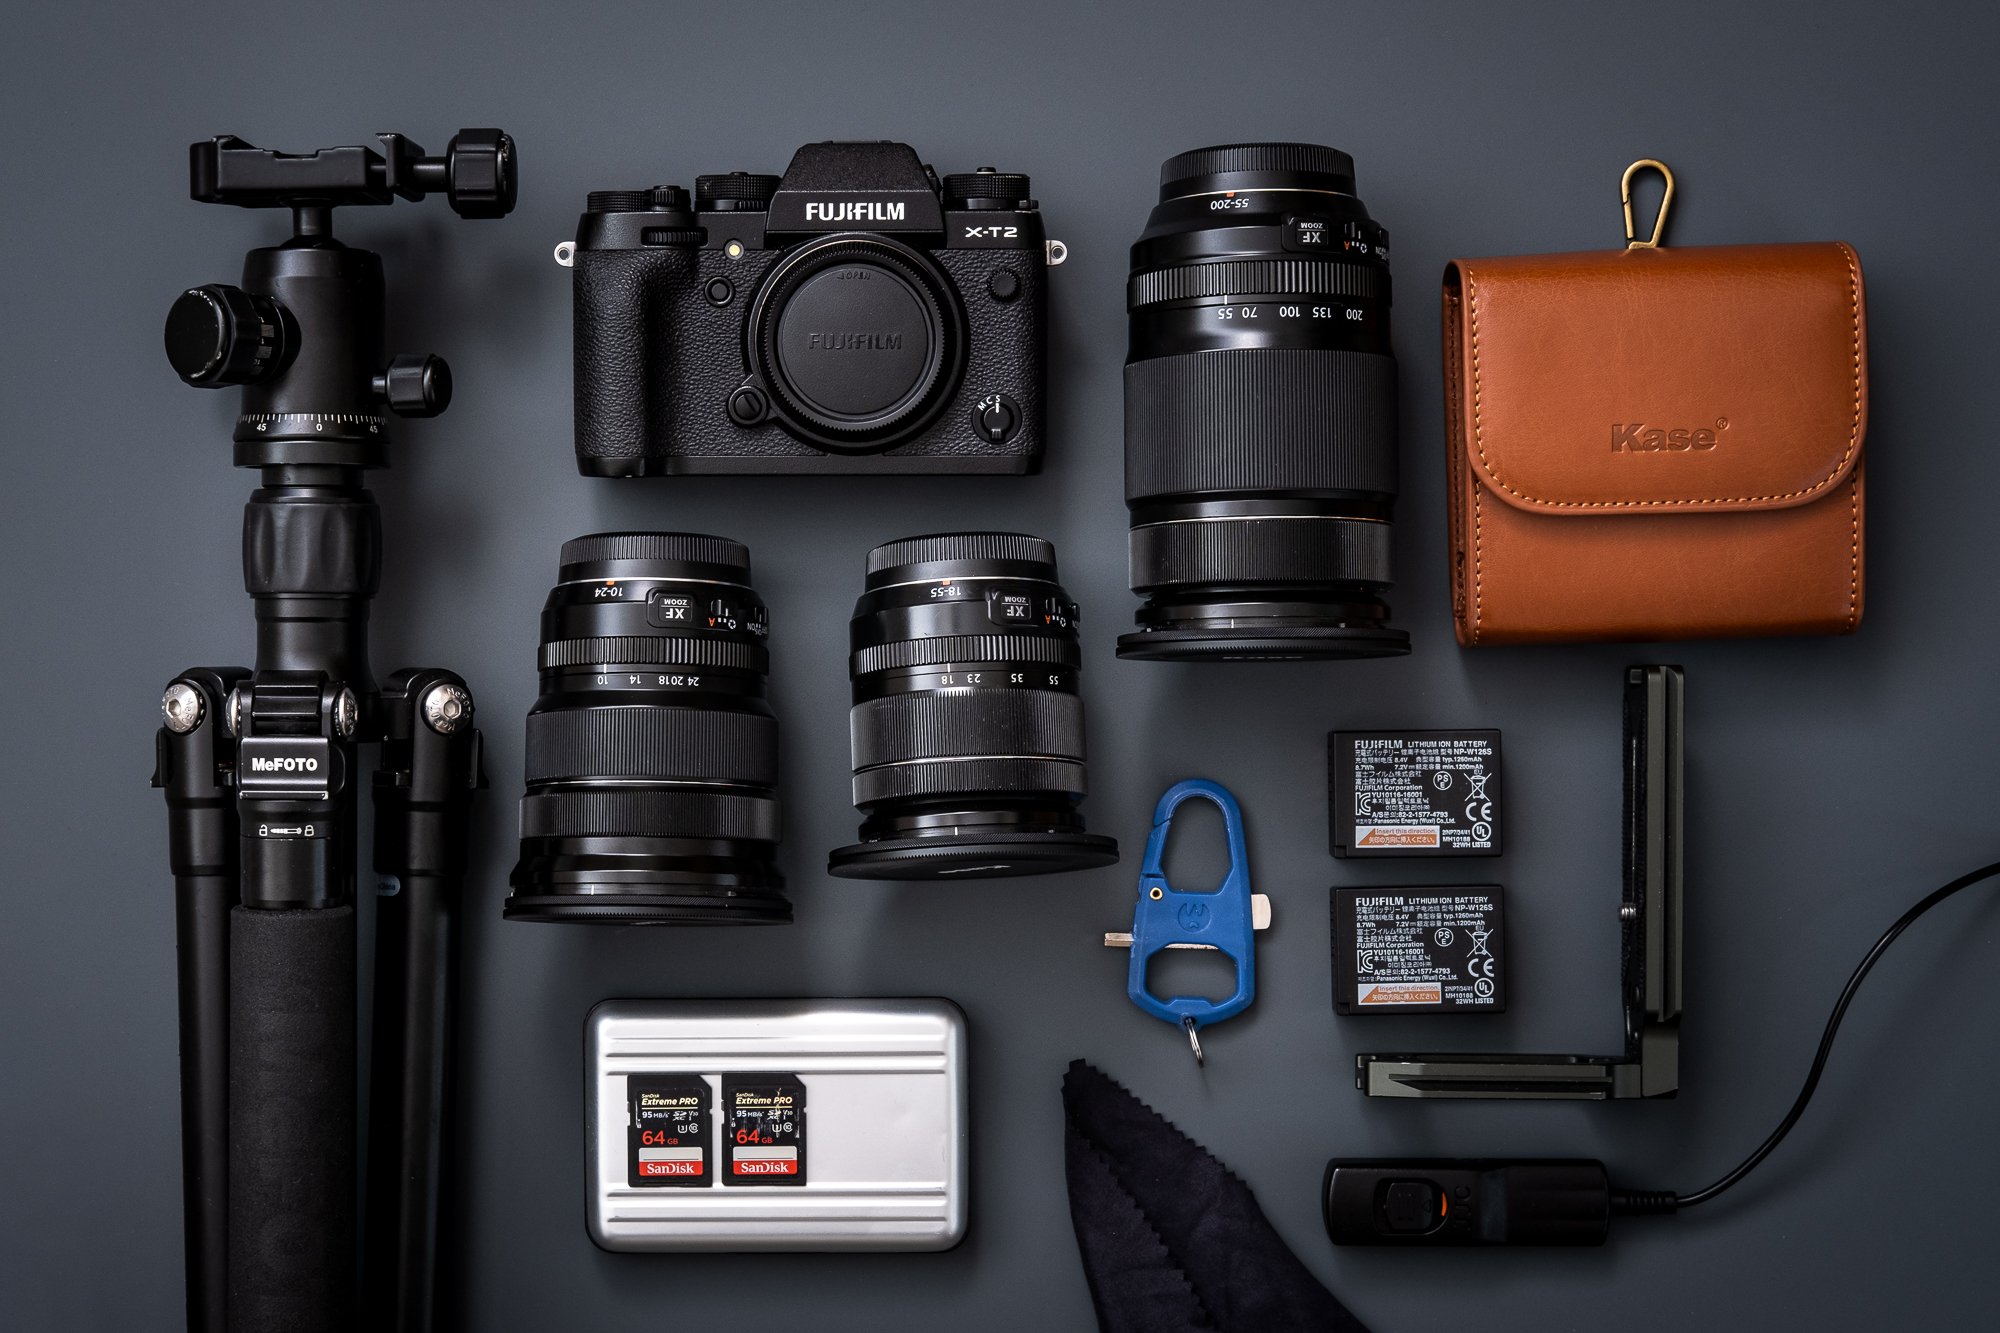
Where is the best place to park when visiting the Brecon Beacon Waterfalls?
There are at least three car parks located near this stretch of the river. The larger, paid car parks are probably the most accessible, but it means a longer downhill walk (uphill all the way back) to get to the falls. If you are looking for a little less faff and are happy with a longer walk, see below for a link to two of the large car parks nearby. The falls are well signposted and easy to find. The cost for a day’s parking was £5 and both take card payments.
Four Waterfalls Car Park: https://goo.gl/maps/gmsWApCx3drg71BP8
Gwaun Hepste - Four Falls Trail Car Park: https://goo.gl/maps/R1xGWj8MV6dunLTC8
My preference, however, is to park at the Small Car Park which, as the name suggests is very small but a lot closer to the falls. It gets full quickly but if heading out particularly early then you should find a spot.
Small Car Park: https://goo.gl/maps/MUPhkEokn6CexoX7A
One last option is a private field which is open most days right next to the Small Car Park. As far as I know, they also charge £5 but I’ve not used this car park before, so if you do manage to park your car here, do check when the gate is locked, just in case.
Photographing Sgwd Isaf Clun-Gwyn Waterfall
As I mentioned above, I don’t have any photos to share of the Sgwd Clun-Gwyn Waterfall so working down the river, the first set of images were taken at Sgwd Isaf Clun-Gwyn Waterfall. In my opinion, this cascading set of falls is the most interesting and provides a host of different compositions to choose from.
Starting at the top, this spot is a bit of a scramble up the hill but once in position, you’re greeted with this sweeping line which forms the edge of the upper falls. Compared to my visit in 2021 when the levels were higher and flow a lot stronger, this time around, it was very different. With less water flowing over the edge, the falls had less impact and the photos were less about demonstrating the power the falls can possess but more about the subtle beauty of the silky water, delicately cascading through the rugged Welsh landscape.

Fujifilm XT2 | XF18-55mm | 18mm | 1/4th Second | f/4.5 | ISO200

Fujifilm XT2 | XF55-200mm | 61mm | 1/3rd Second | f/10 | ISO200

Fujifilm XT2 | XF55-200mm | 95mm | 0.8 Seconds | f/8 | ISO200
Along with the wide photos of the falls, I also made sure to use my 55-200mm telephoto zoom lens to take some close-up, intimate landscapes. I wanted to capture the shapes and textures of the rocks and water, because together with the wide-angle photos, they all help to document the trip, telling a more complete story of my time there.
Now standing towards the bottom of Sgwd Isaf Clun-Gwyn, you get a better view back up the falls and of the various levels the water has to work its way down, temporarily spending time in this small pool, before getting on its way again down towards Sgwd y Pannwr.

Fujifilm XT2 | XF18-55mm | 19mm | 1/15th Second | f/9 | ISO200

Fujifilm XT2 | XF18-55mm | 50mm | 1/4th Second | f/11 | ISO200

Fujifilm XT2 | XF55-200mm | 100mm | 1/5th Second | f/8 | ISO200
For the photo below (and the almost identical version taken the previous day above), I wanted to get the entire scene into the frame, but I couldn’t get the results I wanted with the 10-24mm lens. The wide focal length was pushing the background further away, including too much sky, so I decided to forgo the wide-angle and take a multi-frame panoramic image with the standard zoom instead. Sweeping from left to right with my 18-55mm lens attached, I took 3 photos which were then merged together later in Adobe Lightroom.
Of the two panoramic photos I took of this scene, I much prefer this one below. The slight mist in the air helped to defuse the sunlight and by using the CPL filter when photographing the wet rocks, it helped remove most of the glare and distractions from around the edge of the frame.

Fujifilm XT2 | XF18-55mm | 18mm | 1 Second | f/8 | ISO200

Fujifilm XT2 | XF18-55mm | 34mm | 1/10th Second | f/8 | ISO200

Fujifilm XT2 | XF55-200mm | 82mm | 1/3rd Second | f/8 | ISO200
The final photo from Sgwd Isaf Clun-Gwyn waterfall below was taken back near the top but this time on the other side of the river. It’s a photo I wasn’t able to take on my previous visit as I ran out of time looking for the route to the spot, but with the water level a lot lower this time, I was able to make my way across the river just a little up-stream and get to this location far easier.
As you can see, from this vantage point, you get a fantastic view of the entire top half of the waterfall as it flows down, cascading towards the pool at the bottom. Getting nice and wide with the 10-24mm lens, I placed the falls to the right and using the trees on the left to balance the composition. I think this is my favourite photo I took during my trip to the falls.

Fujifilm XT2 | XF10-24mm | 13mm | 0.8 Seconds | f/10 | ISO200
Photographing Sgwd y Pannwr Waterfall
Just a little further down the river is where you’ll find Sgwd y Pannwr waterfall. A bit more unconventional as the main drop is at a 90-degree angle to the direction the river is flowing, so it makes for an interesting time finding a good composition here.
Although I think the water in the photo below could do with a bit more flow, I do prefer it to when I was at the same spot in 2021. Back then, with the water gushing over the edge, the scene was a lot messier and it was much harder for me to get a good photo from this angle. This time around, I was able to scramble around the edge of the pool and take the photo below.

Fujifilm XT2 | XF18-55mm | 25mm | 1/3rd Second | f/7.1 | ISO200

Fujifilm XT2 | XF18-55mm | 34mm | 2 Seconds | f/8 | ISO200

Fujifilm XT2 | XF55-200mm | 74mm | 2 Seconds | f/11 | ISO200
On the upper level, the water has carved itself through the rock and although there was very little water up there, I still liked the way it created a useful lead-in line towards the interesting tree at the edge of the falls.
After taking that photo, I then climbed down into the gap and made my way out to the end so I could take a close-up photo of the water as it fell. I crept as close to the edge as I dared, mounted the 18-55mm and took this photo below which turned out to be my favourite from this particular waterfall.

Fujifilm XT2 | XF18-55mm | 18mm | 0.6 Seconds | f/9 | ISO200
Photographing Sgwd Yr Eira Waterfall
Probably the most famous and for sure, the most popular waterfall along this trail is Sgwd Yr Eira. Located at the southernmost point of the four falls trail, it’s well worth the extra walk and steep climb down as you are greeted with this stunning view at the bottom of the gorge. Being so popular, I can’t recommend enough to fellow landscape photographers to get here as early as possible to avoid the crowds of people who start arriving around mid-morning.

Fujifilm XT2 | XF18-55mm | 22mm | 1/3rd Second | f/9 | ISO200

Fujifilm XT2 | XF10-24mm | 10mm | 2 Seconds | f/8 | ISO200

Fujifilm XT2 | XF55-200mm | 61mm | 0.8 Seconds | f/9 | ISO200
What makes this waterfall a bit more special and the reason it’s the most popular spot along the trail is that you can walk right behind the falling water. Getting up close and personal and effectively inside the waterfall is a unique experience and one I just had to try and photograph. Although there is plenty of room to walk behind the water, finding a good composition turned out to be quite difficult because when standing directly behind the falls, you can’t get back far enough to fit it all in. To work around this space issue, I decided to walk to one side, mount the wide-angle lens and take the photo above, which not only allowed me to get more of the waterfall in the frame but also allowed me to include some of the textures and colour in the wet rocks behind it.
With the water levels being low (have I already mentioned that?), I was able to wade into the river and find some new compositions of Sgwd Yr Eira which is how I managed to take the photo below. Using my 10-24mm lens once again, I placed the camera just a few inches above the water to emphasise the rocks in the foreground. With the left-hand fall being a little lower than the other two, it does look a little unbalanced but there was nothing I could do about that and overall, I’m pretty happy with how this one turned out.

Fujifilm XT2 | XF10-24mm | 10mm | 0.5 Seconds | f/9 | ISO200
Photographing Sychryd Waterfall
During the late afternoon on my first day at the falls, I drove a few minutes south of the four waterfalls trail as I wanted to pay a visit to Sychryd waterfall. Located on a small section of the river Sychryd and close to a village called Pontneddfechan I found the nearest car park was at Dinas Rock which you can find here: https://goo.gl/maps/mntGhXc1YDeDAgW76 and is free to park at. After a short 5-10 minute walk up and around Dinas Rock, you drop down into the Sychryd Gorge which is where you will find this charming multi-tier waterfall.
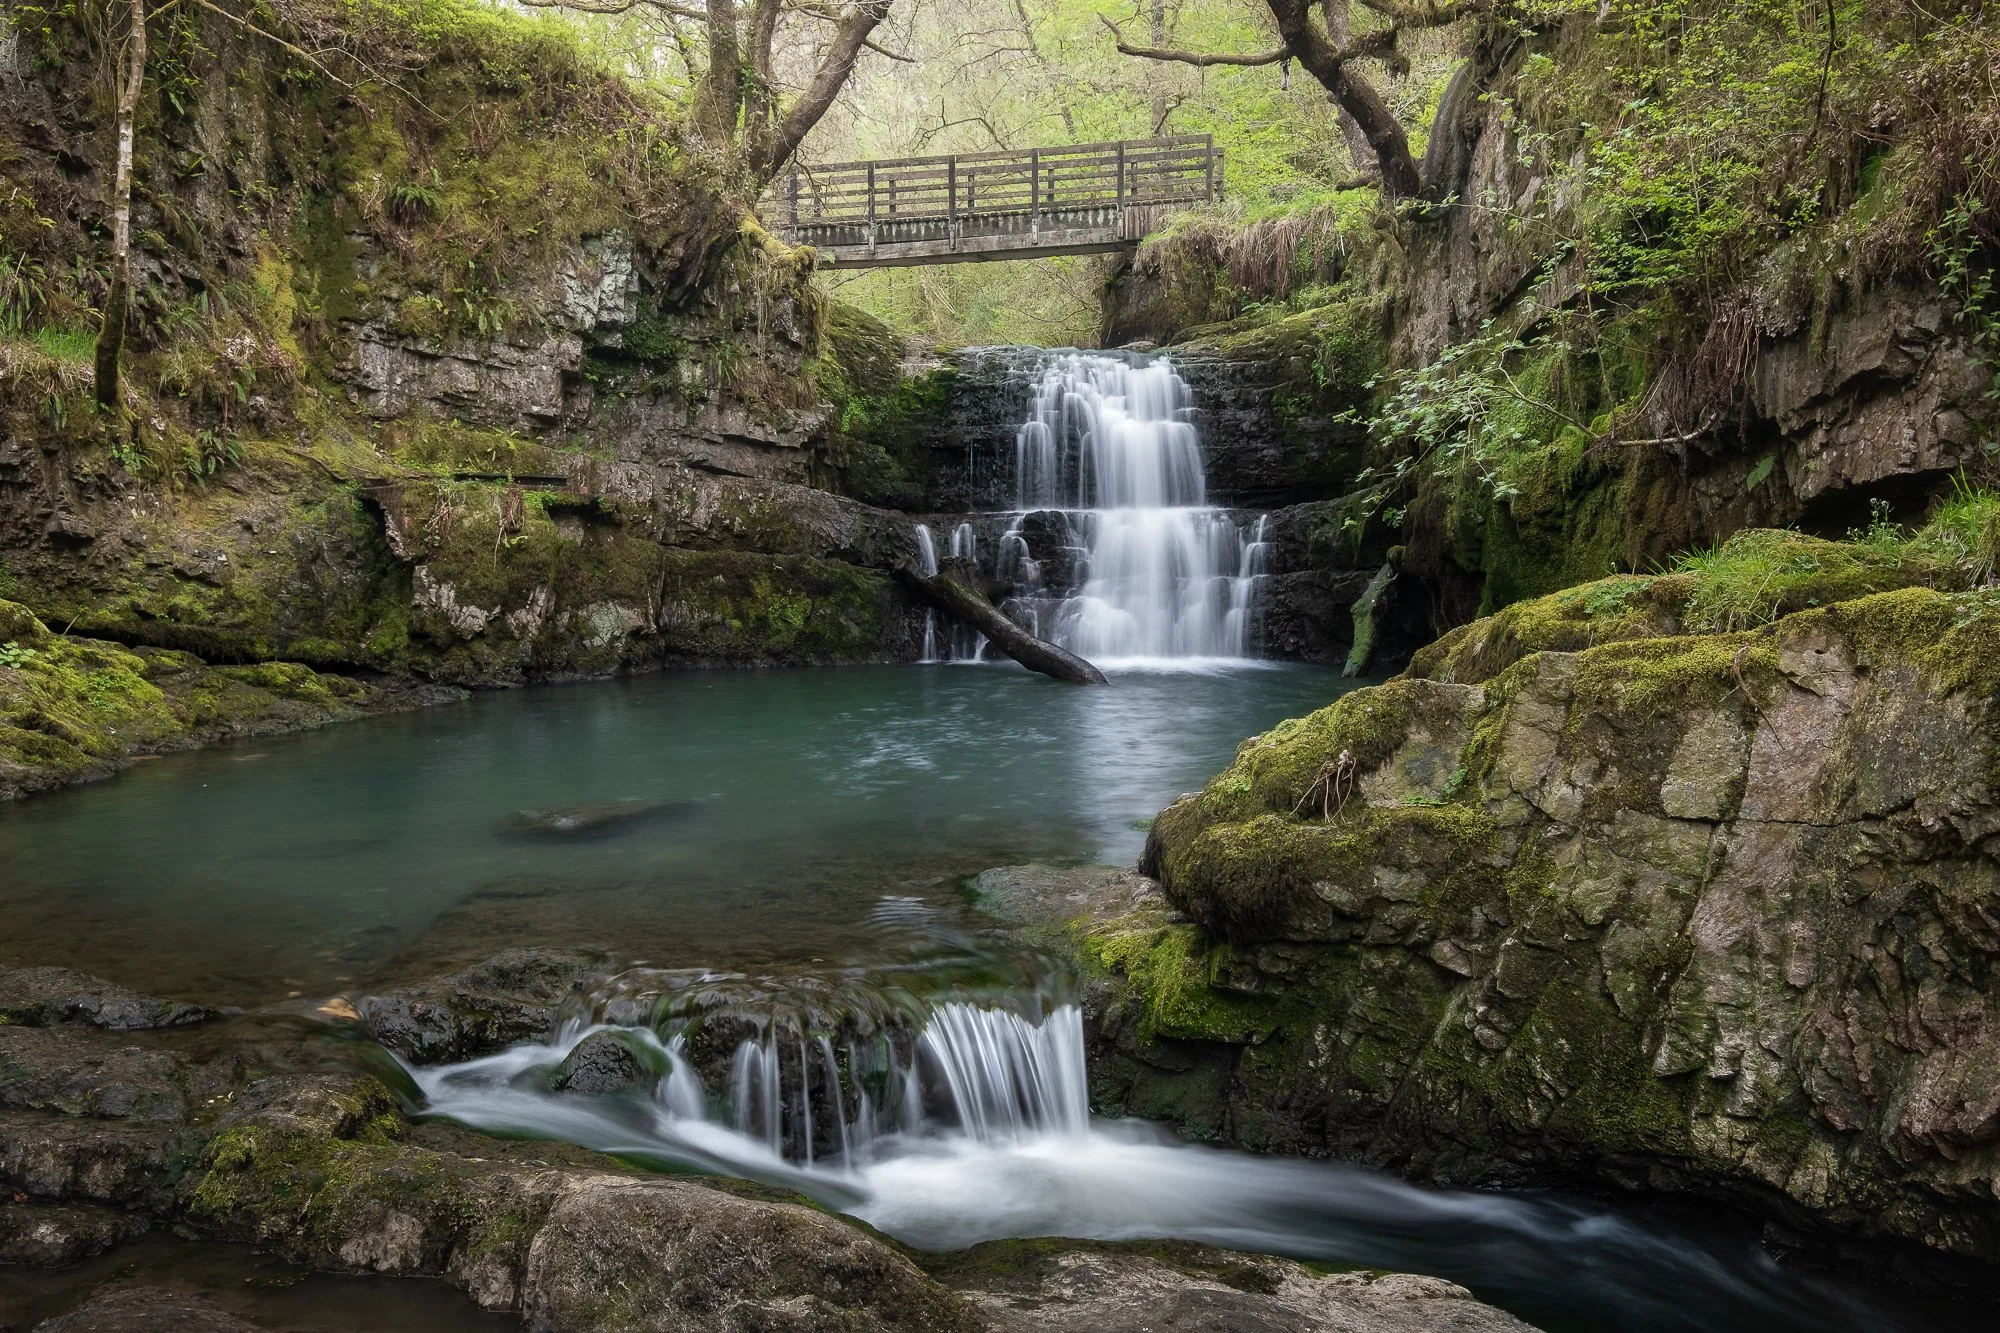
Fujifilm XT2 | XF10-24mm | 17mm | 1 Second | f/8 | ISO200

Fujifilm XT2 | XF55-200mm | 58mm | 1/4th Second | f/6.4 | ISO200

Fujifilm XT2 | XF55-200mm | 190mm | 1/5th Second | f/6.4 | ISO200
The first photo above and probably my favourite is the wider composition of the water cascading down into this emerald plunge pool named Pwll y Berw. Being careful not to include any bright, distracting sky above the trees, I purposely lowered my tripod so that the small cascade was included which added some useful depth and foreground interest to the photo.
With the light levels still quite bright, I took all of the photos here using two Kase filters stacked on top of each other. Firstly, the circular polarising filter which helped to cut any unwanted glare from the wet, reflective surfaces and secondly, a neutral density filter (I forget what strength) to elongate the shutter speed, helping to create that silky smooth effect with the waterfall.
Once done taking the wider photos, I attached my telephoto 55-200mm lens and zoomed right in to take some close-up photos of the silky white, cascading water against the dark, wet rocks underneath.
Dinas Rock (Welsh for Fortress Rock) is a large limestone cliff face and a popular place for experienced rock climbers. On my way back to the carpark, I noticed these green trees growing out of the middle of it and was drawn to the way the green leaves contrasted against the grey stone. So, I mounted my 55-200mm lens once more and snapped a photo.

Fujifilm XT2 | XF55-200mm | 55mm | 1/4th Second | f/7.1 | ISO200

Fujifilm XT2 | XF55-200mm | 105mm | 1/20th Second | f/9 | ISO200
Photographing the local Woodland
Given how much I enjoy photographing the local woodland close to where I live, there was very little chance I would leave this place without photographing some of the interesting woodland scenes which flanked the river and waterfalls.

Fujifilm XT2 | XF18-55mm | 29mm | 4 Seconds | f/11 | ISO200

Fujifilm XT2 | XF55-200mm | 105mm | 1/60th Second | f/8 | ISO200

Fujifilm XT2 | XF10-24mm | 14mm | 1/15th Second | f/7.1 | ISO200

Fujifilm XT2 | XF18-55mm | 29mm | 1/15th Second | f/7.1 | ISO200
At the beginning of this post, I mentioned that I chose to visit again in April as I wanted to see and photograph the location while surrounded by the vibrant colours of spring but in truth, I feel I was still a couple of weeks early because although some of the trees such as those above were adorned with green leaves, others such as those below were only just waking up from their wintry sleep.
Given the lack of spring colour in the canopy and the unfavourable light I had, I still really like these photos as the twisted, almost gnarled shapes and overall arrangement of the trees still appeals to me.

Fujifilm XT2 | XF18-55mm | 33mm | 1/4th Second | f/8 | ISO200

Fujifilm XT2 | XF55-200mm | 58mm | 0.4 Seconds | f/8 | ISO200
So, that was my second visit to these amazing falls and I’m starting to think I might make this trip once every two years or so as I really enjoyed the previous two trips and there are still plenty more trails to explore here.
I hope you enjoyed this on location blog post and although I’m clearly no expert, if you do have any questions about an upcoming visit, feel free to message me directly or leave a comment below and I’ll try to help as much as I can.
Until next time,
Trevor

The Landscape by Paul Wakefield | My Photo Bookshelf
After hearing so many recommendations for this landscape photography book by other collectors, I had to see what all the fuss was about and I’m glad I did. In this Photo Bookshelf post, I’m talking about The Landscape by Paul Wakefield.
After hearing so many recommendations for this landscape photography book by other collectors, I had to see what all the fuss was about and I’m glad I did. In this Photo Bookshelf post, I’m talking about The Landscape by Paul Wakefield.
The synopsis
THE LANDSCAPE is the latest book by British photographer Paul Wakefield. A long-awaited monograph that includes photographs of both epic proportions and intimate detail. Natural landscape is presented through five different sections: Shorelines, Rockscapes, Drylands, Woodlands and Snowscapes.
Paul’s work combines a classic landscape tradition with a contemporary sensibility and reflects his lifelong passion for the natural world. Paul was born and grew up in Hong Kong and has worked continuously on his own landscape projects while using his vision of landscape on advertising commissions. He has published four books previously, three of which were with Jan Morris, renowned author of travel literature.
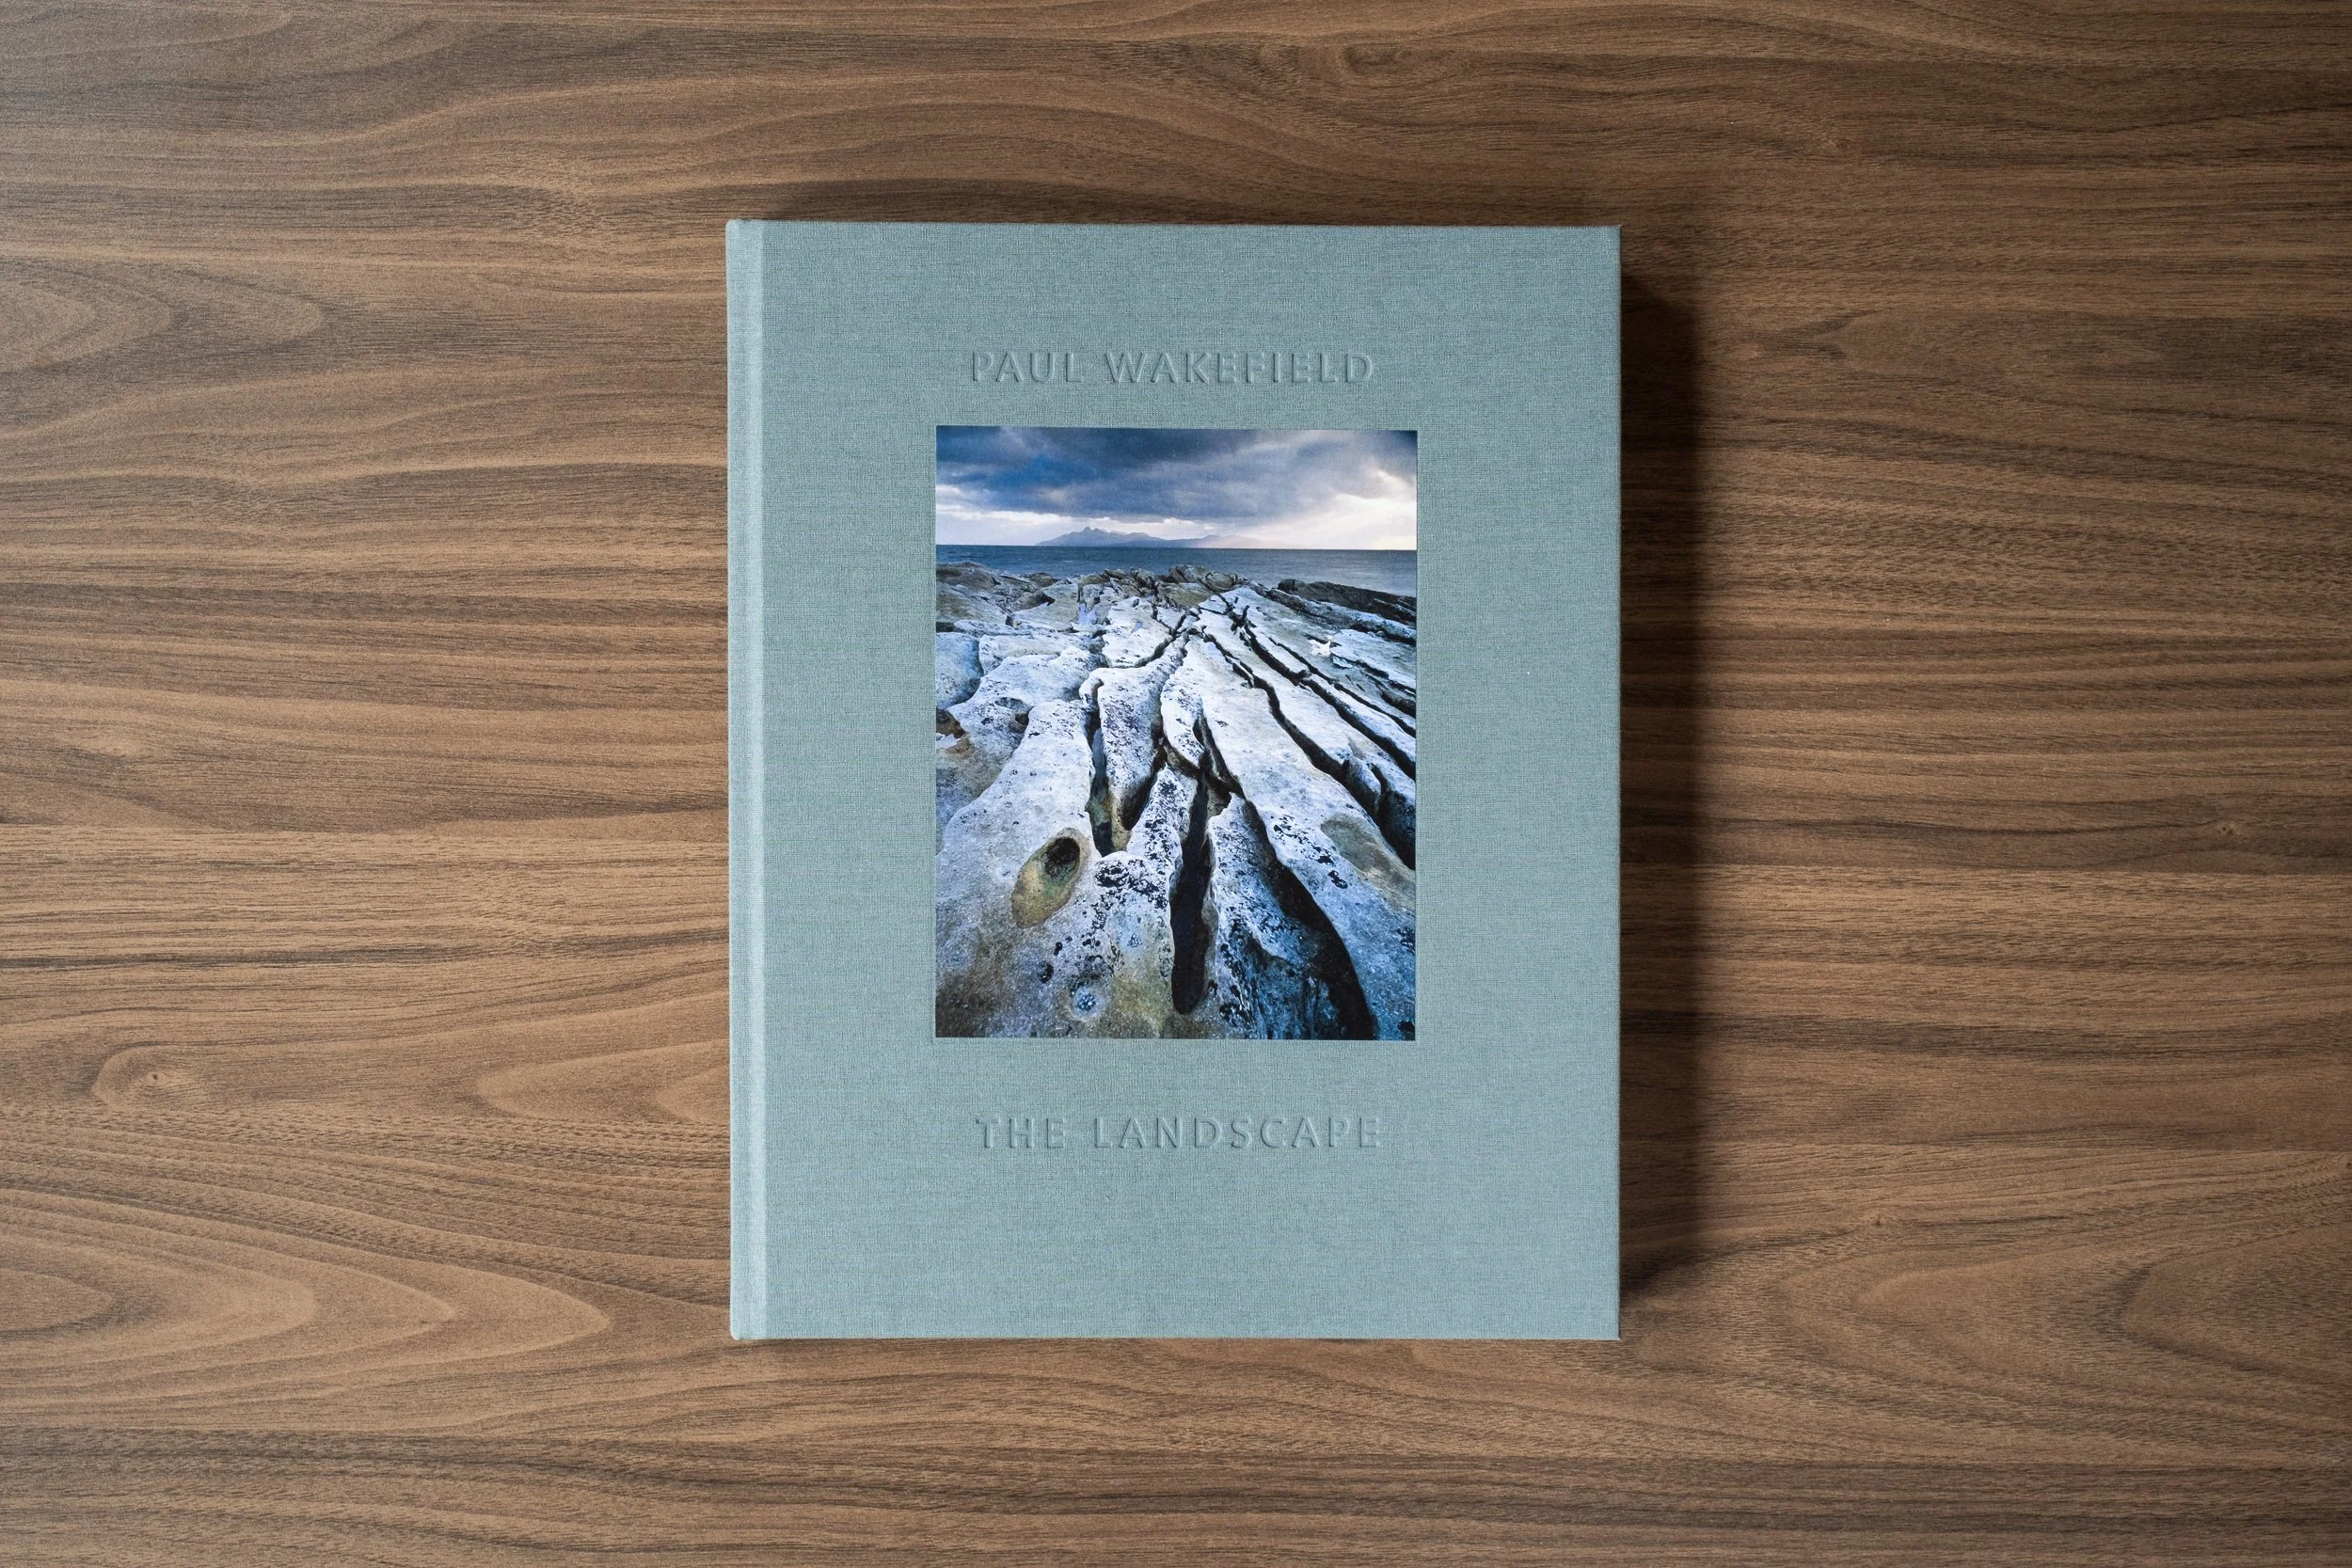
My thoughts about the book
The first thing I realised when I purchased this book was its size. It’s a big one. So big in fact that it doesn’t fit on my bookshelf! But here’s the thing, having spent time with the book, ready and studying the photos, I can’t imagine it working any other way now. The larger photos look stunning and with the extra real estate, the borders are still a good size meaning even though they are bigger, each photo can stand alone and be allowed to breathe without feeling awkward or cramped on the page.
The book starts with a foreword by Robert Macfarlane and an introduction by Wilton, both written beautifully with a host of quotes and metaphors as they describe Paul’s work and offer their interpretation of the photos.
As mentioned in the synopsis above, when the photos start, they are presented in five different sections: Shorelines, Rockscapes, Drylands, Woodlands and Snowscapes. Within each section is a collection of mostly intimate landscape images with a few wider vistas intertwined. The book flows beautifully and the high-quality paper used suits the imagery perfectly.
For any landscape photographer, this timeless book is a must have. I’ve had the book just a few months and already read it twice and I know for sure, I’ll be drawing inspiration from it for years to come.
Book Details
Hardcover
Size: 290mm x 363mm
Pages: 128
Photos: 80
Availability at the time of writing: Still in print and available from the author’s website at https://www.paulwakefield.co.uk/the-landscape

Surrey Landscapes by Nick Oakley | My Photo Bookshelf
In this photo bookshelf post, I talk about Surrey Landscapes by Nick Oakley. This book features landscape photos taken across Surrey and having lived in this wooded county all of my life, I just had to pick up a copy for myself.
I’ve lived in Surrey all of my life and explored this wooded county with and without my camera countless times, so when I saw Nick Oakley was releasing his Surrey Landscapes book on Indiegogo, I had to get myself a copy.
Author’s synopsis
This coffee-table book celebrates both the popular hot-spots and less well known corners of the county and is also a call from the countryside to those who want to see more. There are no other landscape photography books celebrating the breadth of Surrey’s natural spaces, so this collection of images, bringing together work from the last two years, is a perfect keepsake or gift for anyone who enjoys the county’s countryside and landscape photography.

My thoughts about the book
I was interested to see the locations featured, to both enjoy some landscape photos taken of places I know well and at the same time, get some inspiration for future photo locations I might visit. This book delivered on both counts. The photos featured in the book are great, capturing the Surrey landscape across all seasons and for each photo, Nick has included a paragraph of text describing the photo, the conditions or the location in more detail.
There’s a good mix of both popular and lesser-known locations and for the locations I wasn’t aware of, Nick included some high-level location information as well as a handy map of Surrey at the beginning of the book with each photo plotted. Keeping the location information high level was a good move in my opinion as he gives you an idea of the general area the photo was taken but to try and visit the exact same spot still requires a bit of exploring and effort on our part.
It’s worth mentioning that this book cost just £12 (£16 including shipping) and for a landscape photography book, that’s incredibly good value. The book is well-made, solid in construction and as mentioned before, full of great photos and useful information. My only negative point is the choice made by the author to print the pages with a highly reflective, glossy finish. I found this a little unconventional and quite distracting while reading the book.
That being said, the book was still amazing value and worth every penny.
The previous paragraph has been edited since the post was first published. I had assumed that there was a correlation between the glossy pages and the production costs of the book, suggesting that it was a quality issue. I have since been corrected by the company that printed the book that the glossy finish was a creative choice and not in any way down to price or quality. I stand corrected and have retracted that point. Check the comment below for more information.
I’m pleased I spotted this book when it went on sale and I will certainly use it to draw inspiration for location ideas around my home county.
Book Details
Hardcover
Size: 240mm x 240mm
Pages: Contains 45 colour photographs across facing pages
Availability at the time of writing: Still in print. Available from the author’s website: https://nickoakleyphotography.co.uk

On Location | Photographing Beachy Head Lighthouse
Find out how I got on when I spent the day taking landscape photographs along the East Sussex coast at Beach Head.
Being an amateur photographer with a full-time job and a young family, finding quality time to be out for hours in the landscape taking photos isn’t always easy. I’m sure many will relate to finding clever ways to balance their time between life and what is essentially a hobby. So, when the opportunity to have a full day to myself presented itself, I wasted no time planning a trip down to Beachy Head to photograph that stretch of the Sussex coastline.
To make the most of my day, I decided it would be a dawn to dusk shoot, arriving on location at the water’s edge just before sunrise and spending the day in the local area, possibly scout a few locations in the area before heading back to the coast for sunset. During April, that would mean a 16 to17-hour day including the travel but thankfully the tide times coincided with my plans nicely with low tide happening around sunrise and sunset, so I would have plenty of time to refuel at lunchtime, while the tide was in and the beach inaccessible.
The thing about photography is that you can envisage a shoot as much as you like but rarely does it work out the way you plan and I have to admit, the sunrise shoot of the lighthouse, didn’t go as well as I had hoped. The fact is, I didn’t leave myself enough time to get on location and find the best composition. I wanted to take this composition of the lighthouse and cliffs rising out of the frame to the right-hand side, but preferably with a little more interest in the foreground. Maybe a rock pool or channel of water to lead the eye into the frame. I hunted around for 15-20 minutes but the sun was rising fast behind me and I didn’t want to miss this subtle light and pastel colours. So, forgoing an interesting foreground (for now), I settled for this classic composition of the lighthouse and cliffs using these layers of different textures along the beach to add some depth to the overall composition.
While on location, I couldn’t help but feel a little disappointed with not finding a stronger foreground for this image but since getting home and living with the photo a little longer, I find the subtlety of the light and composition work really well together and it’s grown on me quite a lot.

Fujifilm XT2 | XF18-55mm | 29mm | 1/15th Second | f/7.1 | ISO200
One of the reasons I decided to head down to the coast for this shoot was to explore the details, look for small scenes and the different textures on the shoreline. The popularity of photographing intimate landscapes seems to have exploded recently and it’s something that has caught my attention too. I’ve started to see past the wide vista and urban cityscape and explore these closeup, natural scenes most people simply pass by as they go about their everyday life.
Spotting and translating these small scenes into a well-composed photo is not as easy as it might appear with both creative and technical challenges to overcome and I for one still have a lot to learn. Like with traditional landscape photography, there are creative challenges such as working with the light, finding contrast and organising the shapes and textures into interesting, meaningful compositions. Technically, you have some depth of field challenges when getting in so close to the subject and knowing how to focus stack in programs such as Photoshop can be a real-life save when trying to keep an entire image sharp.
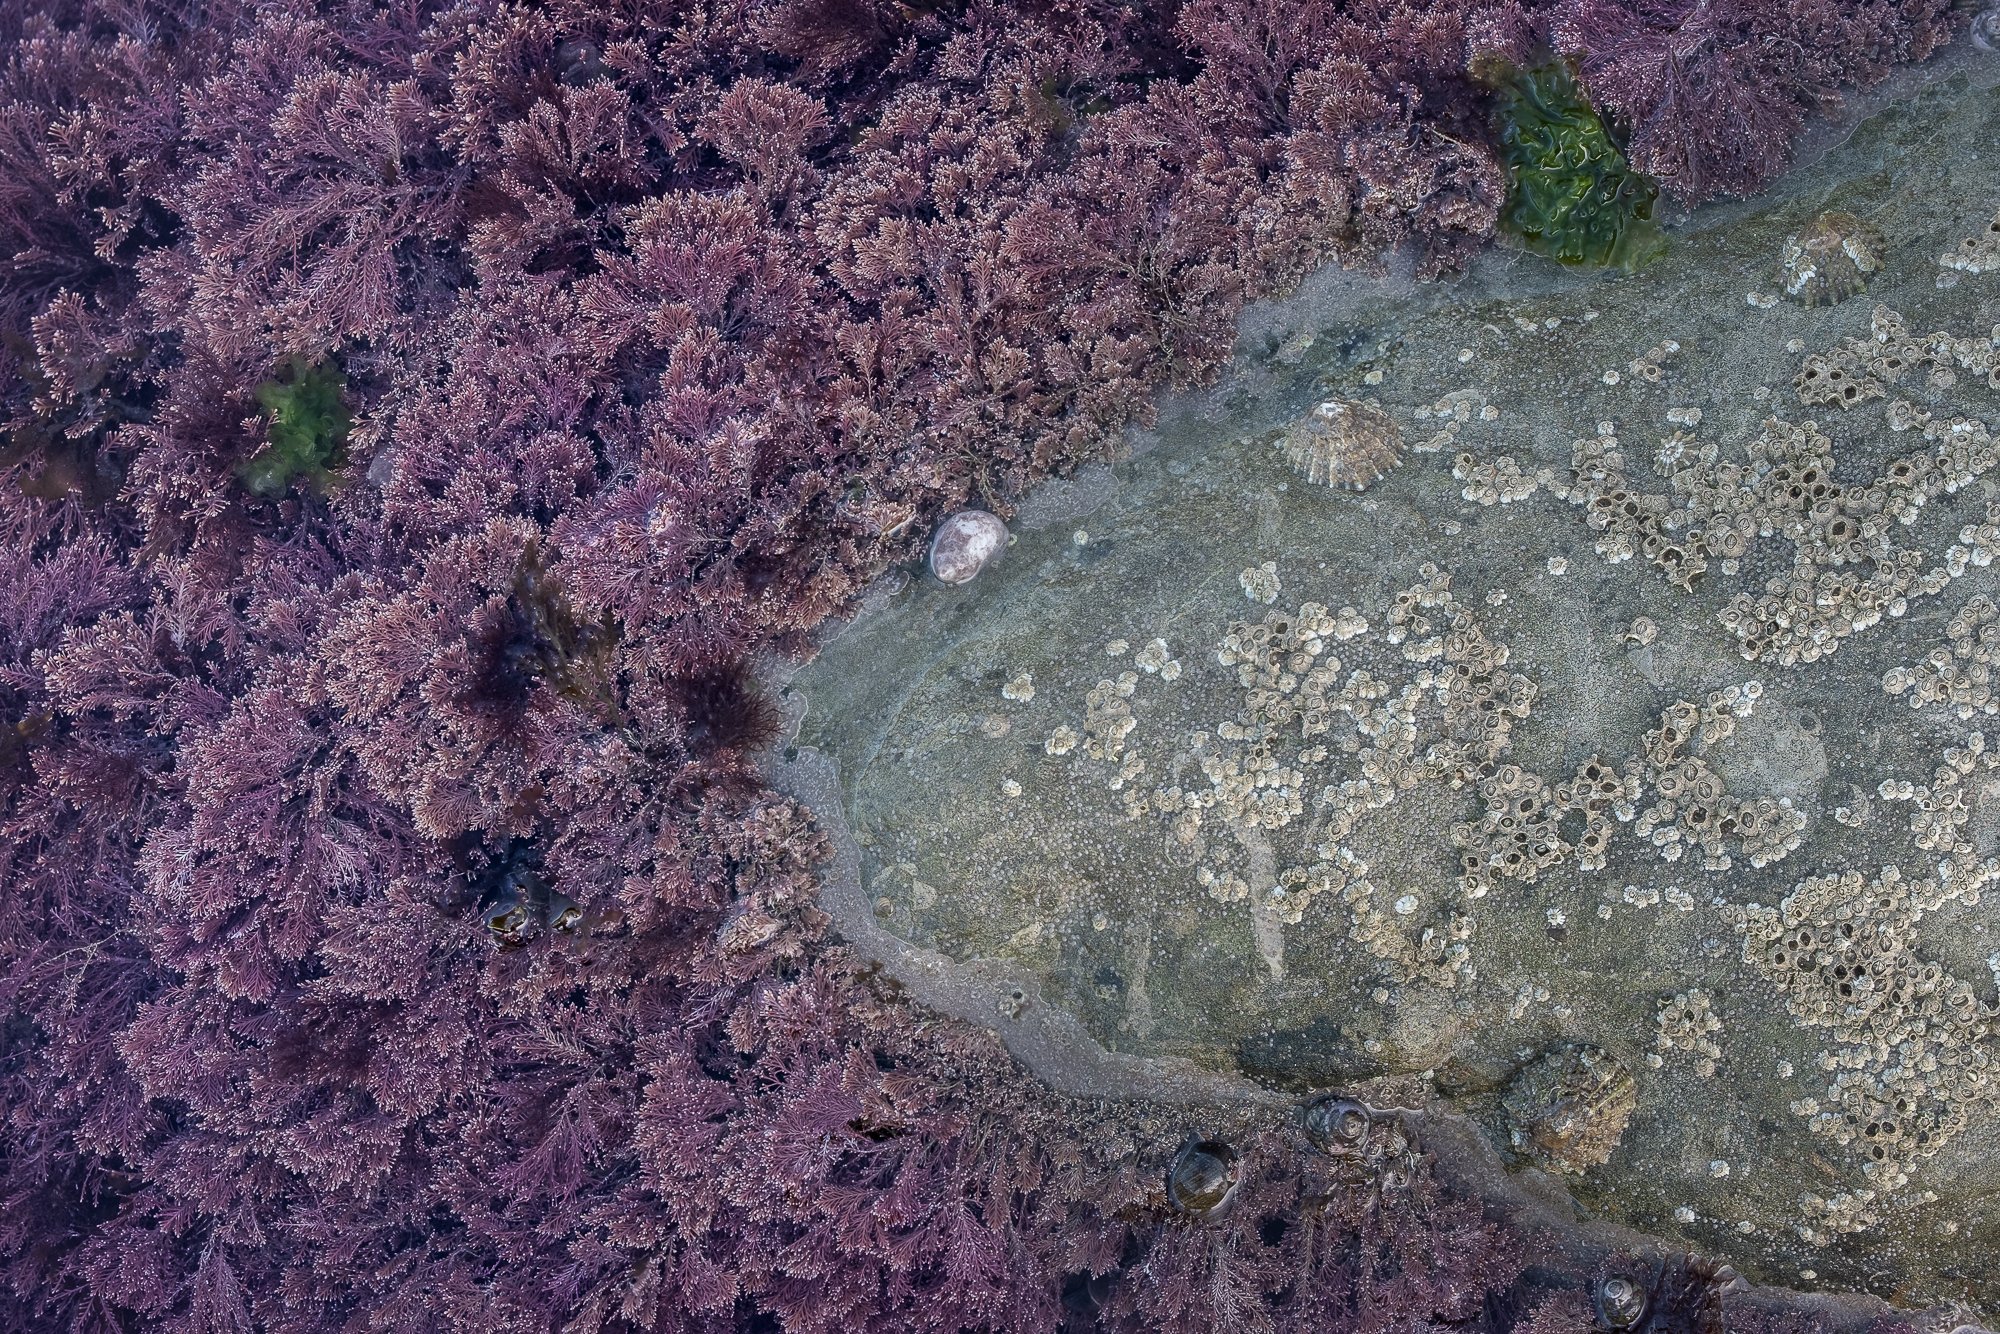

As I hunted around the various rock pools, it was the colour and texture of the coral weed and how it contrasted against the rocks which first captured my attention. The rocks, with a scattering of barnacles and limpets have a host of interesting textures themselves, but when set against the purple weed and organised into a somewhat pleasing composition, an intimate rockpool image starts to form. I also found this yellow, rusty coloured stone alongside the purple weed and liked the contrast in textures and colours it created.
To my eye, the purple coral weed stood out and had some vibrancy to it but I think because it was submerged underwater, my camera struggled to pick up on this colour and in post-production, I had to pull the colour back quite a lot so it reflects better what I saw when I was there, on location.
I mentioned previously the technical challenges involved when taking close-up photos of small scenes and although it’s not immediately obvious, the rocks above the water and submerged coral weed are at different heights. Being at different distances from the camera and with the focal length I was using meant there was no way to get the entire scene sharp in one photo, so I needed to focus stack the image and blend the sharp areas together later. With the added challenge of the weeds and limpets moving subtly between shots, blending and processing each photo took a lot longer than I first anticipated. I’m quite happy how these turned out and the two images below are my favourite of the set.
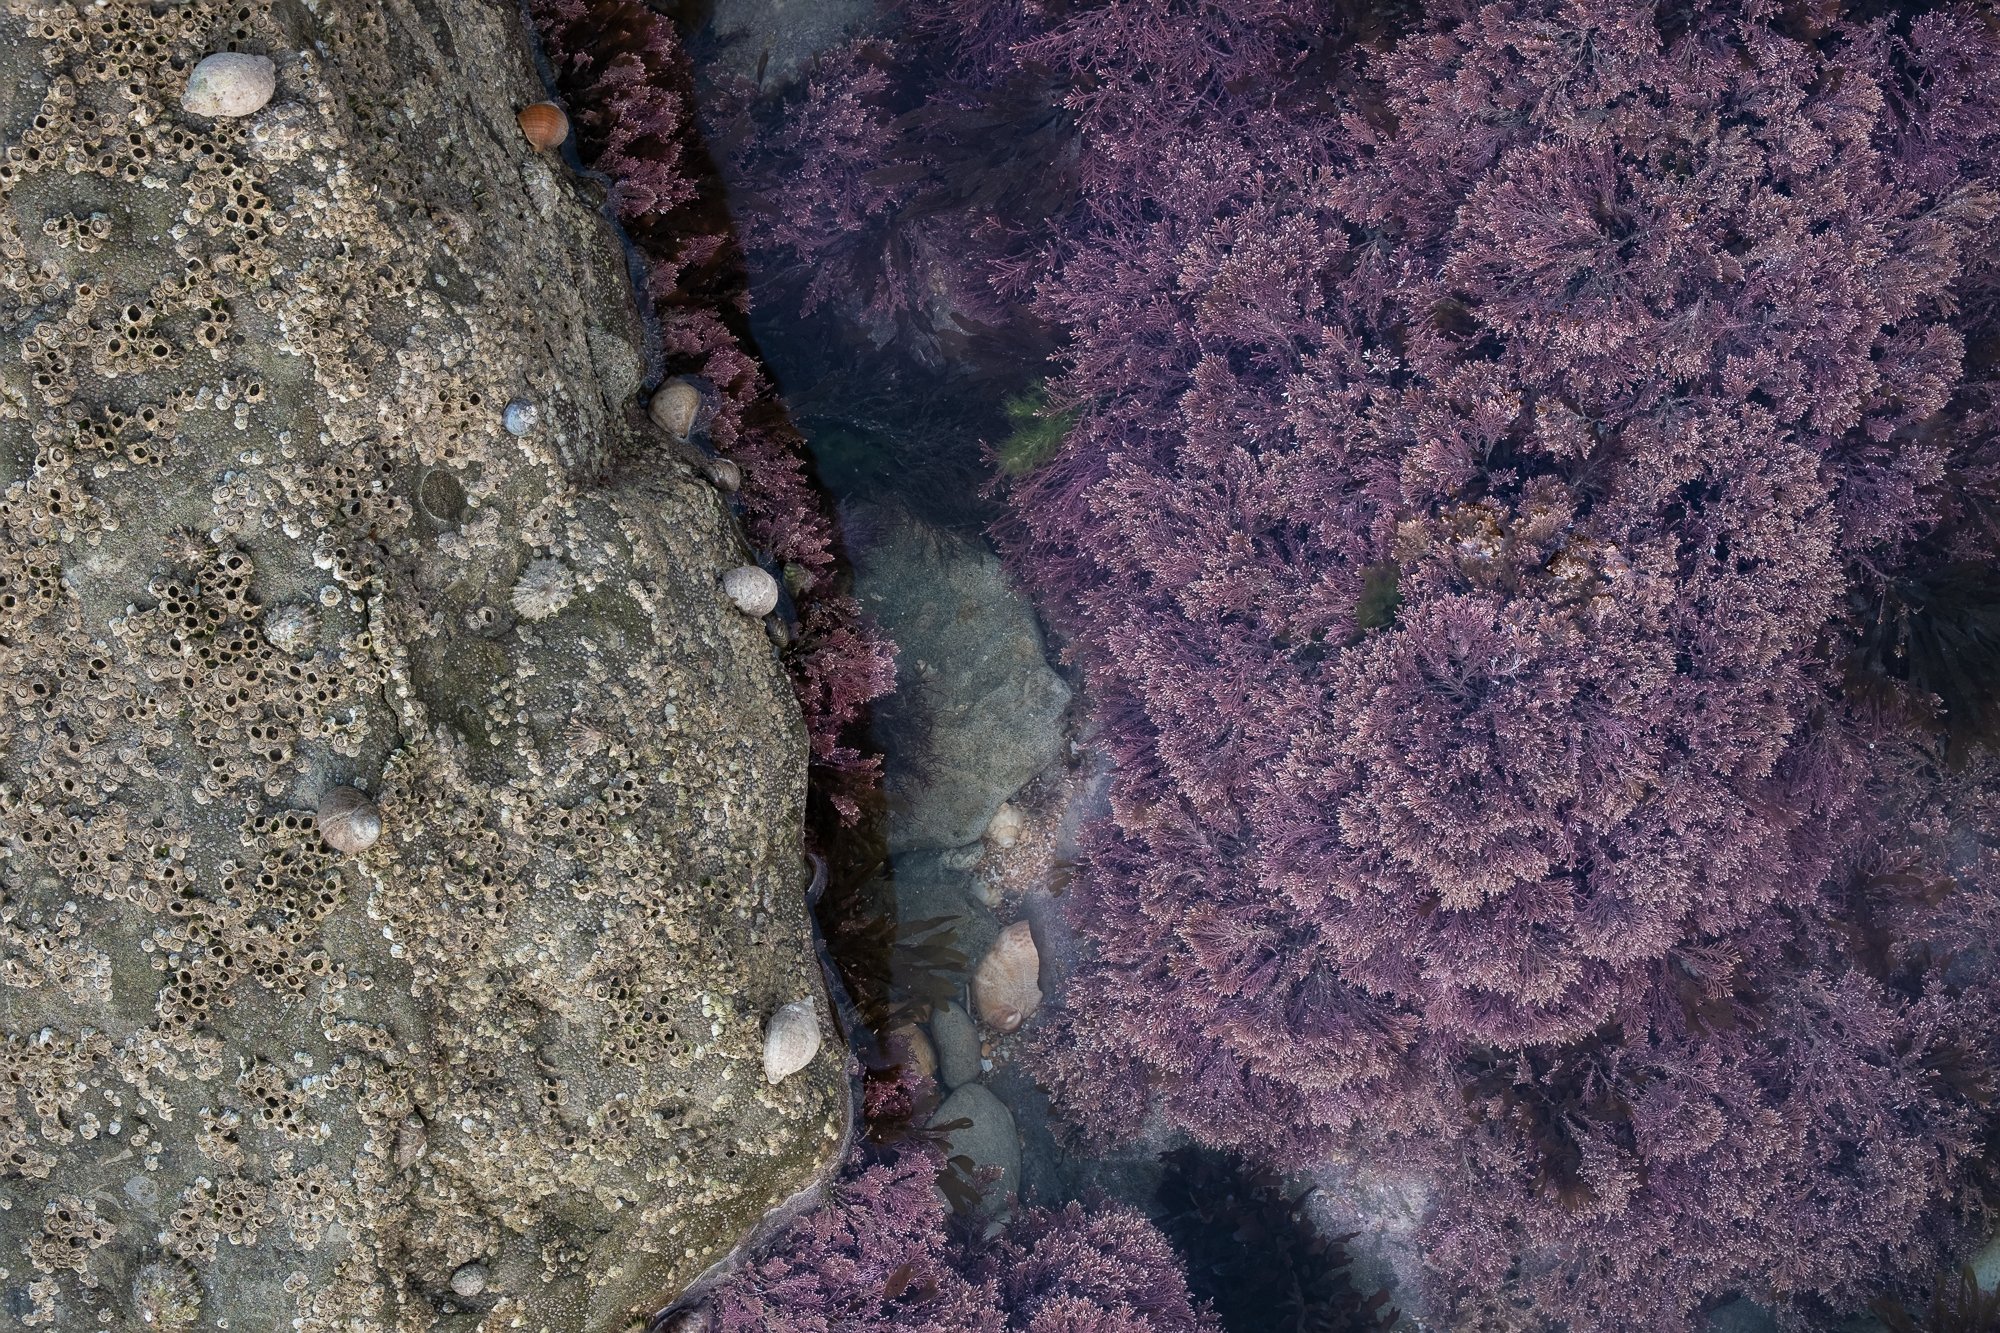
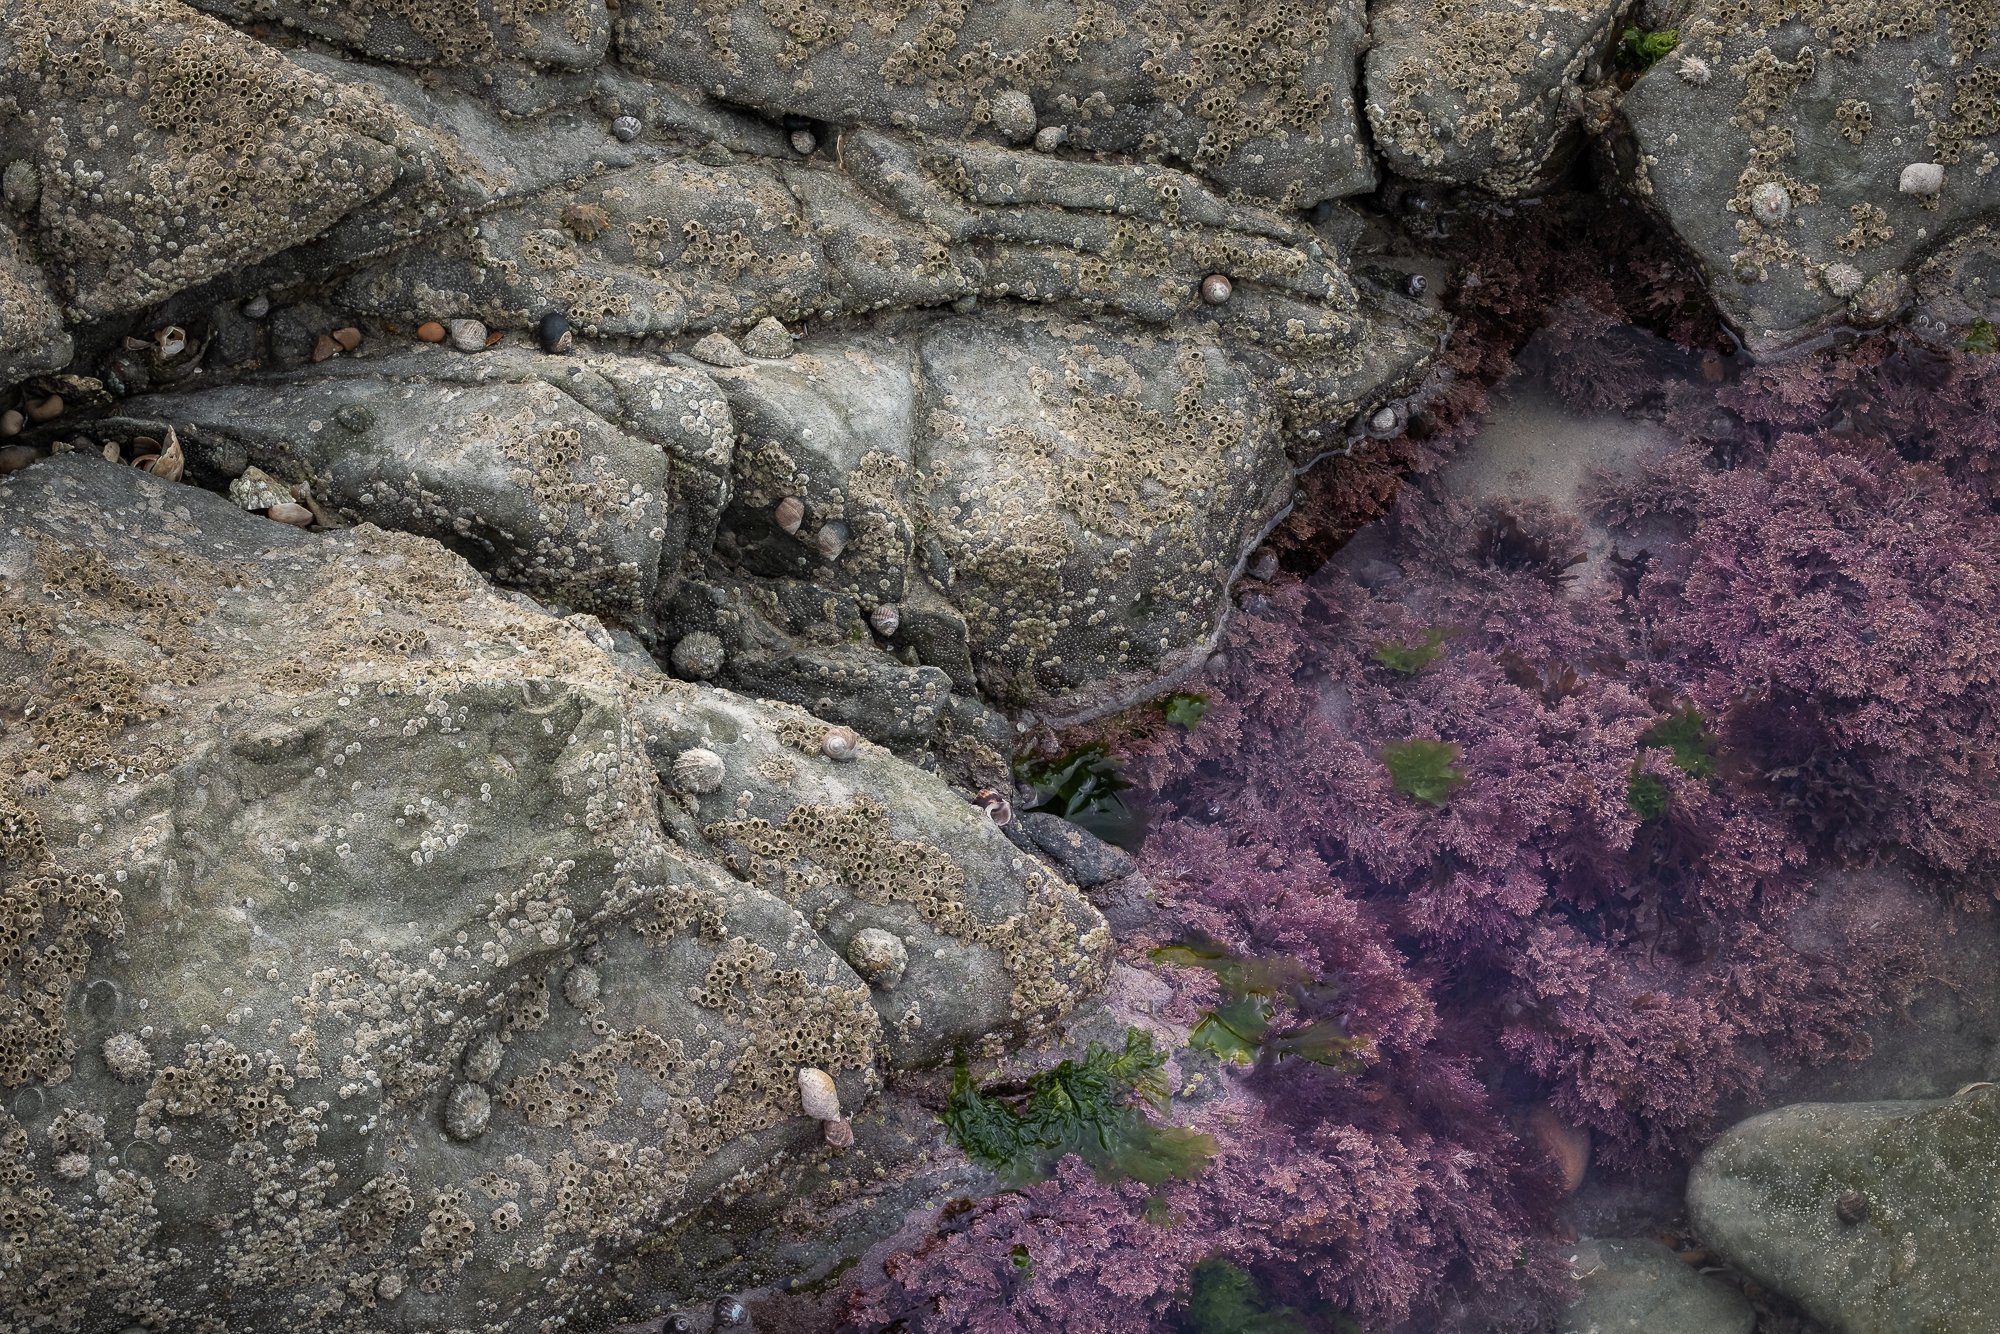
Once finished photographing the rock pools, I turned my camera toward the chalky cliffs. The light was getting stronger by this time and I wanted to photograph some of the textures and features of the chalky cliffs before it became too harsh.
Looking upwards, I liked the way this triangular section of the cliffs points upwards, mimicking the peak of a mountain and against the soft, thin layer of clouds, the shapes and textures of the chalk could really stand out. I guess it’s the closest I’ll ever get to a mountainous terrain here in the relatively flat southeast of England.
I wasn’t really sure what I was doing with the second image below other than just enjoying a scene and photographing it. It’s no award winner but on reflection, it turns out I actually quite like it, specifically the horizontal lines and textures in the cliff face set against the soft shapes of the smoother boulders in the foreground creating this somewhat layered composition.
With the sun high in the sky and the tide now coming back in, I decided to head back inland to get a coffee, relax for a while before heading to my next destination.
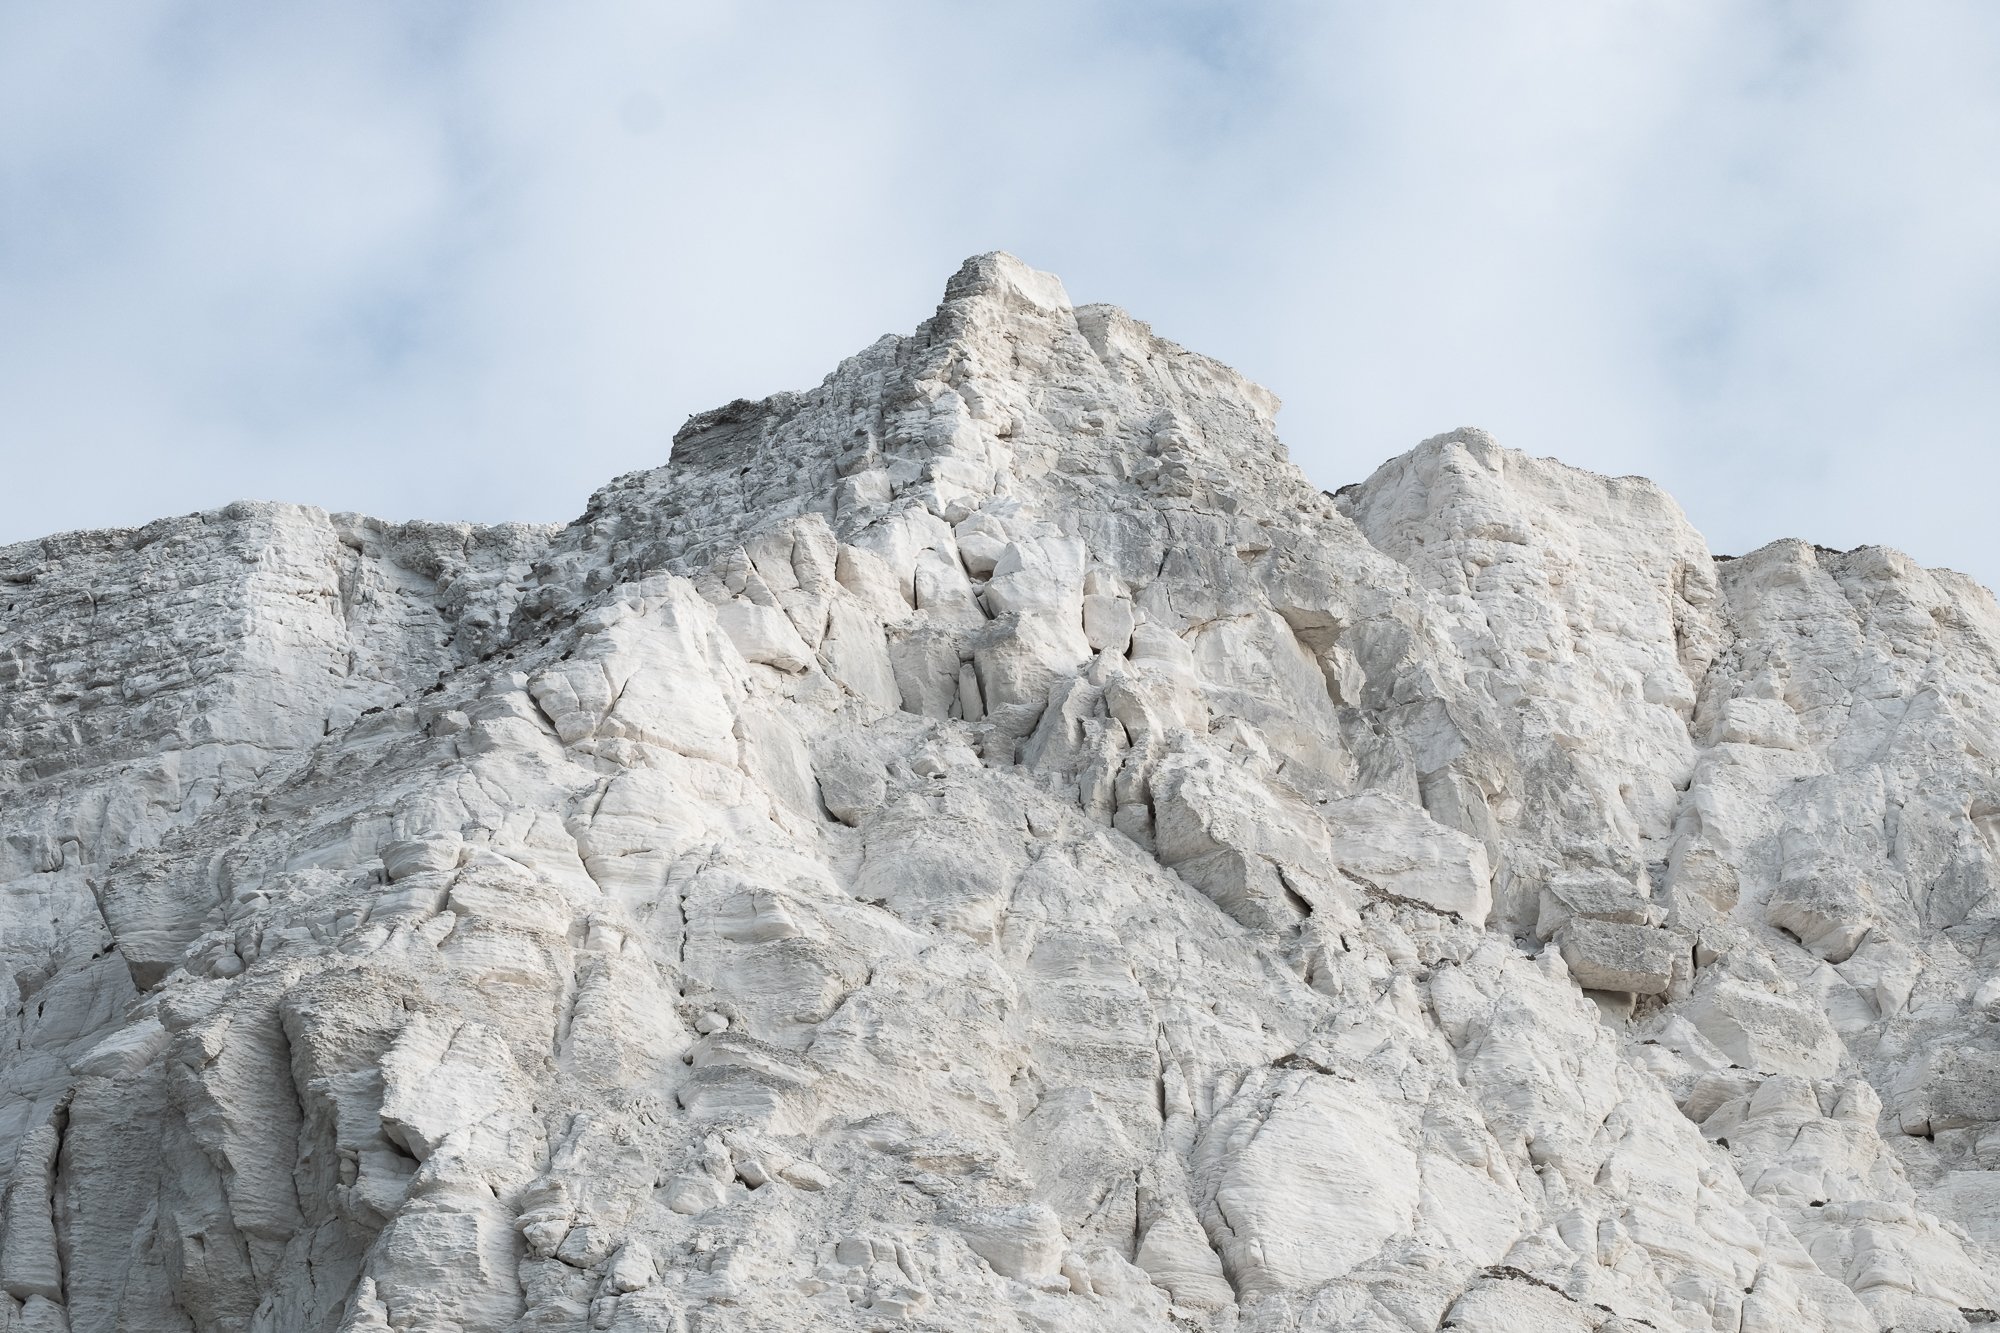
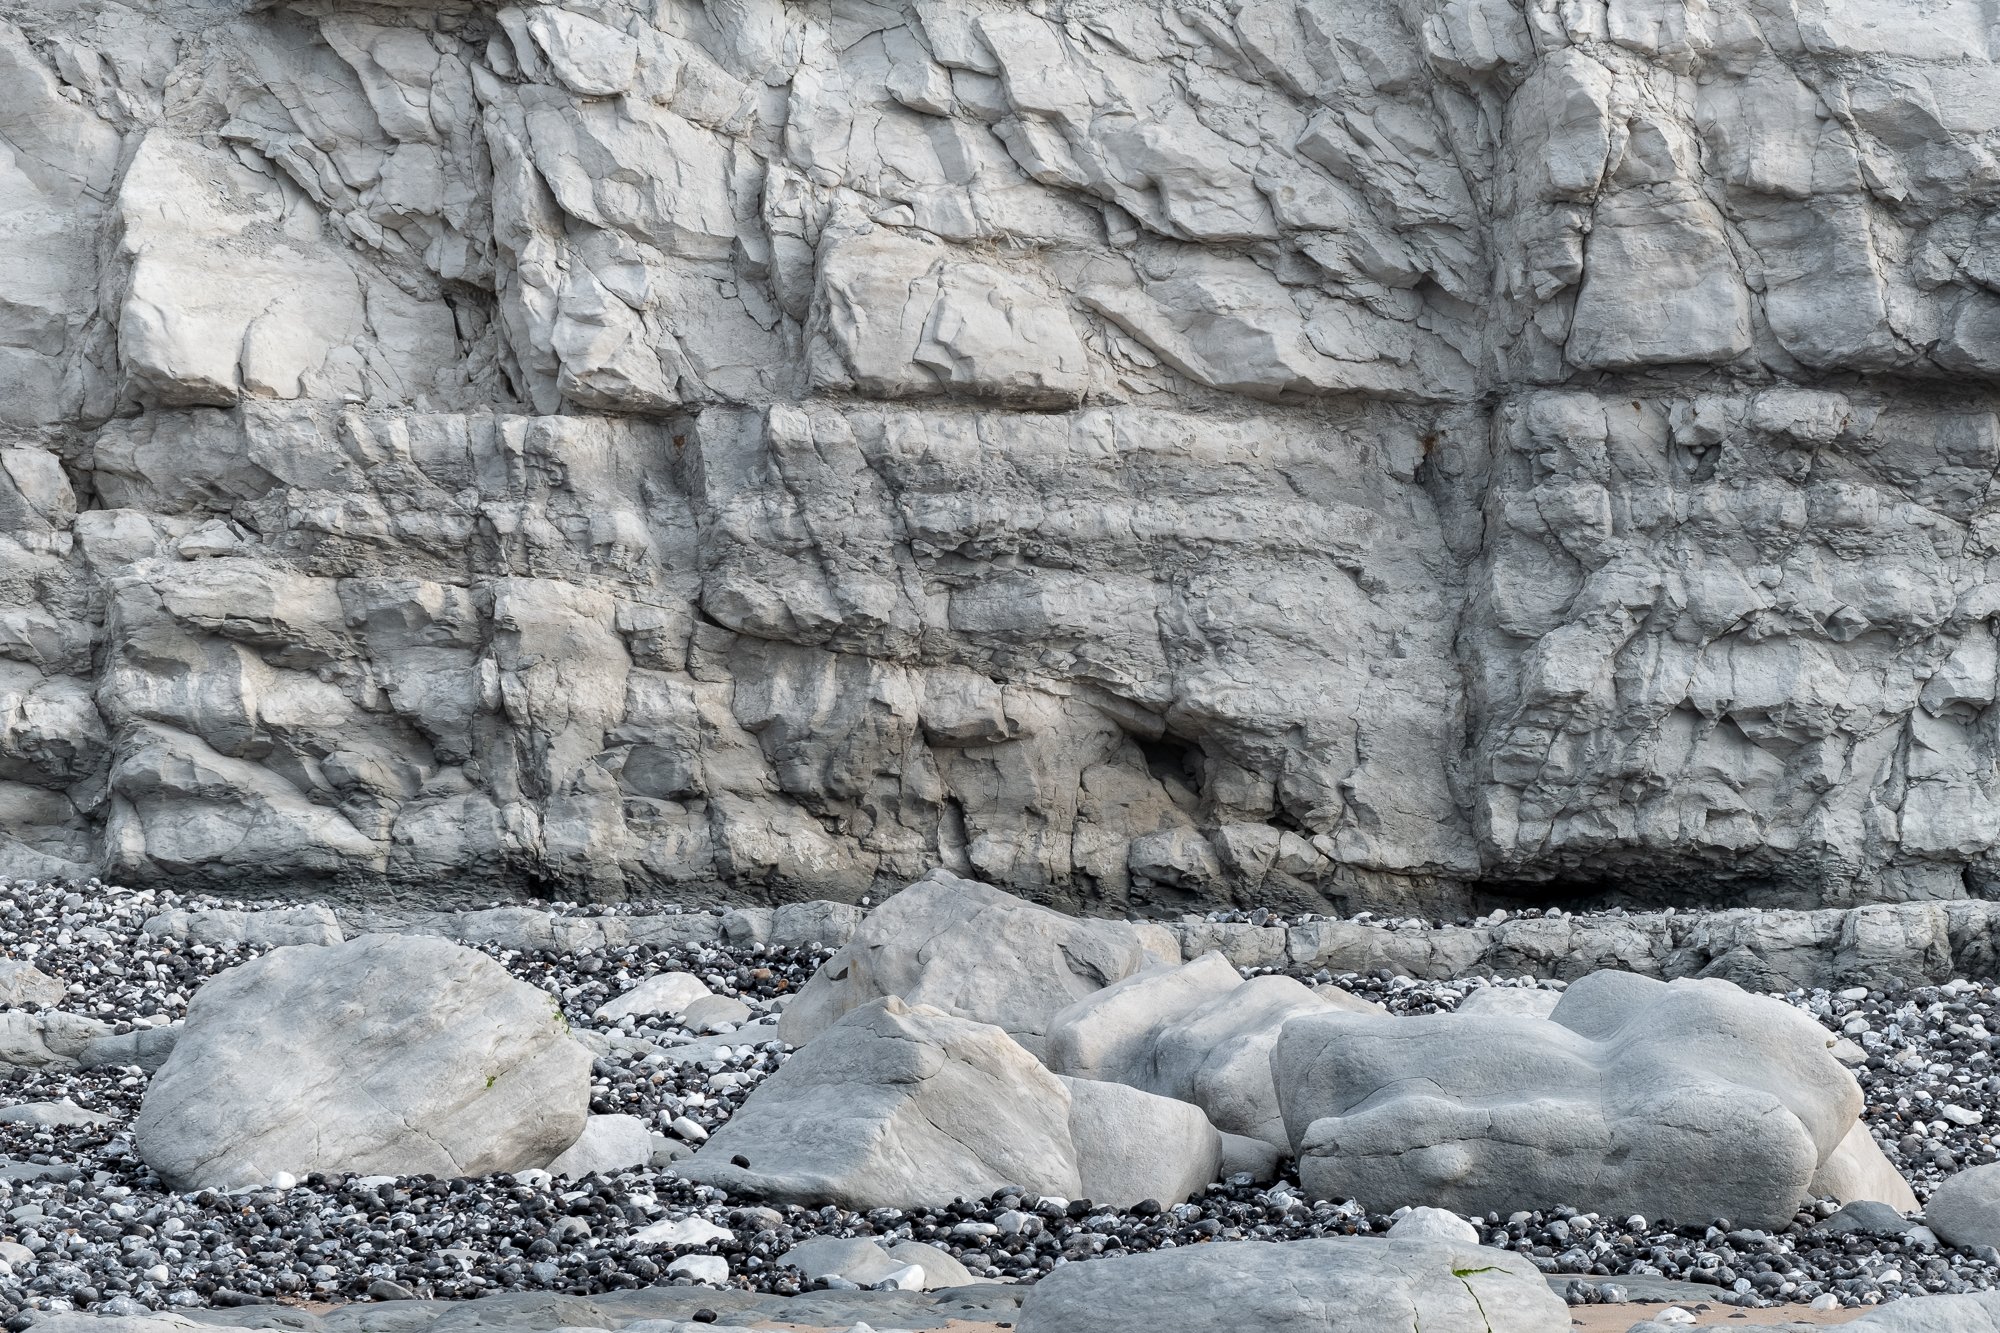
I’ve wanted to visit the nearby Friston Forest for a while now and being close by, this was the perfect time to go and scout the area for future woodland photoshoot opportunities. So, once rested and hydrated, I drove the short distance, parked up and ventured into the woodland.
By now it was the middle of the day and far from ideal conditions (for me) to take woodland photos but as I wandered through, I did get the camera out a couple of times when a particular scene caught my eye. On any other day, I avoid dappled woodland light like the plague but on this occasion, as I stood at the top of a bank, looking down on this tree, the textures created by the vibrant leaves and the light hitting the trunk was enough for me to set the camera up and take a photo of it.
It was a gloriously sunny day and the shaded walk through the trees was a perfect way to spend the afternoon.


After a lovely walk in the forest and a few hours relaxing along the beach with a coffee or two in nearby Eastbourne, I made my way back to Beachy Head, this time giving myself plenty of time to work on a better composition of the lighthouse.
With the sun getting lower in the sky, slowly working itself around the back of the cliffs and out of view, I searched the many watery channels left by the outgoing tide for my foreground. After hunting around a while, much of the water had filtered out from the gaps in the rocks and I found the foreground I was looking for. This channel of water winds its way between the rocky foreground towards the lighthouse working perfectly as a compositional lead-in line while at the same time adding the right amount of visual weight to the left hand of the frame balancing it somewhat against the heavier line of cliffs on the right.
With the light at its best, illuminating the sky behind the lighthouse and basking the scene in its beautiful golden tones, I took what turns out to be my favourite photo of the shoot. I couldn't decide between a landscape orientation which emphasises the epic cliff line on the right or a portrait orientation, which allowed me to include more of that golden hour sky and longer channel of water in the foreground. So, I took both and have shared them below.

Fujifilm XT2 | XF18-55mm | 18mm | 1/200th Second | f/8 | ISO200

Fujifilm XT2 | XF18-55mm | 20mm | 1/250th Second | f/8 | ISO200
Still happy with the composition, I decided to wait around after sunset, keeping the camera in the same position to see how the light evolved. Was I going to get an epic explosion of post-sunset colour or will it subtly fizzle away as the sun lowered further below the horizon? It turned out to be the latter.
With the light fading, the sky directly behind the lighthouse was looking good as it transitioned from those gold tones we had before sunset to a more subtle pink and blue pallet in the sky and on the cliffs. I really wanted to emphasise these different colours in my next photo, so with the help of my telephoto 55-200mm lens I took this close-up panoramic photo of the lighthouse, set against those pink and blue tones all around it. A simple composition, but sometimes that’s all you need to let the other aspects such as colour and texture stand out.
Finishing off the day, I put the wide lens back on the camera and photographed the lighthouse with the foreground once again included as the last of the light faded and the early blue hour crept in. With the photos I wanted in the bag and a bit of a walk back to the car ahead of me, I decided I was done for the day and made my way home.

Fujifilm XT2 | XF55-200mm | 70mm | 1/20th Second | f/8 | ISO200 | Stitched Pano

Fujifilm XT2 | XF18-55mm | 18mm | 1/6th Second | f/8 | ISO200

Fujifilm XT2 | XF18-55mm | 18mm | 0.8 Seconds | f/14 | ISO200
So, there you have it, a very full-on but enjoyable day of photography along the Sussex coast. I enjoyed a beautiful pastel sunrise, got to practise some intimate coastal photography, enjoyed some time-out, alone to relax, I scouted a new woodland location, had coffee on the beach, and was gifted a beautiful sunset to top it all off.
What a fantastic day!
Until next time.

Venice by Dorothy Bohm | My Photo Bookshelf
This is Venice by Dorothy Bohm. A nostalgic journey through a beautiful city, featuring 90 film plates of the landscape, architecture and people of Venice.
Although most of the photo books I’ve purchased feature landscape photography, every now and then I might buy one that has less to do with landscape photography and more about a particular topic I care about. In this case, Venice and specifically the renowned photographer, Dorothy Bohm’s 1992 publication.
Author’s synopsis
Instantly recognizable from snapshots and postcards, the incomparable Venice is a city of many faces. In this lavish book, renowned photographer Dorothy Bohm searches out the layers of significance behind Venice's disguise, probing the many hidden cities behind the familiar architectural drama, the Adriatic light, & the disguise of Carnival. A beautiful collection of images that discovers the true subject matter of great photography in a sudden reflection, a whimsical window display, or the tattered remnants of a poster.

My thoughts about the book
When I discovered this book a few years ago, I hadn’t yet started my photobook obsession, but having already visited and falling in love with this beautiful jewel of the Adriatic, I subsequently came across the late Dorothy Bohm’s work and her fascinating story on a Sky Arts documentary. So, when I found out Dorothy had published a book back in 1992 that combined my love of Venice and her photography, I had to buy a copy.
Most of the books I own are centred around landscape photography, as it’s the genre I enjoy the most, both taking my own and enjoying the work of others. But this book is far from a landscape photography book. Yes, it features some of the iconic cityscapes we all recognise but what I particularly like about this book is that it’s a snapshot in time, combining multiple genres, such as cityscapes, architecture, street and documentary photography, but with a feeling of nostalgia created by the classic film look and the styles captured within them.
Written by author and curator Ian Jeffrey, the forward is a piece of art in itself. It’s so elegantly written and such a beautiful account of Dorothy Bohm’s photography. Throughout the book, many of the photos are accompanied by quotes from famous artists and authors who have some kind of connection to Venice, Italy, or the arts. Dorothy provides a list of these quotes and where they can be found at the back of the book. Also at the back of the book is a reference list with information about all of the photos such as an interesting fact, the place name or a brief behind the photo story. Having these words at the end is an interesting approach as it allows you to add a little more context to the images if you want it. Alternatively, you can ignore the list altogether and just enjoy the photos and their accompanying quotes, allowing you to make your own assumptions.
Along with the landscape and architecture photos, a part of this book focuses on the people of Venice and I love that. You have residents looking out of their windows, ladies meeting for coffee, men at work and people dressed up during the carnival season with masks and face paints galore. What I find fascinating is that although much has changed in the 30 years between the book being published and my visit to Venice, I still recognise so much from this book and get a real sense of nostalgia when I read it. The feeling this book portrays is Venice, it’s a feeling the city has and will always have and that’s how I know Dorothy did such a good job of capturing it in the 90 colour film plates she includes in this fantastic book.
Book Details
Hardcover
Size: 241mm x 279mm
Pages: 112
Availability at the time of writing: Unavailable from the usual UK booksellers. Consider buying a used copy.