
BLOG ARCHIVE

3 Minutes in London | Weekly Photo #67
This week, I share a long exposure photo taken in London. I also talk about my 10 steps for taking great long exposure photos and where you can grab a copy of my free ebook.
One of the reasons I like to take long exposure photos of a cityscape is that not only can it help to simplify a potentially cluttered image by blurring out distractions, but in the right conditions, it can also add a sense of energy, movement and dynamism into a scene and that’s what I think I’ve captured in the photo shown here.

Fujifilm X-T10 | XF10-24mm | 13mm | 180 Seconds | f/9 | ISO200
I took the photo from Tower Bridge in London late one evening in Summer 2017. It was back when the Fujifilm X-T10 was my primary shooter which I used along with the wide-angle XF10-24mm lens to take this photo. I don’t often shoot quite as wide as I’m usually left with lots of distortion in the architecture that lines the river, but I think it works quite well here. The wider field of view allows more of the sky to be included and gives the impression the moving clouds are spreading apart as they get closer to the camera, creating some strong lead-in lines that bring the eye back towards the middle of the frame.
Along with an aperture of f/9 and ISO of 200, I used a 10-stop Formatt-Hitech filter to reduce the light hitting the sensor and stretching the exposure all the way to 3 minutes giving the river a smooth, glass-like look and those streaky clouds in the sky.
This post is featured in my Weekly Photo series where I post a new photo every Monday. To have this delivered directly to your inbox, you can subscribe to the mailing list here.

Bankside | Weekly Photo #65
This week’s photo is a long exposure of a classic composition in London of the Millennium Bridge and St Paul’s Cathedral.
Looking back through my last 64 Weekly Photo posts, I see that I’ve never included a photo of this composition with the Millennium Bridge leading to St Paul’s Cathedral, even though I have photographed it on countless occasions and come away with a few decent shots of it, so, after giving it some thought, I think I now know why I’ve not shared one to date.

Fujifilm XT2 | XF18-55mm | 21mm | 71 Seconds | f/10 | ISO200
You’ve probably heard this quote, or a variation of it before: “Perfect is the enemy of good” which is kind of how I feel about photographing this view in London. It is one of the most popular views to photograph and for that reason, there are so many excellent versions of this image out there. Over the years, I’ve repeatedly visited this spot to capture something better, more epic than I have seen so far and the problem with that is the chances of doing so are, in reality, pretty low. I probably visit this spot every other month when I think the conditions look good to shoot in so when you think about it, that’s only 6 times a year. I want to capture a long exposure, similar to this composition, but with a bit more drama. I want the clouds heading towards or away from me to create some strong lead on lines that mirror the bridge. So far this is the closest I have come to getting that shot.
I decided to share this photo as a bit of a lesson for me really. I have been so caught up in trying to capture the photo I envisage in my mind, I have wrongly dismissed some of the other good photos I have taken, so, it serves as a bit of a reminder to me that although the holy grail is to capture the perfect shot at a particular location, I need to appreciate and not dismiss the photos I capture along the way.
I took this photo in July 2019 while walking around Bankside in London. Hoping for some favourable conditions, I headed to this spot in front of the Tate Modern, which provides this great composition of the Millennium Bridge which leads the eye over the River Thames towards St Paul’s Cathedral. For this long exposure shot, I used my Fujifilm XT2, XF18-55mm lens and my Formatt-Hitech 10-stop ND filter. As there was quite a lot of cloud cover, the light from the sun would come and go so I needed to wait for a large enough gap in the clouds to take this shot while the sun was hitting the bridge and dome.
At this time of day, the area is still busy with locals and tourists, especially during the summer months, so, another advantage of using the 10-stop filter and taking a long exposure is it will blur all of the people crossing the bridge out of the image. With my aperture and ISO dialled in (f/10, ISO200) I got a 71-second exposure making it appear that nobody was crossing the bridge while the shot was taken. In reality, there were plenty but luckily no one stopped for a selfie while crossing.
Although I really like this photo, the clouds lack the definition and subsequent drama I was looking for which means I’ll certainly be returning again soon. It’s possible I’ll never get the image I’m looking for, but I guess that’s part of the game we landscape photographers play. We are slaves to the elements and let’s face it, if it was easy, it wouldn’t be worth doing, right?
Until next week.
Trevor
This post is featured in my Weekly Photo series where I post a new photo every Monday. To have this delivered directly to your inbox, you can subscribe to the mailing list here.

Basin de San Marco | Weekly Photo #56
A sunrise photo of some moored gondolas and the Church of San Giorgio Maggiore across the Basin de San Marco.
Before the pandemic took hold, I was starting to consider how I could diversify my own photography so it wasn’t so focused on London or urban scenes. I wanted to spend more time exploring my local area but while working in the city, I guess it was just easier to continue shooting where I spent most of my time. Fast forward a few months and things have obviously changed quite a bit. Since the lock-down started to ease in the UK, I’ve had some great fun researching and scouting locations to photograph here in the South East of England, from castles and lighthouses to ancient woodlands and rolling hills, I have certainly taken advantage of this opportunity.
I will of course share some photos of my recent outings here on my site soon enough but you can keep up with what I’m doing in real-time by following me on Facebook or Instagram and checking the stories I post while out in the field.

Fujifilm X-T10 | XF10-24mm | 17mm | 14 Seconds | f/7.1 | ISO200
This week’s photo is one taken on my first trip to Venice back in 2017. My sunrise shoot was coming to an end and this was the last shot on my list I wanted to take.
This is a frequently captured composition of the moored gondolas on the edge of the Basin de San Marco but it’s a classic for good reason. It shouts Venice and most people that visit to take photos will try to capture this scene for their own collection and there is absolutely nothing wrong with that in my book. I’d already spent a few days seeking out new, unique compositions of the city but I wasn’t going to leave without getting my own versions of the hero shots of Venice such as this or the famous view from Ponte dell'Accademia which you can see here: The Glass Canal | Weekly Photo 28.
Compositionally, it took me a few minutes to find the best spot along the water and arrange everything how I wanted. Using my wide-angle 10-24mm set to 17mm, I composed the boats so that they would be pointing up and inwards towards the centre of the frame which mirrored the triangular shape of the clouds that also appear to point to the centre of the frame and towards the Church of San Giorgio Maggiore which was basking in the warm morning light across the water.
I also liked the way the light was falling onto the wooden poles in the foreground and wanted to make a feature of these but had to stay mindful and avoid them obscuring the view of the bell tower across the water. I purposely kept the camera level to minimise any distortion and keep the wooden poles straight which avoided any significant correction and cropping while editing the image.
Lastly, I wanted to capture the movement in the boats but there was too much ambient light to do this by adjusting camera settings alone so I used a 10-stop ND filter to get the longer shutter speed of 14 seconds which was enough to capture the movement, soften the foreground a little but still allow the boats to be a feature and remain recognisable in the image.
If you want to see more of my photos from Venice, you can see them here: A Weekend in Venice
Until next time
Trevor
This post is featured in my Weekly Photo series where I post a new photo every Monday. To have this delivered directly to your inbox, you can subscribe to the mailing list here.
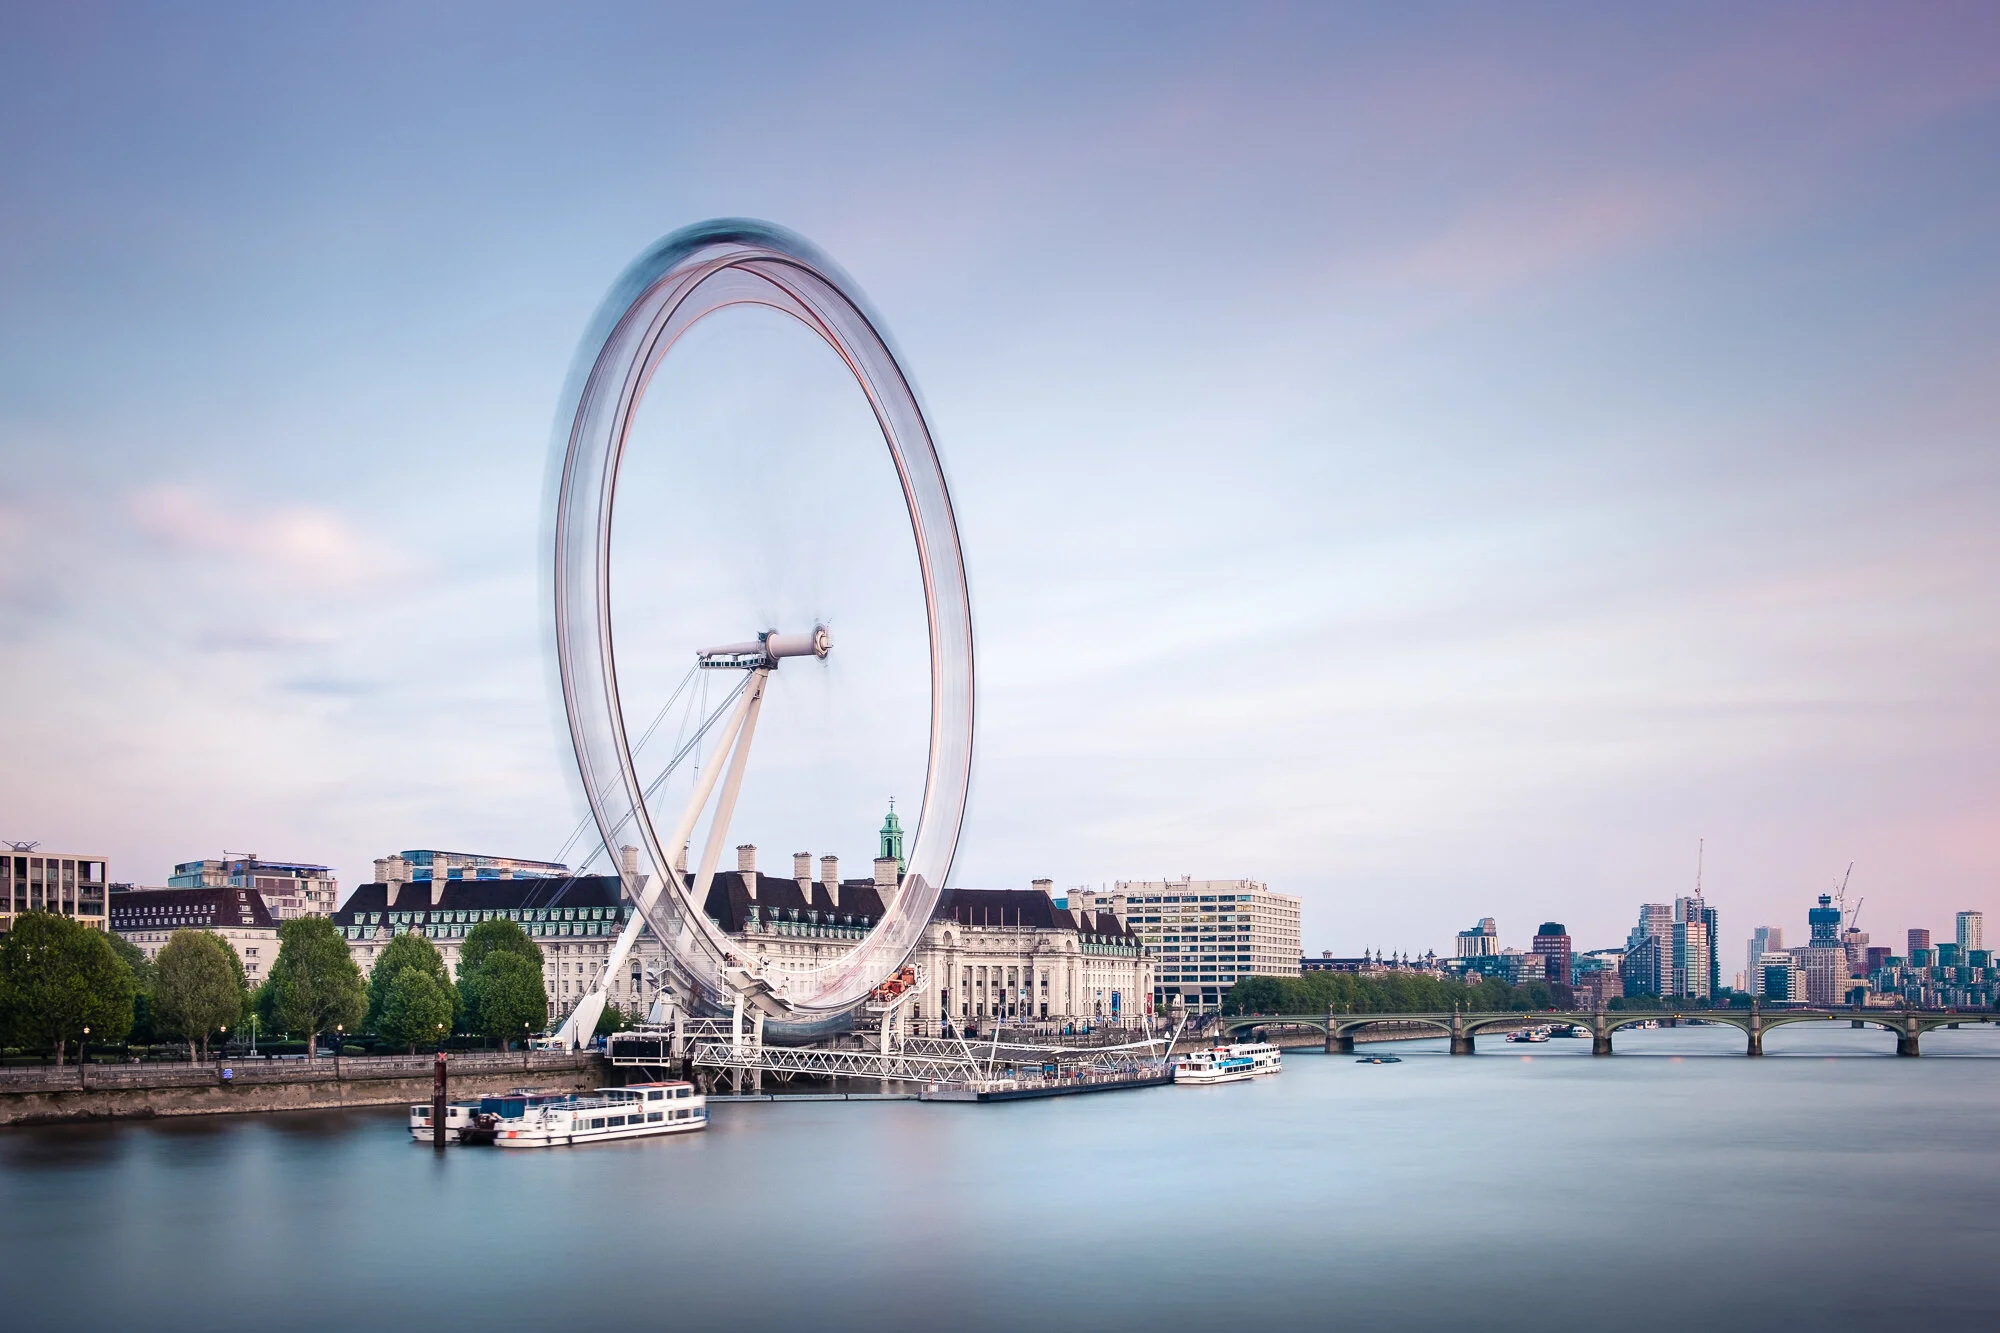
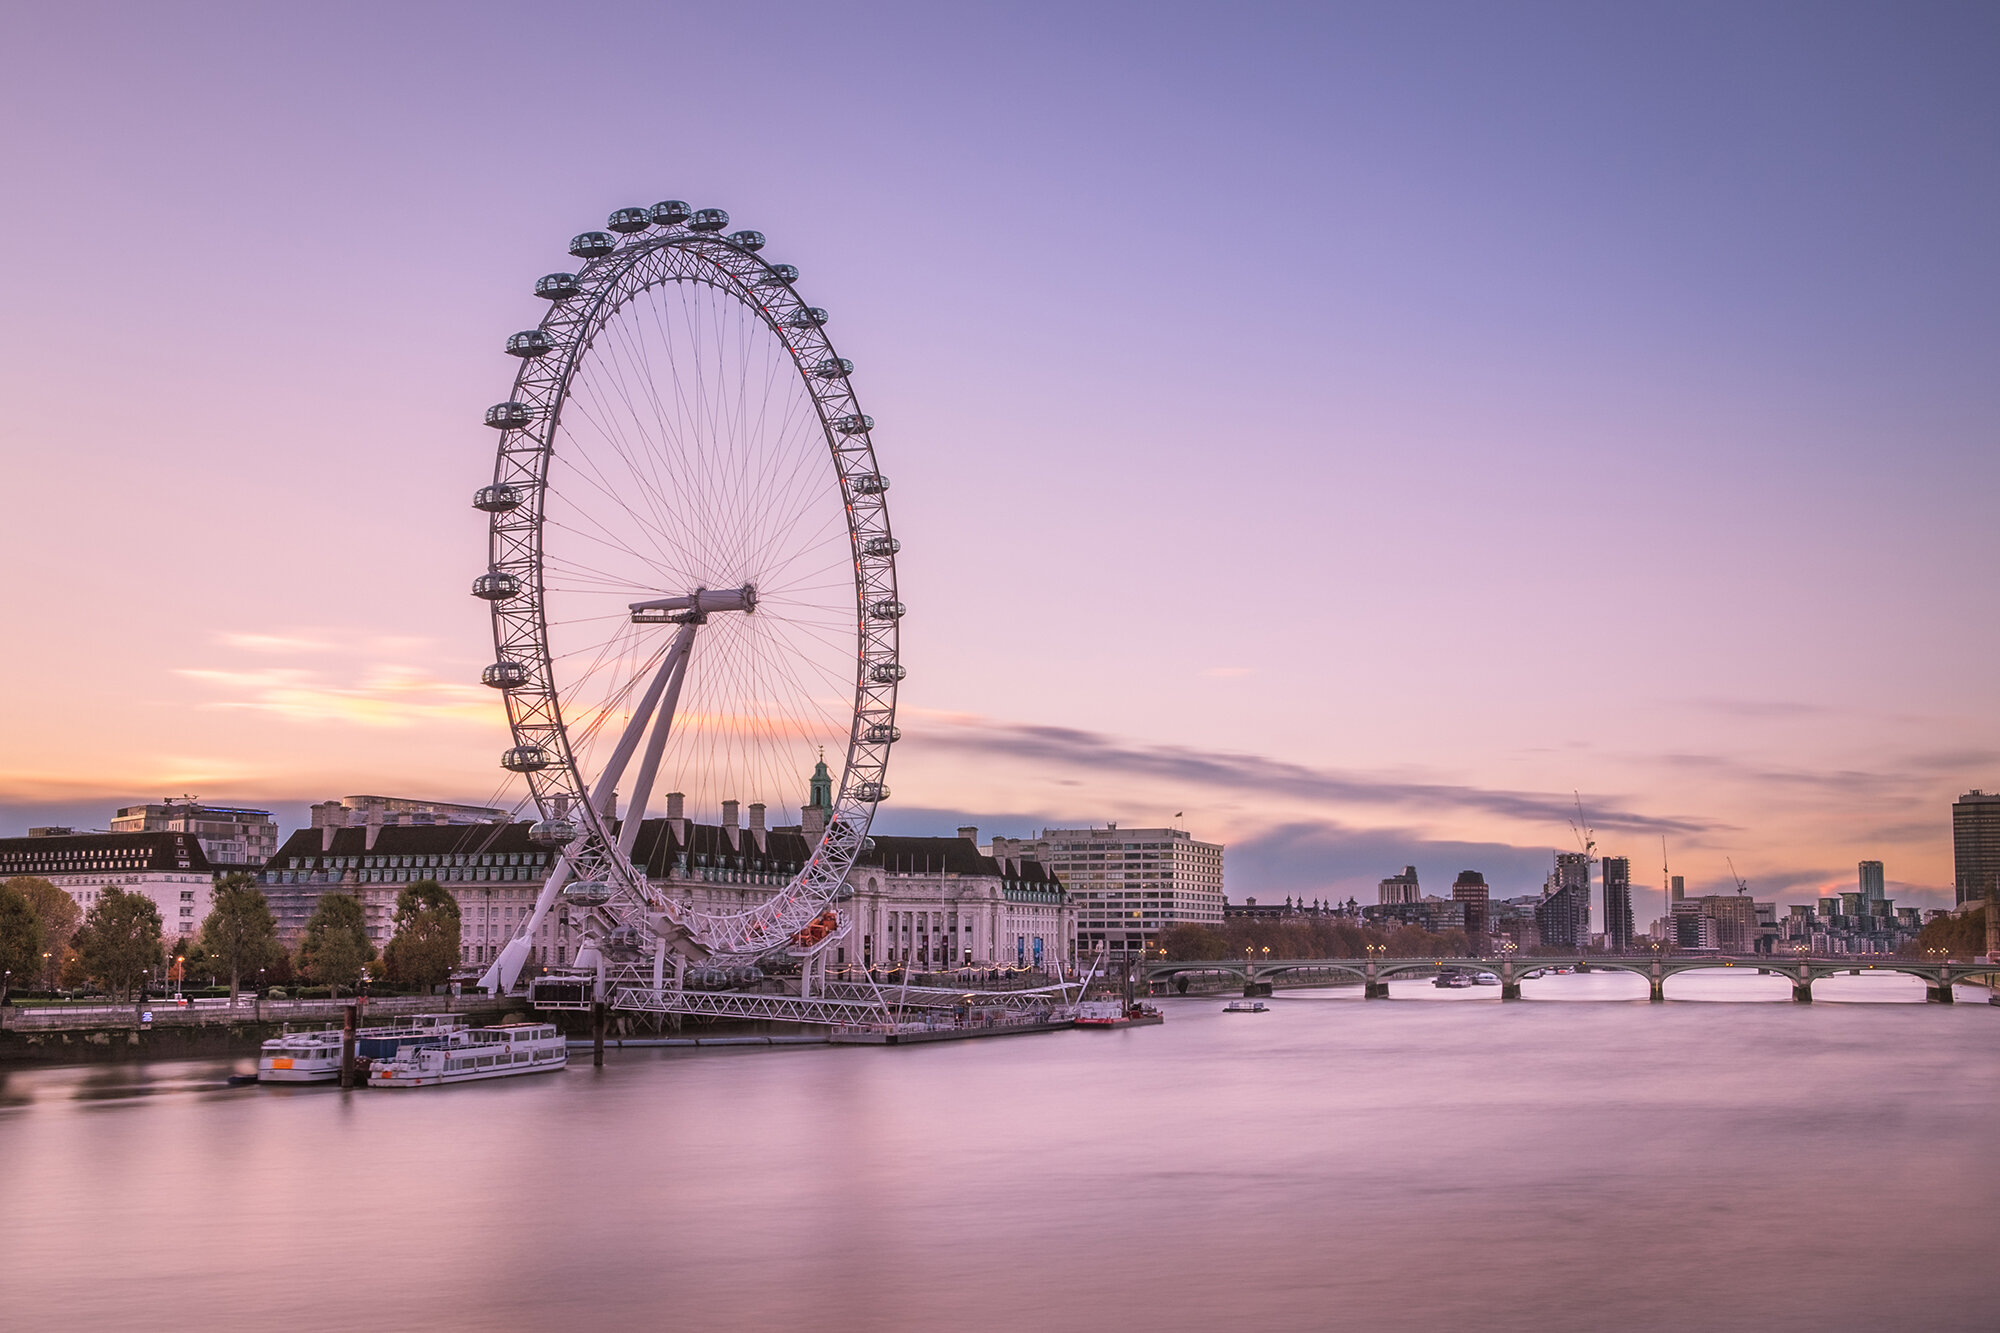
Spinning Wheel | Weekly Photo #43
In May 2019, I took this long exposure photo of the London Eye around sunset and this week I talk about how I took the photo and what some of the challenges are when taking a long exposure photo from this vantage point.
Before I dive into this week’s post, I wanted to let you know about an article I published last week all about printing the photos we take. In the article, I talk about what I’ve printed recently and why I think it’s so important for all photographers to commit ink to paper and the benefits it can bring to your craft. I decided to share the article now as with many of us on lockdown due to the global pandemic and unable to head out to take photos, I honestly feel this is a good opportunity to go through some of your most important work and have a go at printing some photos. For people that love their photos, there is nothing like holding them in your hand as physical, tactile pieces of art. You can find the article on my blog here: Why every photographer should print their photos.

Fujifilm XT2 | XF18-55mm | 21mm | 95 Seconds | f/7.1 | ISO200
I haven’t shared a long exposure for a few weeks now and as I was rummaging through my photos searching for this week’s post, I came across this photo of the London Eye which was taken from my favourite vantage point looking down the River Thames from the Golden Jubilee Bridge. One of the reasons I take long exposure photos is that it allows me to remove some of the clutter from the image such as the ripples in the water or in this case, smooth the motion of the London Eye and this composition suits this approach perfectly as I can exclude the taller buildings which are just out of frame on the left allowing this modern icon to stand tall and dominant in the frame and simplifying the composition even more.
In my main cityscape kit, I use the Formatt-Hitech 85mm system and for this photo, I used their 10-stop ND filter to give me the shutter speed I wanted to smooth out any movement in the scene. The London Eye moves quite slowly and takes around 30 minutes to go all the way around which means if the exposure is too short, all you really get is a bunch of slightly blurry passenger capsules. To get this effect that makes the London Eye appear to be spinning more rapidly, the exposure really needs to be at least 30 seconds or in this case, with the ambient light fading fast, I ended up with a 95-second exposure.
Shooting from this spot is not without its challenges when taking longer exposures like this. First off, the bridge is a bit wobbly. The Golden Jubilee Bridge is attached to the older Hungerford Bridge and when a train crosses, everything shakes a little which can cause some camera shake. Also, as the camera is pointed down the Thames, the river traffic takes longer to pass through the frame and when taking long exposures, finding the right gap to take a photo can be difficult, to say the least. Looking through Lightroom at the photos from that evening, of the 10-15 shots I took, this is the only photo I managed that was both sharp and free of ghostly looking riverboats in the water.
I visit this location regularly enough and more often than not, leave without a shot in the bag and for those times I do leave empty-handed, I have to remind myself that the hunt is as important as the catch which can be a bitter pill to swallow.
Stay safe and well while we all get through these uncertain times and I’ll talk to you next week.
Trevor
This post is featured in my Weekly Photo series where I post a new photo every Monday. To have this delivered directly to your inbox, you can subscribe to the mailing list here.

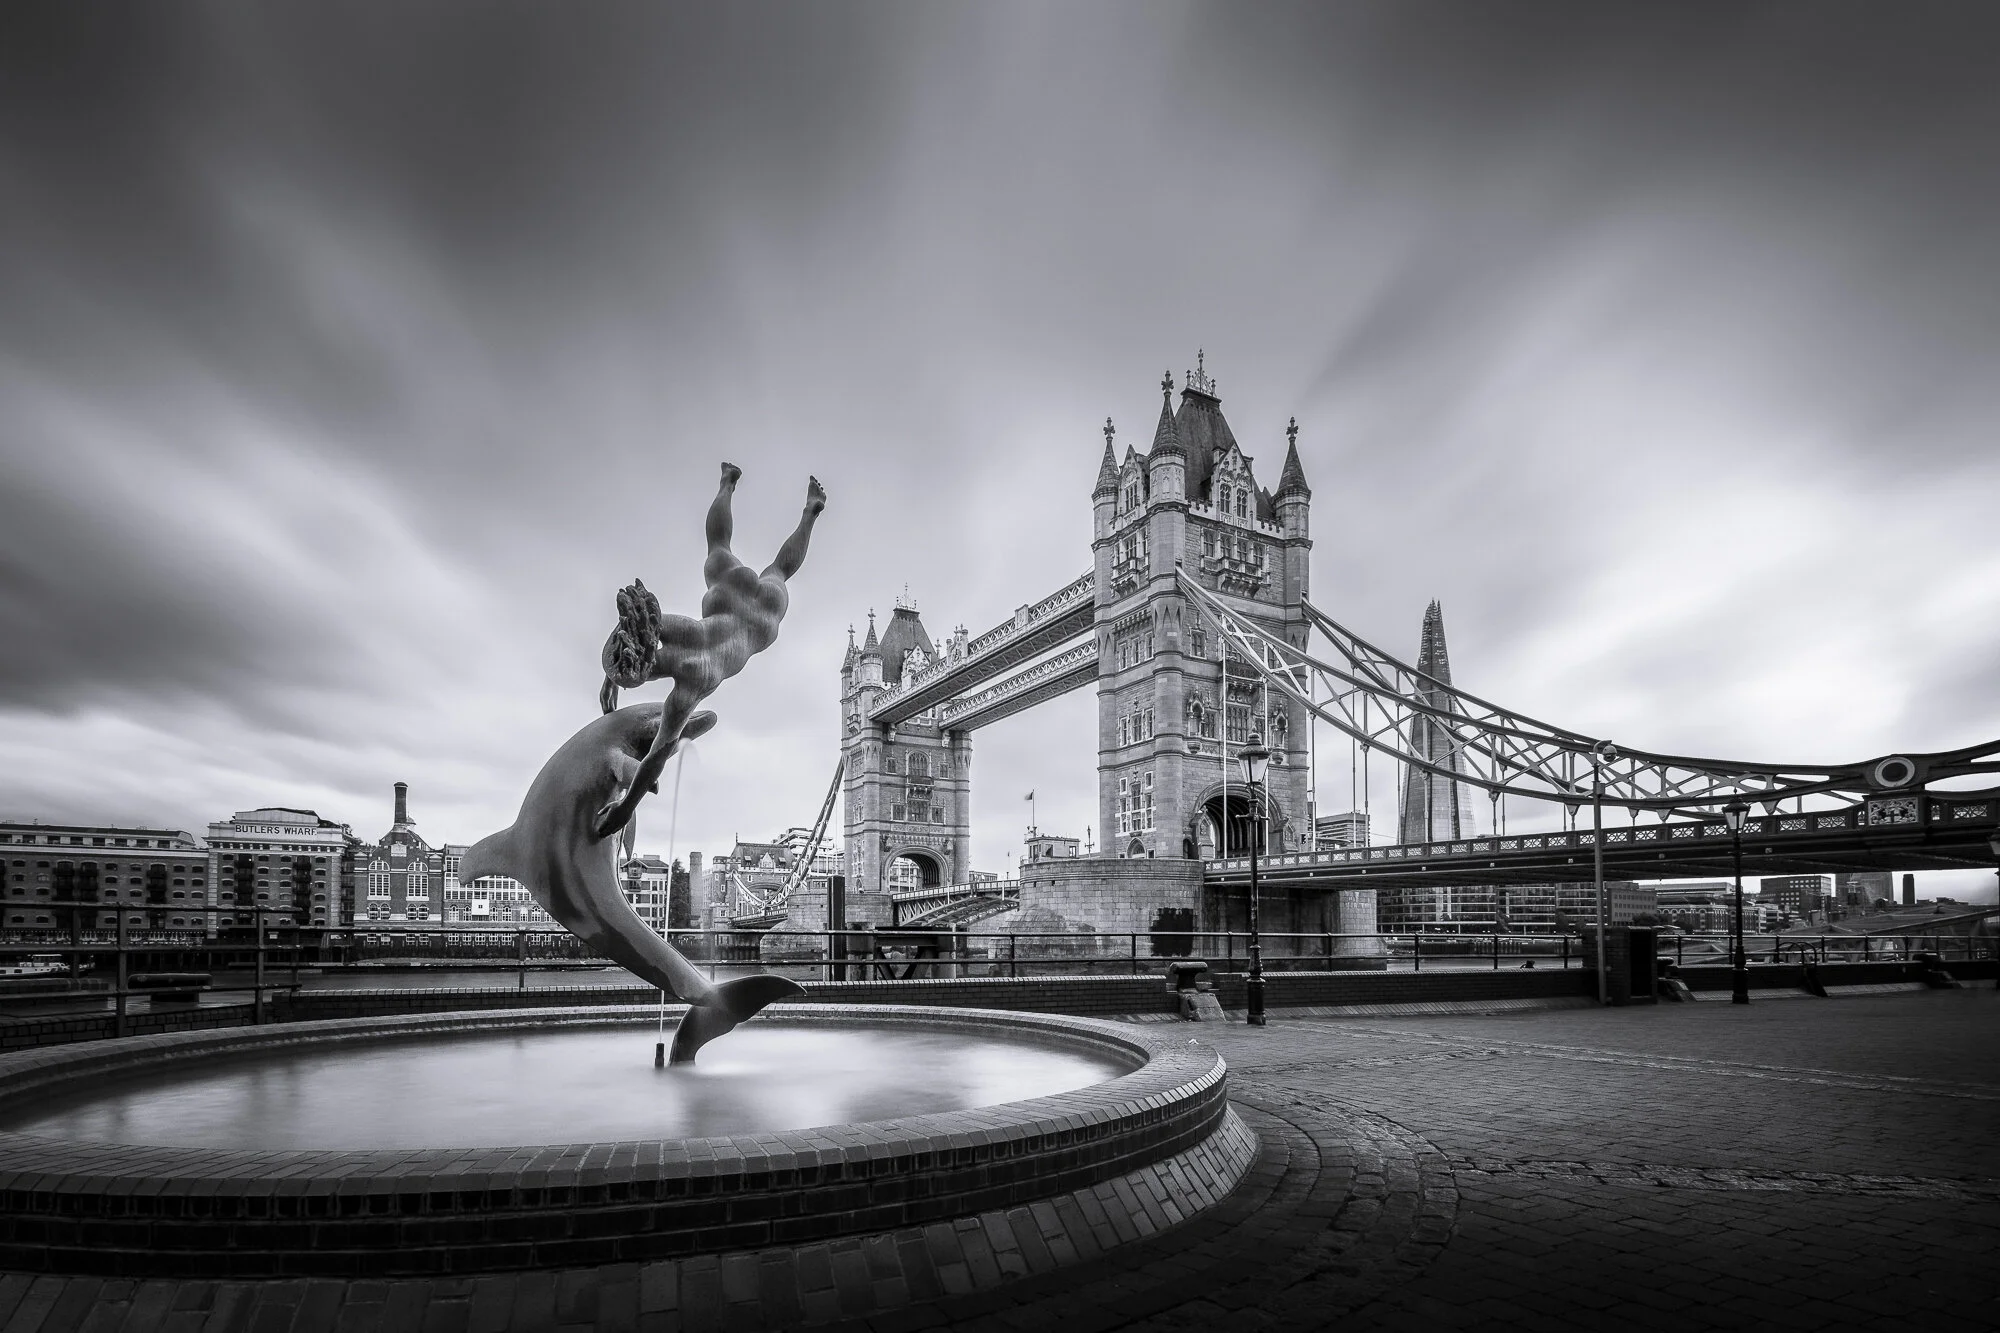
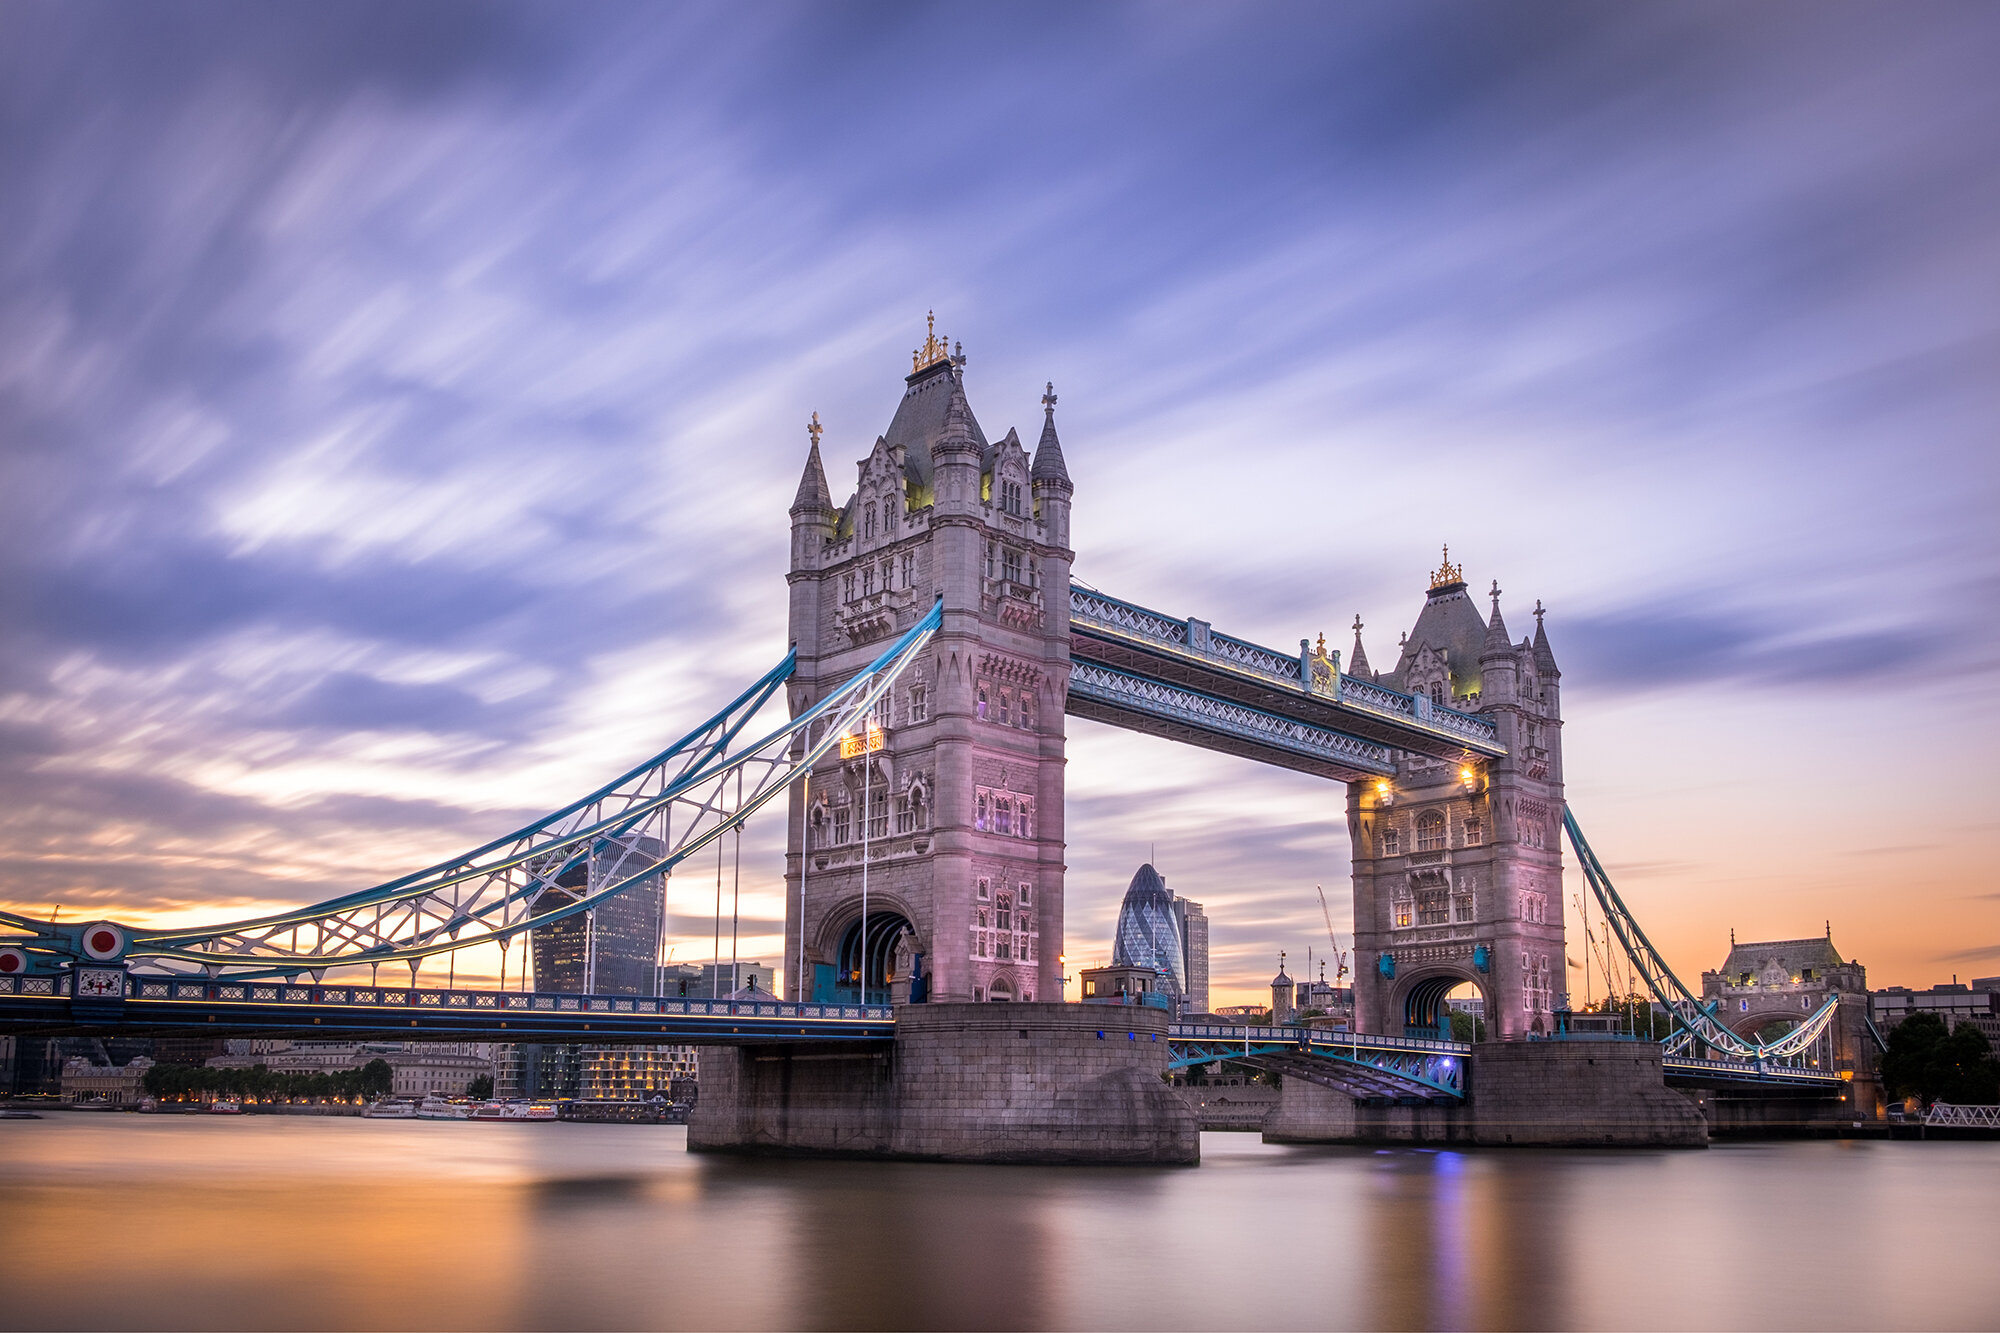
150 Seconds in London | Weekly Photo #36
This long exposure photo of The Girl and the Dolphin Fountain in front of Tower Bridge very nearly didn’t happen as it took some time and a lot of patience on my side for there to be a large enough gap between people to capture this 150-second long exposure photo.
This is my own take on a classic composition of Tower Bridge with the Girl and the Dolphin fountain in London taken back in 2018. It’s a popular location for photographers and tourists alike as it provides a great view of some of London’s iconic landmarks. This particular long exposure photo is a personal favourite of mine which I have printed large and hanging up on my wall at home.

Fujifilm XT2 | XF10-24mm | 16mm | 150 Seconds | f/11 | ISO200
Before I speak about the photo itself, I wanted to talk about how this shot reminds me of the patience needed while out and about taking photos like this in London. This is such a busy spot and it was such a nice evening so there were quite a few people about, trying to grab a peek at Tower Bridge. Normally when taking long exposures, if the exposure is long enough, someone walking into my shot won’t register in the final image but if they stop, even for a short while, I will get a blurry, messy figure in the scene.
Being someone who likes my cityscape images clear of people and with so many people stopping to look at the view, as much as I tried, I could not get a clean image. Every time I thought the coast was clear, I fired off a new shot only for another person to walk into the scene and stand there long enough to be visible in the final image. I won’t lie, it was incredibly frustrating and if I was that way inclined, I may have asked some of the people to move out of the way while I took the shot but firstly, I don’t have the front to do this and secondly, what right do I have to do that anyway? Being there photographing this location gives me no greater rite of passage and everyone is entitled to stand where they like and take in this epic view even if it means me missing the shot altogether. So, I just stood there, waiting patiently for a gap in the foot traffic with no outward signs of frustration and while I still had good light, I was eventually rewarded with a 150-second window without someone stopping for too long enabling me to capture the image.
This photo was taken on my Fujifilm XT2 and wide-angle XF10-24mm lens. Using a wider focal length of 16mm meant that I could capture the entire scene without it looking squashed in and leaving the architecture enough room to breathe. I used my Formatt-Hitech 10-stop filter to give me the 150-second exposure allowing me to capture the movement in the clouds perfectly resulting in a kind of frame around Tower Bridge which I think works really well here.
I also have another black and white, long exposure of a slightly different composition which I published in week 21 of this Weekly Photo series. You can see that image here: Deserted City | Weekly Photo 21.
I was (and still am) really pleased with this photo. the light and movement of the clouds were just perfect and although it’s not too often I get the right conditions for taking a long exposure photo at sunset, I’m glad I was able to stay patient and wait it out as it paid off in a big way!
Until next time.
Trevor
This post is featured in my Weekly Photo series where I post a new photo every Monday. To have this delivered directly to your inbox, you can subscribe to the mailing list here.

Defenders of London | Weekly Photo #35
I recently took a trip over to the Thames Barrier in East London during a pretty miserable, grey day and as the light was fading, I managed to capture this black and white, long exposure photo of these distinctive structures.
Some will recognise this distinctive structure but for those that don’t, this is the Thames Barrier situated just east of London, not far from the Isle of Dogs. It was erected in 1982 to protect the city against high tides and storm surges.

Fujifilm XT2 | XF18-55mm | 28mm | 209 Seconds | f/10 | ISO200
As you will probably know, I do like a long exposure photo. Something about the ethereal, minimalistic look they provide means that for me at least, it’s the perfect technique to use when capturing a busy, sometimes overly cluttered London Cityscape. The process allows some of the tension in the scene to be defused enough to ensure the main subject can stand proud and distraction-free in the frame.
You can check out more reasons to give long exposure photography a try in an article I wrote a while back called Slowing Down Time | Why the Long Exposure?.
I took this photo a couple of weeks ago while on a shoot with Andy Conway. Andy is an excellent photographer and up and coming YouTuber based in the South of England. After meeting at Canary Wharf, we decided to leave the hustle and bustle behind and head east to capture the Thames Barrier. The weather was pretty miserable, the sky was lifeless and the light was flat so there was really only one thing for it. A black and white, long exposure image was on the cards for this shoot. After spending a minute or two scouting the location, we settled on this side-on composition of these imposing structures that appear to be standing in-line, at the ready to defend the city against their tidal enemy. With the camera mounted and a 10-stop filter attached to the lens, I went about capturing this 209-second exposure.
After converting to black and white, I process the image with a high key, minimalistic look which helped to emphasise the strong architectural lines of these powerful, intimidating structures. I used local adjustments in Lightroom to dodge and burn parts of the image to get the tones and brightness how I wanted and finished up with a bit of split toning to cool down the overall image and give it the clean, slightly metallic look I was after.
One last thing before we wrap up. For some, giving long exposure photography a try can be a bit daunting, but in truth, it really is quite straight forward if you understand what’s involved so, I wrote a 10-step guide that you can follow if you want to give this technique a try. Use the link at the bottom of this post to subscribe to my newsletter and a PDF copy will be sent straight to your inbox.
Cheers,
Trevor
This post is featured in my Weekly Photo series where I post a new photo every Monday. To have this delivered directly to your inbox, you can subscribe to the mailing list here.

The Glass Canal | Weekly Photo #28
This week I present an ultra-long exposure of 8 minutes taken from the Ponte dell’Accademia bridge during an early morning sunrise in Venice.
“Venice is the exemplar of human wit and ingenuity. Despair of man and go to Venice: you will cease to despair. If human beings can build a city like this, their souls deserved to be saved.”
Like many photographers, I love to take photos of Venice. It has everything I like from charming streets and intimate canals to grand, cityscape vistas that will take your breath away. This picturesque city has an abundance of rustic splendour and oozes history throughout.

Fujifilm X-T10 | XF18-55mm | 18mm | 480 Seconds | f/8 | ISO200
During a previous trip to Venice in 2017, I decided to venture out before sunrise to capture the city as it sleeps. As an urban landscape photographer, whatever city you happen to be in, there is no better time to capture it than at sunrise. This is the time where you can have the place to yourself and capture the landscape in a way not normally experienced by most other people.
If there was one shot I just had to capture during my stay it was this composition below looking down the Grand Canal towards the Basilica di Santa Maria della Salute in the distance. The light wasn't as epic as I hoped but if I was going to capture a long exposure, this had to be it.
Upon the Ponte dell’Accademia Bridge, I set my camera onto the tripod, composed, focused and then mounted my filter. You can see the settings I used directly under the image above. I also have an easy 10-step process to taking long exposure photos which is available to download by subscribing to my newsletter. Having already taken a test shot without the filter, with the light levels as they were, the resulting exposure was an impressive 8 minutes. So, with the remote cable release connected, I went about taking the shot.
What I really like about this image is I had one chance to capture it while there was some light in the sky. The eight-minute exposure makes the water almost mirror-like with a touch of etherealism and the resulting image is a clean crisp shot ensuring the sweeping curve of the water leads the eye to the main focus being the architecture and Basilica.
Back in Lightroom, I had to deal with one of the downsides of such a long exposure and that was the many hot pixels across the image. These are areas of electrical discharge created by the sensor getting hot whiles taking the long exposure. Noticeable in the shadows, I had to endure the tedious process of cloning out the hundreds of small red dots from the darker parts of the image.
If you’re interested, I wrote a two-part travel blog about my trip to Venice which is filled with photos and information about the many places I visited.
Until next time.
Trevor
This post is featured in my Weekly Photo series where I post a new photo every Monday. To have this delivered directly to your inbox, you can subscribe to the mailing list here.

Peaceful City | Weekly Photo #27
Taken while on an early morning walk in the city, I was struck by how peaceful this scene looked and loved the silhouettes of the buildings over on the Isle of Dogs. In this post, I talk through my thoughts on the composition and editing process.
This is the view that presented itself to me, one morning in late December as I crossed London’s Tower Bridge. I was on a sunrise walk in the city during that funny time between Christmas and New Year where most people are at home and the city has a quiet, more subdued feel about it so I decided to try to capture some of that feeling tranquillity in my photos.

Fujifilm X-T10 | XF18-55mm | 39mm | 58 Seconds | f/13 | ISO200
What captured my attention when looking across East London was how calm and still, the city looked. There were some subtle pastel colours in the sky as the sun started to make an appearance and that coupled with a slight mist in the air was all I needed to set the camera down and try to capture the scene in front of me. While setting up, I decided I would try the image as a long-exposure to help soften the scene a little more by removing the ripples in the water and make the clouds a bit wispier. I ended up going with a 58-second exposure but with the light increasing fast, I had to close down the aperture to f/13, reducing the light enough to achieve such a long exposure.
I deliberately composed the shot so that the River Thames swept around the right-hand side of the image and flanked St. Katherine Docks that lined the river in the foreground but with the darker heavier buildings all on the left-hand side, I had to make sure I included the clouds on the top right of the frame to help add some much-needed balance. Although only subtle, I think the clouds do just enough to save the entire shot as, without them, it just wouldn’t work at all. In addition, I decided to emphasise the high-rise buildings in the background over on the Isle of Dogs so instead of going wide which may be the more obvious choice, I used a focal length of 39mm to help bring the buildings a little forward in the frame.
When I initially edited the image, I brought way too much colour back in and the image was bright orange and way too garish. After sitting on the image for some time, I decided to pull the colour right back to these subtle pastel tones all helping to communicate the peaceful feeling I experienced on that particular morning. If you edit your photos and sometimes wonder if you have over-edited an image, just stop and let the image sit there for a while. Be it days, weeks or for some, even months, if you are still happy after living with it all that time, then you know it’s a keeper!
Chat to you soon.
Trevor
This post is featured in my Weekly Photo series where I post a new photo every Monday. To have this delivered directly to your inbox, you can subscribe to the mailing list here.
Deserted City | Weekly Photo #21
This week’s photo is a black-and-white, long exposure photo made up of several photos taken at different times blended together to remove the many people that visit this popular viewpoint. In this post, I walk through the process I followed to create this photo.
This week’s photo was taken at the same time I took Weekly Photo #9 while at St Katharine Docks. In that post, I talked about my decision to venture out with my new Fujifilm X-T30 even though the weather was pretty miserable and taking a great long exposure black and white image. This time, I want to share with you a pretty easy photoshop technique to capture busy locations whilst removing all of the people in the photo.

Fujifilm X-T30 | XF10-24mm | 10mm | 8 Seconds | f/9 | ISO160
As it was a dull cloudy day I decided to create a high-contrast, black and white long exposure photo of this great view of Tower Bridge. The idea was to have the movement in the clouds provide some nice framing of the architecture which was only possible as they were moving towards me. If the clouds were moving in any other direction, the composition just wouldn’t work.
Although it was a cloudy day, the light levels were still quite good so even with the Formatt Hitech 10-stop ND filter attached to my XF10-24mm lens, the exposure time was only 8 seconds. Normally this wouldn’t be long enough to capture a good amount of motion blur in the clouds but on this particular day, they were moving pretty fast and even with an 8-second exposure, I captured plenty of movement in the clouds and this meant I didn’t have to close the aperture down too much to reduce the light hitting the sensor which would have also affected the overall quality of the image.
How to remove people from your photos
Although it was a pretty miserable day, this is still a popular location so unless you arrive very early in the morning, you will always have people wandering into your shot. Normally I would have a long enough exposure to blur most of the movement out but on this day, I had an 8-second exposure which meant I still had people showing up in the photo. So, to fix the issue, I decided to take multiple exposures that I could merge in post-production later.
Being careful to keep the camera in the same place, I took one exposure for the sky and over a period of time, a few different exposures of the foreground to ensure I had the entire scene void of people across all of the exposures. The important thing to remember here is that the people do eventually have to move so you don't capture people in the same position across the entire series. otherwise there will be no way to mask them out using this technique.
Here’s how I created the final image:
I edited the first image in Adobe Lightroom.
I then synchronised the edits across all copies of the image to keep the look consistent throughout.
I exported all photos as layers into Photoshop.
I highlighted all layers and selected Auto-align Layers from the Edit menu.
I added a layer mask to all layers and went about masking out the people in each layer to reveal a person behind without the person in.
I may well release a more detailed article with video or screenshots demonstrating how I put this image together. Please do leave a comment if that’s something you might want to see.
Until next time
Trevor
This post is featured in my Weekly Photo series where I post a new photo every Monday. To have this delivered directly to your inbox, you can subscribe to the mailing list here.

2 Minutes in London | Weekly Photo #18
This week’s photo is a long exposure photo of the London Eye taken on a late summer’s evening in 2018. On top of the story behind the photo, I also share some of my other long exposure articles that will help anyone looking to improve their long exposure technique.
Long exposure photography in London has been a passion of mine for a number of years now. I love the way this technique allows me to capture the changing light, motion and even colour over relatively long periods of time all within a single frame. This can create stunning ethereal photos which allow the viewer to witness a scene in a way they wouldn’t usually see with their own eyes even if they were standing next to me while I captured the image.

Fujifilm XT2 | XF18-55mm | 24mm | 121 Seconds | f/10 | ISO200
Taking a long exposure of the London Eye
This photo was taken in September last year. I chose this location to capture a long exposure of the London Eye as I like the way it allows you to see down the river towards the buildings near St George Wharf in the distance which adds some great depth to the shot. If you time it right, you can avoid the boats that run up and down the river creating a nice simplified, clutter-free look. Although the sky was pretty clear, as the sun went down, some beautiful pastel colours appeared across the sky.
I took this photo with my Fujifilm XT2 and my trusty XF18-55mm. Using my Formatt Hitech 10-stop ND filter, I was able to change this photo from around a 1/8th of a second exposure to 121 seconds.
I have written many blog posts about taking long exposure images including why I do it, how I do it and so on. So, instead of repeating myself once again, I will list some of my most popular posts below for you to read at your leisure. So, if you have a few minutes, grab a coffee, settle in and have a read.
Slowing Time: Why The long Exposure?
How I take Long Exposure Pictures
My Top 5 Long Exposure Locations in London
Lastly, if you haven’t done so already, sign up to my newsletter and you will get a PDF eBook which lists my 10-step guide to take better long exposure photos. Click here to visit my Subscribe Page.
Thanks for dropping by.
Trevor
This post is featured in my Weekly Photo series where I post a new photo every Monday. To have this delivered directly to your inbox, you can subscribe to the mailing list here.
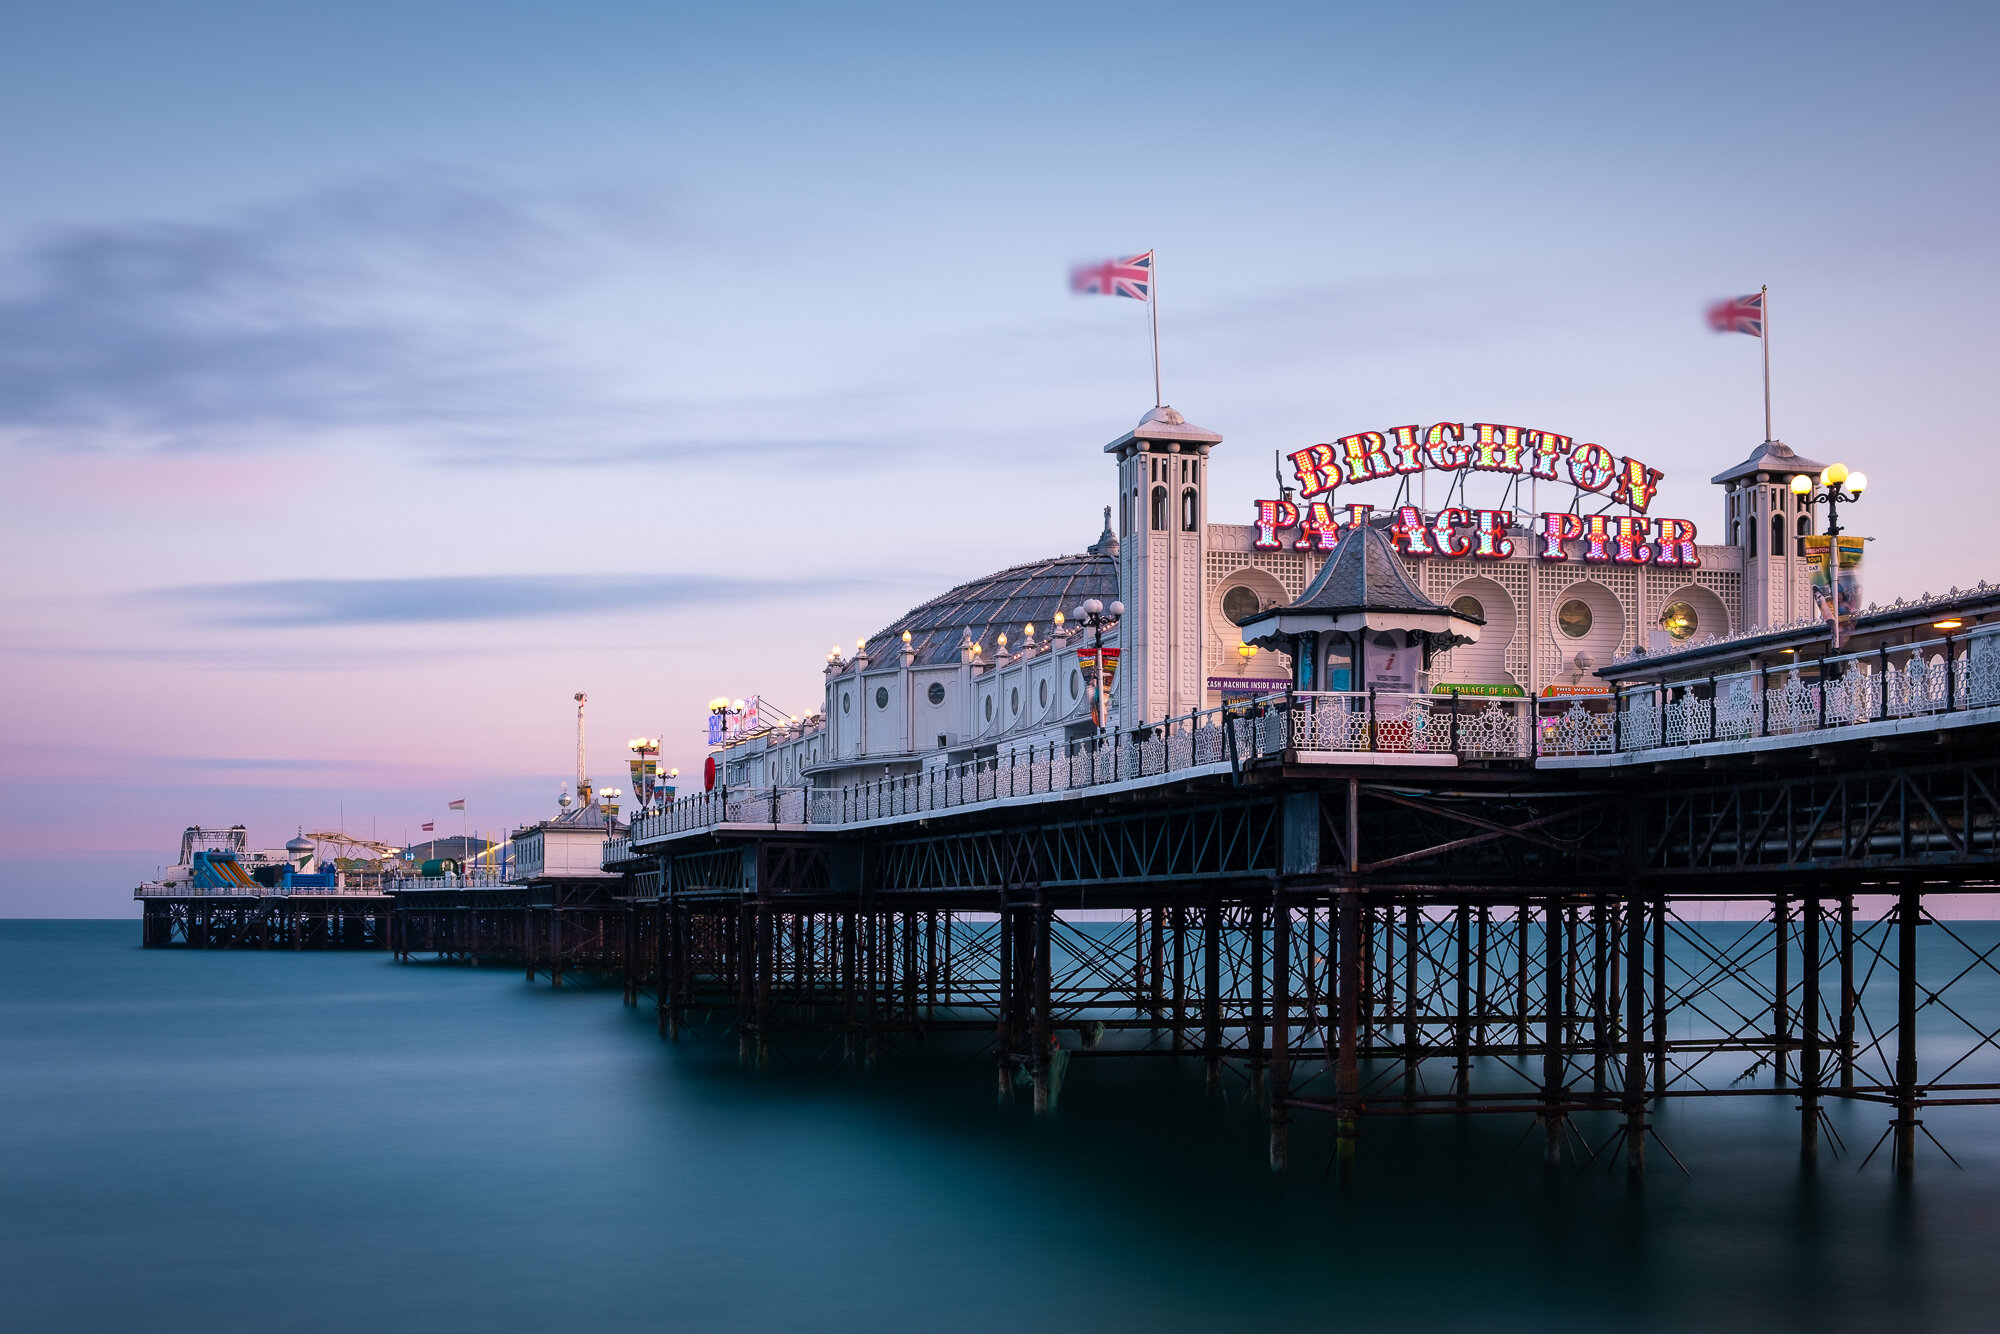
3 Minutes in Brighton | Weekly Photo #12
After a few hours wandering around Brighton taking photos of the seafront, I captured this 3 minute long exposure of the Palace Pier whilst I sat on the beach, relaxing and taking in the last light of the day.
This photo encompasses so much about why I take long exposure photos. The calm created by the velvety clouds and sea with the pastel like blend of light as it changes throughout the long exposure and the main subject standing out without distractions competing for attention.

Fujifilm XT2 | XF18-55mm | 28mm | 181 seconds | f/9 | ISO200
In my pursuit to capture more photos down on the south coast, I once again travelled to Brighton on a warm July’s evening to try and capture a few images I had planned. I wrote about it a bit more in my latest “On Location” post titled On Location | Photographing Brighton Beach where it became apparent that the particular style of image was not going to be possible on this trip so after a couple of hours of photographing the seafront, I wandered to this spot by the Palace Pier to relax, capture the scene in front of me and enjoy the sunset.
As the sun was setting, I set my Fuji XT2 camera on the tripod which was only extended quarter height as I was sitting down on the beach, I mounted my Formatt-Hitech 10-stop filter onto the front of the lens and with the cable release in hand I went about capturing the image. (Read more about how I take long exposure photo here).
Sometimes I wonder if the images we take reflect the mood and environment we took them in and judging by the resulting photo, I think there is certainly a lot of truth in that as for the 30 or so minutes I was sitting on the beach, there was a relaxed, peaceful vibe. With the smooth look created by the 3-minute exposure and the pastel colours in the sky, I think this shows through in the image too.
A beautiful end to a beautiful evening.
Until next time.
This post is featured in my Weekly Photo series where I post a new photo every Monday. To have this delivered directly to your inbox, you can subscribe to the mailing list here.

My Top 5 Long Exposure Locations in London
I’m going to show you what I think are 5 of London’s top spots along the River Thames to take long-exposure cityscape photos of some of the city’s most iconic views.
I’m a big fan of long exposure photography. I love the way long exposure photography blends all of the elements, such as light and colour together in a single image. Colours tend to be softer, distractions removed and overall, I have a cleaner, less cluttered composition. This is especially true when applying the technique to my London cityscape photography. If capturing wide vistas of London’s skyline from the River Thames, it can end up a rather cluttered image. The fast-flowing river, the many, many people that walk along the banks and some of the less attractive or ill-fitting architecture can all add a sense of chaos and noise to the final image. By rendering the river silky smooth, removing all of the people and softening the sky, I find long exposure photography adds balance and focus to the final image.
“What makes photography a strange invention is that its primary raw materials are light and time.”
I previously wrote a more detailed article about why I take Long Exposures and what it brings to both the colour and composition of my images. You can find the post here: SLOWING TIME: WHY THE LONG EXPOSURE?
In this post, I’m going to show you 5 of my top spots along the River Thames that are ideal locations to capture long exposure photos of London’s iconic views. I will attempt to cover some of the more practical information such as how to get there and when to visit. It’s probably worth noting at this point that the list below is far from exhaustive. There are many other great locations along the river or elsewhere in the city to take long exposure photos but as mentioned, these are some of my top locations which I want to share with you.
In this post, I won’t talk too much about the technique or equipment I use but if you are interested in this, take a look at a previous article I wrote which covers my 10 step approach to taking long exposure photos: HOW I TAKE LONG EXPOSURE PICTURES.
One last thing to add before we jump in to the 5 locations is that all 5 are tripod friendly. Tripods are a key component when taking long exposure photos as the camera has to be absolutely still and like most cities, there are many privately owned areas with strict rules around tripod use but for all of these locations, you should have no problem with tripod police spoiling your fun.
The London Eye from The Golden Jubilee Bridge
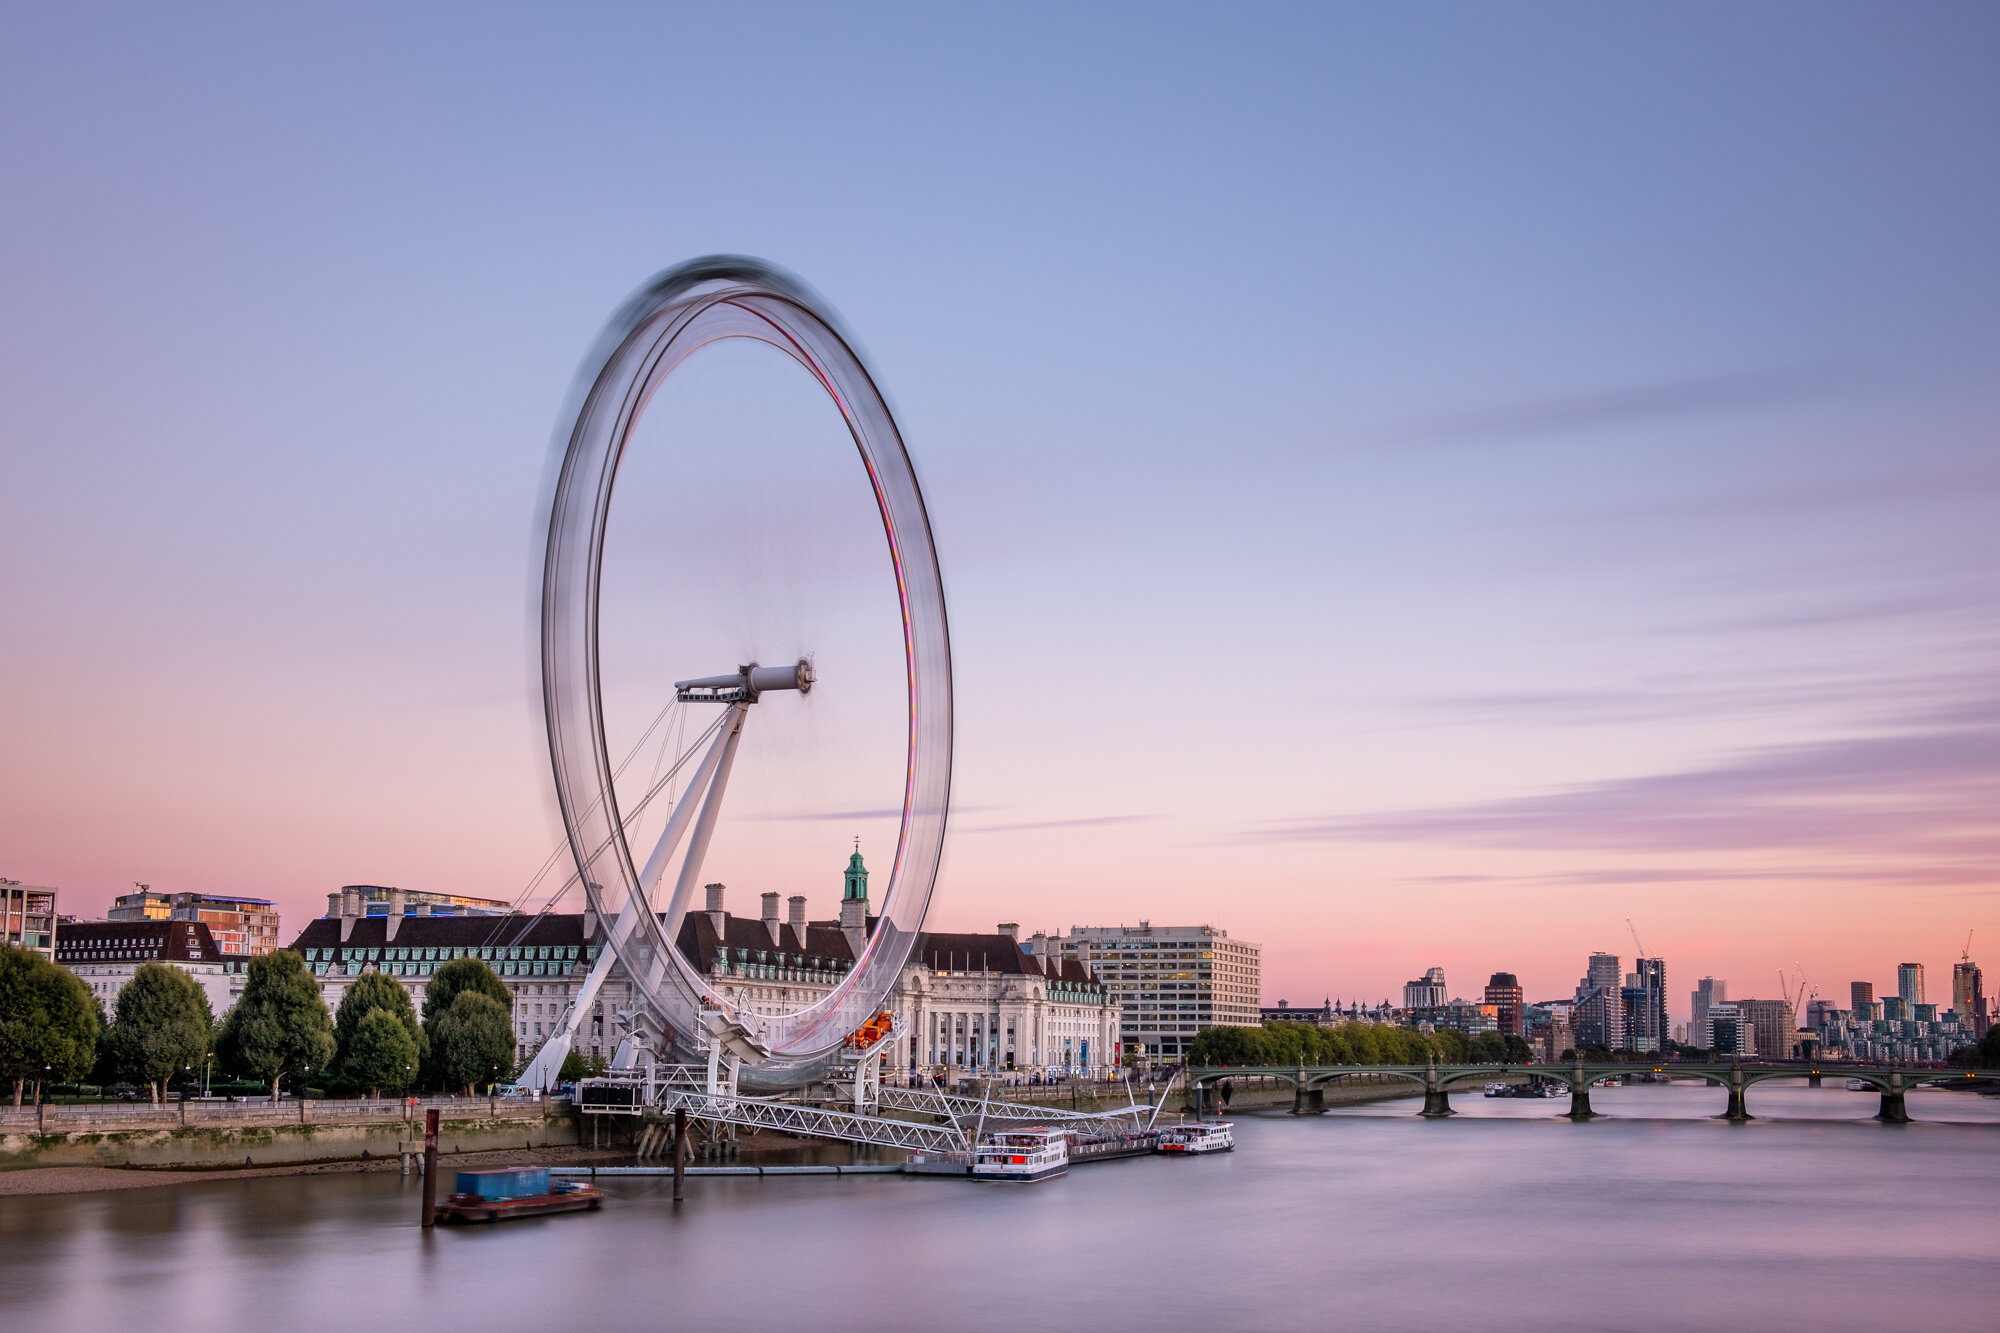
Fujifilm XT2 | XF18-55mm | 24mm | 121 seconds | f/10 | ISO200
Travelling West to East along the River Thames, we will start at the London Eye. The London Eye itself is probably the best landmark in London to capture with Long Exposure photography as the spinning wheel adds a great sense of motion and interest in the sky, especially when the sky is clear as in the photo here. There are a handful of great locations to capture the London eye such as from Westminster Bridge in the distance, directly from the front or behind the wheel but for long exposure compositions, this is my favourite.
Top tip: Opening times for the London Eye vary throughout the year so if you want to get the movement like that shown in the photo below you should ensure you plan the shoot while the London Eye is open.
Getting Here:
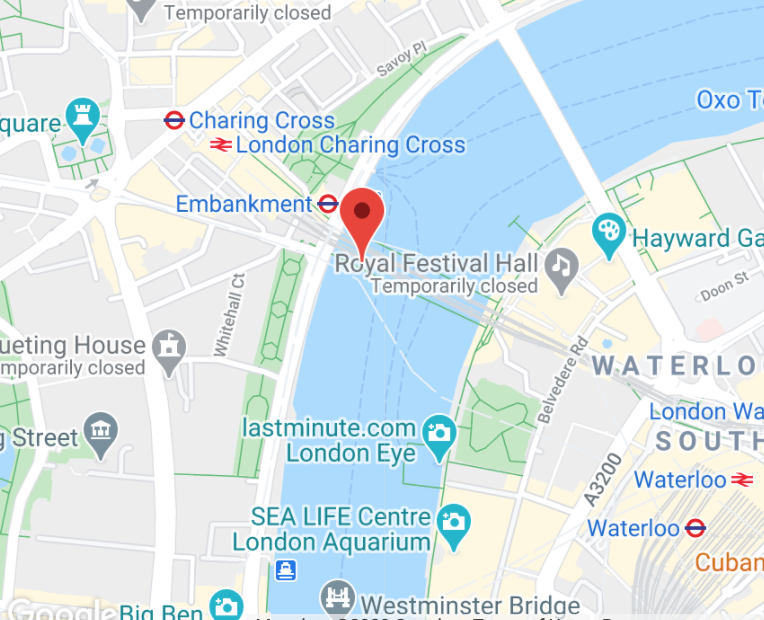
The nearest tube station is Embankment which is along the Circle and District lines. When existing the station, head towards the riverside and under Hungerford Bridge and up the stairs onto the southern Golden Jubilee Bridge.
Click here to open location on Google Maps
When To Visit:
The London Eye itself faces west so straight at the setting sun. This means during the golden hour and sunset, you can get some great light. You can still get some great shots of the London Eye at sunrise but I find it best to avoid the months Between September and March as the sun rises behind the London Eye which can cause issues getting a correctly exposed image. Oh, and you have to get up super early!
Westminster from Waterloo Bridge

Fujifilm X-T10 | XF18-55mm | 23mm | 58 seconds | f/11 | ISO200
Over the years, I have walked across Waterloo Bridge many times and love this view towards the west, but before I started taking long exposure photos, I never really captured a photo of it I particularly like. How does it go again? “A good view does not necessarily make a good photo?”
Usually, there’s a lot going on in this composition. With the rough waters, London Eye, people walking across the Golden Jubilee Bridge and along the Southbank, it’s hard to pick out the main focus points in the composition. By capturing the scene as a long exposure, some of these elements are removed from the composition leaving the rest of the image some room to breathe.
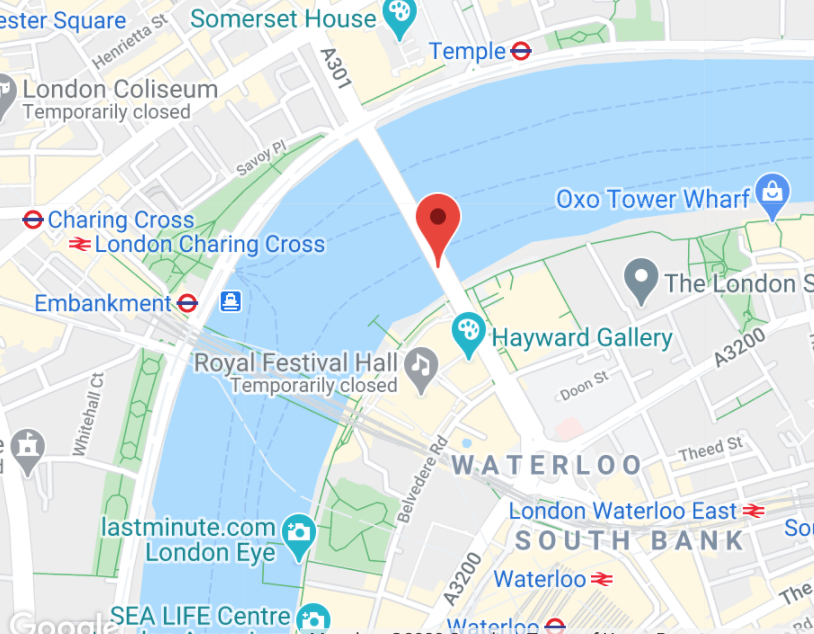
Getting Here:
There is a choice of tube stations for this location. Waterloo which is on the Jubilee Line or you have both Embankment or Temple to choose from on the Circle and District Lines.
Click here to open location on Google Maps
When To Visit:
To capture a good sunrise, the winter months are a great time to do so as the sun will light the scene from the left but I find the summer months the best time for capturing the evening light as the sun sets to the right of the scene, later in the evening meaning less river traffic to avoid in your photo and importantly, less people crossing the bridge as the path is a bit tight for space, leaving little room to set up the tripod safely.
If you’re interested as to how I edited the photo above, I wrote a post about the steps I took which you can find here: EDITING SUNSET AT THE SOUTH BANK
St Paul’s Cathedral and the Millennium Bridge

Fujifilm X-T2 | XF18-55mm | 25mm | 161 seconds | f/11 | ISO200
Continuing east along the river, the composition here is an incredibly popular one for good reason. The Millennium Bridge creates fantastic lead-in lines towards the world-famous St Paul’s Cathedral. The Millennium Bridge can be very busy at times and taking this photo with a standard exposure will capture all of those people compromising the strong, simple lines as you can see here but by using the long exposure technique, all of those people are rendered invisible in the final image simplifying the overall image.
Here you can see exactly the same photo taken with a 1/40s exposure showing people crossing the Millennium Bridge.

Getting Here:
This location is really easy to find. When I took this photo, I was situated right outside the front doors of the Tate Modern Museum on the south bank of the River Thames. Getting here is also super easy as there are many local stations such as London Bridge for National Rail, Jubilee and Northern Lines which are all located south of the river or on the north side you have Mansion House for the Circle or District Lines. You also have St Paul’s on the Circle Line. Head towards Tate Modern and you will find the spot right by the river.
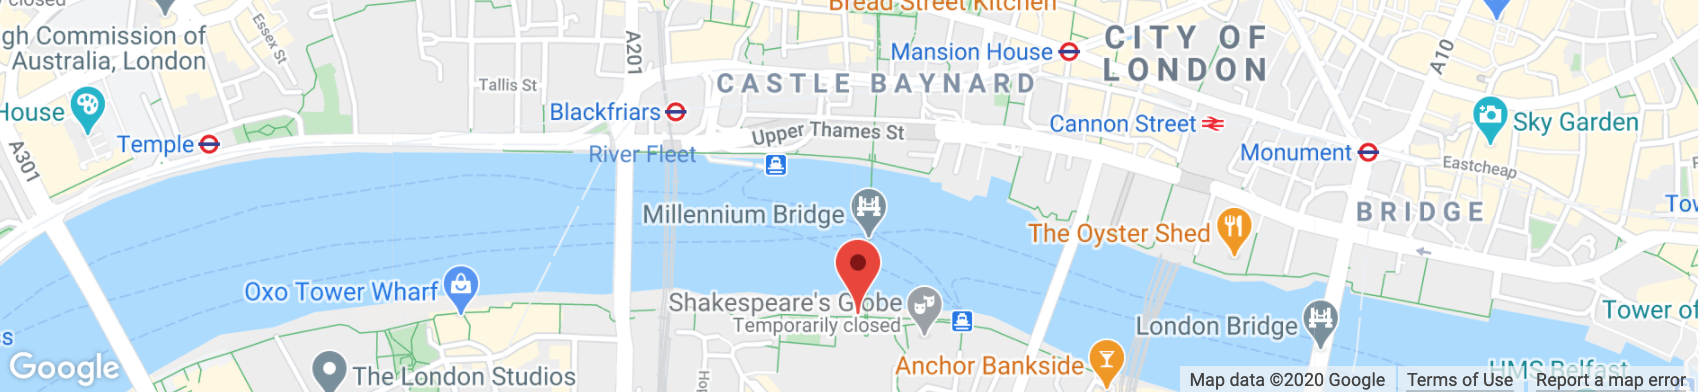
Click here to open location on Google Maps
When To Visit:
Catching a good sunset or sunrise requires a bit of a late night or early morning as the summer months are best. During May to July, the sun rises in the north-east and sets in the north west. Facing north to take the photo, the sun is close by when the best light hits the cathedral. If you want to visit the area and have it all to yourself, then a summer sunrise, although incredibly early is the best option.
City Hall and the Shard from Tower Bridge

Fujifilm X-T2 | XF18-55mm | 18mm | 150 seconds | f/8 | ISO200
Looking west from Tower Bridge provides some great views of The Shard along with the striking architecture of More London and City Hall. Although they belong to different estates, the modern architecture of More London and The Shard complement each other nicely.
This view is another example of how using long exposure removes some of the distractions in an ordinarily busy scene to add calm and focus on the main subject. With the smooth water and softer clouds, the hard-chiselled lines such as those belonging to the Shard are enhanced leaving no doubt as to the main focal point in the composition.

Getting Here:
By far the easiest way to get to Tower Bridge is to take the short walk from either London Bridge (Jubilee Line, Northern Line or National Rail) or Tower Hill (Circle and District Lines). During the day and late into the evening, Tower bridge can be incredibly busy with tourists and commuters so, although tripods are allowed, there is a high risk of it being knocked or bumped. My advice is to keep the tripod retracted and take advantage of the deep walls around the towers to rest the tripod away from the foot traffic. Just be careful the camera is not knocked into the river!
Click here to open location on Google Maps
When To Visit:
As with Waterloo Bridge, if you want to capture a cracking sunset with a little less people around, I think the summer months are best. The sun sets just off to the right lights up the architecture beautifully and the later sunset means a little less foot traffic. As for sunrise, the winter months provide the best chance of great light in the clouds above the buildings as in December and January, the sun rises just off to the right of the scene.
Tower Bridge from the Girl and the Dolphin Fountain

Fujifilm X-T2 | XF10-24mm | 16mm | 150 seconds | f/11 | ISO200
The last stop on this trip down the Thames is Tower Bridge. Tower Bridge is arguably one of the most instantly recognisable structures in the world. The twin towers are a fantastic subject for a long exposure photo and I think this location, with the fountain adding foreground interest, provides one of the best compositions of this iconic bridge.
Getting Here:
As with the location above, the easiest way to get to Tower Bridge is to arrive from either London Bridge (Jubilee Line, Northern Line or National Rail) or the now closer Tower Hill Station (Circle and District Lines). Once at Tower Bridge, the fountain is on the north side of the river right by to the stairs that lead to the bridge’s road level. You can’t miss it.

When To Visit:
You may have gathered from what you have read so far, I find the best light for a long exposure at sunrise or sunset and I find this location great for a sunset photo during the summer months. I’m not keen of having the sun set directly in the scene when taking long exposure photos as it creates too much contrast and can render the subject a silhouette. Having the light come in from the side or front of the subject creates a more balanced exposure and when an epic sunset takes place just outside the frame the best of the light is captured without fighting the dynamic range.
You may require a little patience when capturing this shot as this is the only location listed where people can literally walk in front of your camera. This is a popular spot for tourists capturing a look at Tower Bridge, usually standing for long enough to be rendered visible in your image, regardless of how long the exposure time is. If you want to avoid waiting for a suitable gap or even happy to risk not getting a clean shot at all, then a winter sunrise, all being well with the weather can provide a great shot with a lot less people around.
To capture a great long exposure sunset/sunrise photo of London, you are at the mercy of the weather to get that great light but one other important element that needs to be considered is the clouds. With a long exposure photo, the density and direction the clouds are moving can make or break the final photo. In terms of composition, if the clouds are moving directly away or towards the camera, they can create fantastic lead in lines. Even if the light doesn’t turn out great, if the clouds play their part, you can still walk away with a great long exposure image.
So, there you have it, 5 of my favourite spots to take long exposure photos along the River Thames in London. As I mentioned at the beginning of the post, there are many more spots around the city that are also great to capture but I personally feel that by incorporating the river adds great balance against the movement captured in the sky.
Feel free to leave a comment with your own suggestions for long exposure locations in London and further afield.
Until next time.
How I took this long exposure photo for under £50
Who says long exposure photography needs to be expensive? If you’re looking to give this fantastic technique a try but not looking to invest too much money (just yet) then take a look at this post to see how I took this photo with under £50 of accessories.
Is long exposure Photography an expensive undertaking? Well it certainly can be. Over the years I have spent hundreds of pounds on filters, tripods and accessories in my pursuit of capturing long exposure photos of London’s cityscape.
Now, I accept that the title of this post is a tad misleading. It’s certainly correct that I captured the image below with under £50 worth of accessories but with one significant pre-requisite. The camera. This, you will need to have already, in particular, a camera that has full manual options.
This article won’t go too deep into how to take long exposure photos. If you want to read a 10 step guide to taking long exposure photos, see the following article on my blog: HOW I TAKE LONG EXPOSURE PHOTOS.
On a recent outing in London, I found myself in East London just before sunset. I was actually out testing my newly acquired Fujifilm X-T30 camera that at the time of writing has just been released and just as I crossed Tower Bridge I decided I would put the camera through its paces and capture a long exposure looking west towards The Shard.
Here is the photo I ended up taking. The long exposure gives the image a silky-smooth look and blends the colours of the sky nicely.

Fujifilm X-T30 | XF18-55mm | 18mm | 25 Secs | f/10 | ISO160
What equipment did I use to take this photo?
Apart from the camera itself, I used only two accessories to capture this image. A small table top tripod to keep the camera perfectly still and a 10-stop screw in neutral density filter to slow down the exposure.
Just a note. The equipment I use here is certainly not top of the range and you may well find even cheaper alternatives from places like China but I have been using both items listed below for some time and for the price, it is, in my opinion well worth the extra few pounds over cheaper unknown brands.
Read more about the kit I have in my bag here: WHAT'S IN MY CAMERA BAG? (2019 EDITION)

HOYA PROND1000 10 STOP ND Filter - £29.99
To slow down the light reaching the cameras sensor, and to essentially trick the camera into thinking the ambient light is lower than it really is, you need a Neutral Density Filter. This Hoya PROND1000 is a 10 stop filter meaning it reduces the light entering the lens by 10 stops. Filter kits from the likes of Lee or Formatt-Hitech can be hundreds of pounds whereas I brought this great little filter with a 58mm thread size for under £30.
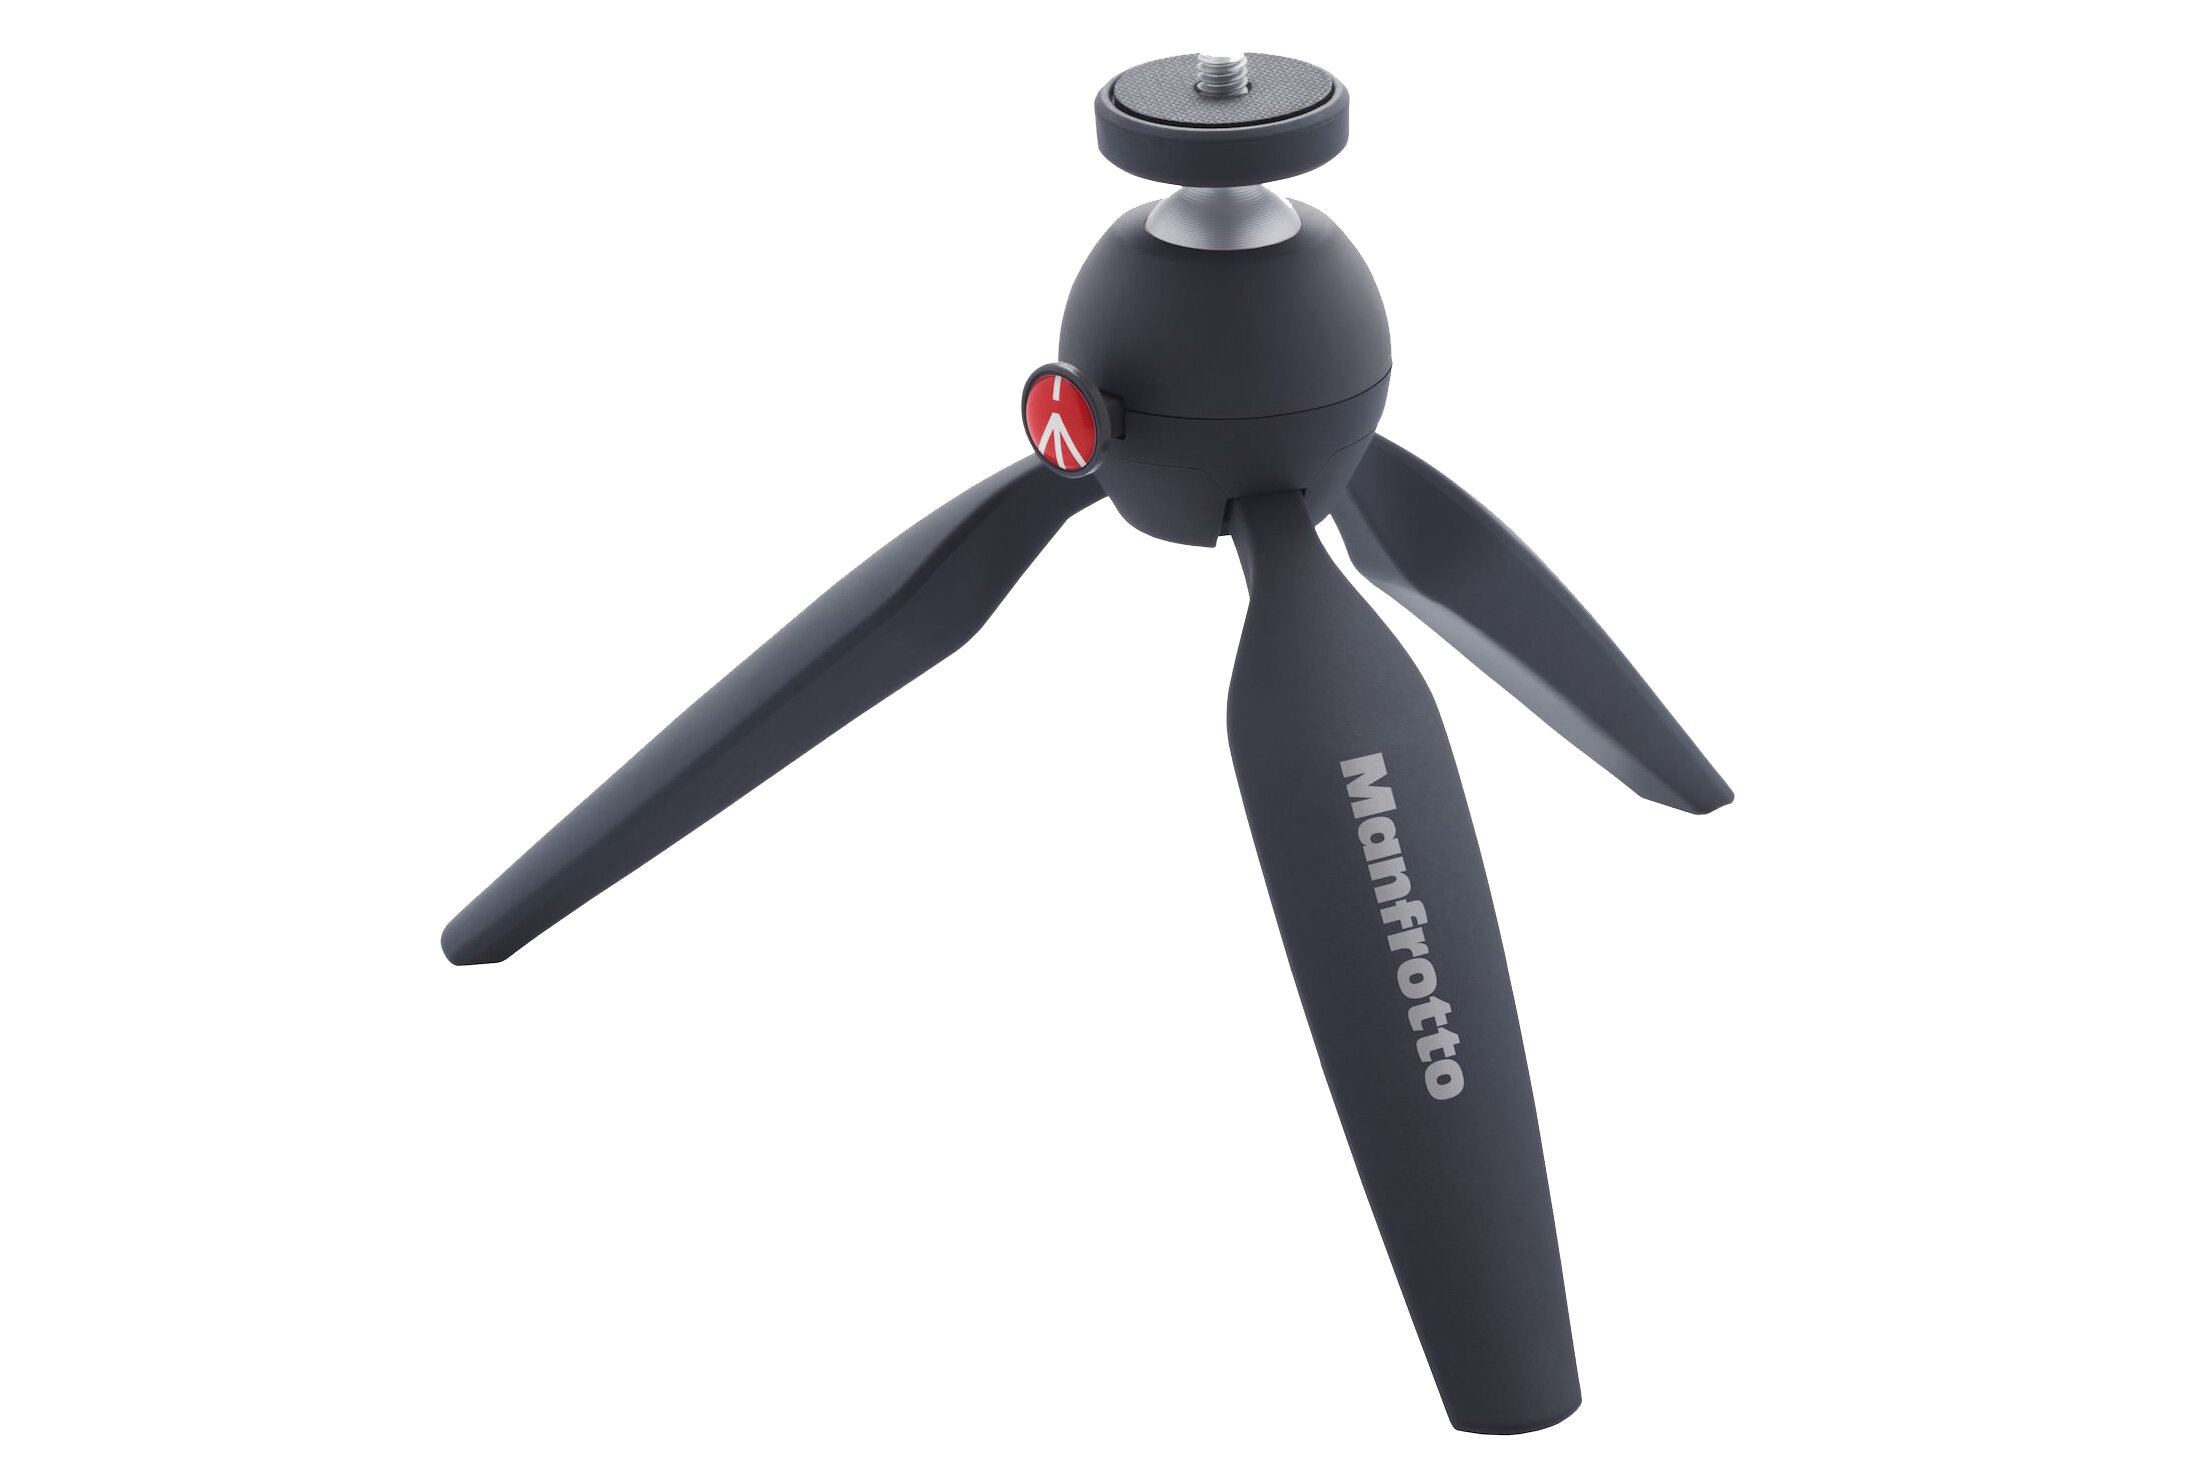
Manfrotto Pixi Tripod - £16.99
Now, I accept that in some ways, this is not the most versatile tripod. It’s size certainly has some limitations but this great little tripod is perfect to slip in any bag and as long as there is a ledge to perch on, this is strong and stable enough to support my Fujifilm X-T30 and attached lens.
Total Cost £46.98
So, looking west from Tower Bridge and with the camera perched nicely on the thick walls that flank each side of the bridge, I composed the image. I manually focused the camera, set my desired aperture and shutter speed and captured what I already think is one of my top photos of 2019.
There you have it. If you’re looking to give this fantastic technique a try but not looking to invest too much money (just yet), now you know how it can be achieved for under £50.

On Location taking Long Exposures at The Shard
A few weeks ago, I headed out to one of my favourite photography locations in London to capture a few shots of The Shard and City Hall at sunset. This has proved to be a location that has left me wanting time and time again. Can I get the shot this time?
A few weeks ago, during a cold winter's evening, I headed out to one of my favourite photography locations in London to capture a few shots of The Shard and City Hall with my newly acquired Fuji XT2 camera. I've never really been much of a kit guy. I like to have the right tools to use but I was a little excited to see how this new camera would perform.
I parked myself across the river from The Shard, in front of the Tower of London. I love this area, especially as it is a private path but they still allow tripods which isn't that common in the Big Smoke these days. As you can see in the map below, this spot is perfect as you get great compositions of the cityscape across the river and of Tower Bridge too.

So, although this is a popular place to shoot the London cityscape, it is one of the hardest to get right in my opinion. The best light would normally hit the buildings in the summer months as in the winter the sun drops down behind the buildings which is nice but with all of that glass on show, it really comes alive when the sun is setting off to the right of the scene casting the light across the image from right to left. On top of this, the light's dynamic range is through the roof making it really difficult to avoid creating a silhouette of the buildings. I didn't bracket these shots hoping that the camera will capture this dynamic range allowing me to pull the details from the shadows and rescue the sky. It did not disappoint.

Fujifilm XT2 | XF18-55mm | 18mm | 1/75th Sec | f/22 | ISO200
Although the light was good on this particular evening, the weather was not playing ball. Here in this image, you can see my Fuji XT2 camera poised to capture this iconic view and there are hardly any clouds in the sky.
Before heading out, I had checked the weather and all was looking good for the right amount of cloud cover and the direction of the wind was supposed to mean the clouds would be traveling away from me but alas, the cloud cover was lighter than expected and the wind direction wasn't quite right. If the clouds were moving towards or away from me, they would create great lead in lines and make fantastic compositional elements in the image.
Nevertheless, the golden rule with landscape photography is that you never know what might change and it's not over until it's over. As the sun dipped below the horizon, a few more clouds turned up and the sunlit those up nicely so on went the 10 stop ND filter and off I went capturing the shot below.

What I think works about the image below is that the long exposure has captured and elongated the clouds making them a little more prominent in the shot with the warm light emphasising them even further.

Fujifilm XT2 | XF18-55mm | 18mm | 43 Secs | f/10 | ISO200
To try to demonstrate how much better the clouds look when moving towards or away from you when taking long exposure images, I took changed direction and took the image below of Tower Bridge. Again, the cloud cover was not perfect, but you can still see how the direction the clouds are moving is important and how it can change the entire look of the image.

Fujifilm XT2 | XF18-55mm | 18mm | 60 Secs | f/10 | ISO200
My last shot in this particular spot was back looking across at the Shard as the last of the sun's warm light was in the sky. Again, cloud cover was lacking but with the light levels dropping I was able to take an even longer exposure of 120 seconds with some darker reds in the sky resulting in a totally different looking shot than before. This is another important lesson about photography and that is the light is everything and compositions that have been shot a thousand times before will take on their own unique look and feel as the light changes. No two images are ever the same.
If like me, you like a cleaner, more minimal shot of London, long exposures can really help simplify the scene. The boat traffic on this stretch of the Thames is particularly busy and this technique helps remove these distracting elements.
I covered this topic a bit more in my post titled Slowing Time: Why the Long Exposure?

Fujifilm XT2 | XF18-55mm | 18mm | 120 Secs | f/10 | ISO200
Heading back for the day (as the cold had got the better of me) I snapped this pleasing composition of Tower Bridge. I had seen an image like this before so by no means an original composition (if such a thing exists for London cityscape photography) but with the lights providing my lead-in line to the Tower Bridge itself, it came out pretty good.

Fujifilm XT2 | XF18-55mm | 55mm | 6.5 Secs | f/11 | ISO200
I think my first outing into London with the Fuji X-T2 was a successful one. It performed well and was, like others before great to use with all the tactile dials and knobs quickly accessible rather than having to hunt around the menu system to make changes during the shoot. I still think the composition of the Shard and City Hall has more to offer and I will no doubt be back again at some point to try to capture it again. But for now, I am really pleased with the images I came home with on this particular day in London.

How to take long exposure photos
How I take long exposure images. With my long exposure work getting a bit more attention, I am getting asked more often about how I take these images and what equipment I use. So I thought I would write this article to provide information about my tools and process while out in the field
With my long exposure work getting a bit more attention, I am getting asked more often about how I take these images and what equipment I use. So I thought I would write this article to provide information about my tools and process while out in the field.
I will start off by saying, I won't be covering the post-processing stage here. I recently wrote an article covering how I took a long exposure RAW image out of the camera to the final retouched photo which can be found here: Editing Sunset at the South Bank.
I will cover below what are, in my opinion, the three most important aspects to achieving successful long exposure photos which are the location/conditions, the equipment needed and technique but it should go without saying that practice and learning from your own experience is at least equal to and arguably more important than the information below. This post is just designed to provide someone enough information to get started with long exposure photography.
The right Location and Conditions
I explained in a previous post which can be found here that long exposure photography can be used as a compositional technique as the moving elements like clouds and water can create fantastic lead in lines or areas of interest.

Fujifilm X-T10 | XF18-55mm | 18mm | 90 Secs | f/16 | ISO200
So how does this relate to the location and conditions? The location is important as it can provide the moving elements for example, water along a river or by the coast. If the location does not lend itself to long exposures, the weather conditions, although less predictable can solve the problem by providing some moving clouds in the sky.
All of that being said, static subjects can be equally important and should not be forgotten, be it a bridge across a river or foreground interest in a landscape. Long exposure photography still requires a well-composed image.
Tip: Using websites or apps such as MeteoEarth or yr.no you can see what direction the wind and clouds are moving and the type of cloud cover. Armed with this information, you can pick your location specifically to ensure the clouds are moving towards or away from you rather than from side to side as this creates much stronger images when taking long exposures.
The Right Equipment
There are two areas that need particular focus when taking long exposure images. Firstly, the light. Long exposure images when there is still too much ambient light are only made possible by tricking the camera's light meter into thinking it is darker than it is so the camera opens the shutter for longer to let more light in. To achieve this, a neutral density filter can be placed in front of the lens to reduce the light hitting the sensor.
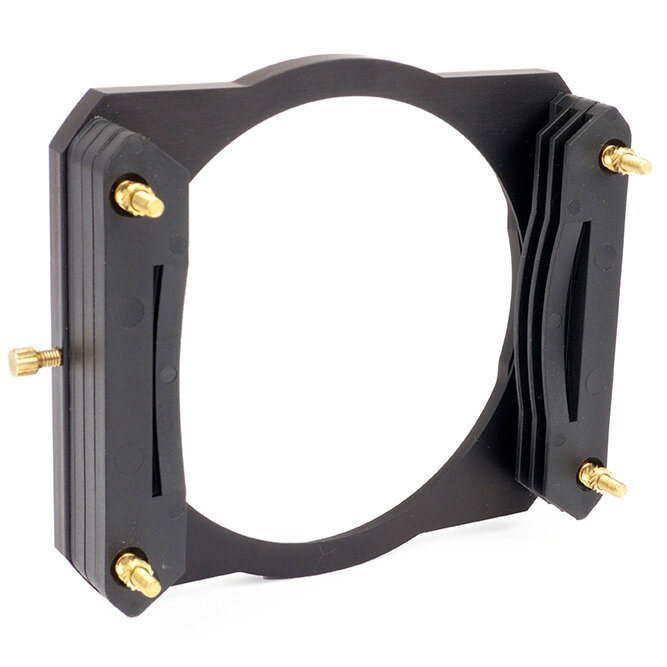
Currently, I am using the Formatt-Hitech 85mm filter system. More information can be found here. I use a filter system as it can be used with multiple lenses without the need to buy multiple filters. These systems are also ideal for using graduated filters when there is a need to balance a bright sky and a darker foreground.

The adapter ring shown here enables the filter holder above to be used with different lenses. All that is needed is the right adapter to fit the thread size on the lens. The size is measured in mm and can usually be found on the very front of the lens itself.

This is the neutral density (ND) filter itself to fit the holder above. I use a 10-stop filter that essentially reduces the light entering the lens and sensor by 10 stops. Here is an article to help understand what a "stop" is in relation to camera exposure.

Using one of the more professional kits in the industry, as shown above, can be expensive. If you are just starting out and want to dip your toe in the long exposure water then buying a screw in filter like this one is a great way to start as it can be a much more cost-effective option. Just be aware that you will need one of these for each of your lenses that have a different thread sizes.
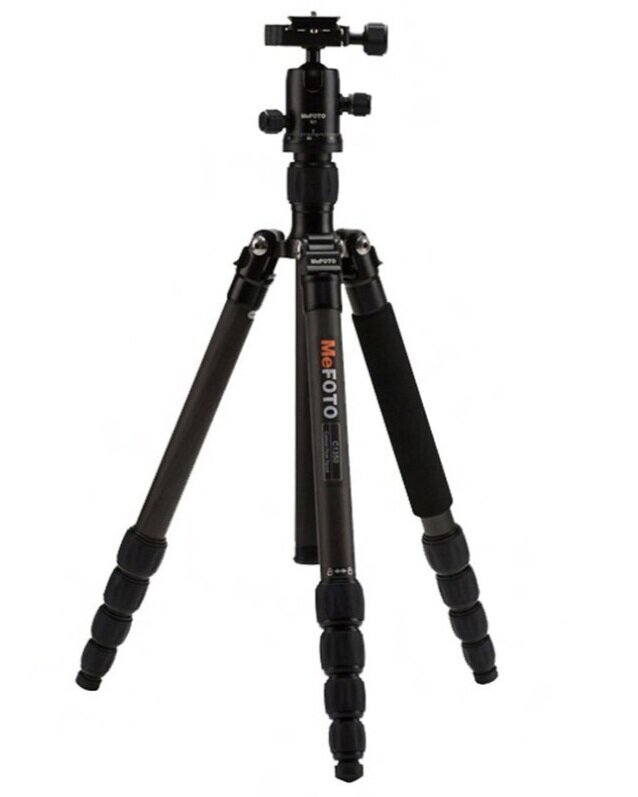
Next up, is the second area to cover which is camera stability. When the shutter is open, it is imperative that the camera stays absolutely still. This is where a sturdy tripod comes in. I use the MeFOTO tripod below as it is light but strong and collapses down quite small which is useful as I walk around London. This isn't a recommendation as such but if you are shopping around for a mid-range, capable tripod, the MeFOTO range is worth checking out.

A cable release, as shown below is usually required once you start taking images above 30 seconds and need to switch the camera to its bulb mode. Regardless of exposure time, by using a cable release you avoid physically touching the camera when the image is taken so to avoid camera shake. In addition, when taking a long exposure in bulb mode, the cable release can be locked in place which means not having to hold the button down and makes the entire process much more comfortable for the photographer.
Tip: If using a cable release, I still tend to use a 2 or 10-second timer as this forces the camera to have just a little time to settle and any vibration stopped by the time the picture is taken. This is particularly useful when using a longer focal length as any vibration is exaggerated when fully zoomed in.
The Right Technique
So, you have found your location and readied your equipment. Your filter holder is on and cable release attached, then what now? You have to actually take the shot so below I will walk through the process I generally use to capture the image and expose it correctly.

Compose: Mount the camera on the tripod, compose the image and set the focal length when using a zoom lens.
Set Aperture: Set the desired aperture. When in doubt, start with around f10 but it really should be set based on the depth of field you need and the amount of ambient light available.
Focus: Set the focus, be it auto-focus or manual, this is the right time to do it as when the filter is attached, there may not be enough contrast for the camera to focus later. Make sure when the focus is set, set it to manual to prevent the camera trying to focus again when taking the shot.
Turn off IS: Some cameras will auto-detect being on a tripod, others won't. Whatever method works, make sure image stabilisation is turned off as the system may cause the image to be soft or blurry.
Capture exposure time: Without any filters attached and with the exposure time set to auto, take a test image and if exposed correctly, make a note of the exposure time the camera used e.g. 1/10th second.
Fit Filter: Whether you have a filter system or screw in filter, now is the time to attach the filter to your lens. Be careful not to move anything on the lens especially if using a zoom.
Calculate Exposure time: Using a long exposure conversion tool or app, calculate the correct exposure needed for the filter you intend to use. I use an app called "LE Calculator". With this app you can see what exposure time you need based on the filter you have the and exposure time you were provided by the camera. The image shows based on the 1/10th second exposure and using a 10-stop filter, I need to have an exposure time of 1m 42s.
Bulb Mode: Next you need to set you camera to bulb mode so you can control how long the camera shutter is open for.
Set timer: As I mentioned earlier, this part is optional but I usually set a 2 or 10 second timer just to force a small break into the process to allow the lens to settle just in case there is a tiny vibration from when I was setting up the camera. The camera has to be totally still!
Take image: Now, using the cable release, take the exposure for the time provided by the calculator tool you have used. When the time is up you should have a correctly exposed long exposure image. If your camera does not provide an on screen timer, you might want to ready your phone to measure the time.
The process above may look daunting at first and quite involved but with a little practice, it will become easier and you should end up doing some of these without thinking.
Tip: If taking long exposure images during sunrise or sunset, the light levels can change very quickly so your required exposure time may change while you are taking the shot itself. Experience will help here but be prepared to add a few seconds to the exposure if the light levels suddenly reduce or remove a few seconds if the light quickly increases.

Fujifilm X-T10 | XF18-55mm | 21mm | 280 Secs | f/9 | ISO200
So that's about it. I think I have captured the important points and I hope it provides some useful information for someone starting up with the long exposure technique. If I have forgotten anything, feel free to leave a comment and I will update the post.

Slowing Time | Why The long Exposure?
I started to use the long exposure technique to add a new creative dimension to my photography in London and this article is about what I think it brings to both the colour and composition of the image.
I started to use the long exposure technique to add a new creative dimension to my photography and this post is about what I think it brings to both the colour and composition of the image.
Now, in case you were wondering, a long exposure photo is when the camera's shutter remains open capturing one image over a relatively longer time than normal. To quote Wikipedia on the subject, "Long-exposure, time-exposure, or slow-shutter photography involves using a long-duration shutter speed to sharply capture the stationary elements of images while blurring, smearing, or obscuring the moving elements." More info can be found here on Wikipedia.
To achieve the long exposure effect you need to trick the camera into thinking the scene you are capturing is darker than what it is in reality and to compensate, the camera will open the shutter for longer in an attempt to let in more light. This is normally achieved by using a filter (a natural density filter) and placing it in front of the camera lens blocking some of the light from hitting the sensor. See my about page for details of the filters I use.
A Compositional Tool
Although London is one of the best (in my slightly biased opinion) and architecturally iconic places on earth, visually the city has a lot going on and it can be hard for the subject to stand out amongst all of the other competing shapes and contrast happening in the scene. Now, although long exposure images do nothing for static objects, such as buildings and statues. If there are moving objects such as water, people or clouds then this is where the technique can make all the difference. By blurring or even removing any moving objects in the image I am able to isolate the main subject making it stand out by removing distractions that will be contending for the viewer's attention. I will also use long exposures to add compositional elements, for example, blurring clouds that are moving towards or away from me can create some awesome lead in lines as in the photo of Tower Bridge later in this post.
Blending the Colours of the Light
A traditional photo captures the colours of the light in a split second and is a true representation of that particular moment in time. However, a long exposure photo will capture the colours as they change over time and blend the tones together which can have some quite beautiful and emotive results that might not normally be captured. Below are two images I took only a minute or so apart with identical post-processing. I shot the first image at 1/20th of a second and on its own a pleasant enough photo.
Fujifilm X-T10 | XF18-55mm | 21mm | 1/20th Sec | f/10 | ISO200
Next is the longer exposure, I took over 28 seconds. Straight away you will notice a less cluttered, simpler composition due to the river being smoothed out complementing the clear sky.
Fujifilm X-T10 | XF18-55mm | 21mm | 28 Secs | f/10 | ISO200
What might be less apparent are the subtly different tones in the image. The colours from the first image are still there but appear slightly more muted in the second, specifically the warmer orange. Also, although not many clouds, in the first image they appear to contend with the London Eye and fight for the same space whereas the softer look of the clouds in this image allows the structure to be more prominent in the scene.
It's not just colour images that benefit
If it is minimalistic architectural cityscapes you want then you can take it one step further and remove the colour altogether. Below is a similar shot of the London Eye taken on a dull, foggy morning when the light was less than ideal.

Fujifilm X-T10 | XF18-55mm | 21mm | 280 Secs | f/9 | ISO200
This image (above) is a 4 minute, 40 seconds exposure, resulting in the River Thames looking even smoother giving it an almost luxurious soft sheen and with the lower, diffused light, this black and white conversion allows the contrast in the London Eye and surrounding architecture to be prominent in an otherwise minimalistic cityscape.
So that's it, a few reasons why I use and enjoy the long exposure in my London cityscapes. To finish, below are a couple more examples of long exposures images I have taken since beginning this slow shutter journey.
Fujifilm X-T10 | XF18-55mm | 18mm | 140 Secs | f/9 | ISO200

Fujifilm X-T10 | XF18-55mm | 18mm | 30 Secs | f/4.5 | ISO200